

Welcome to the final–yes, the very last!!!–block tutorial for the 1930 Farmer’s Wife Sew Along, hosted by Angie at Gnome Angel and sponsored by Fat Quarter Shop and Marti Michell. If you’ve made it this far and have completed all of the blocks, congratulations!! You have finished quite an amazing accomplishment! If you haven’t completed all of the blocks but are still following along, bravo to you as well! And welcome to the club 😀
 Since at this point in this Sew Along, I’m sure there are hardly any techniques or block approaches that need additional guidance, I decided, with the approval of Angie, to approach this tutorial a little differently. Today my tutorial will focus on “what next?” Now that this epic sew along is officially complete and you may or may not have all 99 of the blocks sewn, I will reflect on and share a few different approaches you might want to take.
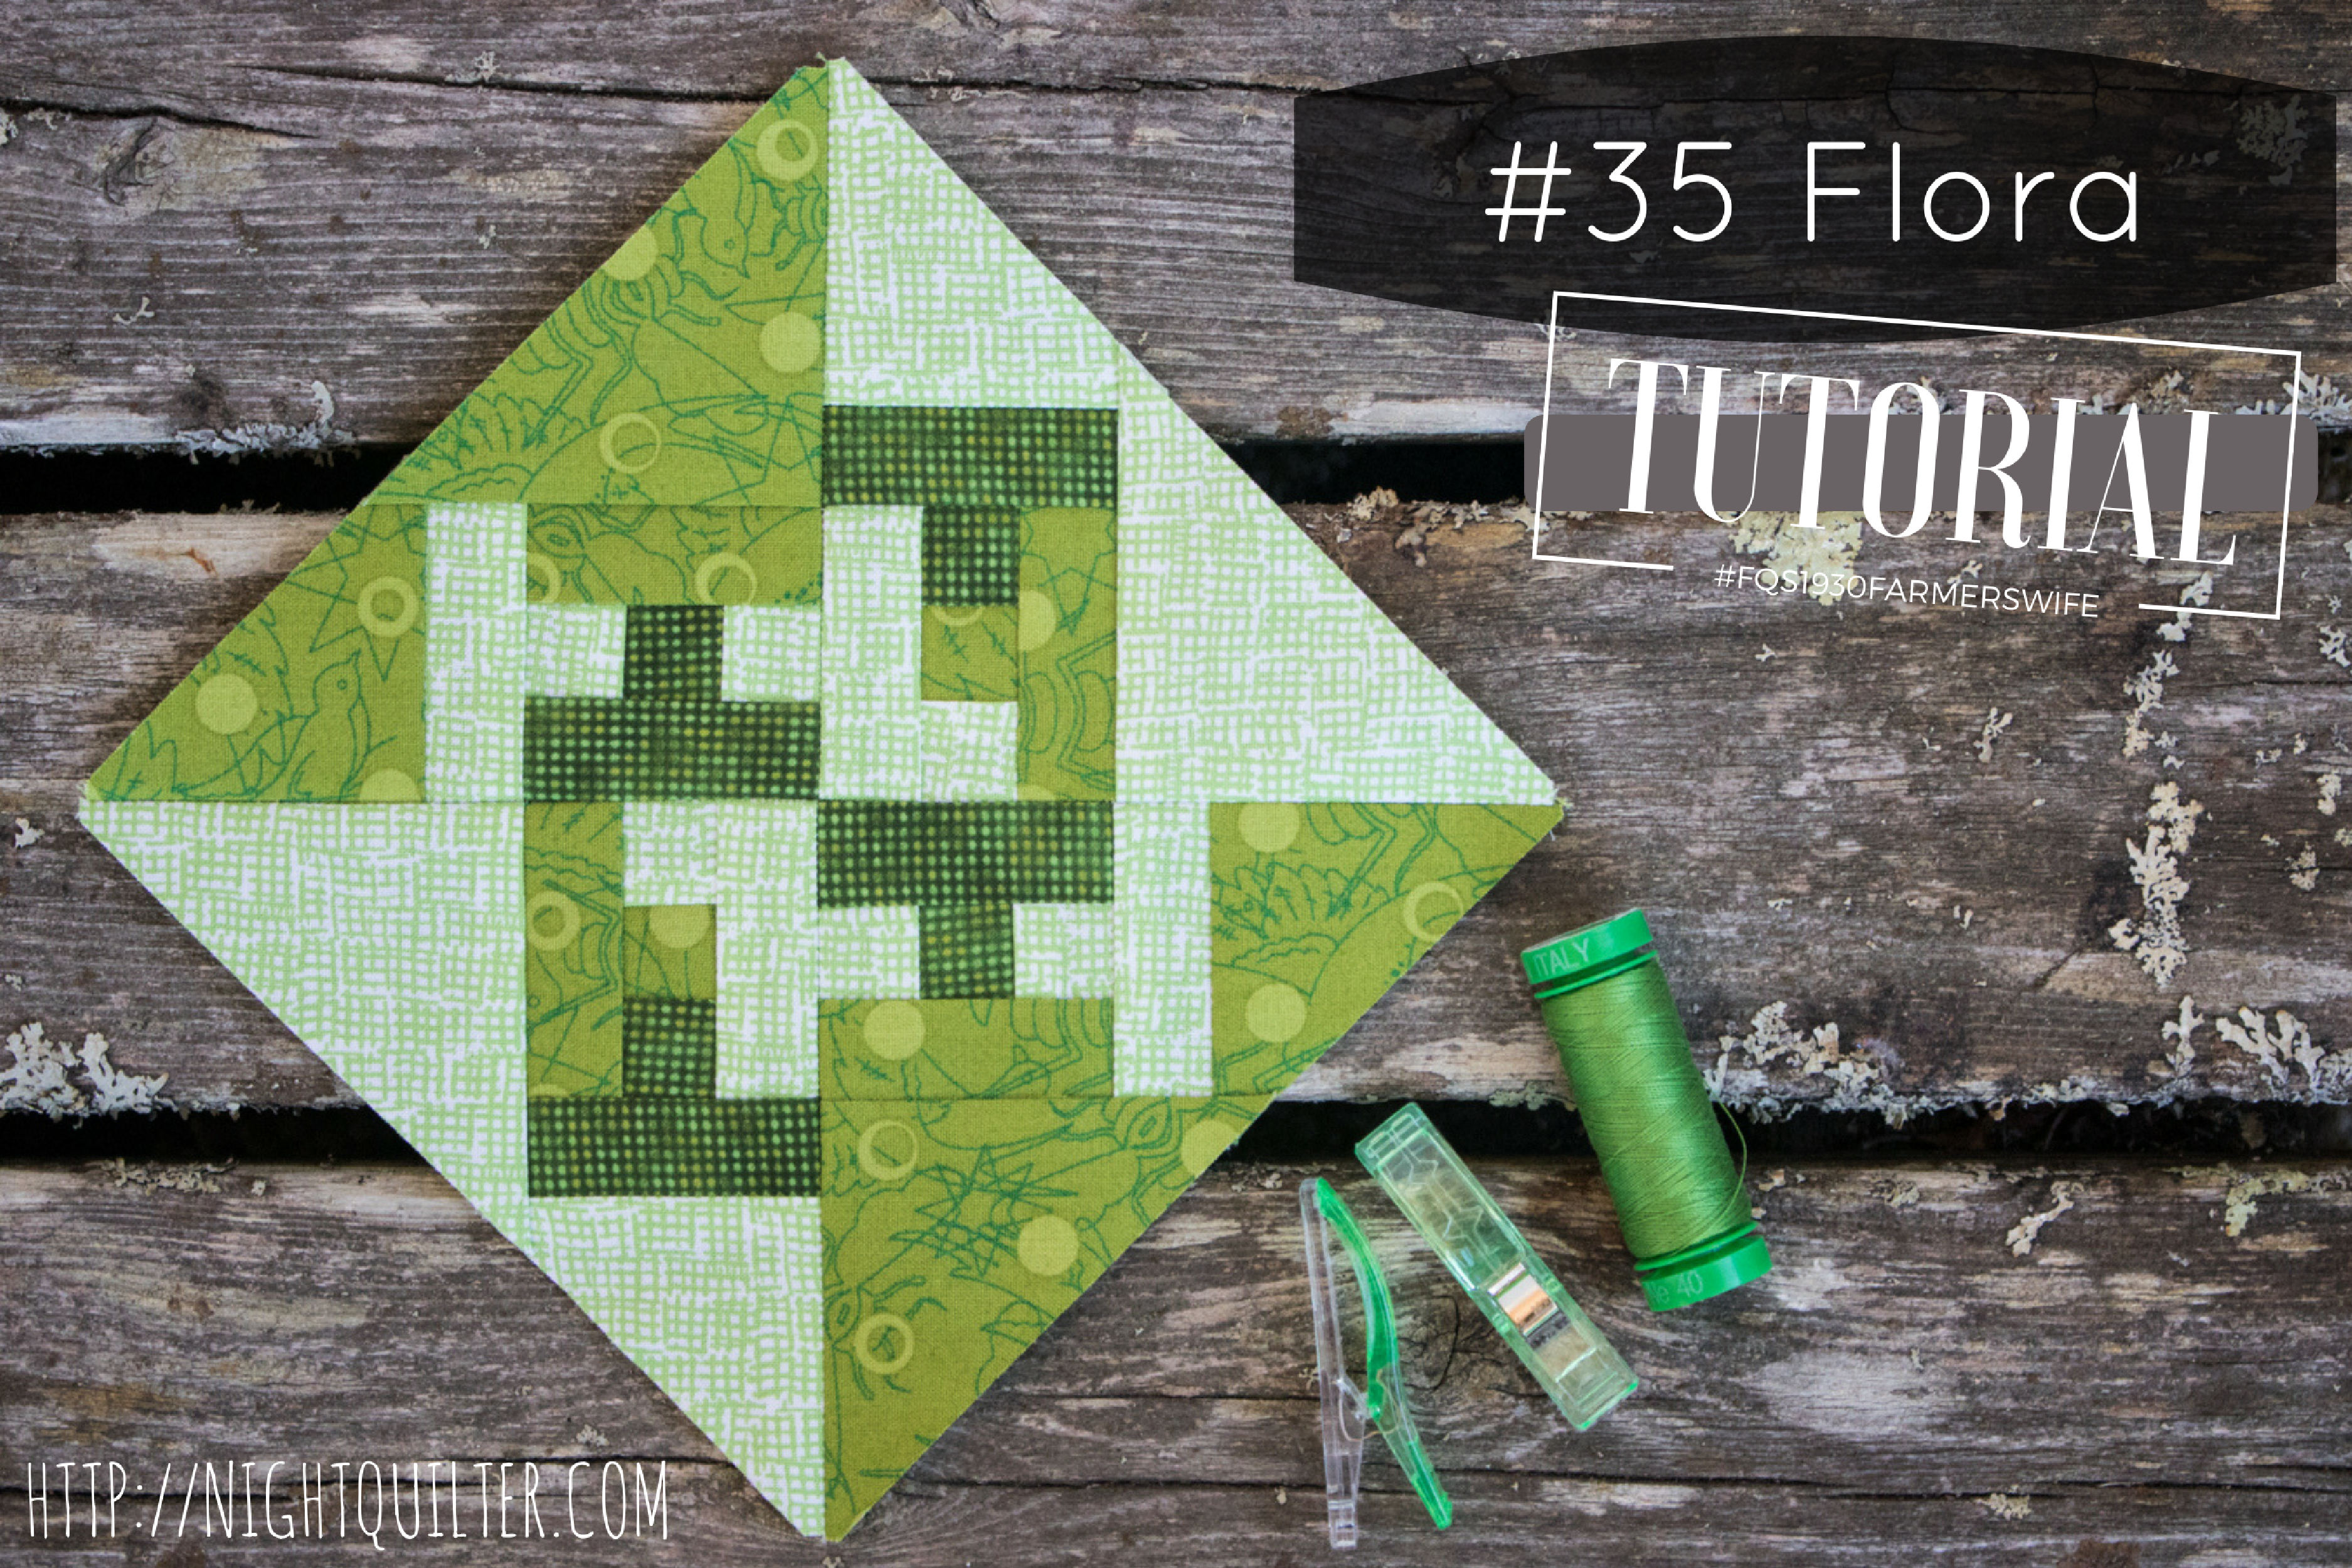
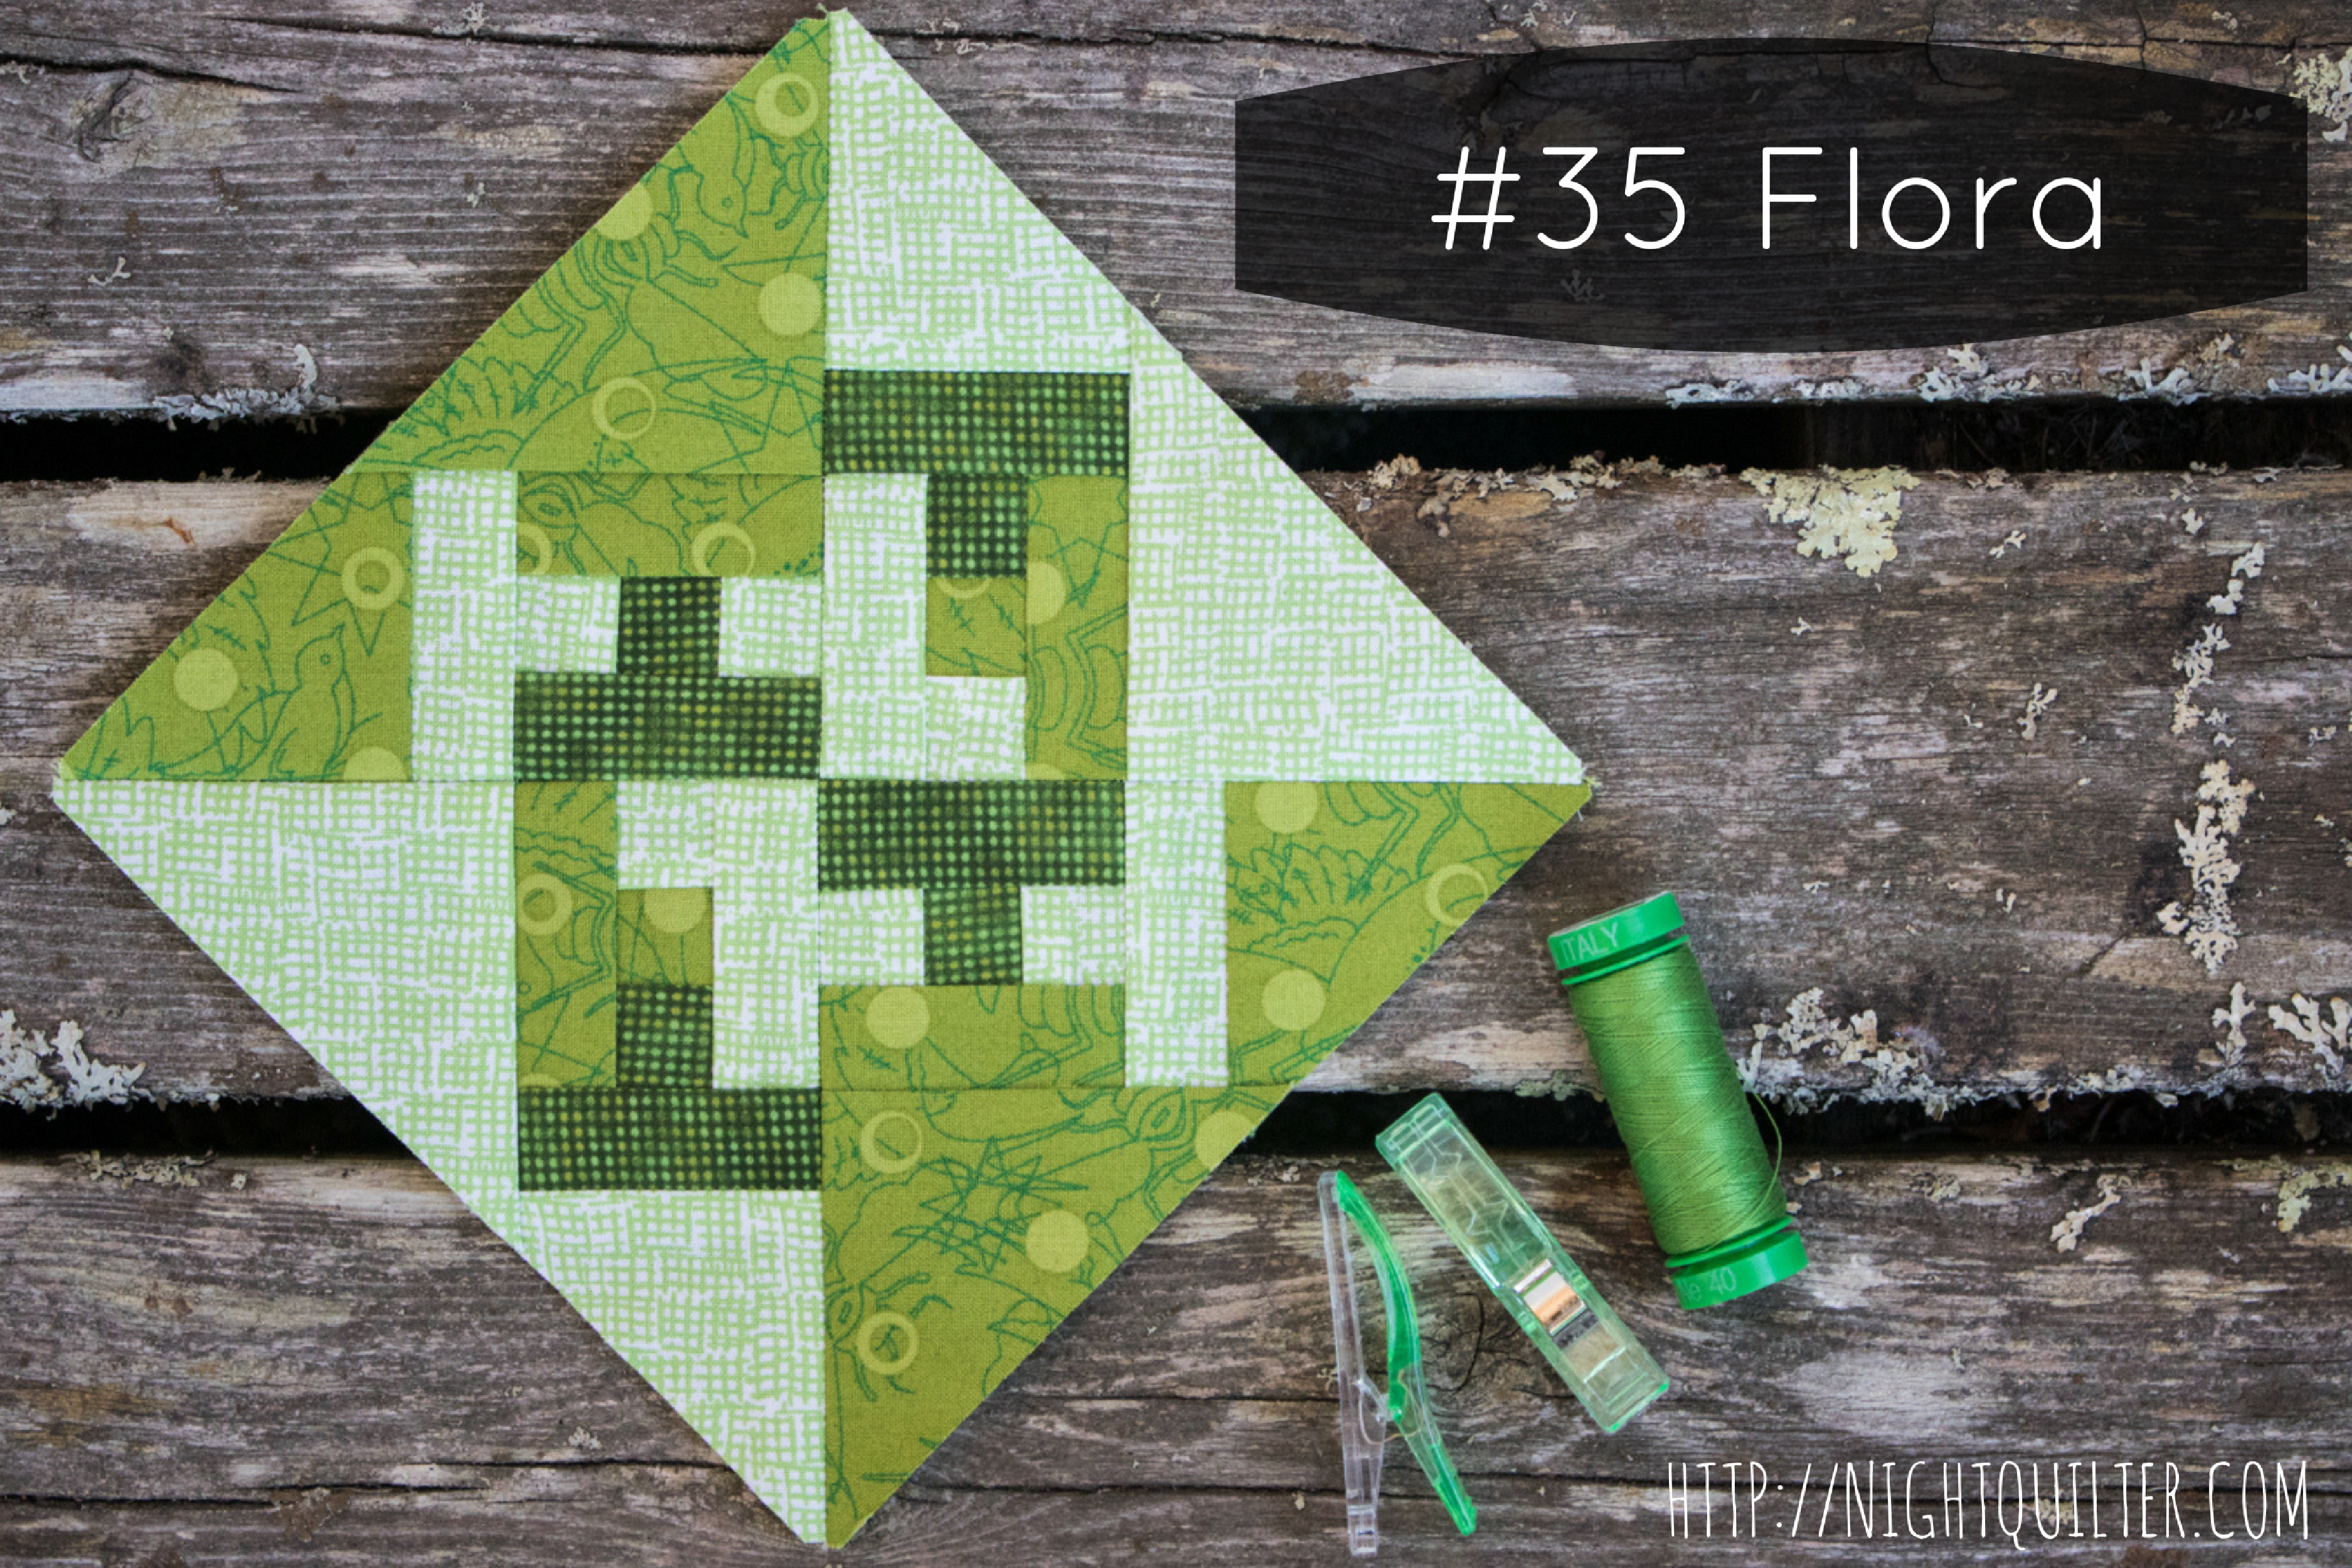
Tips for Foundation Paper Piecing Flora
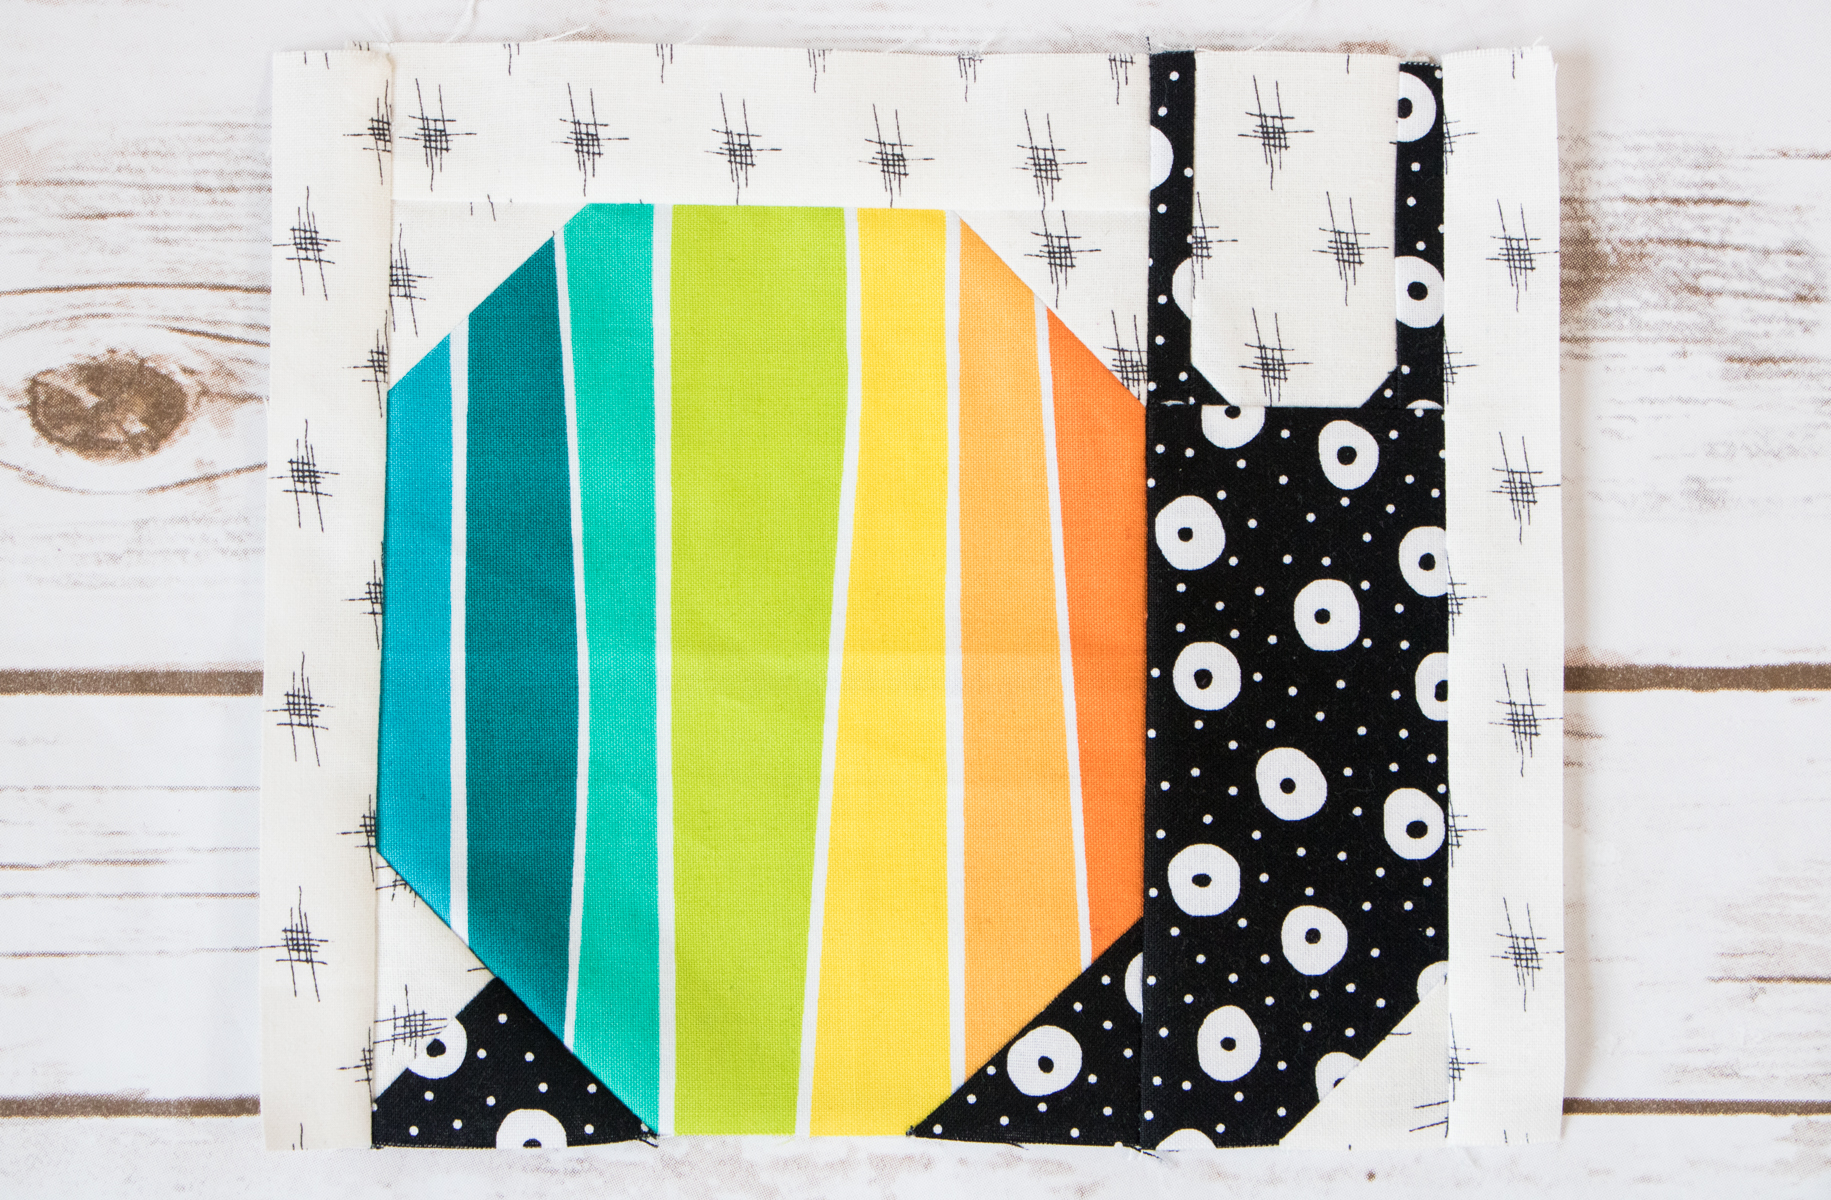
First, let’s get Flora’s construction covered. I foundation paper pieced my block, so for those of you who do not know how to foundation paper piece, visit my Basic Foundation Paper Piecing tutorial here, as well as the Foundation Paper Piecing tutorial guest post I wrote for the Andover Fabrics blog. Trust me, it is a technique worth practicing and mastering, since it opens a whole new world of sewing possibility!
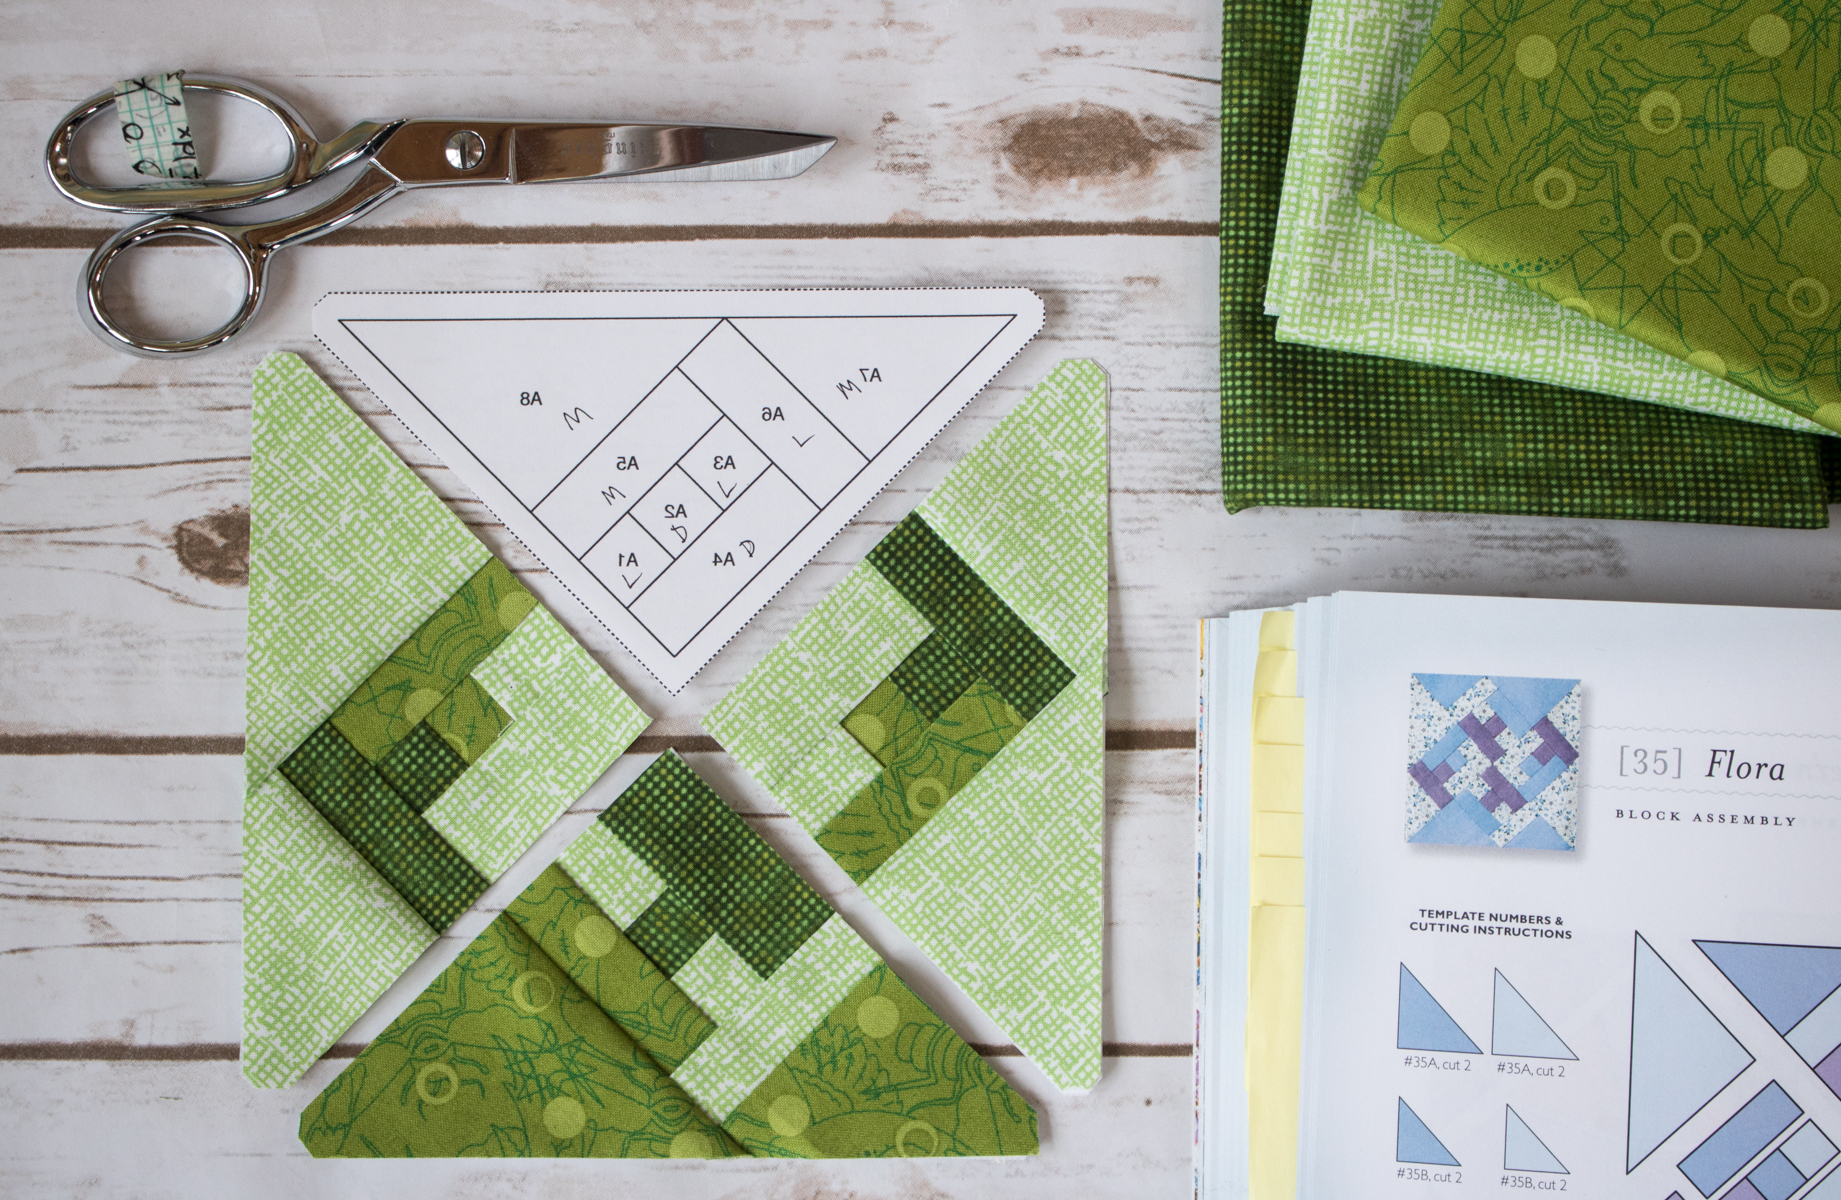 Since this block is not symmetrical, I printed a mirror image of the templates to help ensure I matched the color placement to that in the book. I selected simple dark, medium, and light green fabrics and carefully marked each piece of the template with a D (dark), M (medium), or L (light) before sewing so that once I had my fabric bits cut, I could chain piece the templates without too much thought. Those two preparatory steps (printing mirror image templates & marking each section of the templates) helped make the actual stitching of this block quick and smooth.
 The final block has been sewn! Congratulations! So now what….?
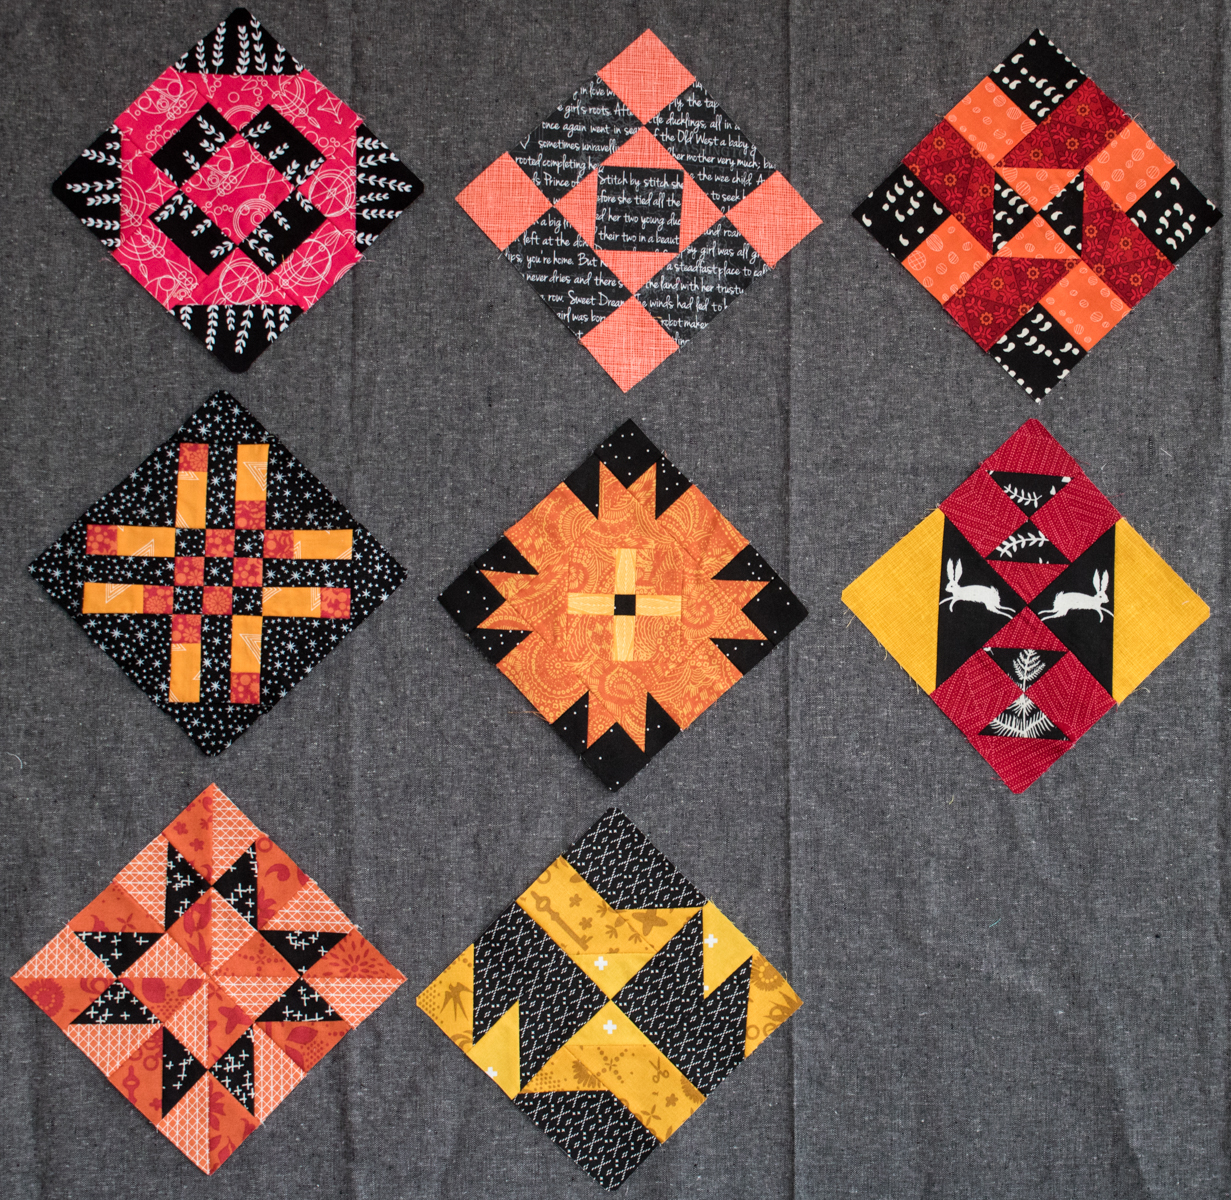
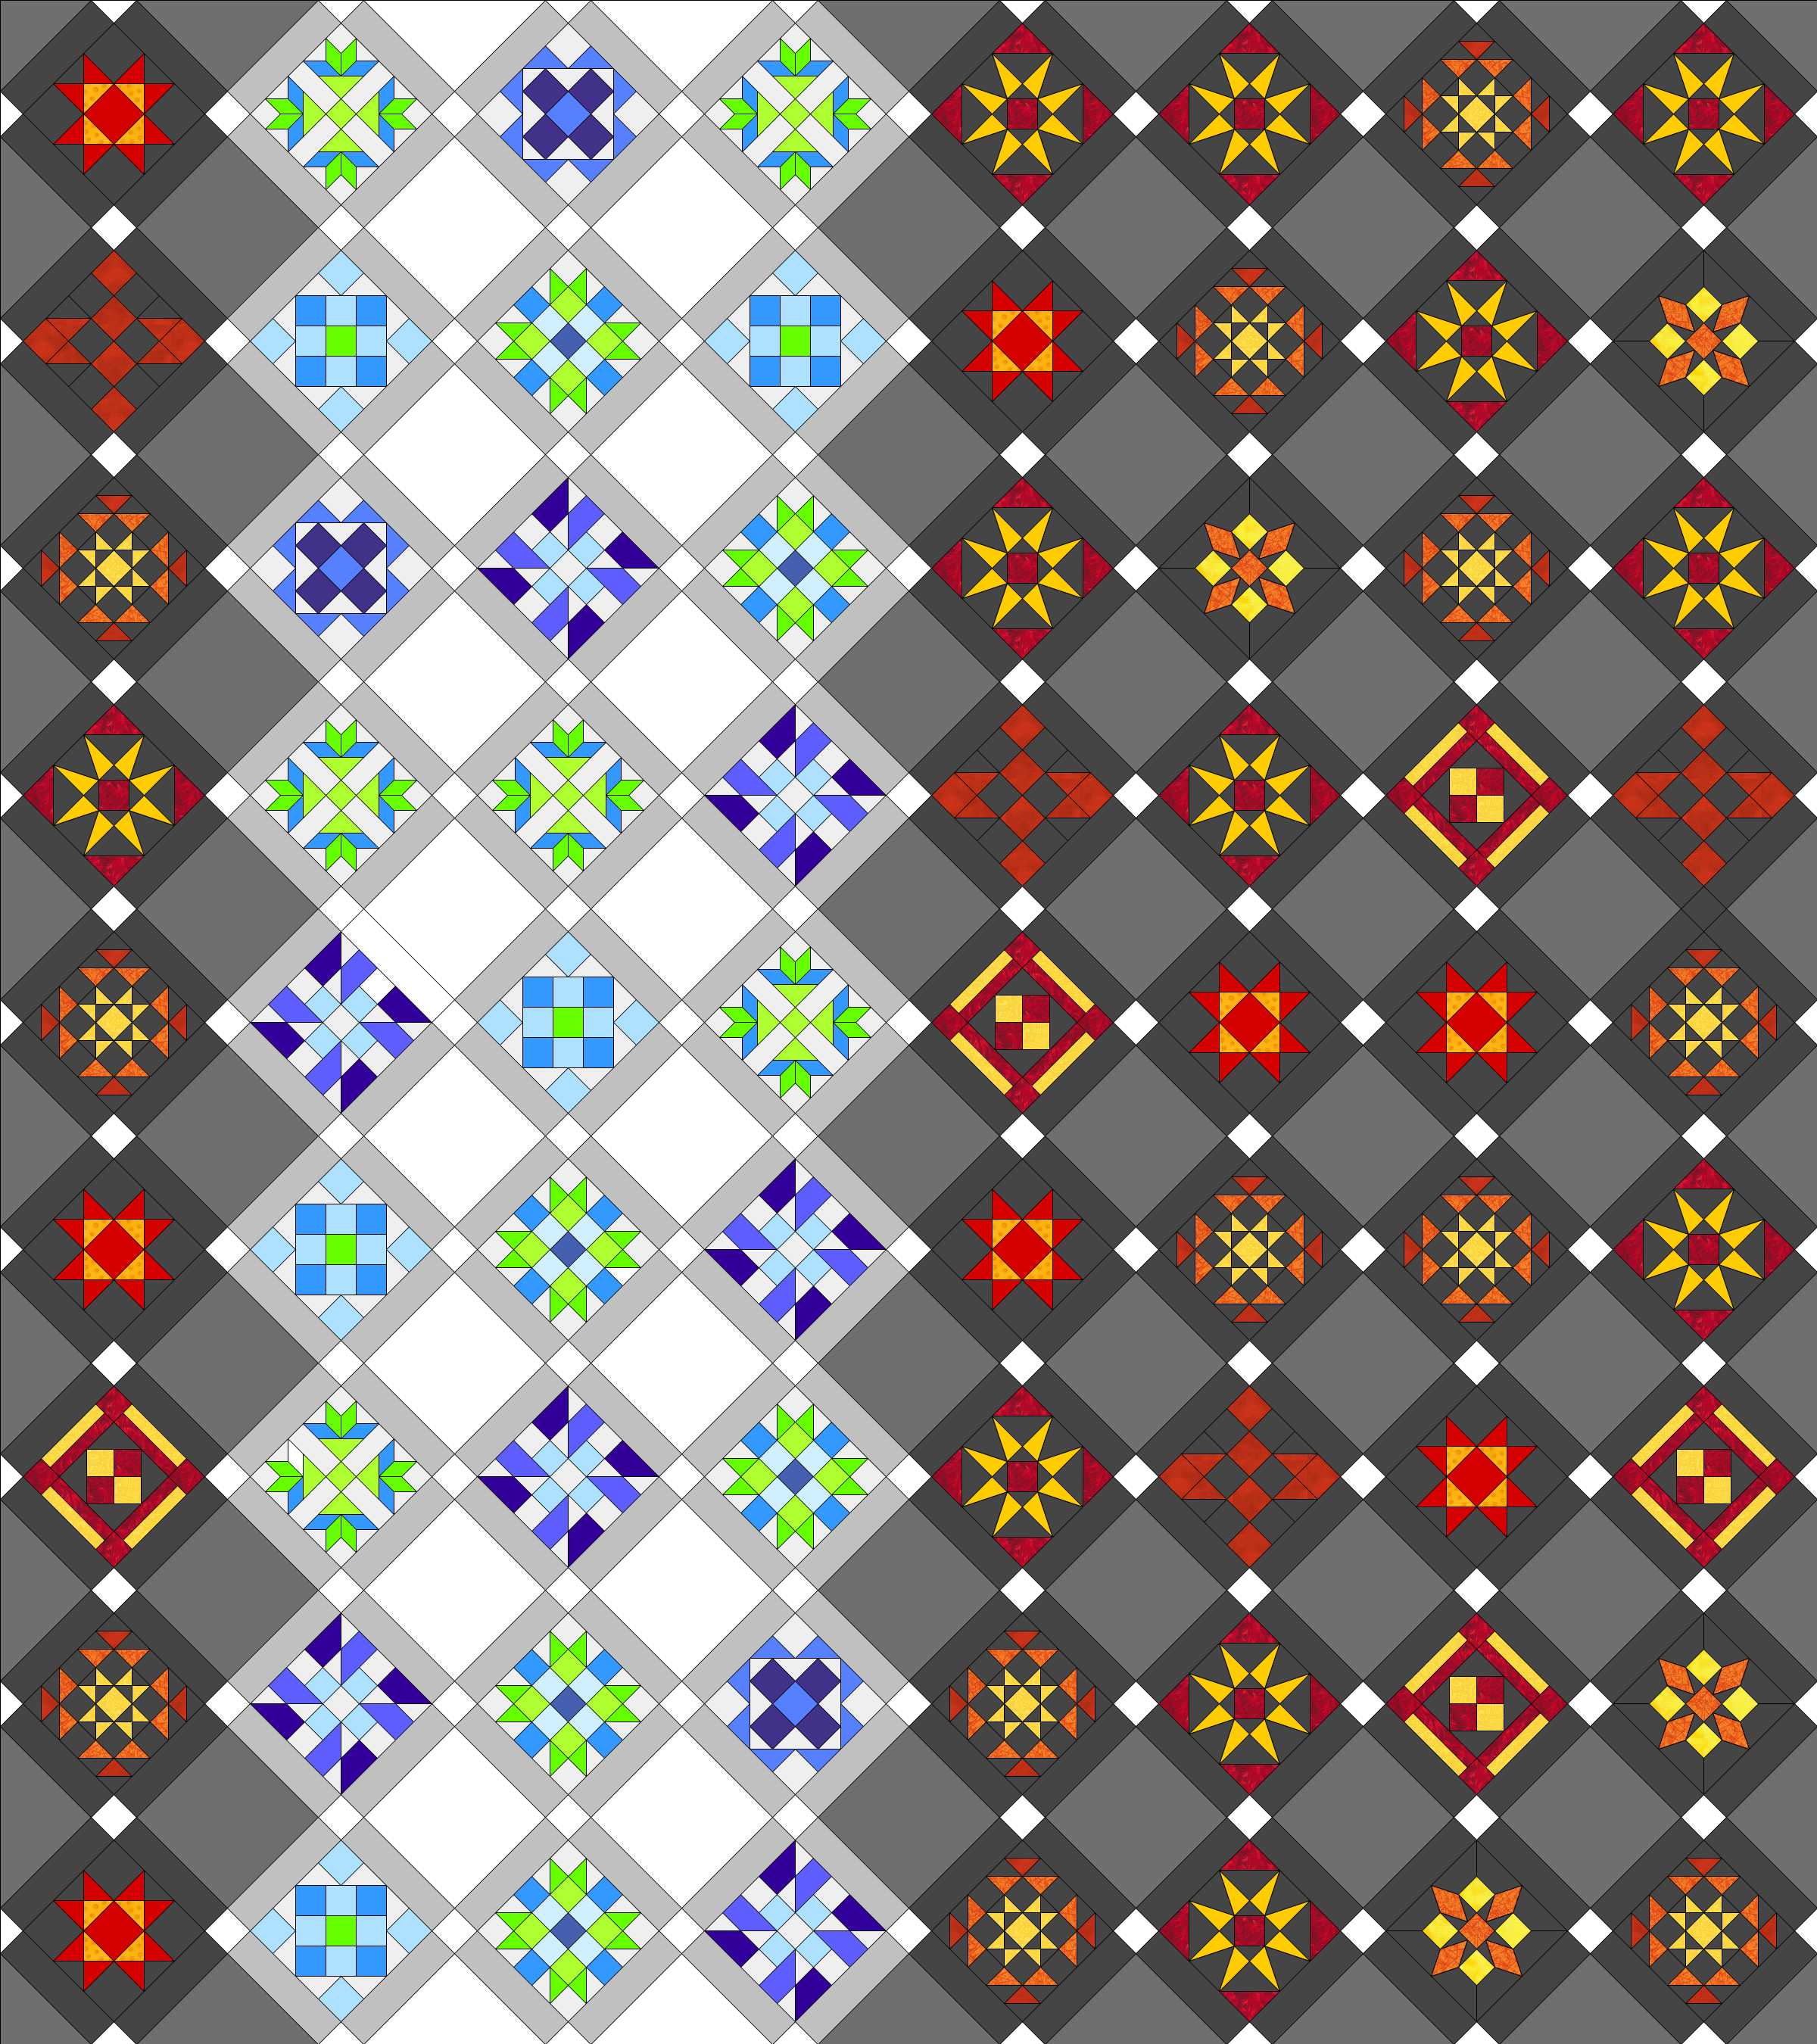 If we reminisce back to October 2015 when we first began this sew along, I originally planned (hoped?) to make 72 blocks instead of the full 99. I planned to sew some with cool colors on a white/low volume background and warm colors on a grey/black background and set them with solid blocks between. It seemed like a solid plan at the time, back when I had in my head that I was making “just a little 6″ block every week”. As you all know at this point, though, these little 6″ blocks pack a punch, often with 30-60 pieces and taking hours to construct. I’ve accepted that the 72 block plan just isn’t in the cards for me at this point in my life. I’m totally ok with that. If you find yourself in the same boat, here are some options.
Keep Plugging Away
One option is to keep plugging away at the blocks with the goal of completing all of them eventually. If you want to be sure to complete them in a timely fashion, you may want to set a new goal for yourself and try to hold yourself to it. Perhaps you could aim to make one block per week, at least 3 weeks out of every month. Or you could plan to make 1 block every 2 weeks, where week 1 is spent selecting fabric and cutting and week 2 is spent sewing the blocks together. If this is your choice, make a plan, write it down, and forge ahead!
Change your Block Setting
Adjusting the way you set your blocks could also help you get a decent sized quilt from the blocks you’ve made. If you have made all 99 blocks, you could set your blocks with simple sashing and have a nice, huge quilt.
 Adding solid blocks between each Farmer’s Wife block can help you get the most bang for your buck with however many (or few, in my case) blocks you’ve made. Add sashing and that will make your quilt even larger relative to the number of blocks you’ve made. My original mock-up includes both the blocks between each Farmer’s Wife block, and sashing, so you can reference that (included a few images up) for a visual.
 Or you could think even further out of the box and arrange your blocks in a more modern, negative-space filled setting. I love the idea of arranging blocks similar to the design in Alyssa Lichner’s Concerto Quilt pattern for Aria Lane!
Make a Smaller Quilt
If you made less blocks than you initially had planned, you could always make a smaller quilt! Lap quilts are all the rage these days, right!? Are any of your local farmer friends having a baby anytime soon? A good handful of these blocks could be beautifully worked into a “Farmer’s Baby Quilt”. With these intricate blocks, you don’t need many of them to make a gorgeous quilt.
Placemats & Pillows!
If, like me, these 6″ blocks showed you who’s boss (and it wasn’t you) and you only ended up successfully making a bit over a dozen of them, they sure would make beautiful placemats or pillows! Both placemats and pillows are handmade items that are often seen and appreciated daily, making sure your painstaking efforts will be appreciated to their fullest.
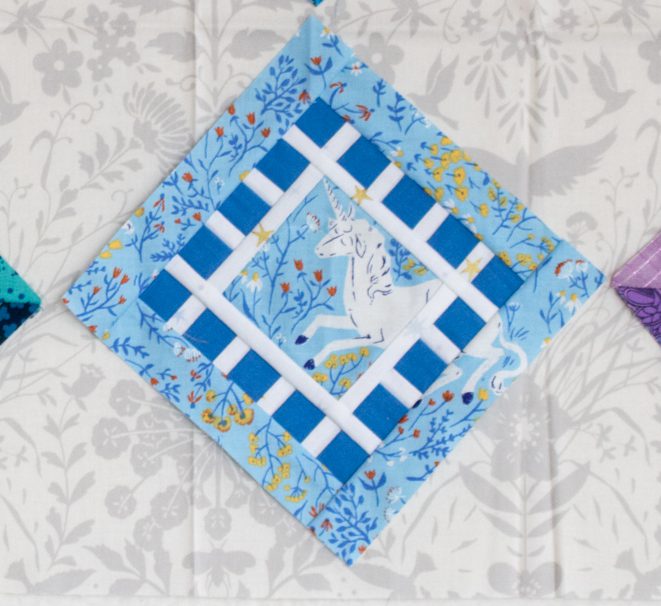 I’m actually thinking the blue unicorn block I made very well might have to become a pillow for one of my kiddos. It will surely be cherished that way.
With all of those options on your plate, your beautiful Farmer’s Wife blocks are sure to find their way into a finished work of beauty instead of floundering in a pile in your sewing space, right?! Choose your own adventure, enjoy the journey, and thanks so much for joining in on this wild Farmer’s Wife Sew Along experience!
So which adventure will I choose?
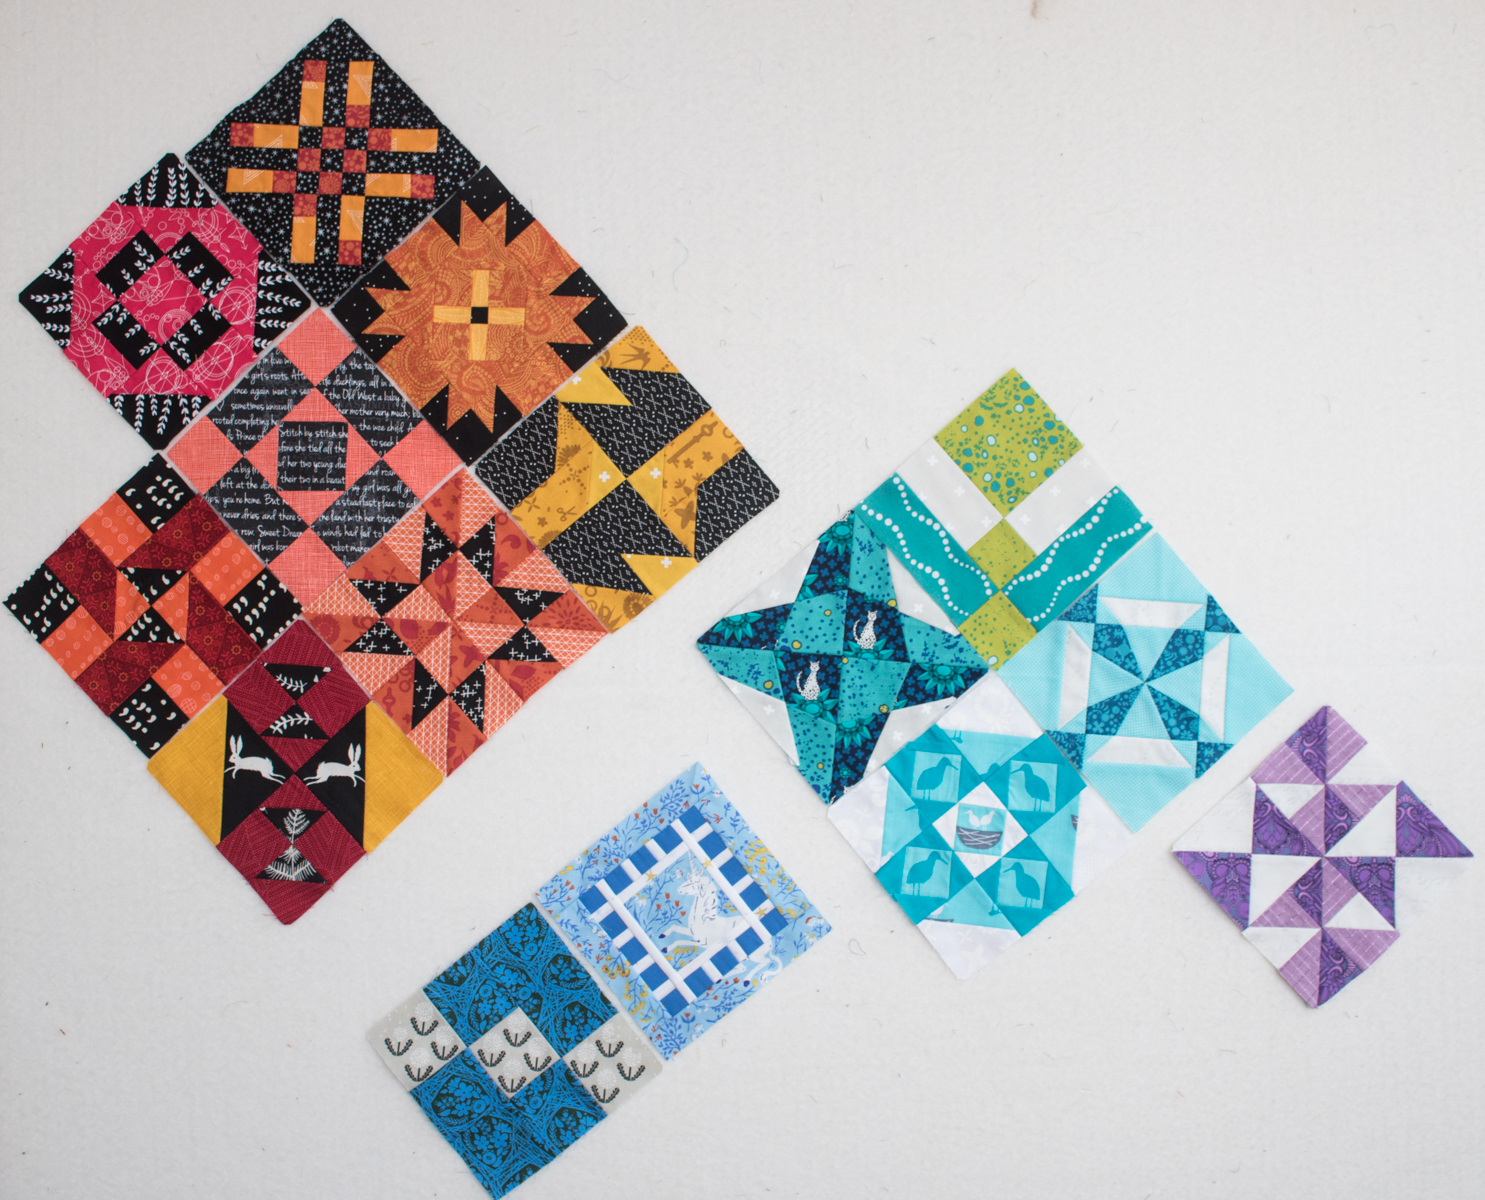
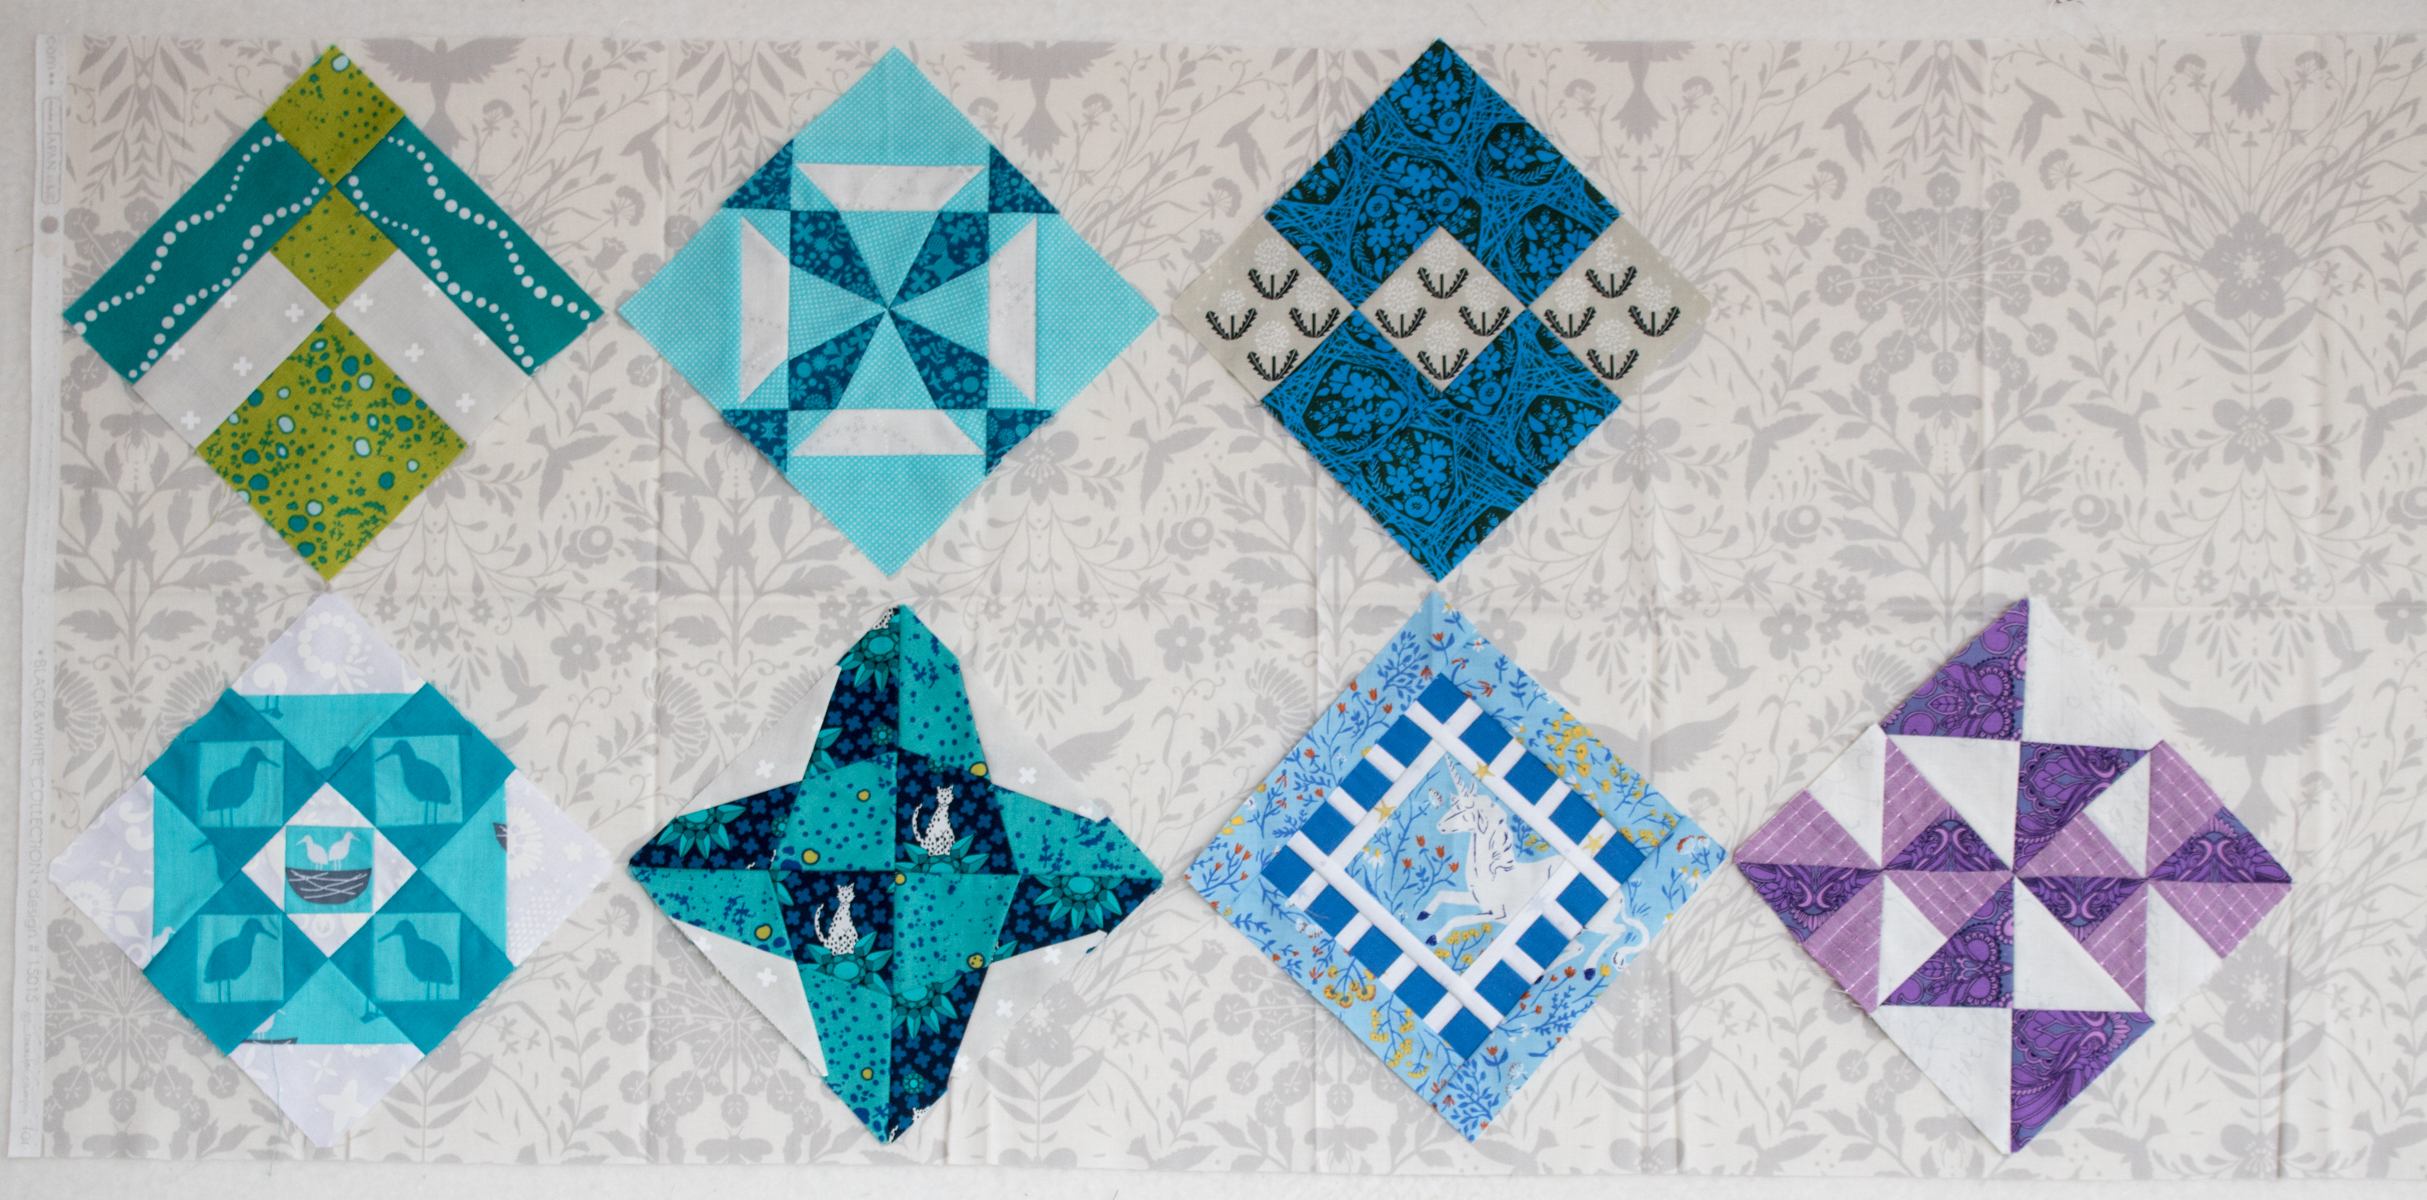
Once I completed Flora, I pulled out all of my completed blocks and put them up on my design wall to take stock of my progress. As seen above, I finished a whopping 16 blocks. I am not counting the three blocks that have foundation paper piecing templates printed, cut out, and fabric pulled, since they are not yet sewn, but I do plan to make them eventually.
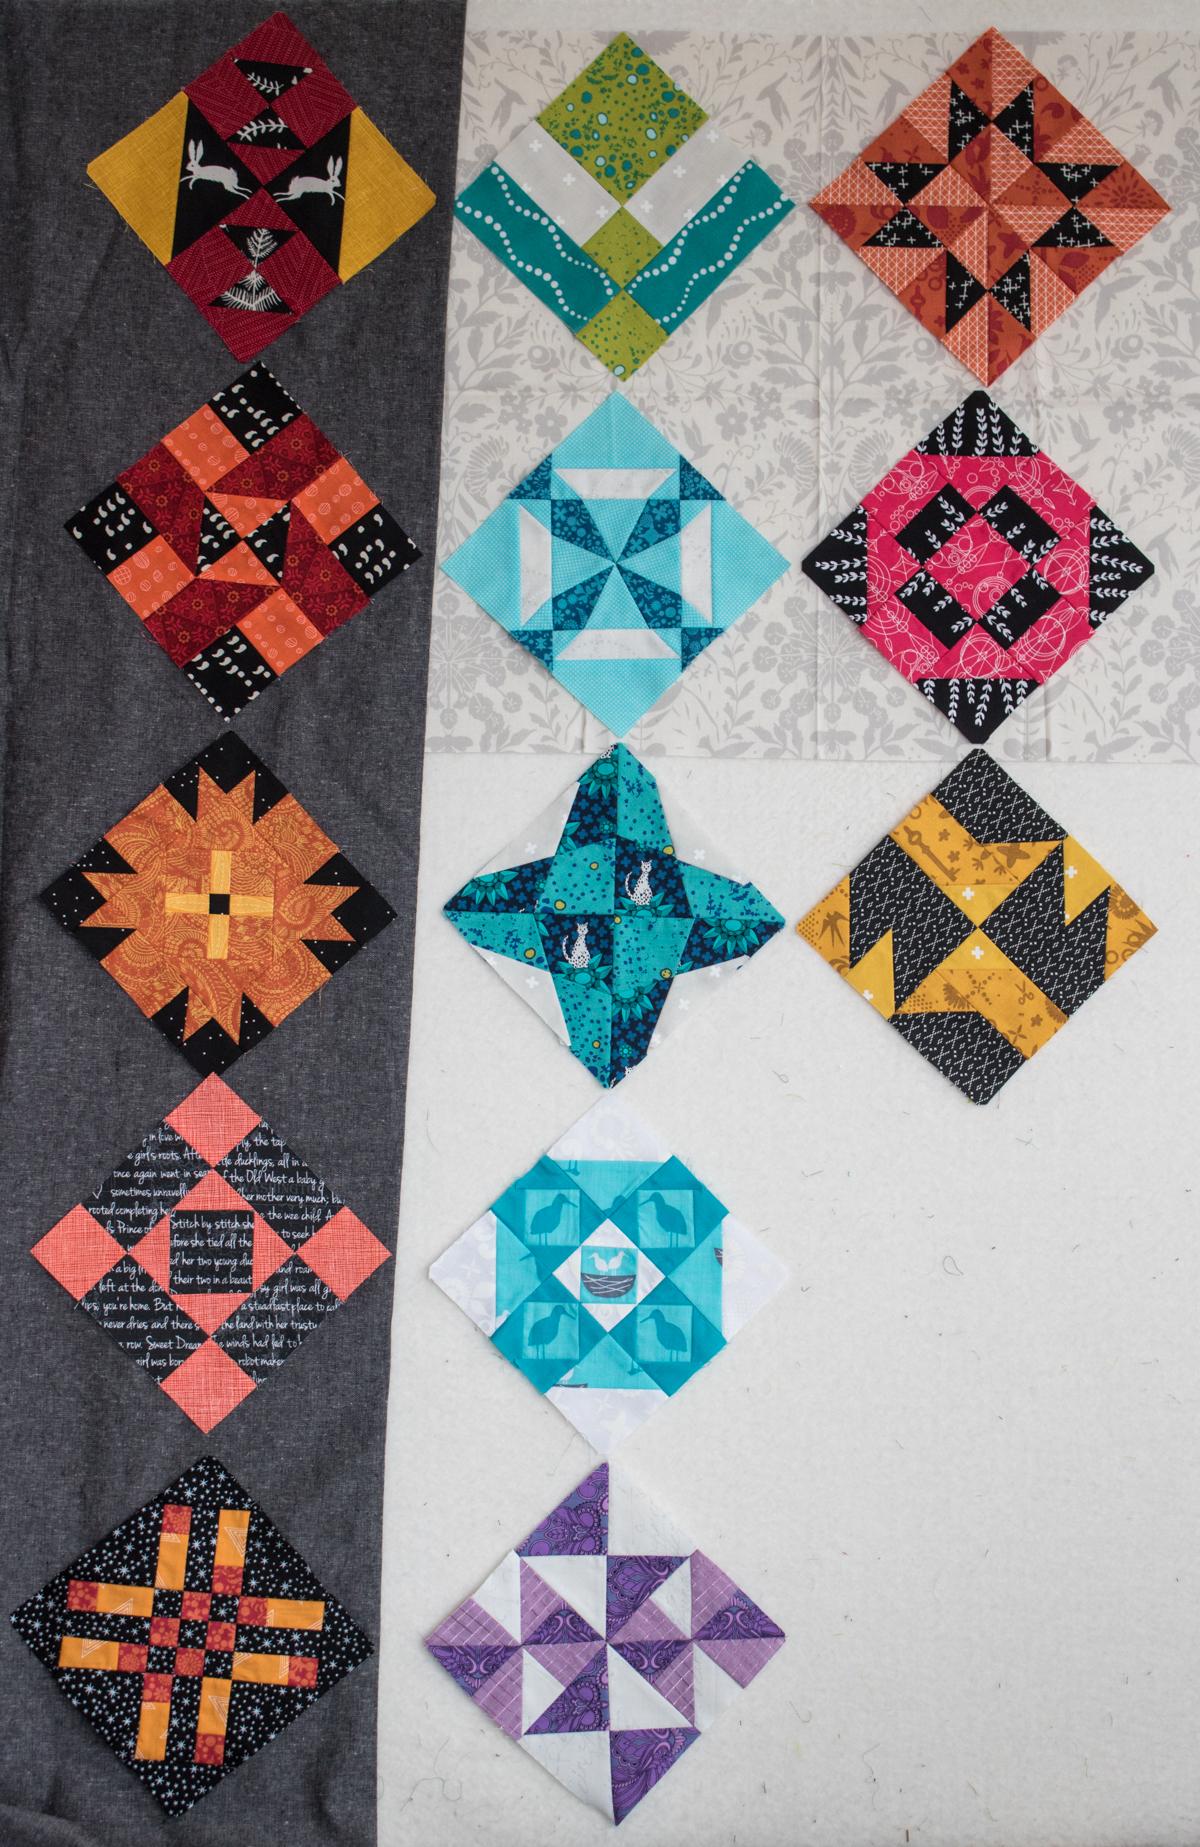 At first I considered the “Make a Smaller Quilt” option, and thought perhaps I’ll make a few more blocks to fill out a lap sized quilt in my original layout. Note that these photos are from a purely planning phase–fabric slapped up onto my portable design wall simply for the benefit of playing with different arrangements visually. It’s wrinkled and wonky and that’s all part of the fun!
 Since I made the warm colored blocks with a dark background and the cool colored blocks with a white background, I probably will stick with those for sashing and background blocks.
Once I began writing this post, though, the negative-space filled setting inspired by the Concerto Quilt is really calling to me. I may opt to plug away and make some more blocks, with the end goal of setting them in a fade out pattern similar to the blocks in the Concerto Quilt. Time will tell, and since I know that I want to make more blocks before settling on any of the options, it’s absolutely okay to choose later!
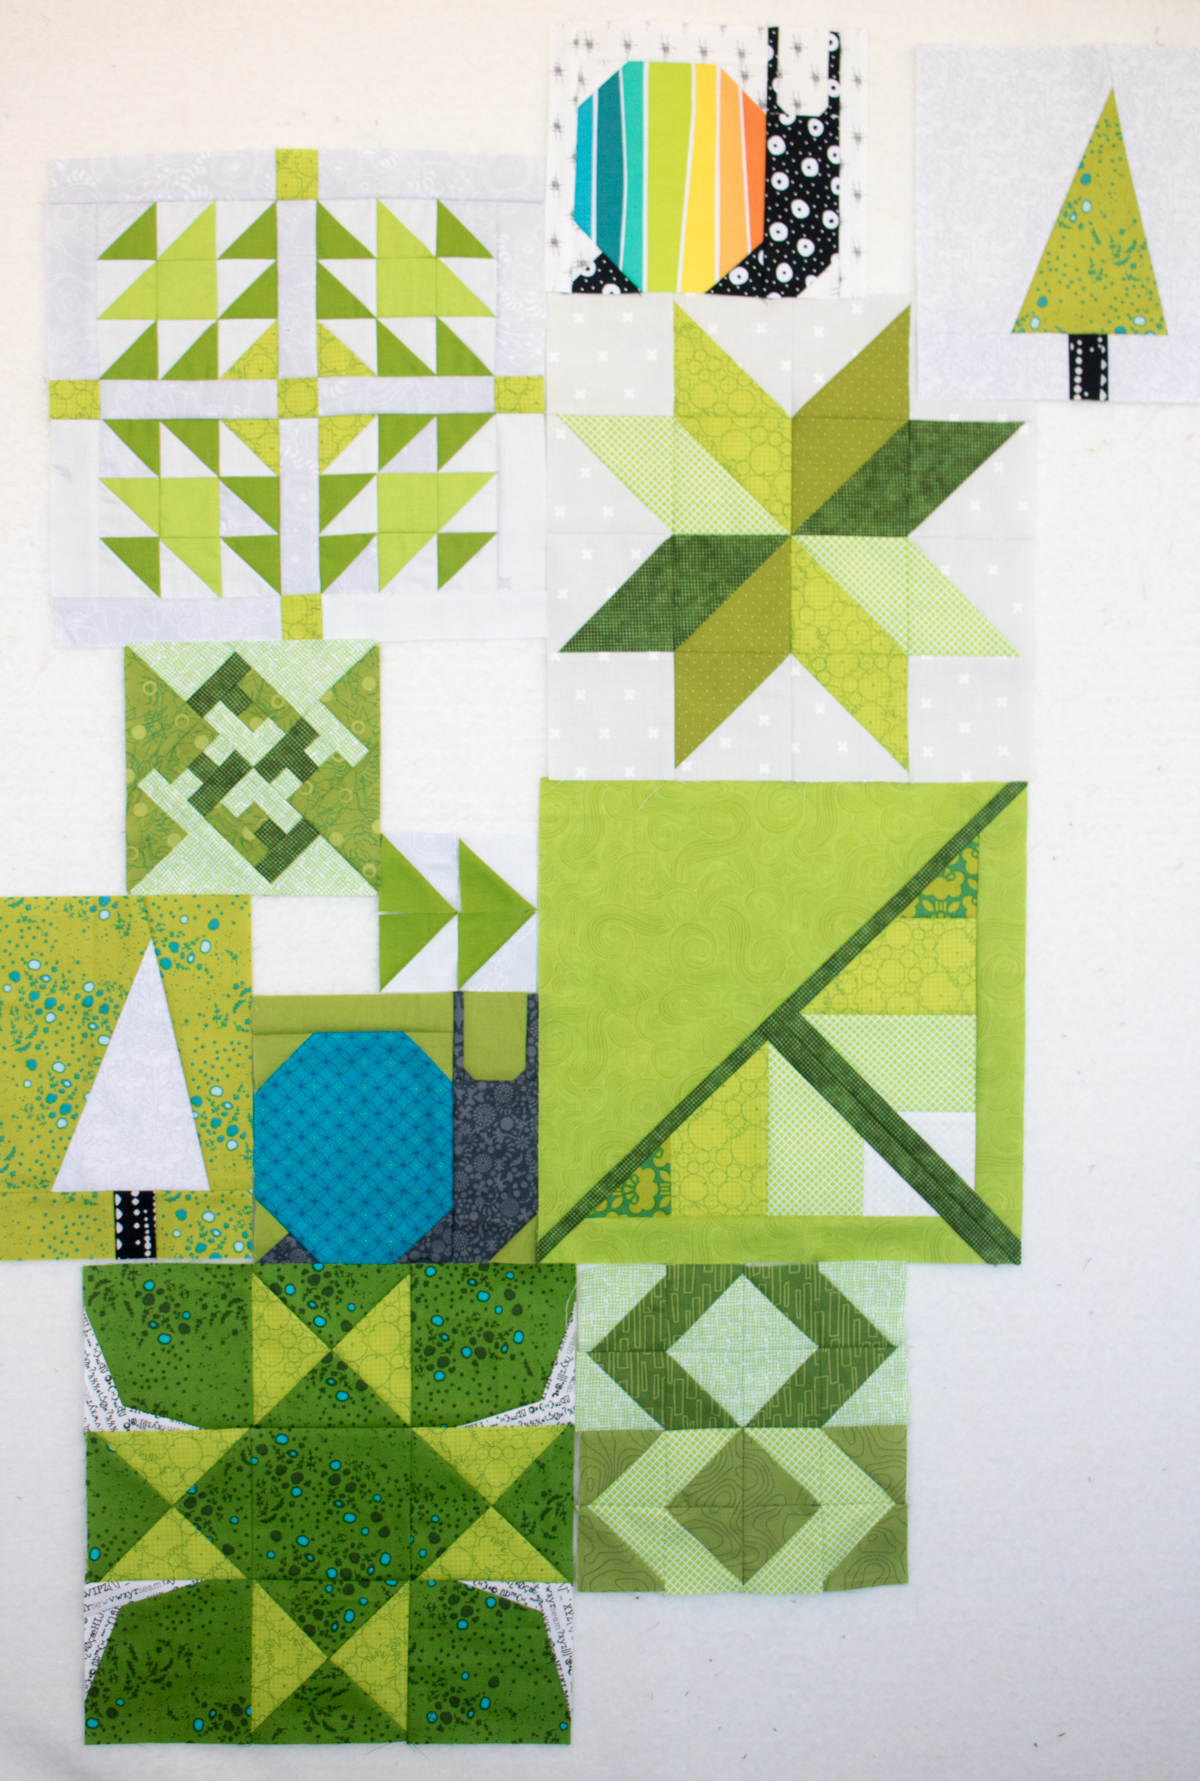
Flora is going to go live in my Greenery 2017 quilt, though, since the block reminded me strongly of dappled light through the treetops and I thought adding a Farmer’s Wife block to my year’s Greenery project would be the perfect touch! The quilt is already a green melting pot of blocks from all of the sew alongs and bees I’m joining this year so it feels only right that a Farmer’s Wife 1930s block join the ranks.
The moral of this story is: There are no rules. This is your quilt. You can do anything you want to with these blocks! Enjoy the adventure!
Important Links
- All the block tutorials by Angie and bloggers.
- FAQs for the sew along.
 The Farmer’s Wife 1930s Sampler Quilt: Inspiring Letters from Farm Women of the Great Depression and 99 Quilt Blocks That Honor Them by Laurie Aaron Hird for Fons & Porter/F+W; RRP $28.99 – Click here to purchase.


 In this tutorial we give everyone some guidelines but the emphasis is on PLAY and MAKING THIS PROJECT YOUR OWN. Don’t celebrate Easter? No biggie, make a similar pincushion in another shape. We will be following on Instagram so please tag your makes
 Print the
  Trace the template onto the wrong side of the leather, marking out two eggs–one with only the outline and one with both the inner and outer lines drawn.
 Carefully cut along the marked lines, remembering to cut one piece along only the outer egg outline and cut the other piece along both the inner and outer egg outlines.
 Set your leather pieces aside.
 Using chalk or water soluble marker, trace the inner egg outline onto your embroidery surface (felt, velvet, jeans, etc) so you will know the limitations of your embroidery design.
 Adorn at your heart’s desire with embroidery, applique, etc. You are welcome to copy our experiments but please feel free to try your own ideas.
 Align your embroidered material so that the embellishments fit within the window of your leather upper (the egg with the hole cut out of the middle).
 Secure the right side of your embroidery to the wrong side of your leather upper with double sided tape, glue, clips, or other method.
 Then, using a ¼ or ⅛ inch seam allowance, top stitch the two together along the inner egg as shown.

 Finally, if possible, trim the seam allowance of your embroidered material carefully about ½” away from the stitched line so that it remains easily inside the outer margins of the egg.
 Using only the outer margin of your Egg Template, trace and cut two pieces of muslin. Sew the two pieces together using a ¼ inch seam allowance, leaving a small opening to use for filling.


 Place the two leather egg pieces wrong sides together and secure with clips. (Note that pinning will create visible holes in the leather–use clips!) Sew around the outer margin of the egg using a ¼ seam allowance, leaving an opening at least 3 inches long unsewn.
 Stuff your filled and fully closed inner pincushion through this opening. Ensuring the inner pincushion remains entirely inside, top stitch the remaining way around the outer edge of the egg.
 Thread the top threads to the back of the piece, tie all loose ends together and trim or bury.


 I haven’t shown much of an update here, so I thought it would be a good time to show you the blocks I do have! I brought my portable design wall right out into the blizzard aftermath, since with all of this white, I thought some green would do it good!
 Unnamed by Jane Armstrong, from the first week of January in the Quilter’s Planner 2017. I started off on the right foot at least! Not one bit of the final layout for this quilt is decided yet, except that this little snail is going to live next to this lovely upward ramp! They seem to go together, and so it shall be.
 Doves in the Daylight by
  Double-Edged Star by
  The little improv trees are what kicked off this Greenery quilt, and they were a Wild Card to help get us started with
 This is Patience Corners, block 1 for the
  And all together now, in the snow, since what better time to spread some greenery than a mid-March blizzard!? Per a suggestion by
  No child-assisted blog post of mine would be complete without a hi from my helper, so here’s a quick photo of my adorable helper today (this is for you, Mom aka Grandma)! Maddie had a snow day, and Max, who goes to preschool just a couple towns over, had school as usual. Isn’t it wild the difference a couple towns can make regarding snow in rural Maine!? So today is a fun Maddie-Mommy-Finn quasi-snow day!
 This quilt got its name after it was nearly completed, as I sat hand stitching the binding to the back. A mini quilt made at the request of
  With freestyle embroidery fresh on my mind and
 I had a lot of fun with the
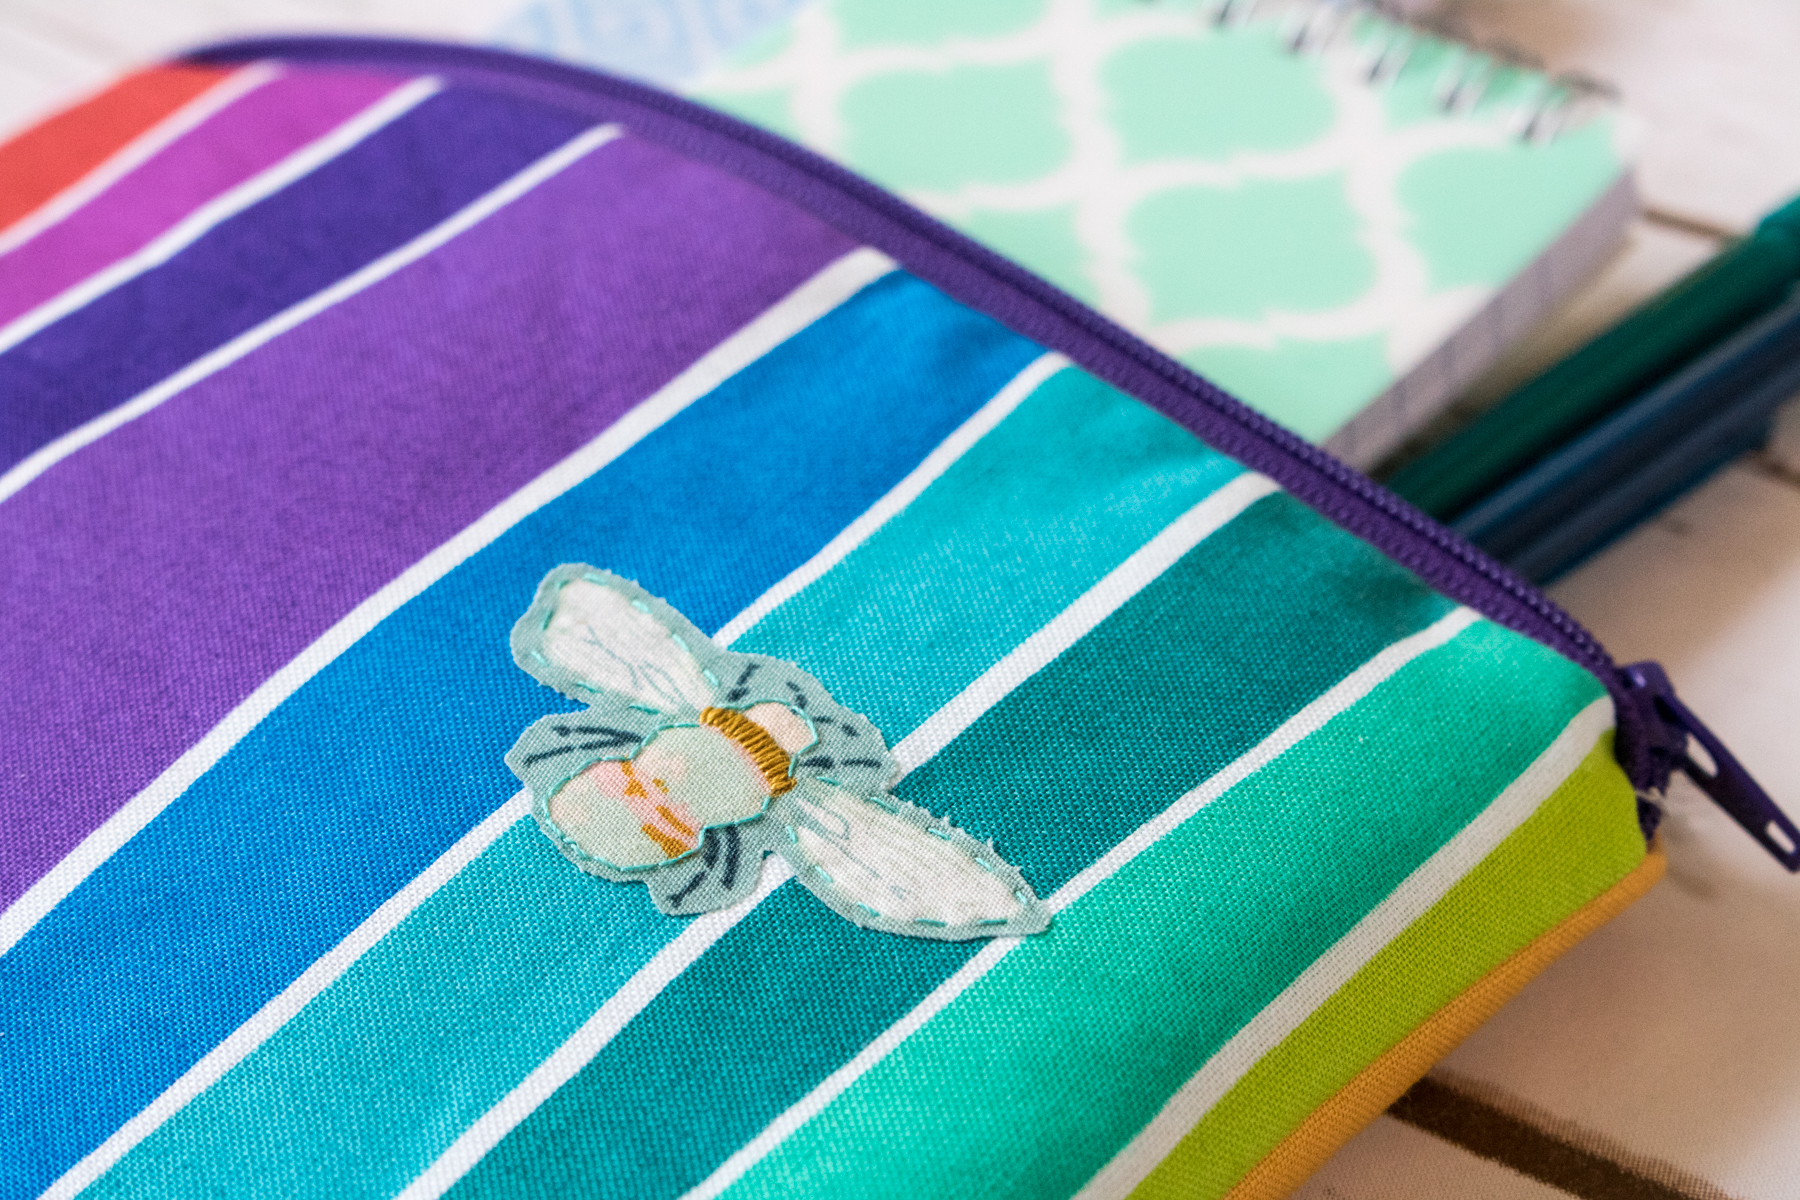
  I knew I wanted to incorporate both hand and machine quilting, and I knew that I wanted the machine quilting to be dense. It took me a while to decide between using 50wt Aurifil 2600-Dove or 5015-Gold Yellow for the quilting, and finally I opted for the Gold Yellow to pull out the gold of the centrally stitched bee. I quilted a diagonal grid approx 1/2″ apart on all of the colored sections of the quilt and I love the texture it created. I wanted the white star and central diamond to pop, so I let them be, patiently awaiting hand quilting.
 I used a rainbow of 12wt Aurifil thread to help pull the rainbow from the gorgeous fabrics into the white sections, and I love the outcome! I decided to switch to 12wt 2600-Dove for the center so that the bee would stand out.
 The back shows that my hand quilting still has plenty of room for improvement (especially when trying to maneuver around the bee), but it’s still fun to see the back, too!
 I used Seventy Six fabrics Rising in Graphite and Numbered in Duck Egg for the back, with an Insignia in Chartreuse label.
 Labeling is one of my favorite parts–maybe because it helps me know that my name is on my work, or maybe because it means I’m finished with a project!!
 This quilt is currently in Andover headquarters in NYC for photography and other fun fabric adventuring before it returns to me, but it was super fun to see it hanging in the booth at QuiltCon (see it, top right??). You can see a photo of me proudly standing next to it in my
 First and most exciting is that
  Here I am proudly standing next to the quilt hung in the fabulous Andover booth.

 I really loved the Minimalist Improv class with
 Sew all the Curves with
  Thursday morning when I first stepped foot onto the showroom floor, and began slowly walking around to take in the vast depth of beauty, originality, workmanship, and meaning that was displayed in those aisle, I was moved to tears. I don’t have the opportunity to attend many quilt shows, and being in the presence of so many quilts created with such passion by talented fellow quilters and friends was an amazing experience.
 Despite keeping a fairly light class schedule, I am sure I did not get to see every single quilt that hung at the show, and more time was spent examining details than taking photos. It’s impossible to select favorites, so instead I will share a selection of photos I took of quilts that stood out to me. You can see all of the award winners on the Modern Quilt Guild website,


 The booths and vendor hall was much fun at QuiltCon. I was able to find replacement milliners needles right before my
  I did not spend as much time at the booths as I would have liked, both because of fullllll days, but also because most of the time they were absolutely mobbed! These photos were taken Sunday afternoon shortly before the end of the show, which is how you can see the booths.
 There were quite a few
 This post would not be complete without at least a collection of photos from gorgeous historic Savannah, Georgia. It was especially fun to explore since my husband Garrett (who incidentally began an instagram account
  I was sure to teach Finn the fine art of hugging trees, and he was a big fan of the birds chirping in the trees (I couldn’t hear them, but I confirmed their presence on several occasions to make sure I was understanding the source of his excitement).
 Savannah is a gorgeous city and I would absolutely return to explore more!
 I’m so grateful to my family for supporting me in my travels.
 Between my parents watching my older two kids, my husband not only taking time off work so that he could be with Finn full-time so that I could attend workshops, lectures, and “do my thing” with quilty friends I rarely see, but also begging for Night Quilter t-shirts to wear during the event, and taking an actual legit interest in quilting and the industry to help support and understand my passion, I am surrounded by the most amazing supports.
 Without that support, none of this would be possible, and no reflection on an event as amazing as QuiltCon would be complete without a huge, from the bottom of my heart, thank you. What an amazing week it was!
 and here it is showing the progress from February:
 I guess 28 days can make a big difference!
 The highlight of the month was getting the chance to chat with Erin from Aurifil on Facebook live while attending QuiltCon in Savannah. You can see my low key chat
  Back to my embroidery progress! Here are some close up shots of the various sections of this freestyle hoop.
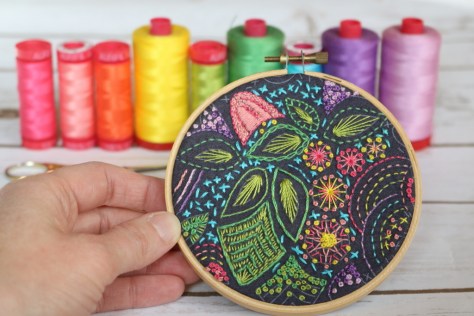
 I am still stitching without a plan, deciding each day’s stitches the morning–or sometimes night!–of the current day. I have tried a handful of new stitches and look forward to trying even more as the year progresses!

 Those little white three-petalled trillium flowers are the most recent addition. Time will tell where this will go from here!
 This month, I had a photography helper, so of course I can’t end the post without a few Finn cameos. I often use the photos on my phone as a reference, so I pulled up January’s photo to make sure I arranged the thread in a consistent way. Finn was please as punch that they matched.
 He also helped me put the thread back into the box, then arranged around the hoop, back into the box, then arranged around the hoop. What a helper!
 Late last year, I kind of got hooked on the quick mental fix that comes with freestyle embroidery while I was creating this
 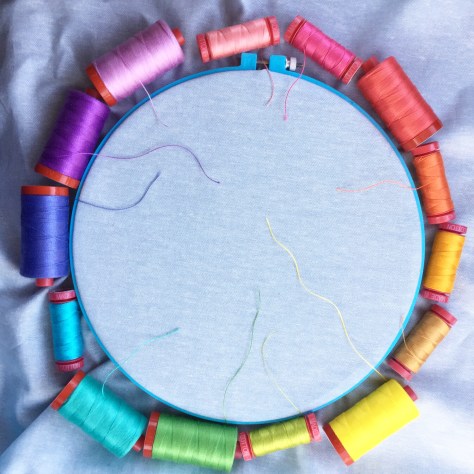 I went into the year with a 10″ hoop of Robert Kaufman Essex linen in light blue, my stash of
 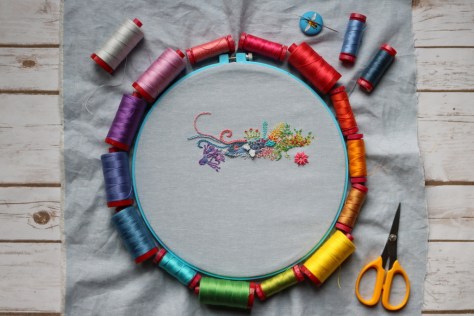 Here is my hoop after 1 month of daily stitch-whereever-the-wind-blows stitching. Fun, right!? I created a separate account on Instagram
 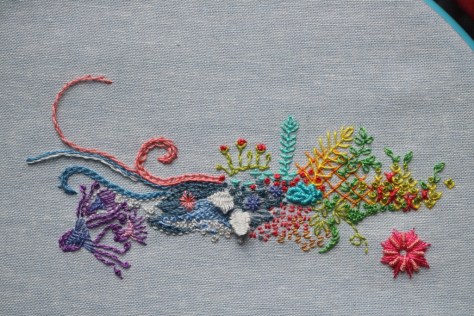 My basic strategy began as a daily google of “
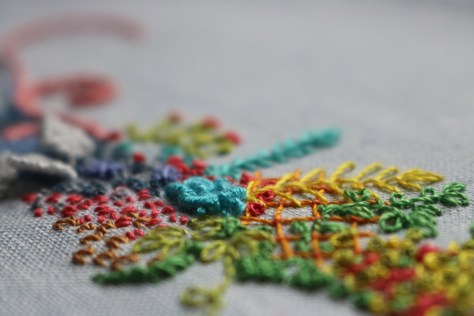 I began by learning bullion knots, so this whole project began with that little mass of turquoise squiggles and has grown organically from there.
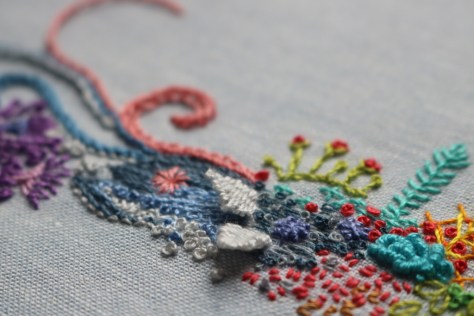 I love the texture that results when you stack embroidery stitches together. Those white floppy things are my first attempts at braided picot stitch, another fun one!
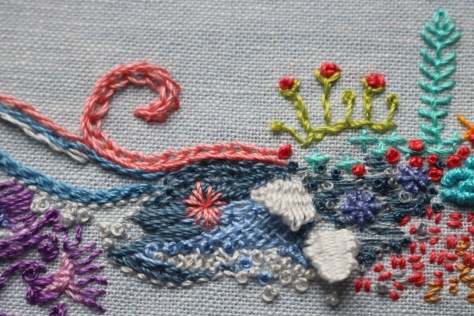 This has been really fun so far, and as of the writing of this post, I’m already over halfway through February, too! (You’ll have to wait until March, or check the IG account, to see those additions, though!) I’ll plan to share an update each month, so that you can see how this grows.
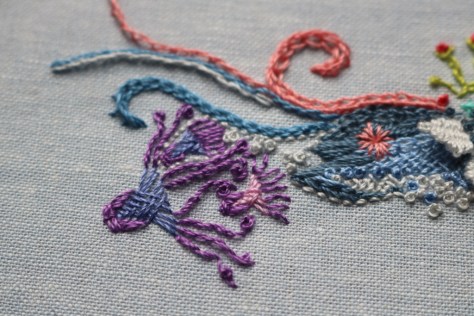 My personal guidelines include stitching at least one stitch each day, trying to plan as little as possible and simply stitch whatever feels right each day, and not remove any stitches no matter how much I dislike the final outcome (cough, cough, that octopus family, cough). I figure this way, the stress of getting everything *just* right disappears, and instead the thought that it will all work out somehow in the end dominates. No stress!
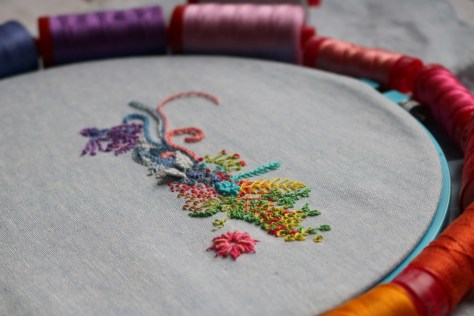 This is a really fun, exhilarating project since it is pure spur of the moment random creativity. If you have any cool, unusual embroidery stitches to recommend, I’d love to add some more to my arsenal. There’s something about learning something new that makes my day.