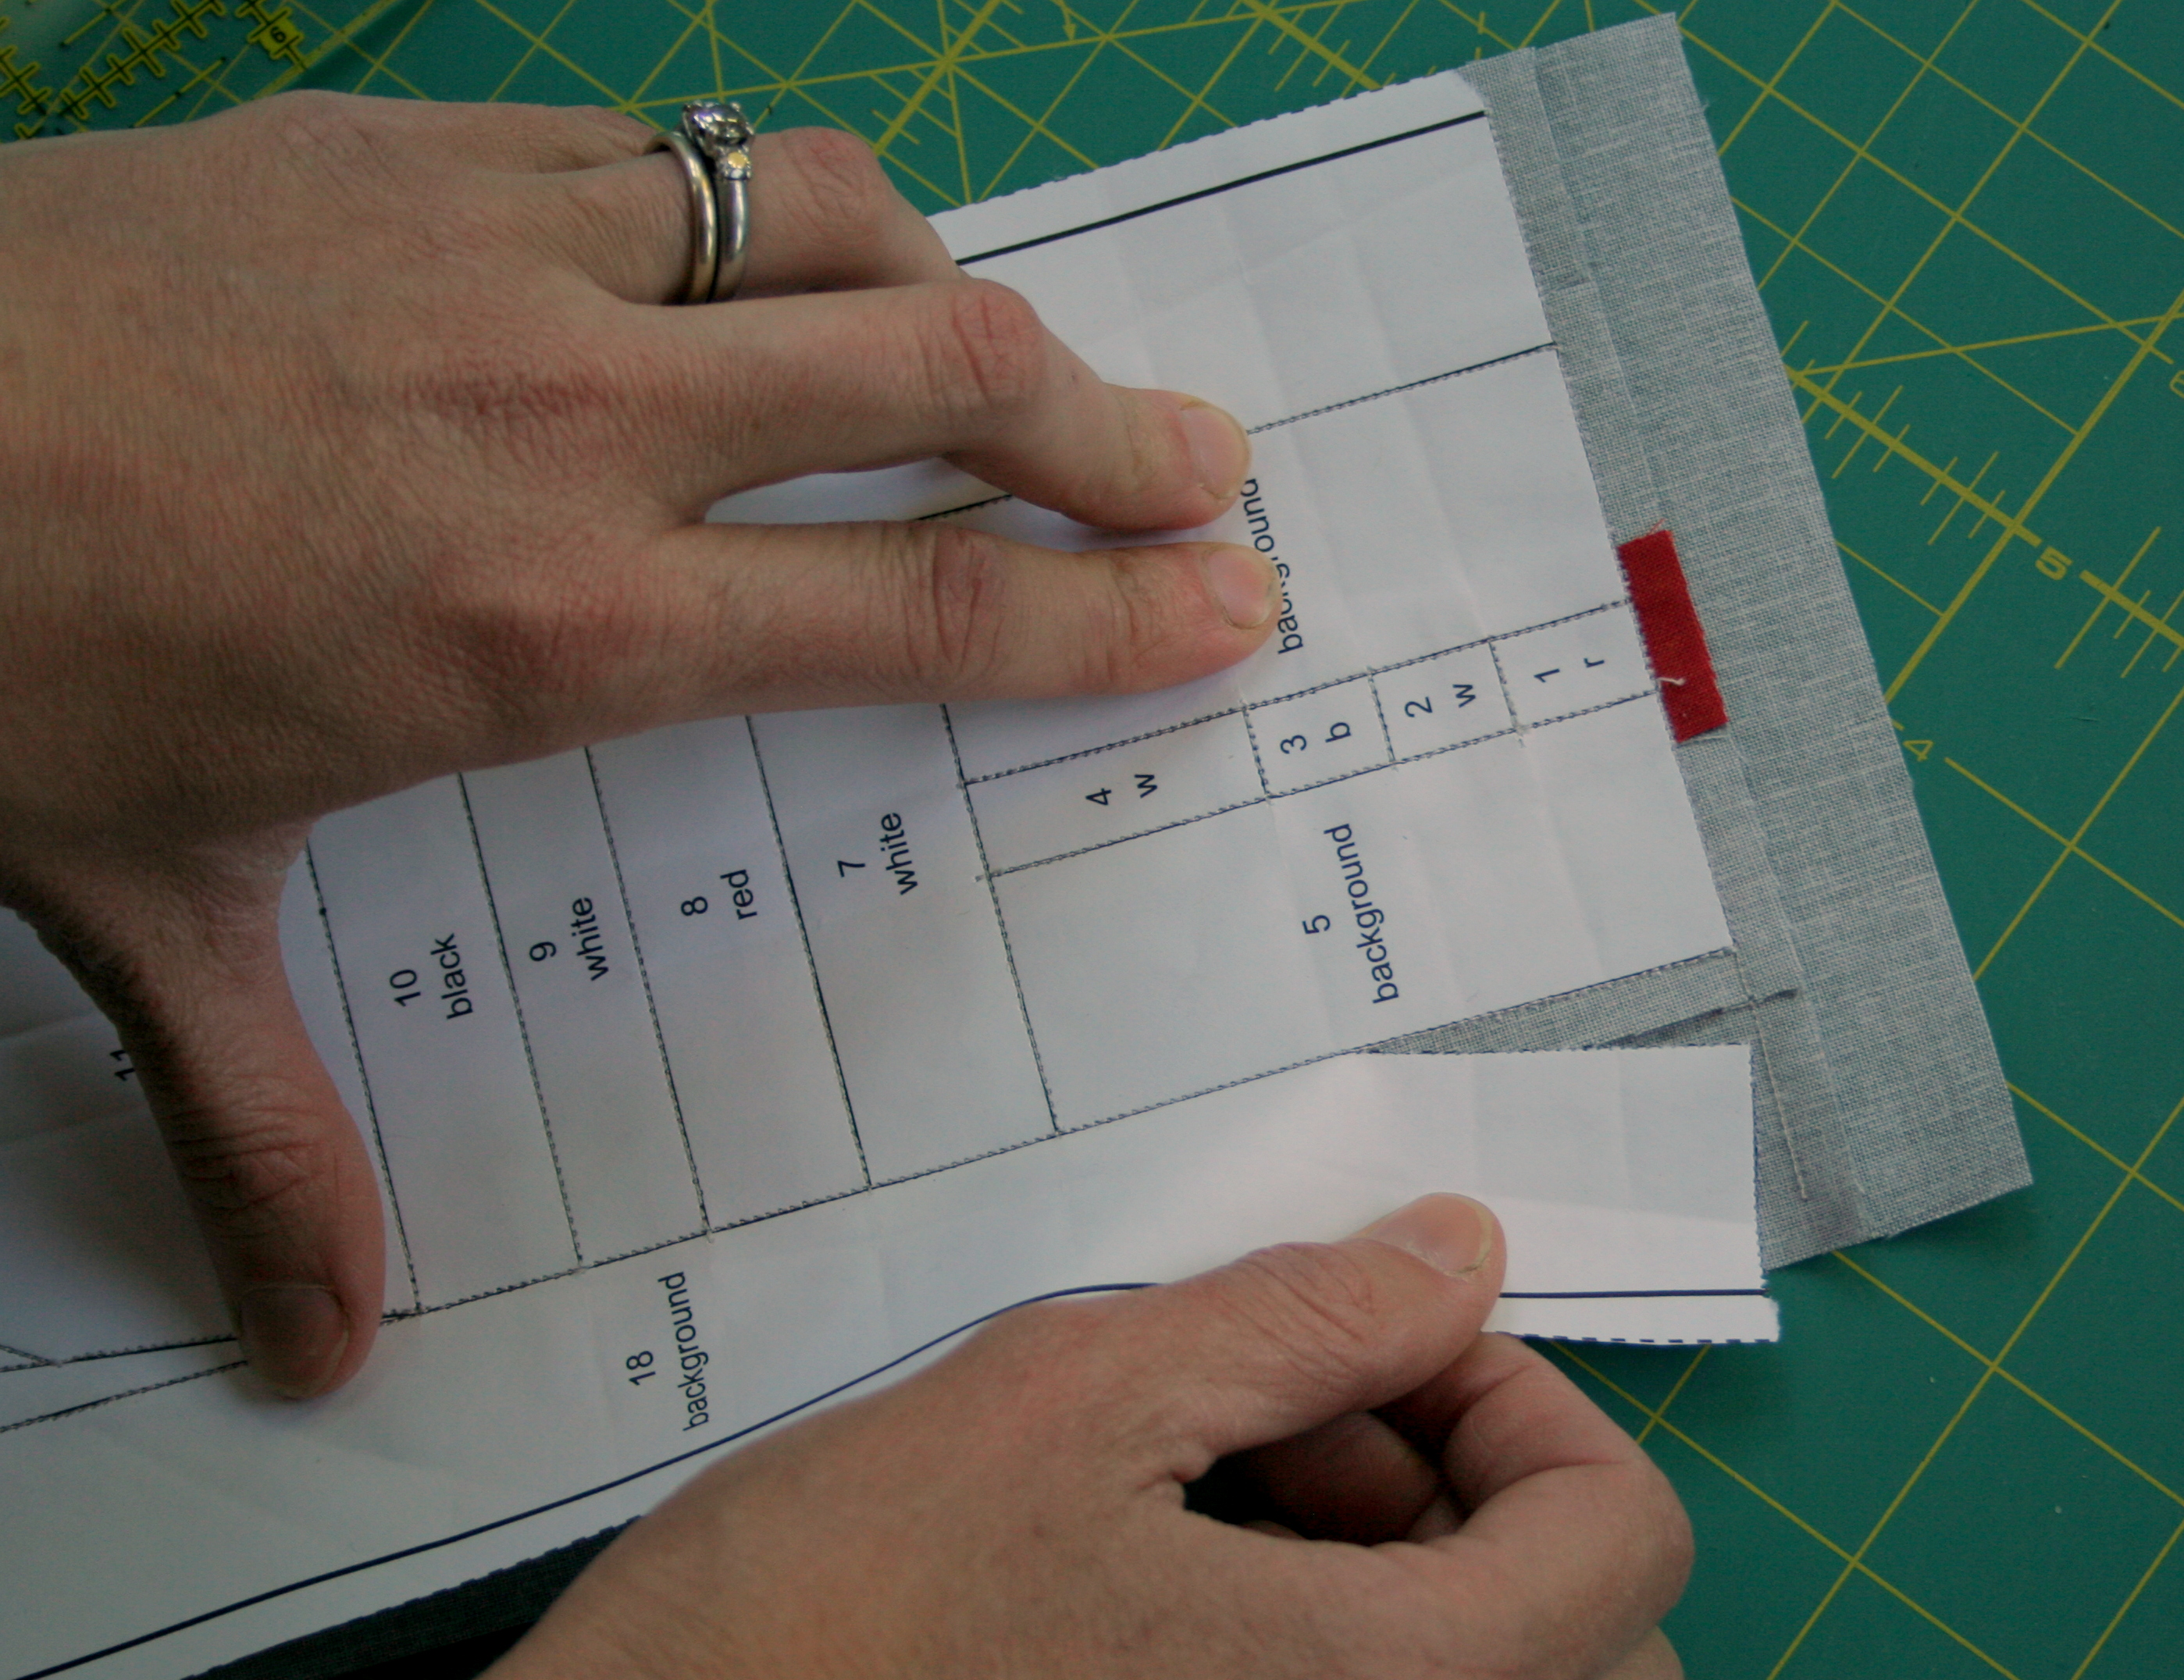
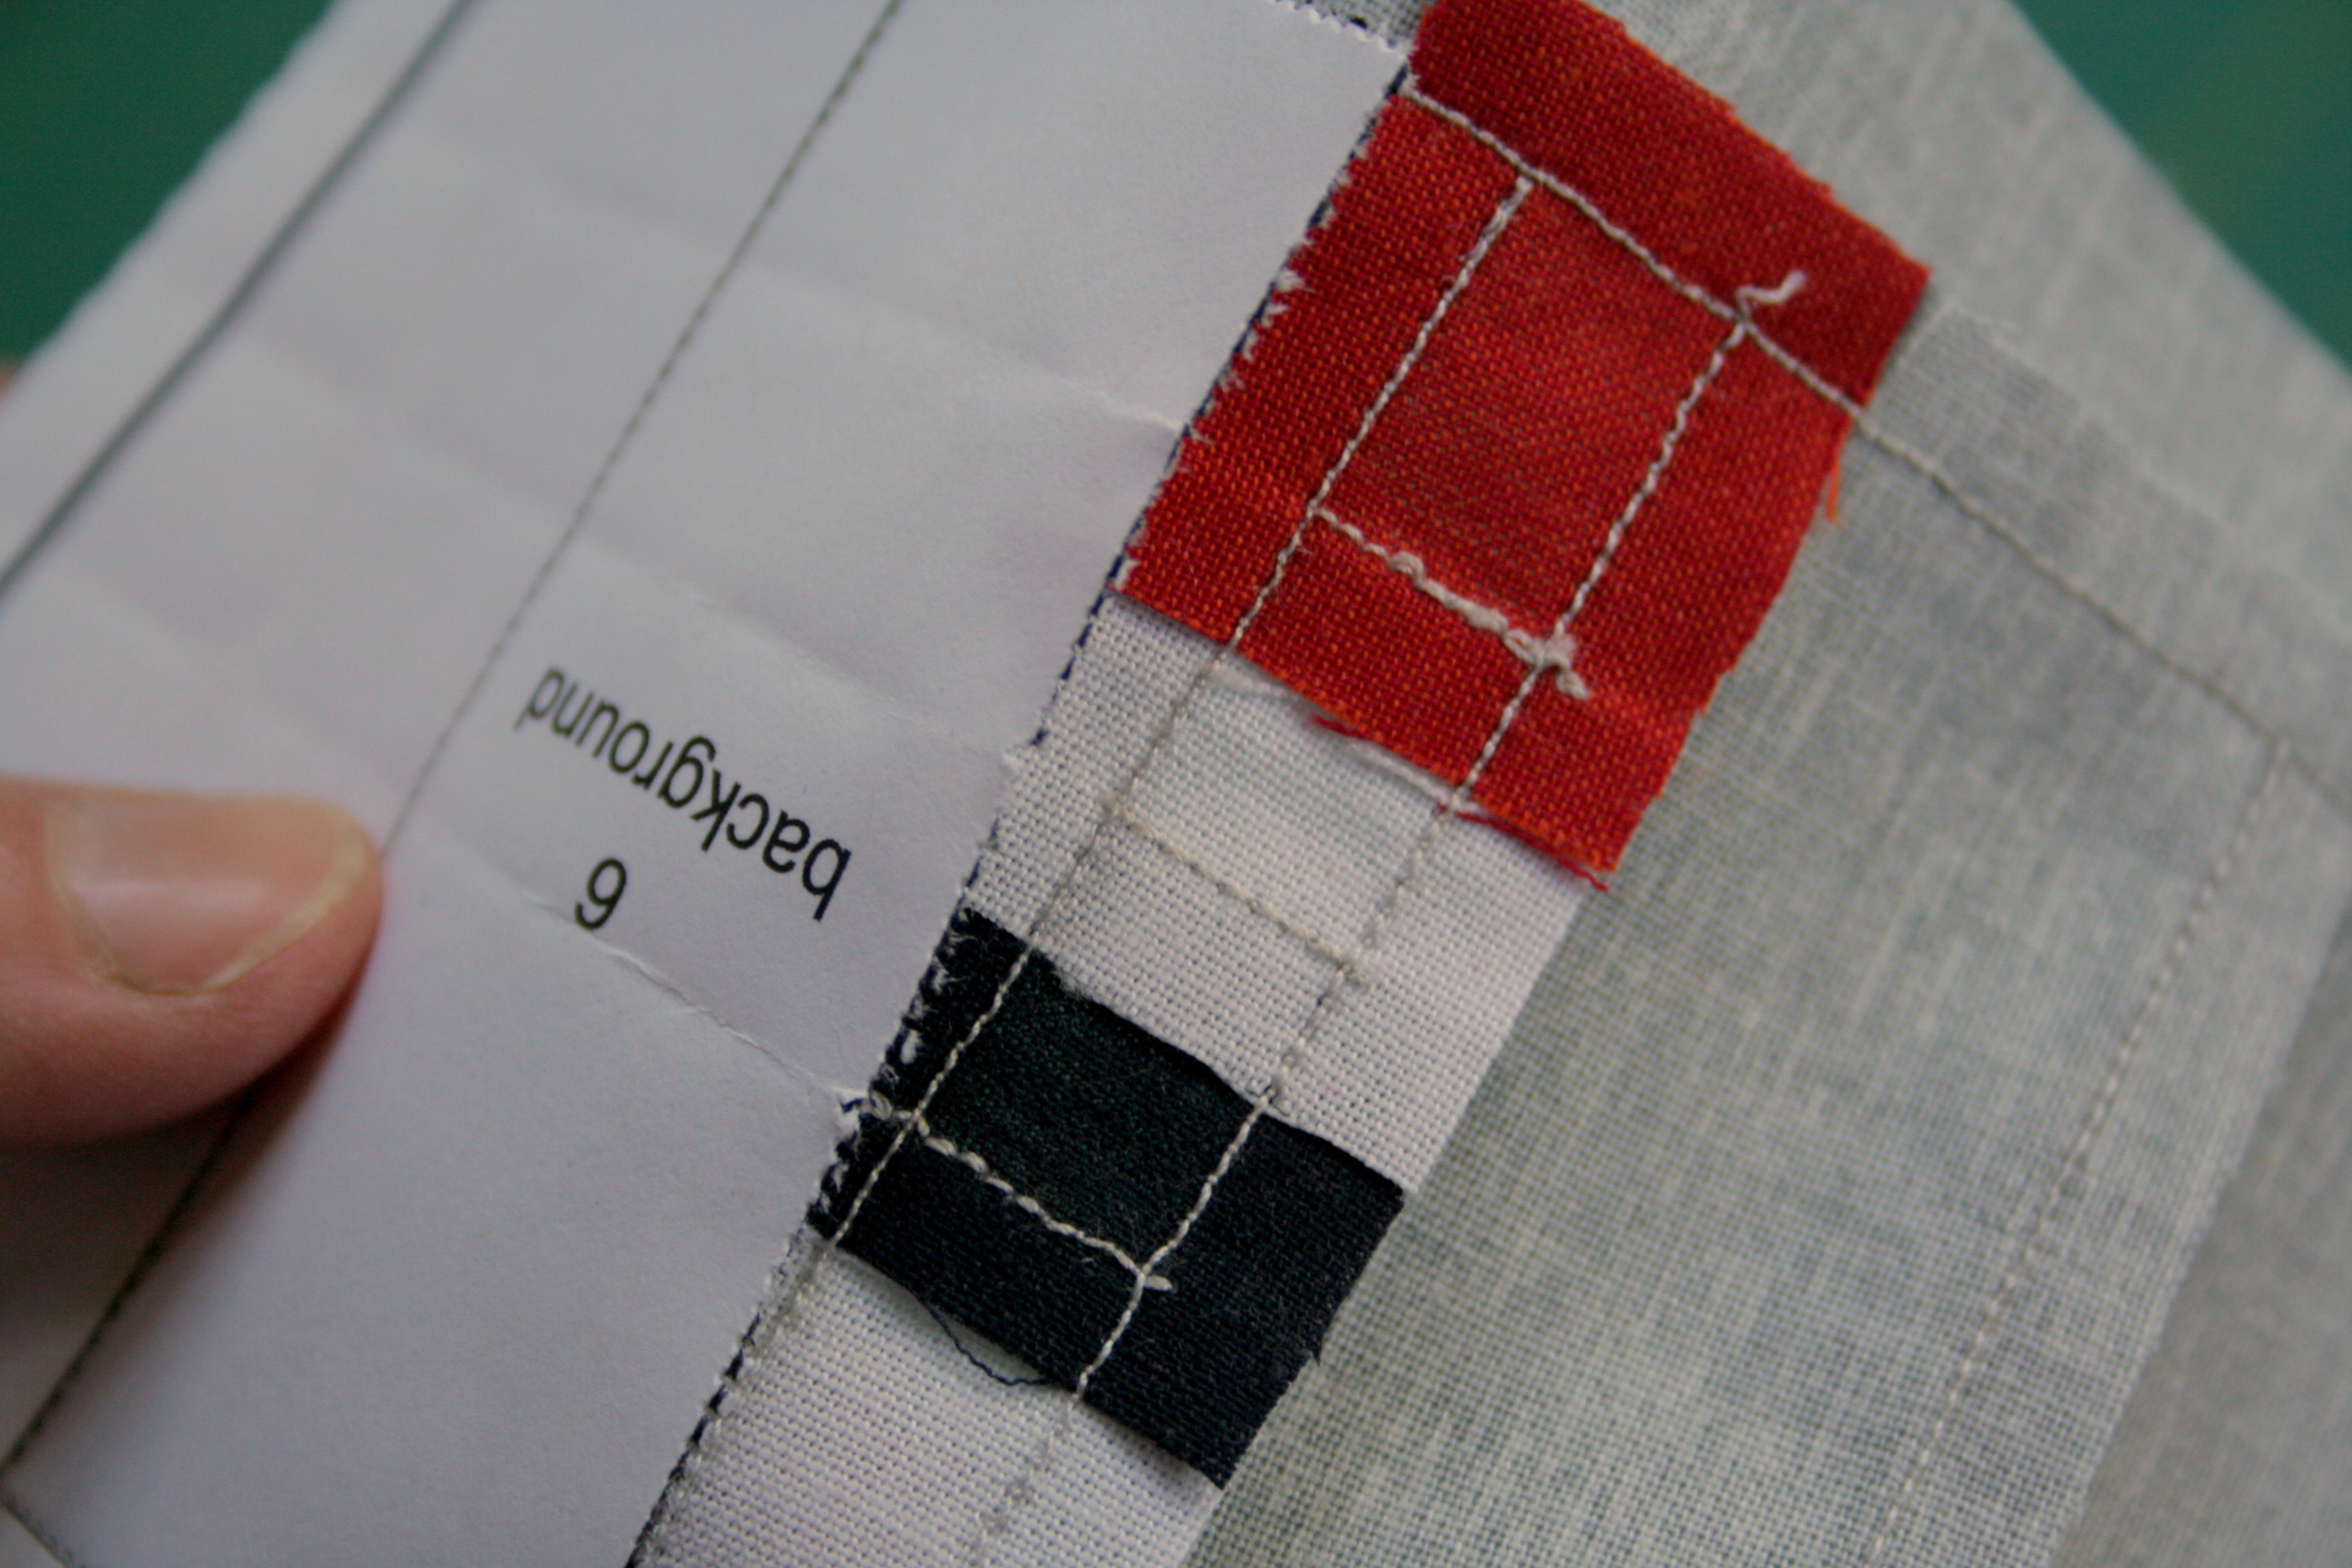
Lately I’ve been trying to multitask during my sewing time, since this summer is so full of outdoor adventuring that my time spent sewing is little. The last time I had a good chunk of sewing time, I worked on piecing three projects at once. It made for little bits of progress for each, but no big noticeable progress on any one quilt. Today I decided to focus on one quilt so that I can hopefully get a finish under my belt to renew my quilting fury. Since I have yet to complete quilts for my kids, I decided it was high time I remedied that, and I decided to focus on sewing together my daughter’s rainbow quilt.
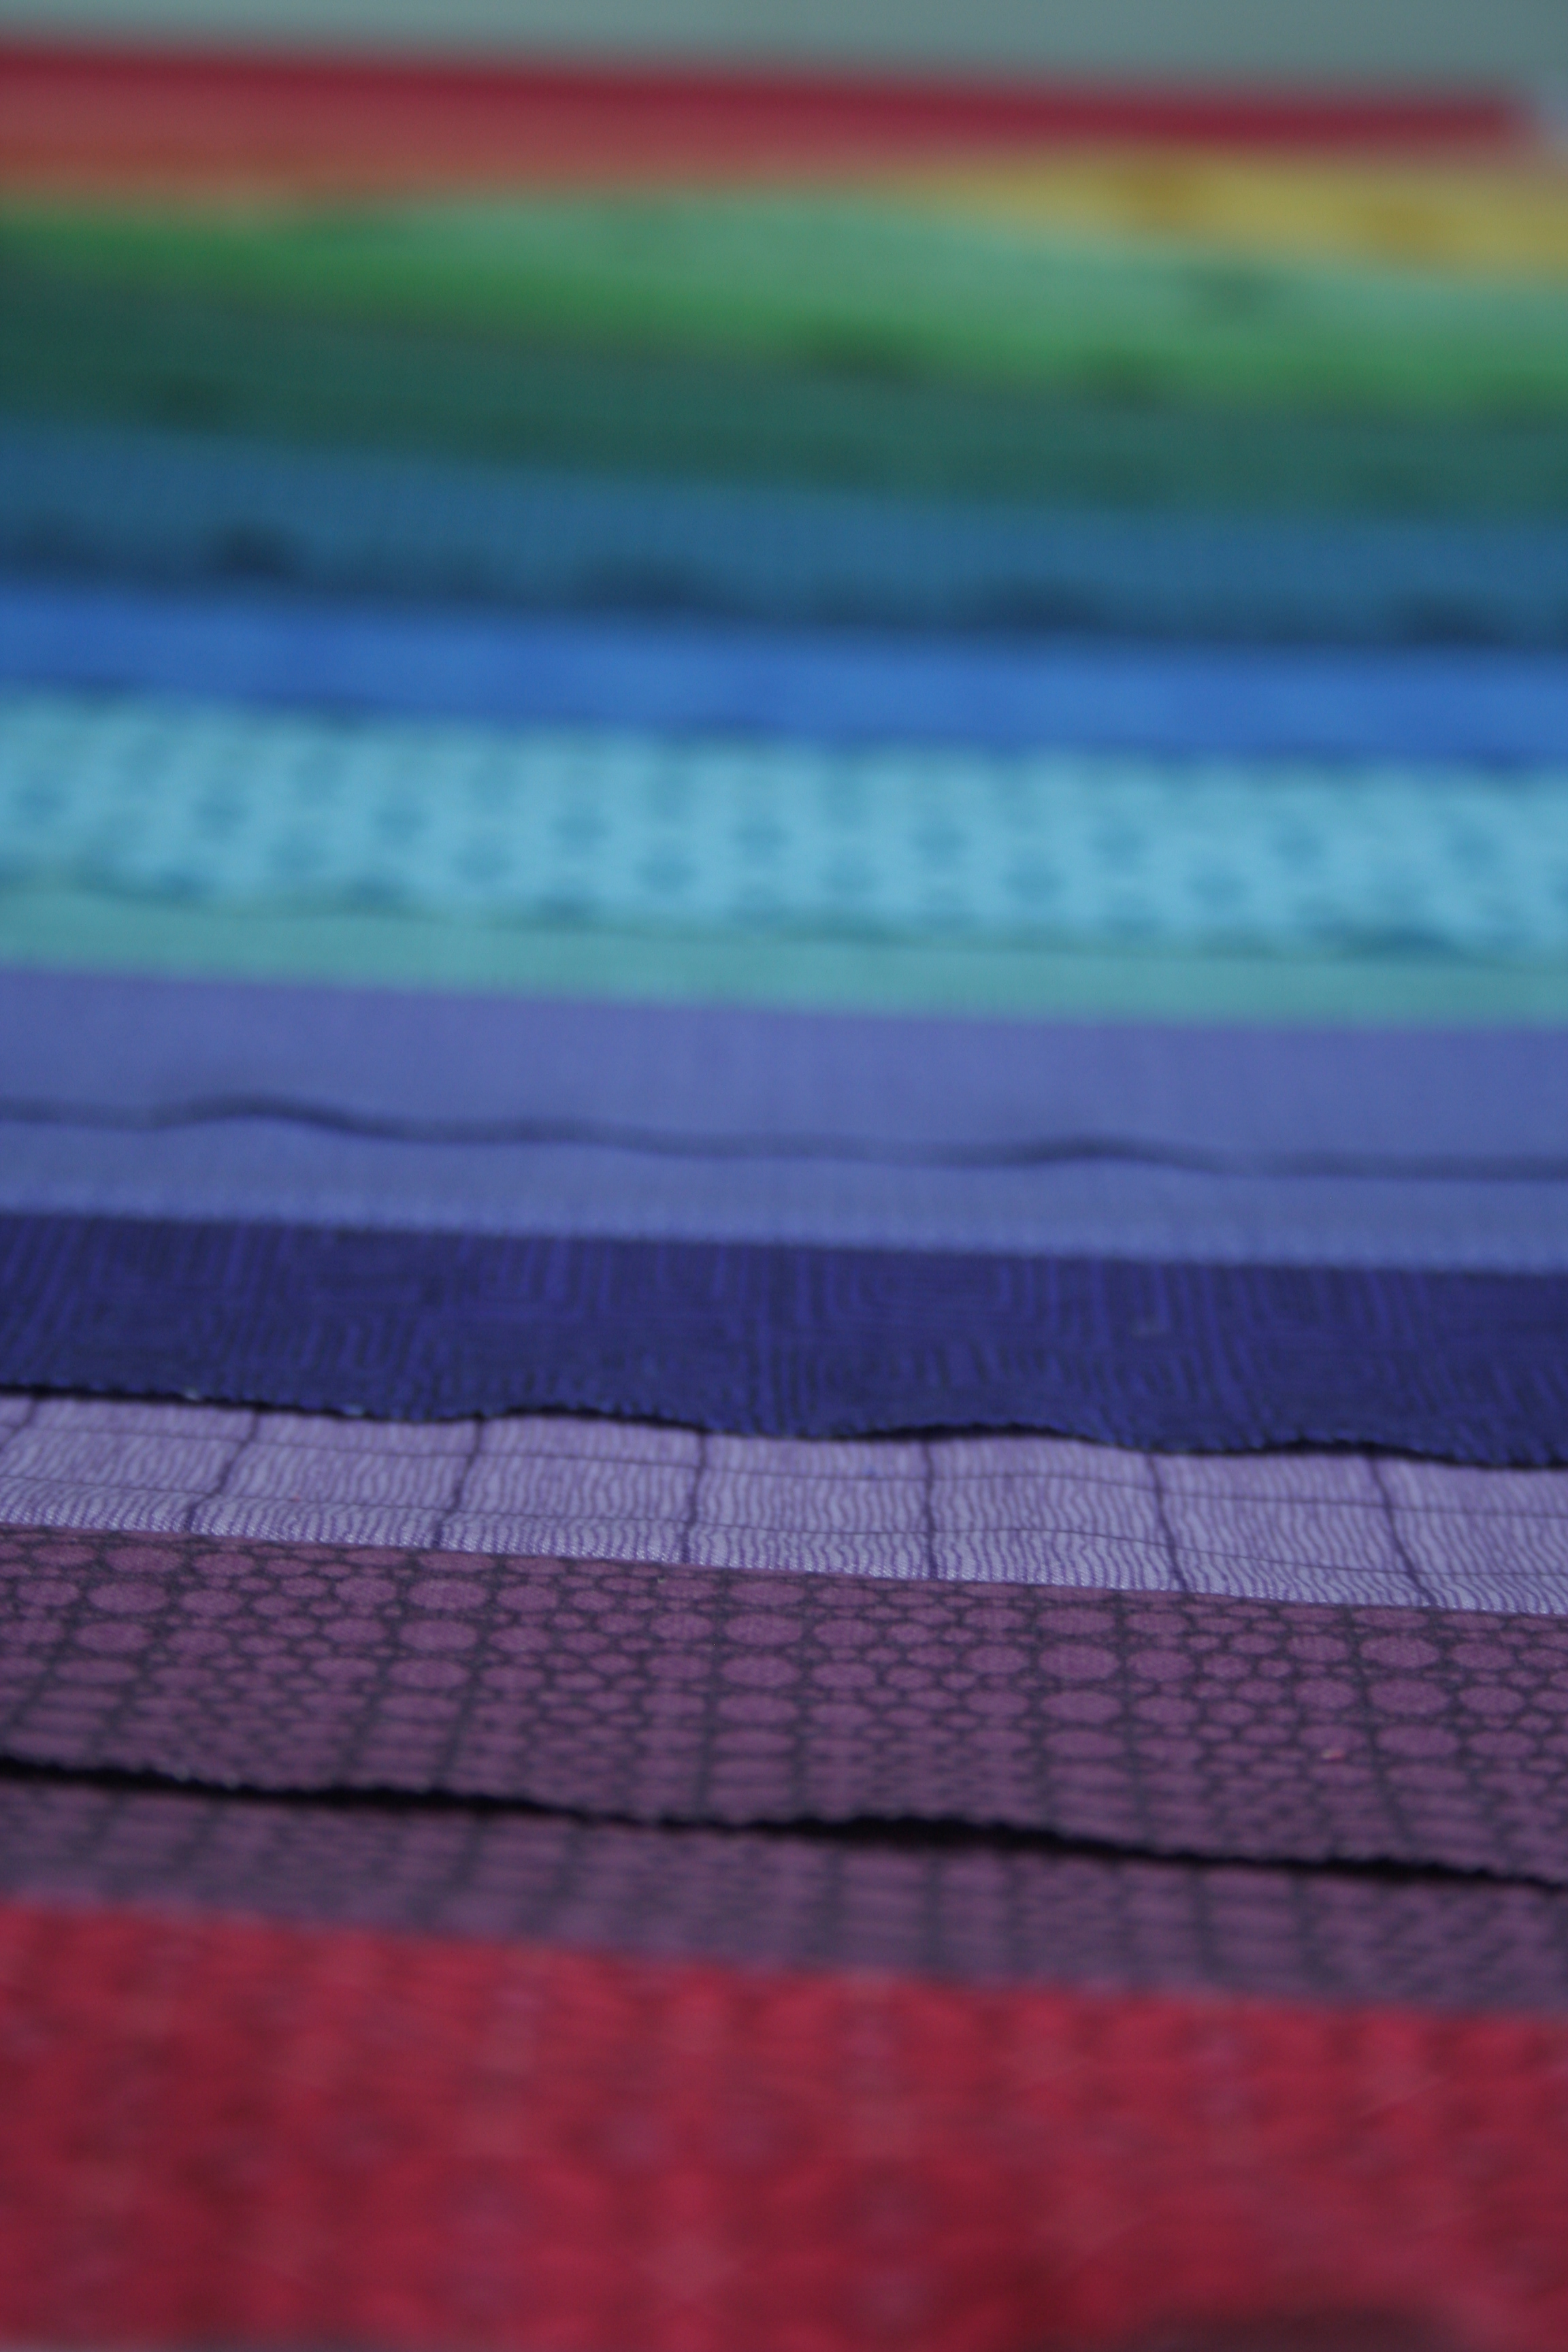
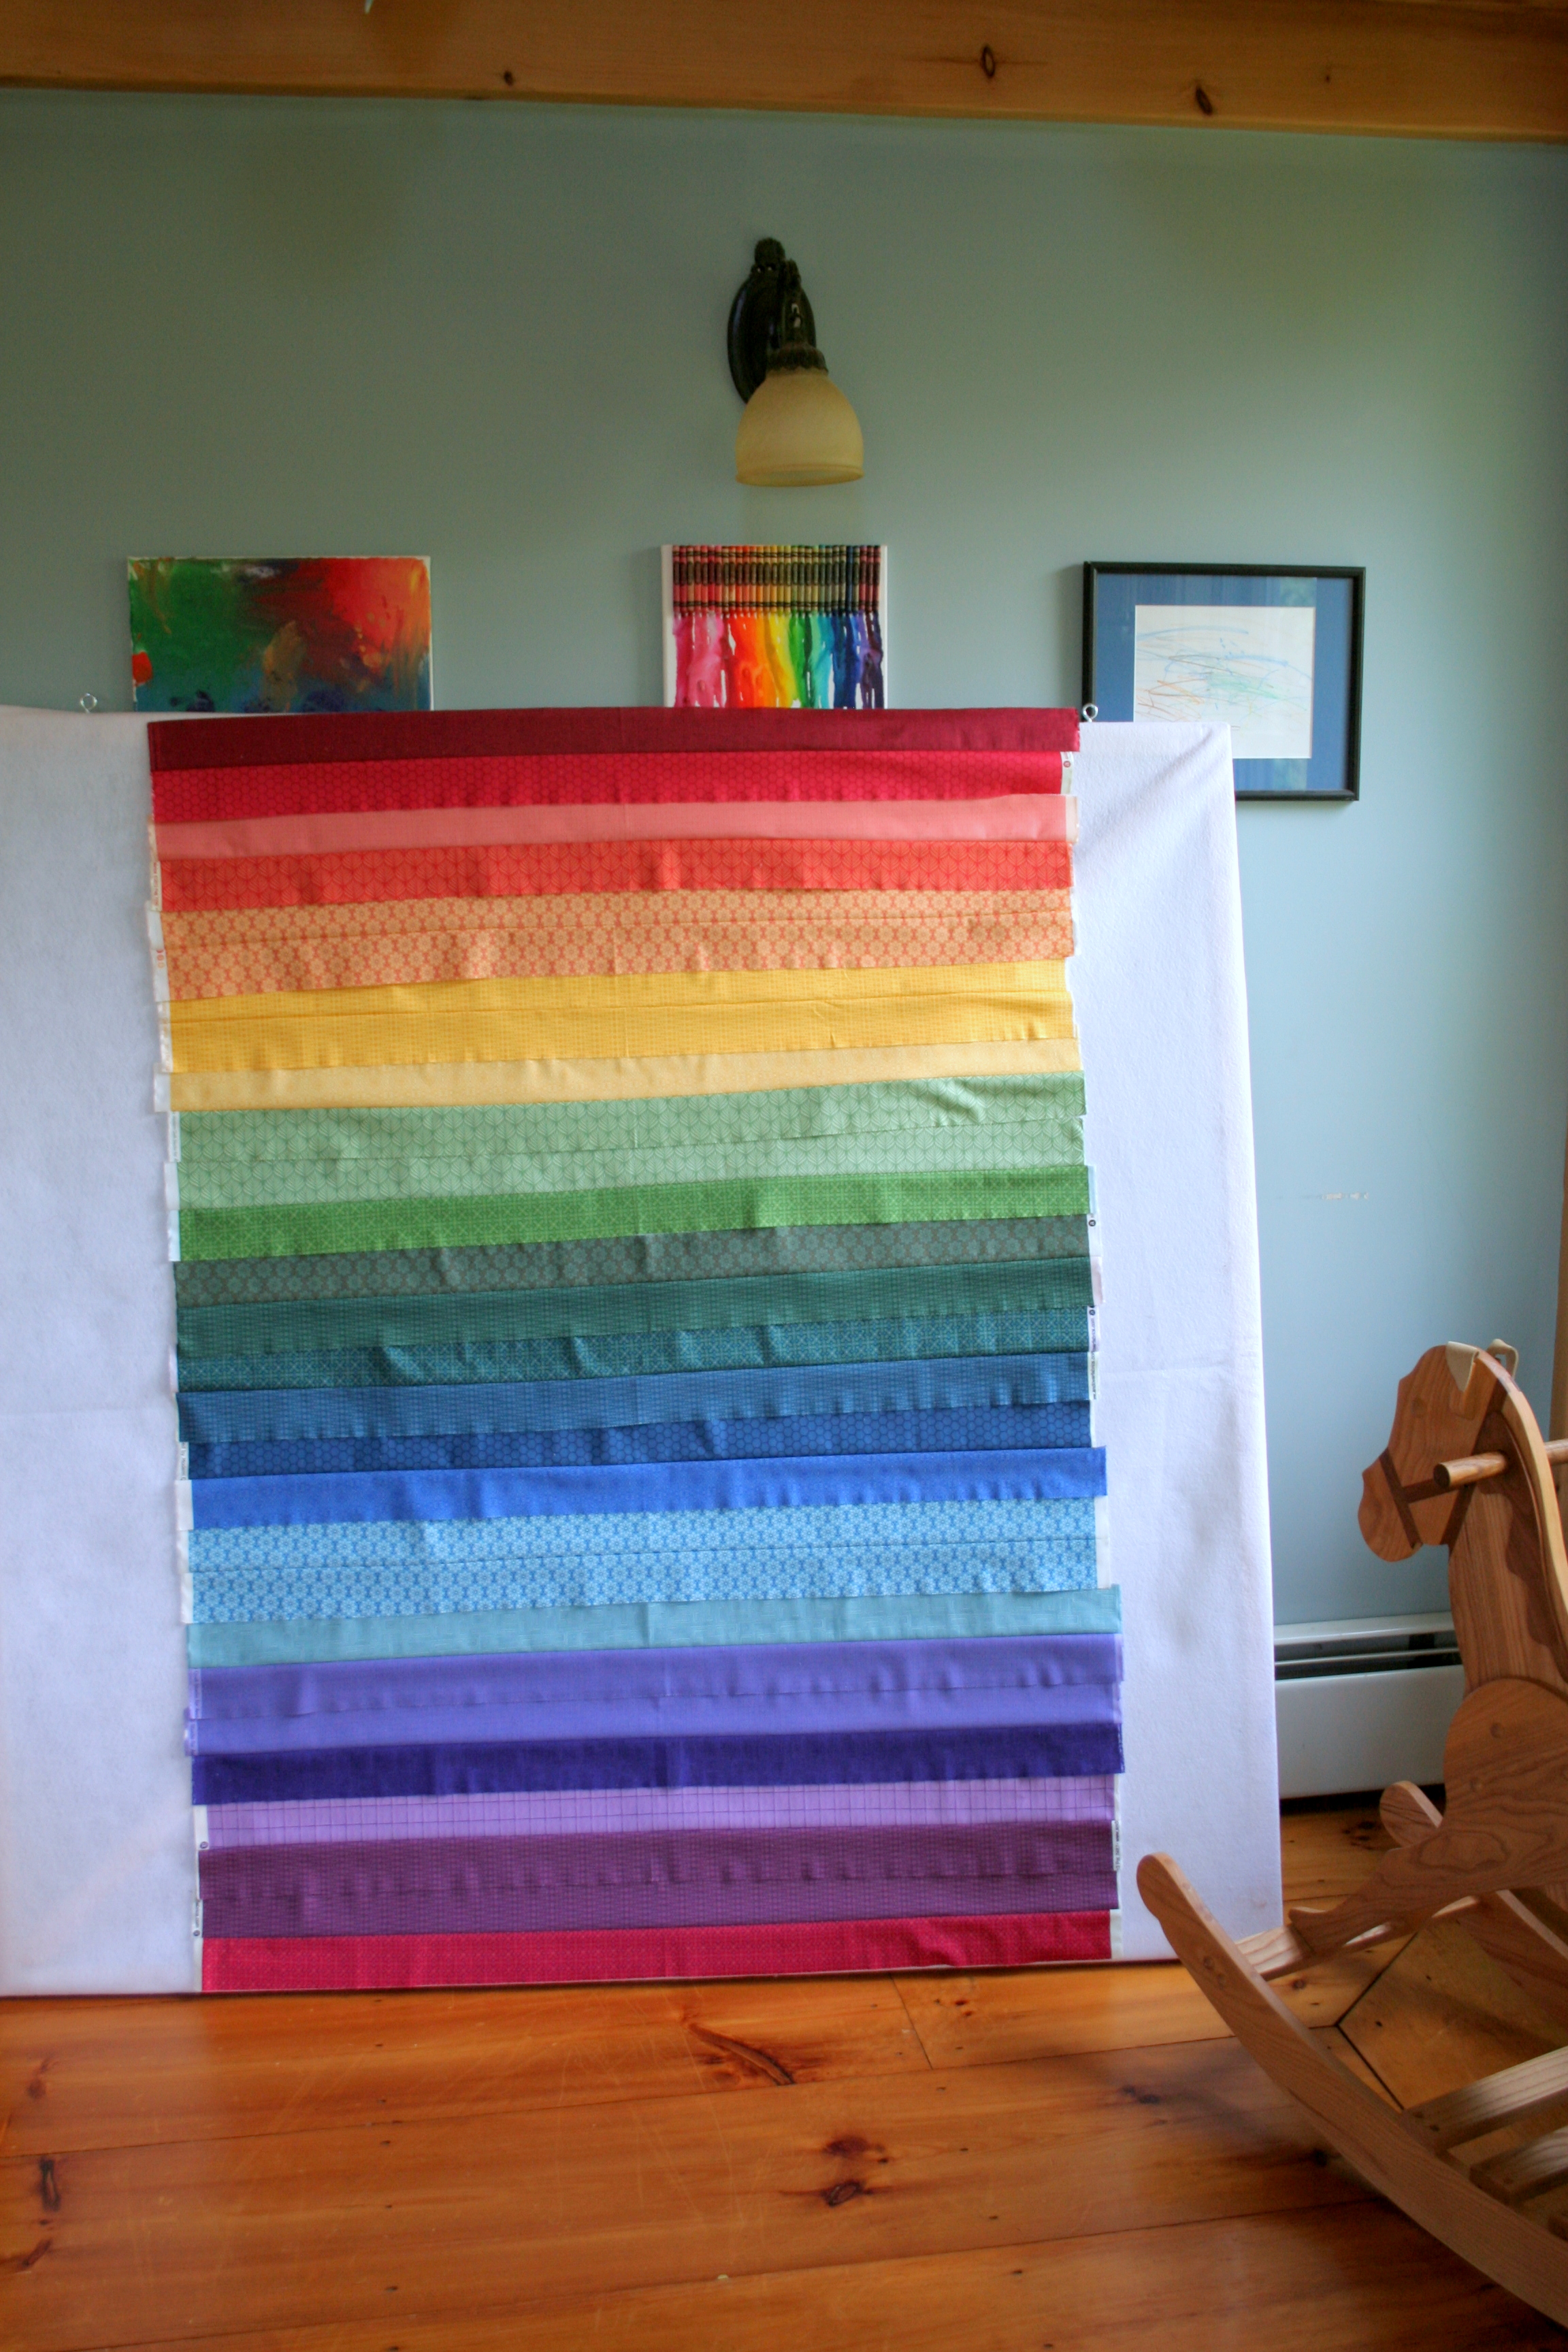
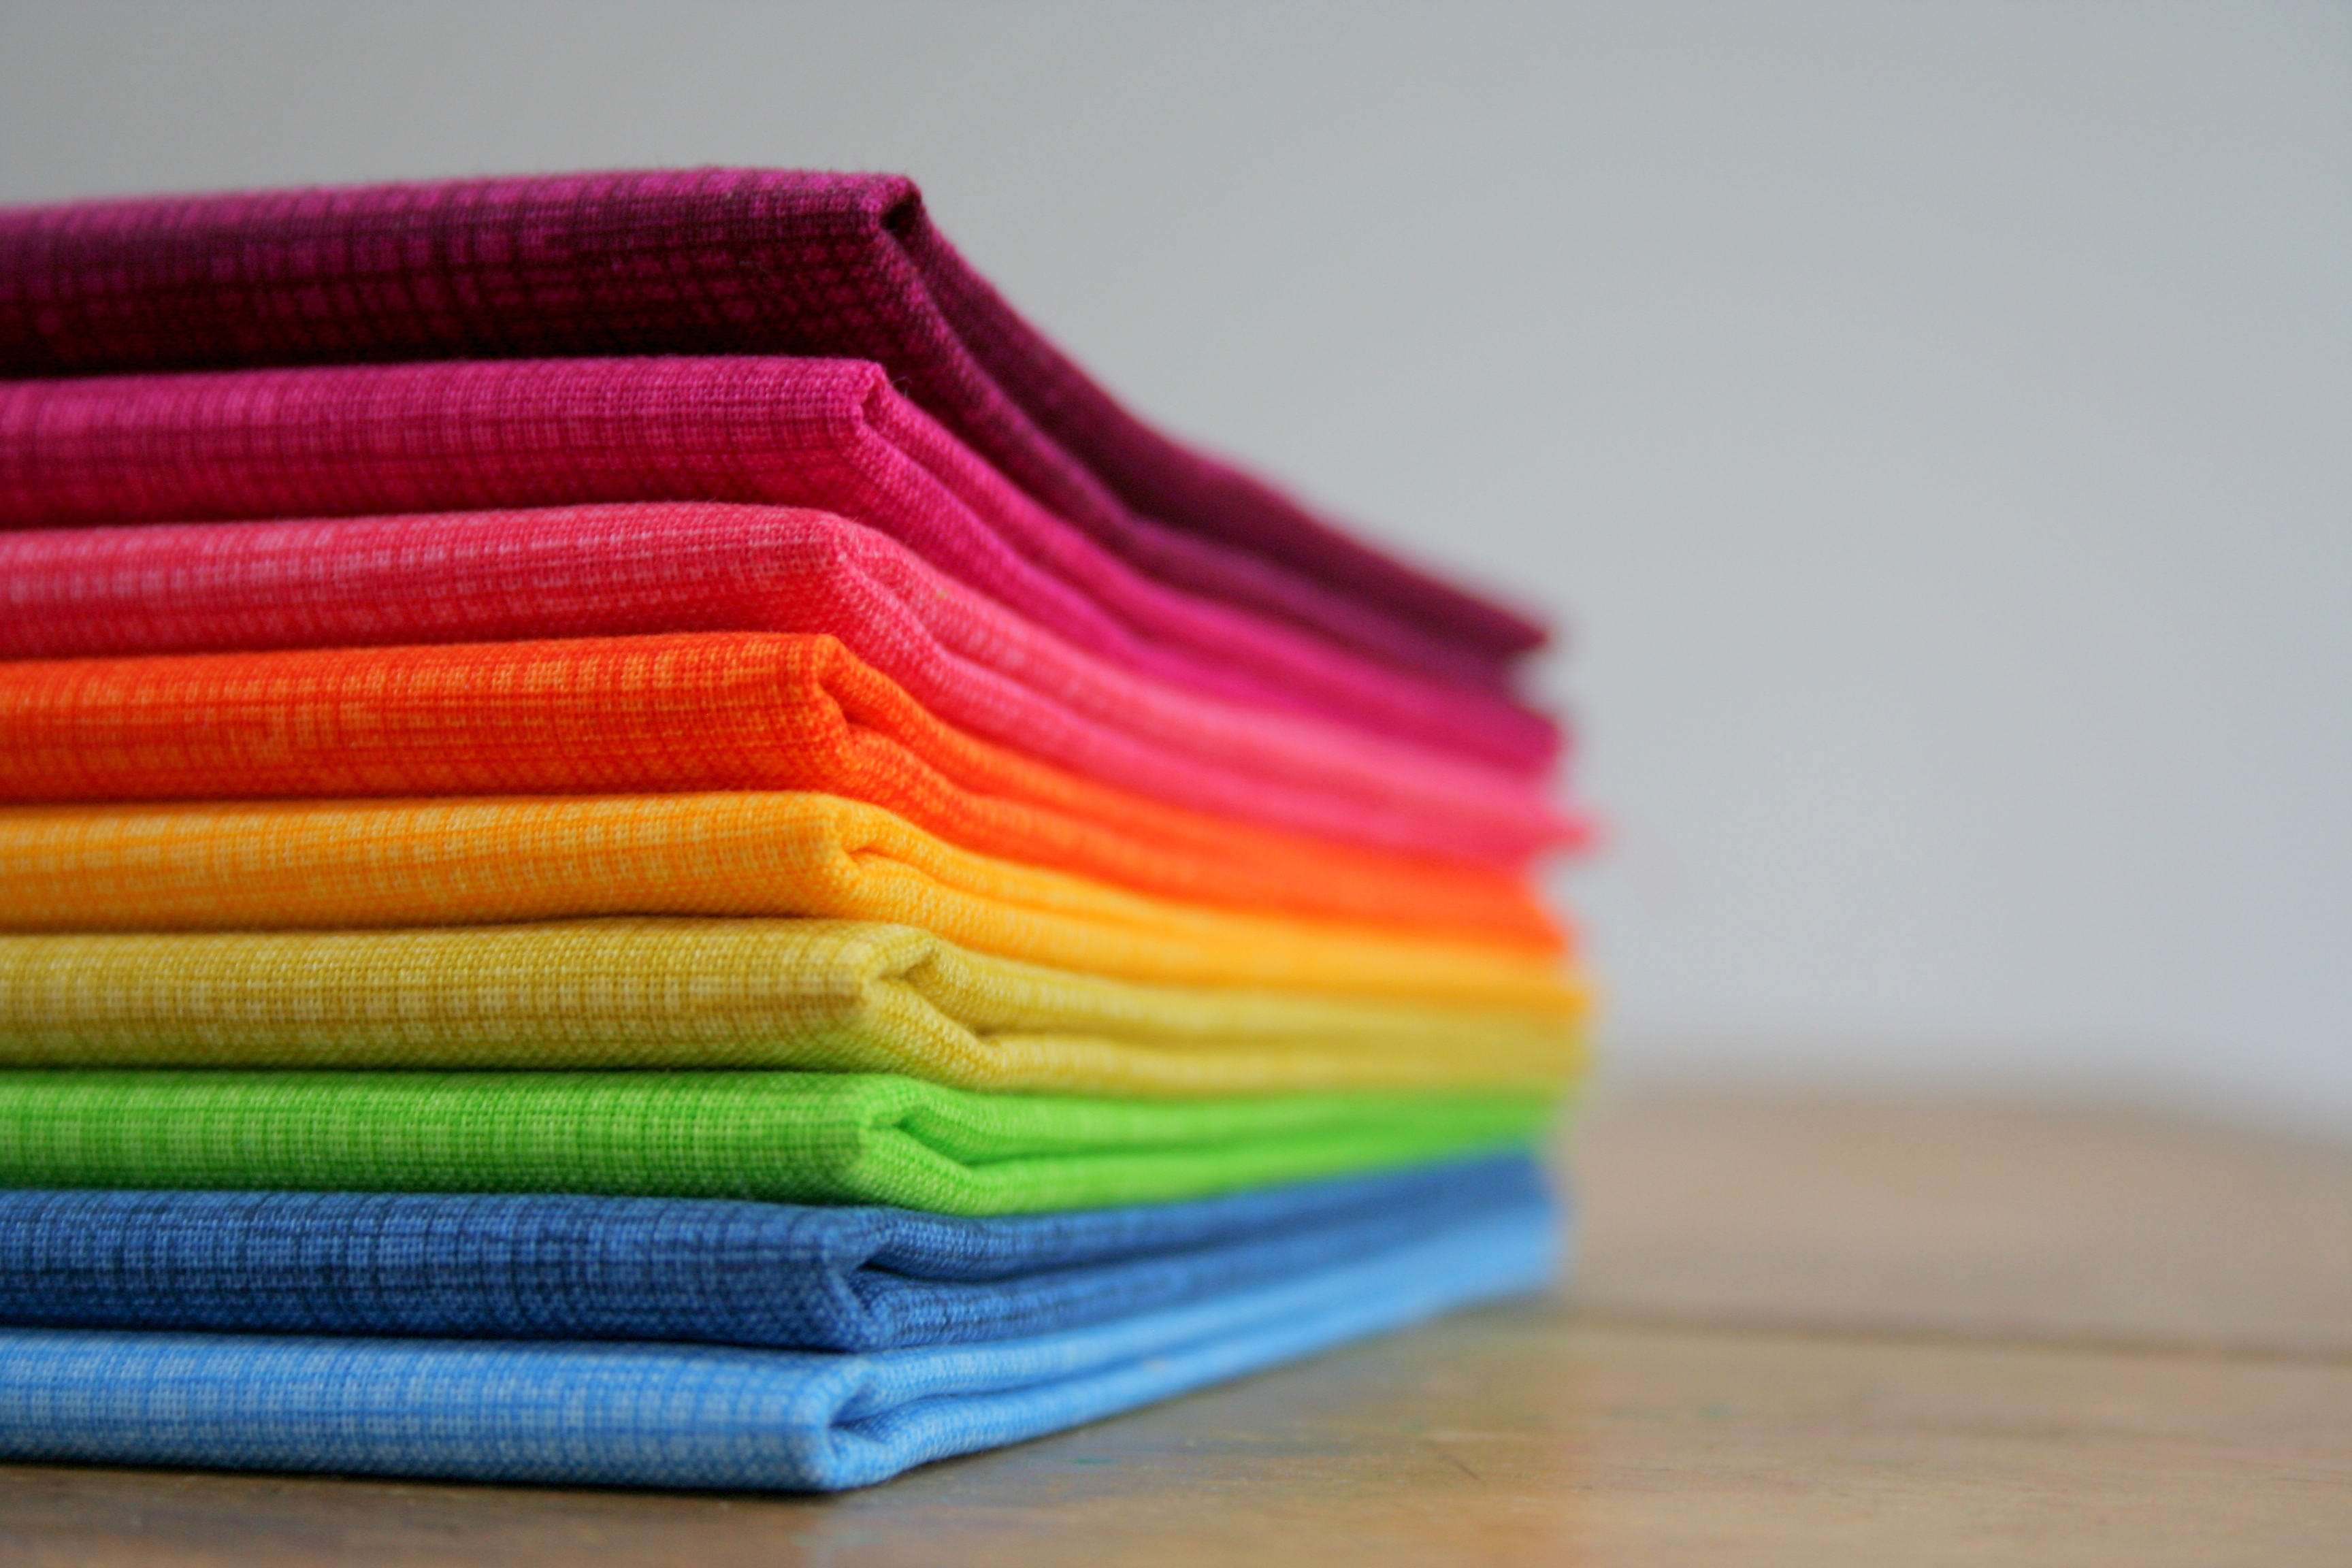
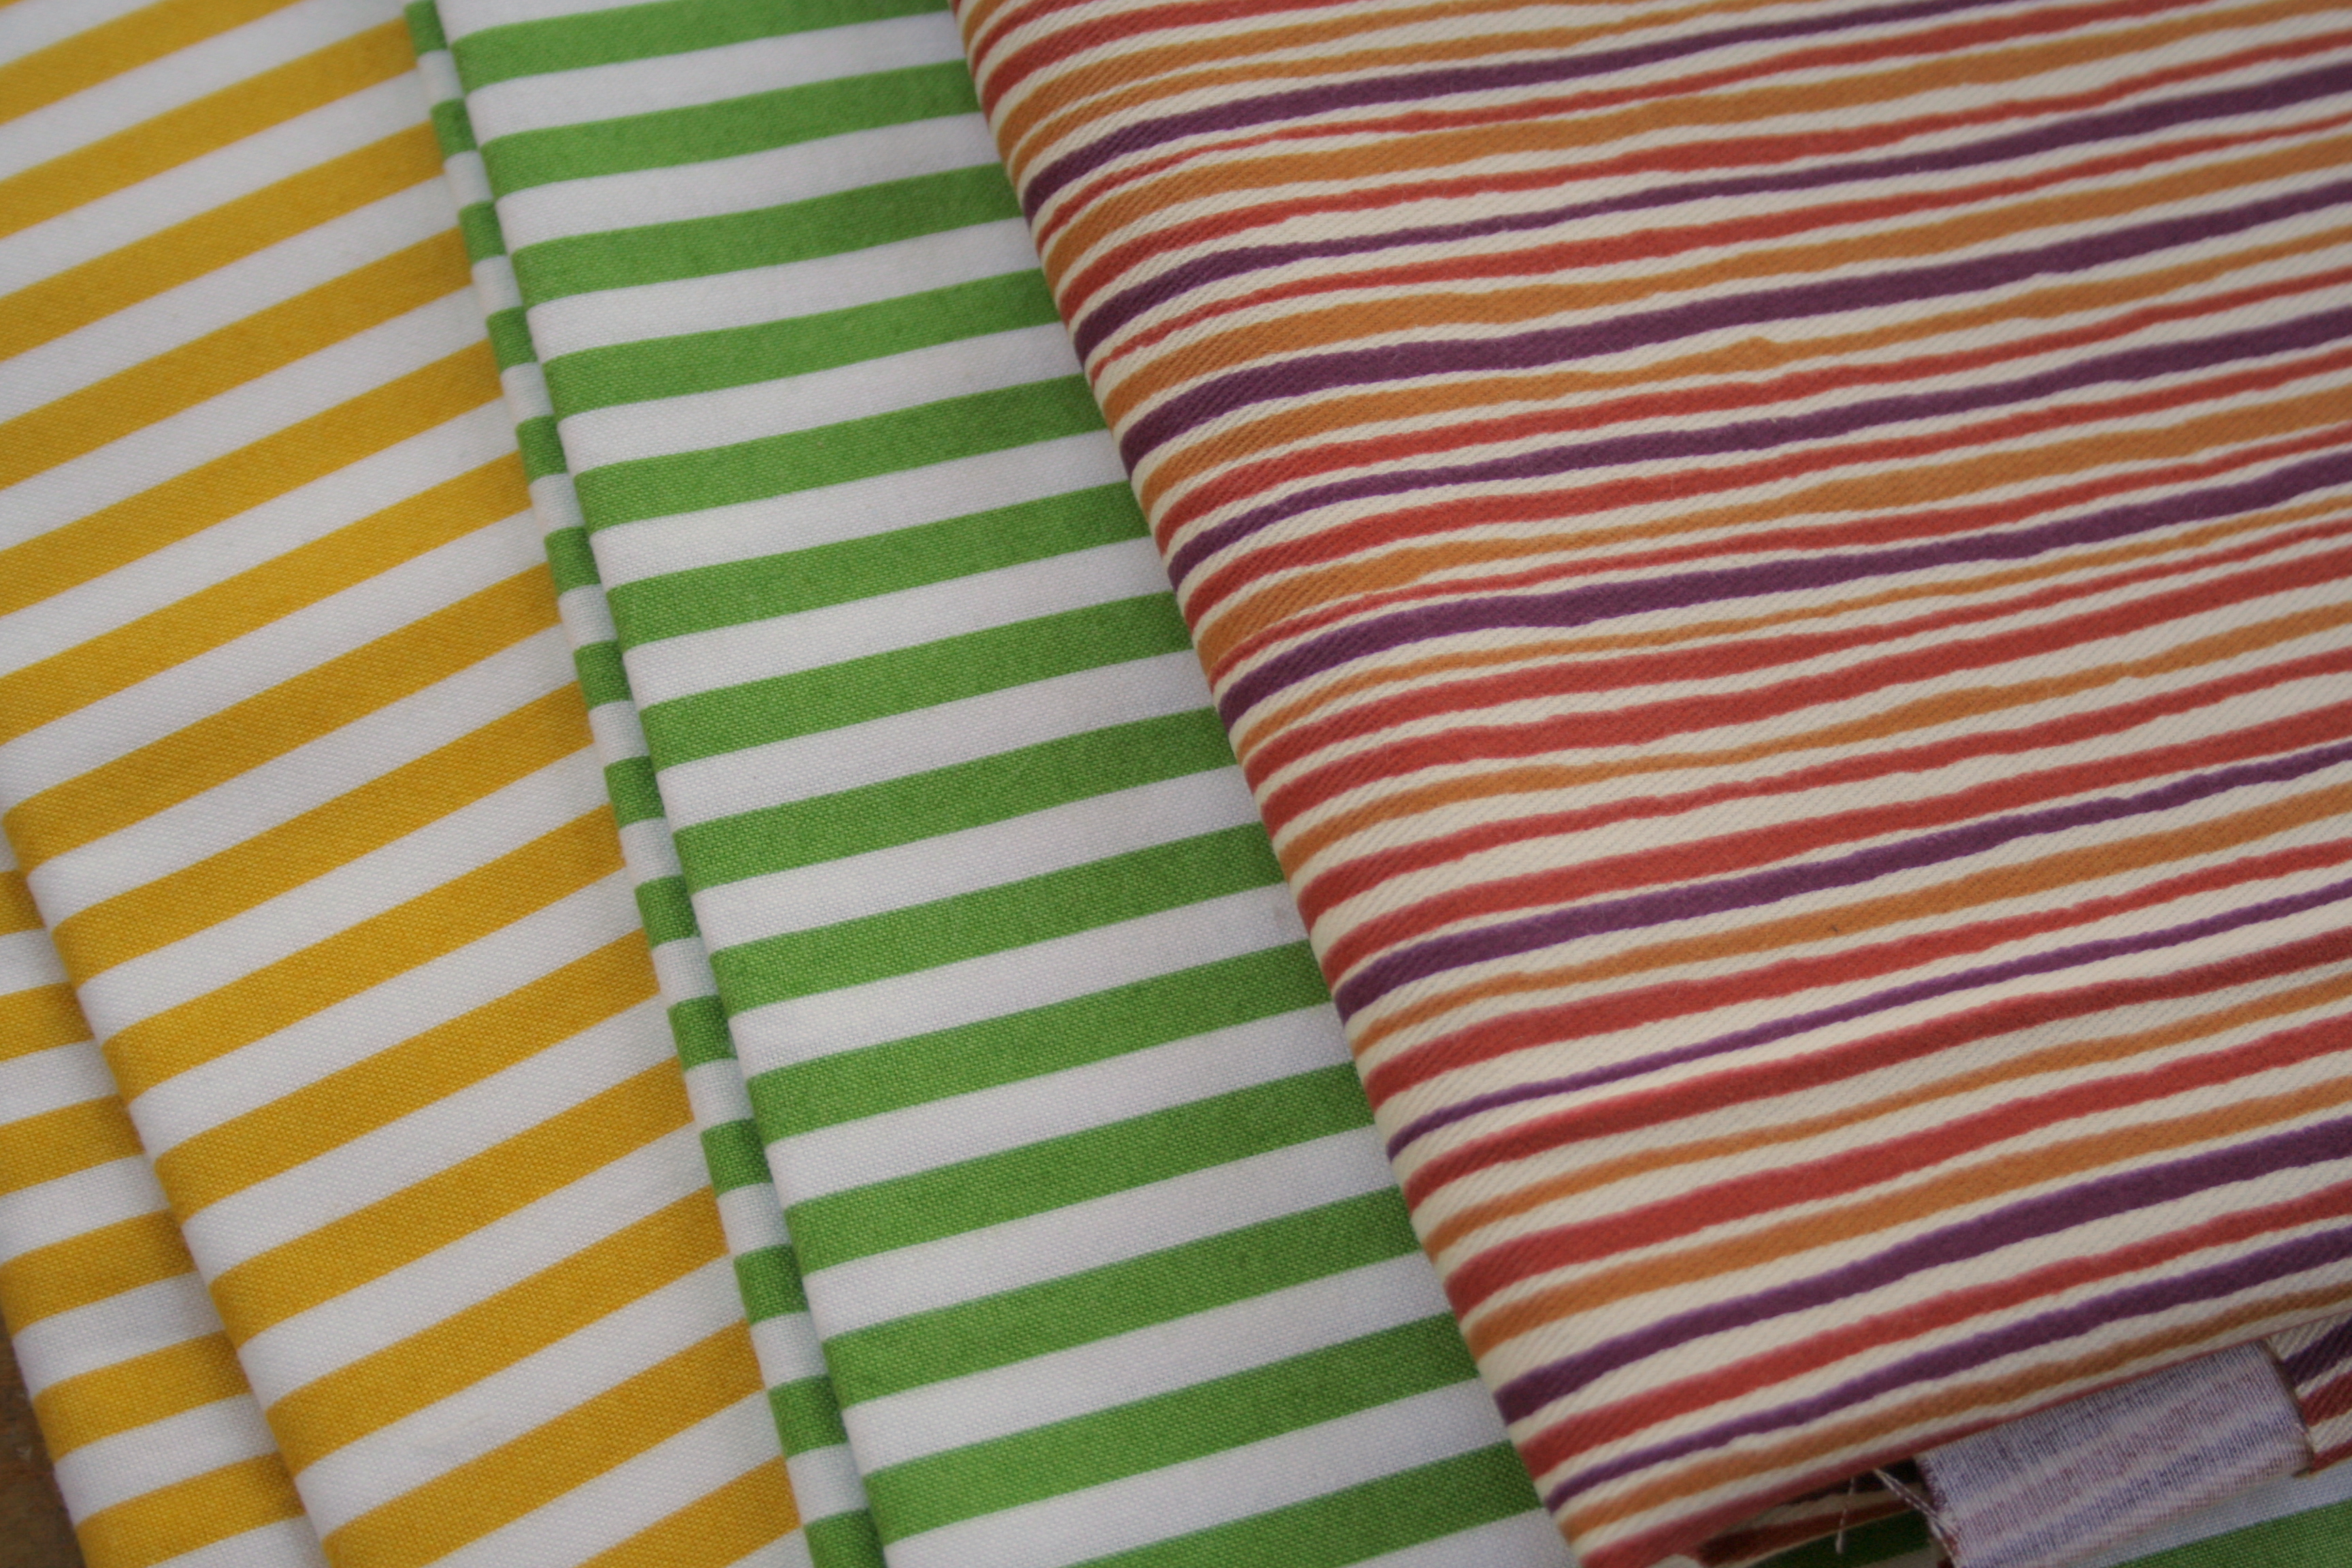
My design wall is one huge fail, so I had to lay out the strips while the “wall” was laying flat on the ground, and then slide it up to take photographs as quickly as possible before the pieces all fell to the ground. The bumps bug me, but such is life. Nothing’s perfect, especially not a partially pieced quilt top! A new design wall is creeping its way up my to-do list.
My four-year-old daughter wanted a rainbow quilt, and while searching for ideas, I came across this gorgeous quilt on Creativebug.
I had never created a quilt using jellyrolls before, but only a couple of days after seeing this quilt, the deal of the day on Missouri Star Quilt Company’s site was the Andover Fabrics Color Collection Jellyroll. Sweet! Needless to say, I bought the jellyroll and added another work in progress to my list.
Today during my two-year-old’s nap, I finished sewing the strips into pairs. I’m hoping I’ll be able to finish sewing all of the paired strips together soon and will have a completed quilt top within a week or two. Next I will have to decide whether to keep it simple and finish it, or to add a border or edging to the quilt. Because it’s for my four-year-old, I’m leaning toward finishing it simply and letting it be small enough for her to drag around with her. What would you do?
I’ll leave you with some fun photographs from my playroom photo shoot today.
The past few months I have been getting to know a great group of new quilting bloggers, making new friends, fine tuning my blog, and learning a ton about quilting and blogging, as part of the 2014 New Quilt Blogger Blog Hop organized by Beth at Plum and June. Today it’s my day to tell you a bit about myself and my journey into quilting.
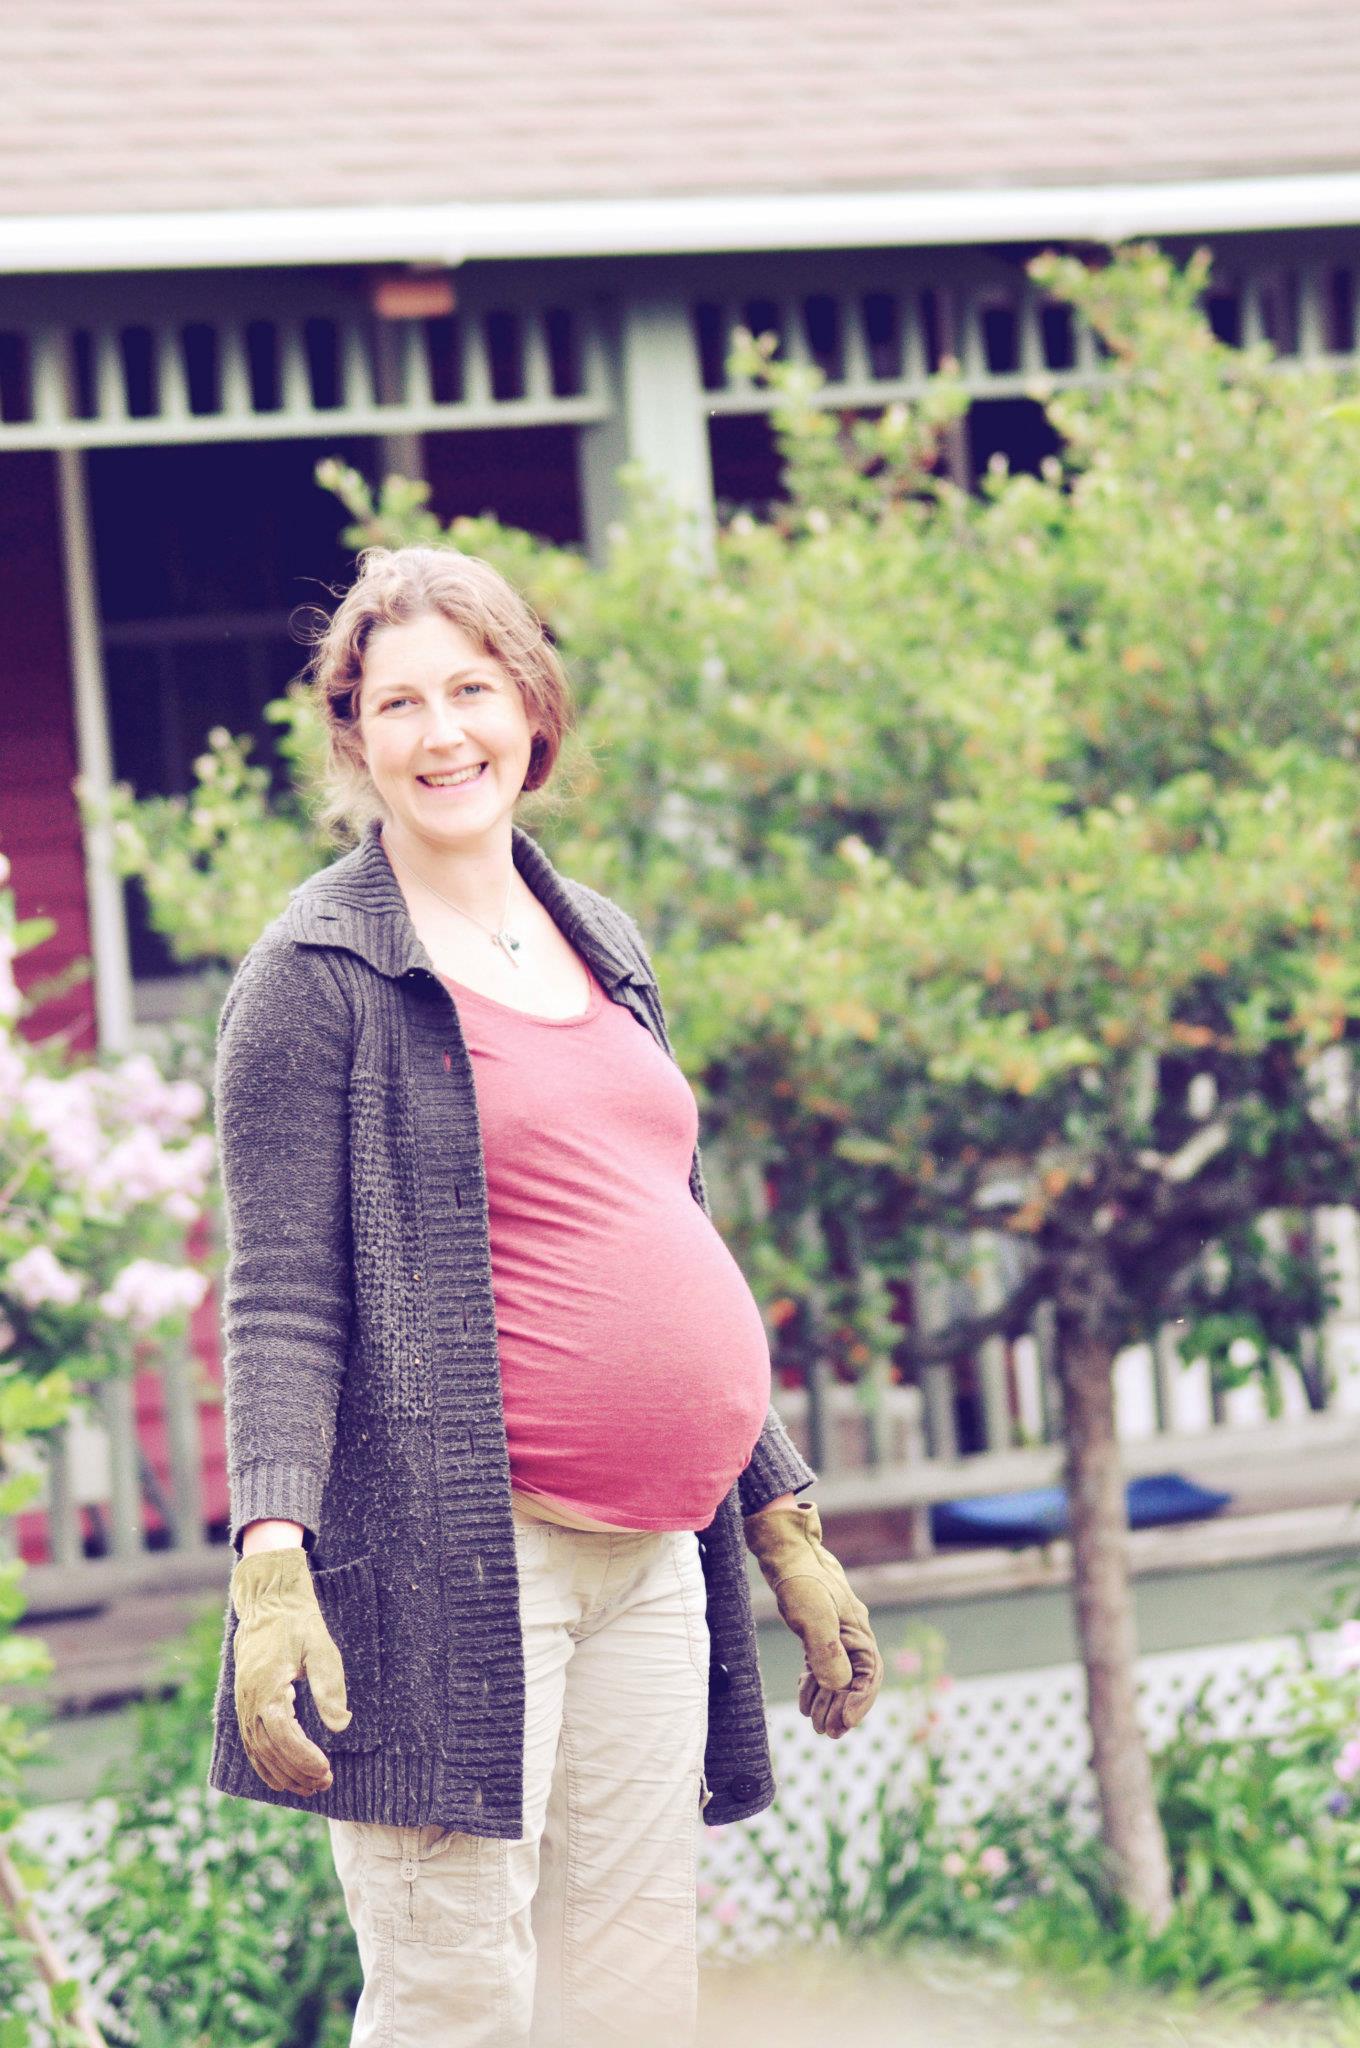
What defines me? mother, gardener, crafter. If there were a quilt hanging somewhere in this picture, this would be quintessential me. (Photo by Brittany White Photography)
Tell us a little about yourself.
When I think about what defines me, “mom” is the absolute first word that arises. I’m a full time mom of two little ones, and to say my life is filled with that blessed duty is an understatement. I also have a degree in environmental science and a master’s degree in elementary education. I’ve worked as a lifeguard, an environmental scientist–wetland and land use specialist, an elementary school teacher, and a yoga teacher. I grew up in New Jersey, but now live in rural Maine and love it. I also love to garden to grow my own organic food, enjoy nature, practice yoga, and of course craft! I have always been crafty, and have dabbled in card making, scrap-booking, jewelry making, mosaic, polymer clay, painting, and more, but only recently found the fiber arts. Now my crafts of choice are quilting and knitting.
There are a few catalysts that propelled me toward quilting, from my lifelong sewist mother, a gift of a simple squares quilt gifted by my talented cousin Hannah, and of course my expert quilter grammy. Shortly after having my son, when I had a gift-quilt only half finished, I discovered that sewing 20 minutes at a time could result in finished projects. This was a revelation for me, and thus began the Night Quilter: I grab a needle and thread when the kids are in bed.
Show us some of your favorite finished quilts.
Click on the name of each quilt to visit its relevant blog post (when there is one). If there is more than one relevant blog post, I will link them all at the end.
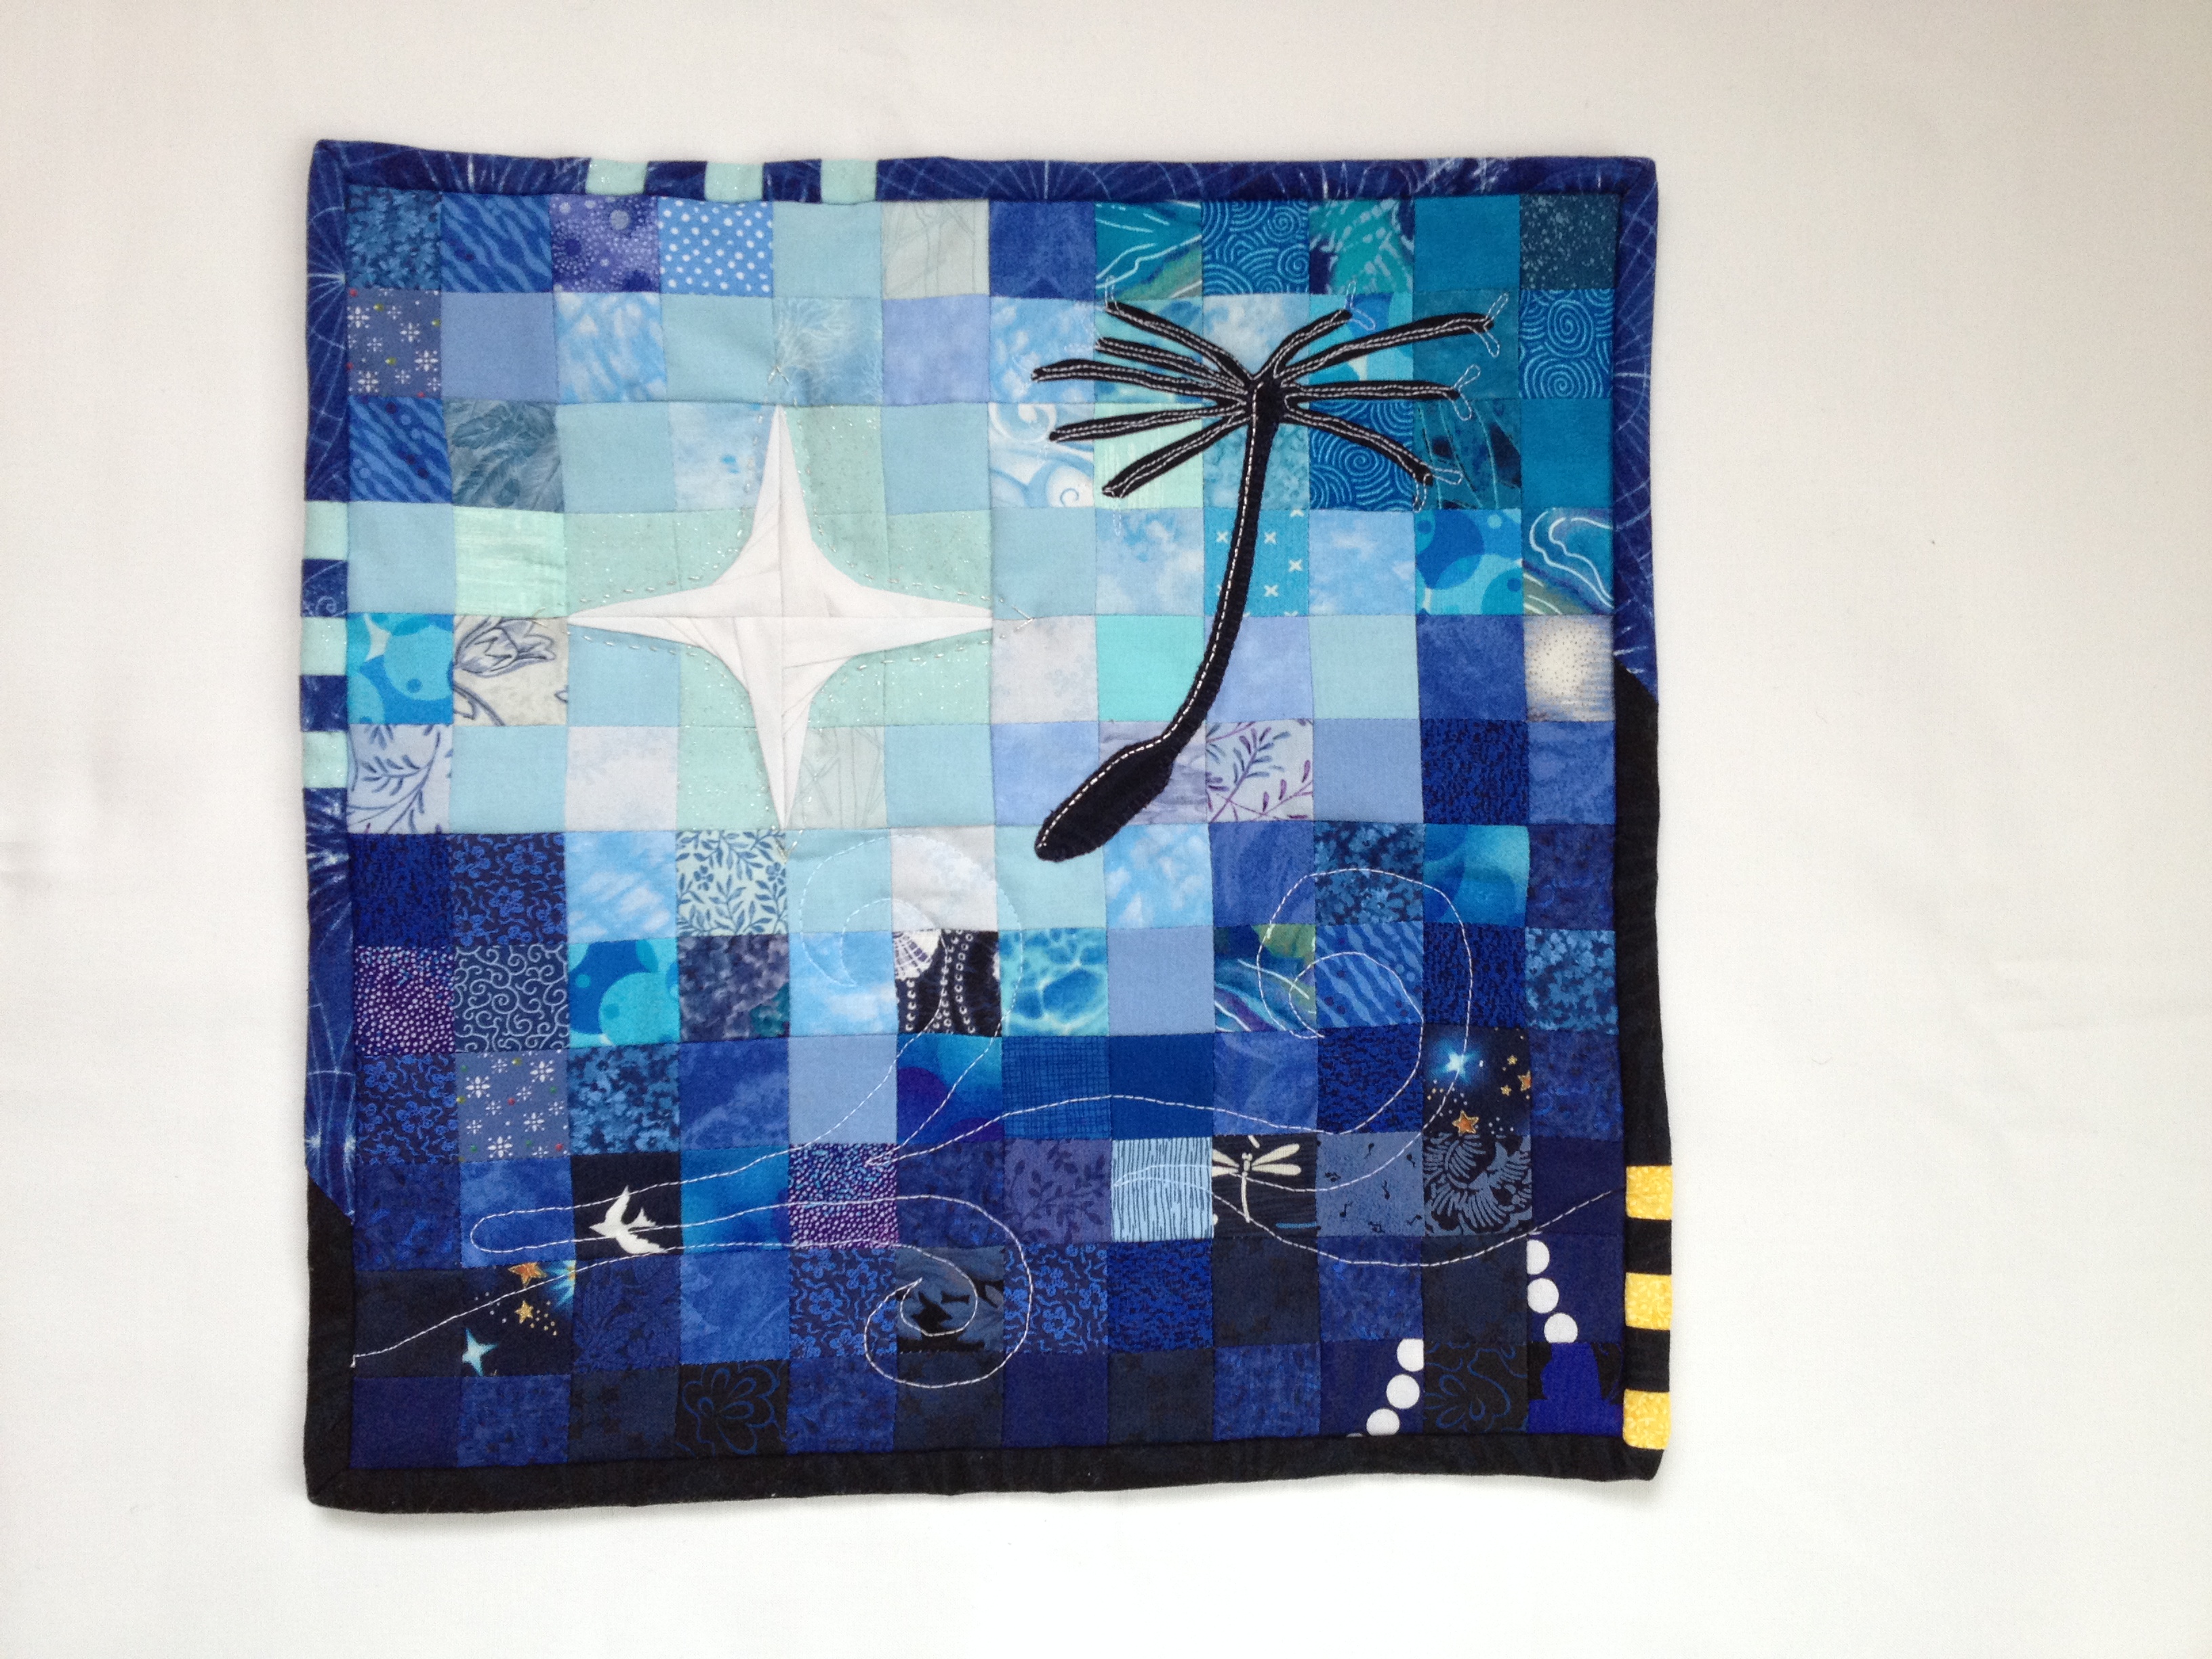
Delight in the Little Thingsis a 12×12″ art quilt I made as a donation for a local Art Auction to benefit a couple faced with an expensive illness. It was inspired by a Facebook group called 12x12s with Cosmo and Cook, where a word is given each month and the goal is to create a 12×12″ art quilt inspired by that word. The word for December, my first month involved, was “Delight”. “Delight in the little things” immediately came to mind, and so I figured I’d make my art quilt out of 1″ squares (little!), featuring a tiny paper pieced sunburst star and a dandelion seed applique. I love the outcome, especially the yellow bits in the binding. For this quilt, it was my first time creating an art quilt, my first time making anything out of 1″ squares, I designed my first paper piecing pattern for the star, and it was one of my first times free motion quilting.
Rainbow Hugs & Kisses is the result of a test run of a paper piecing pattern called Oops, I Scrapped My Pants by ShannonMac Designs. I offered to test her pattern for her, but wanted to make something bright and modern. I am all about rainbow gradient, so that was an obvious add. The black and white stripey binding makes this one of my favorites, and it hangs happily on my craft room pegboard. The pattern is free in Shannon’s Craftsy shop, and it includes a tutorial on the freezer paper method of paper piecing, in case you’d like to make your own.
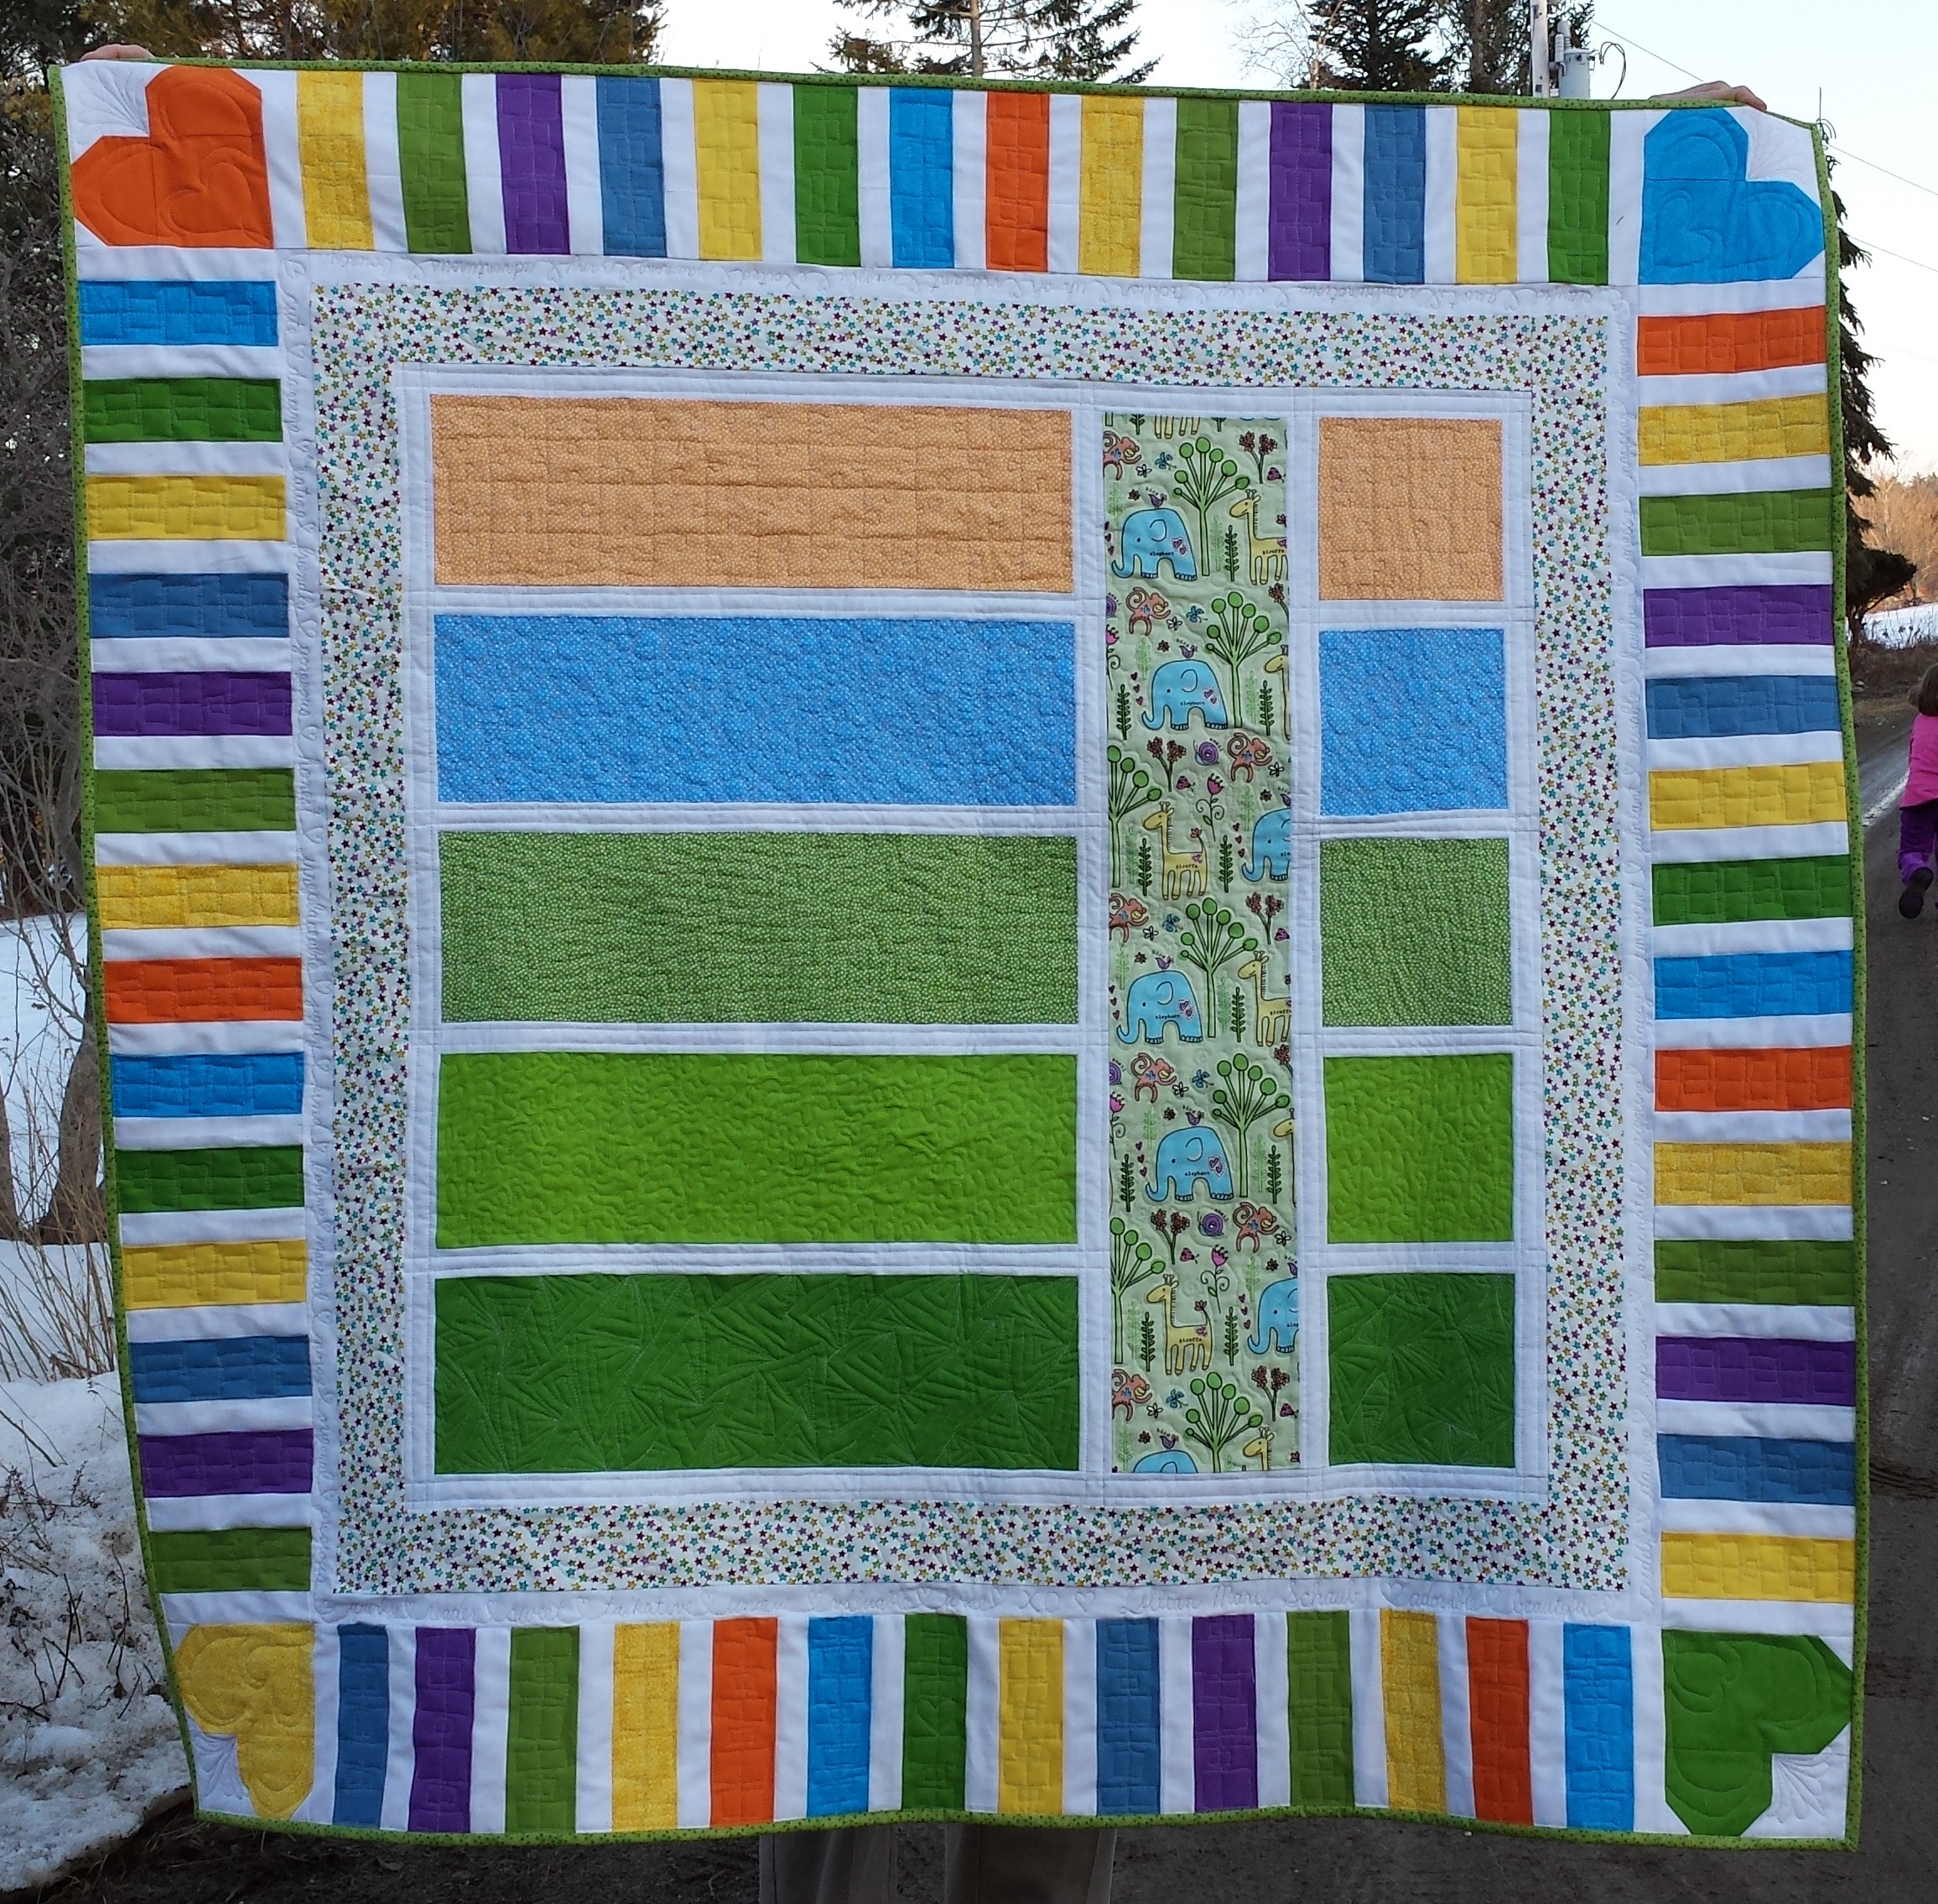
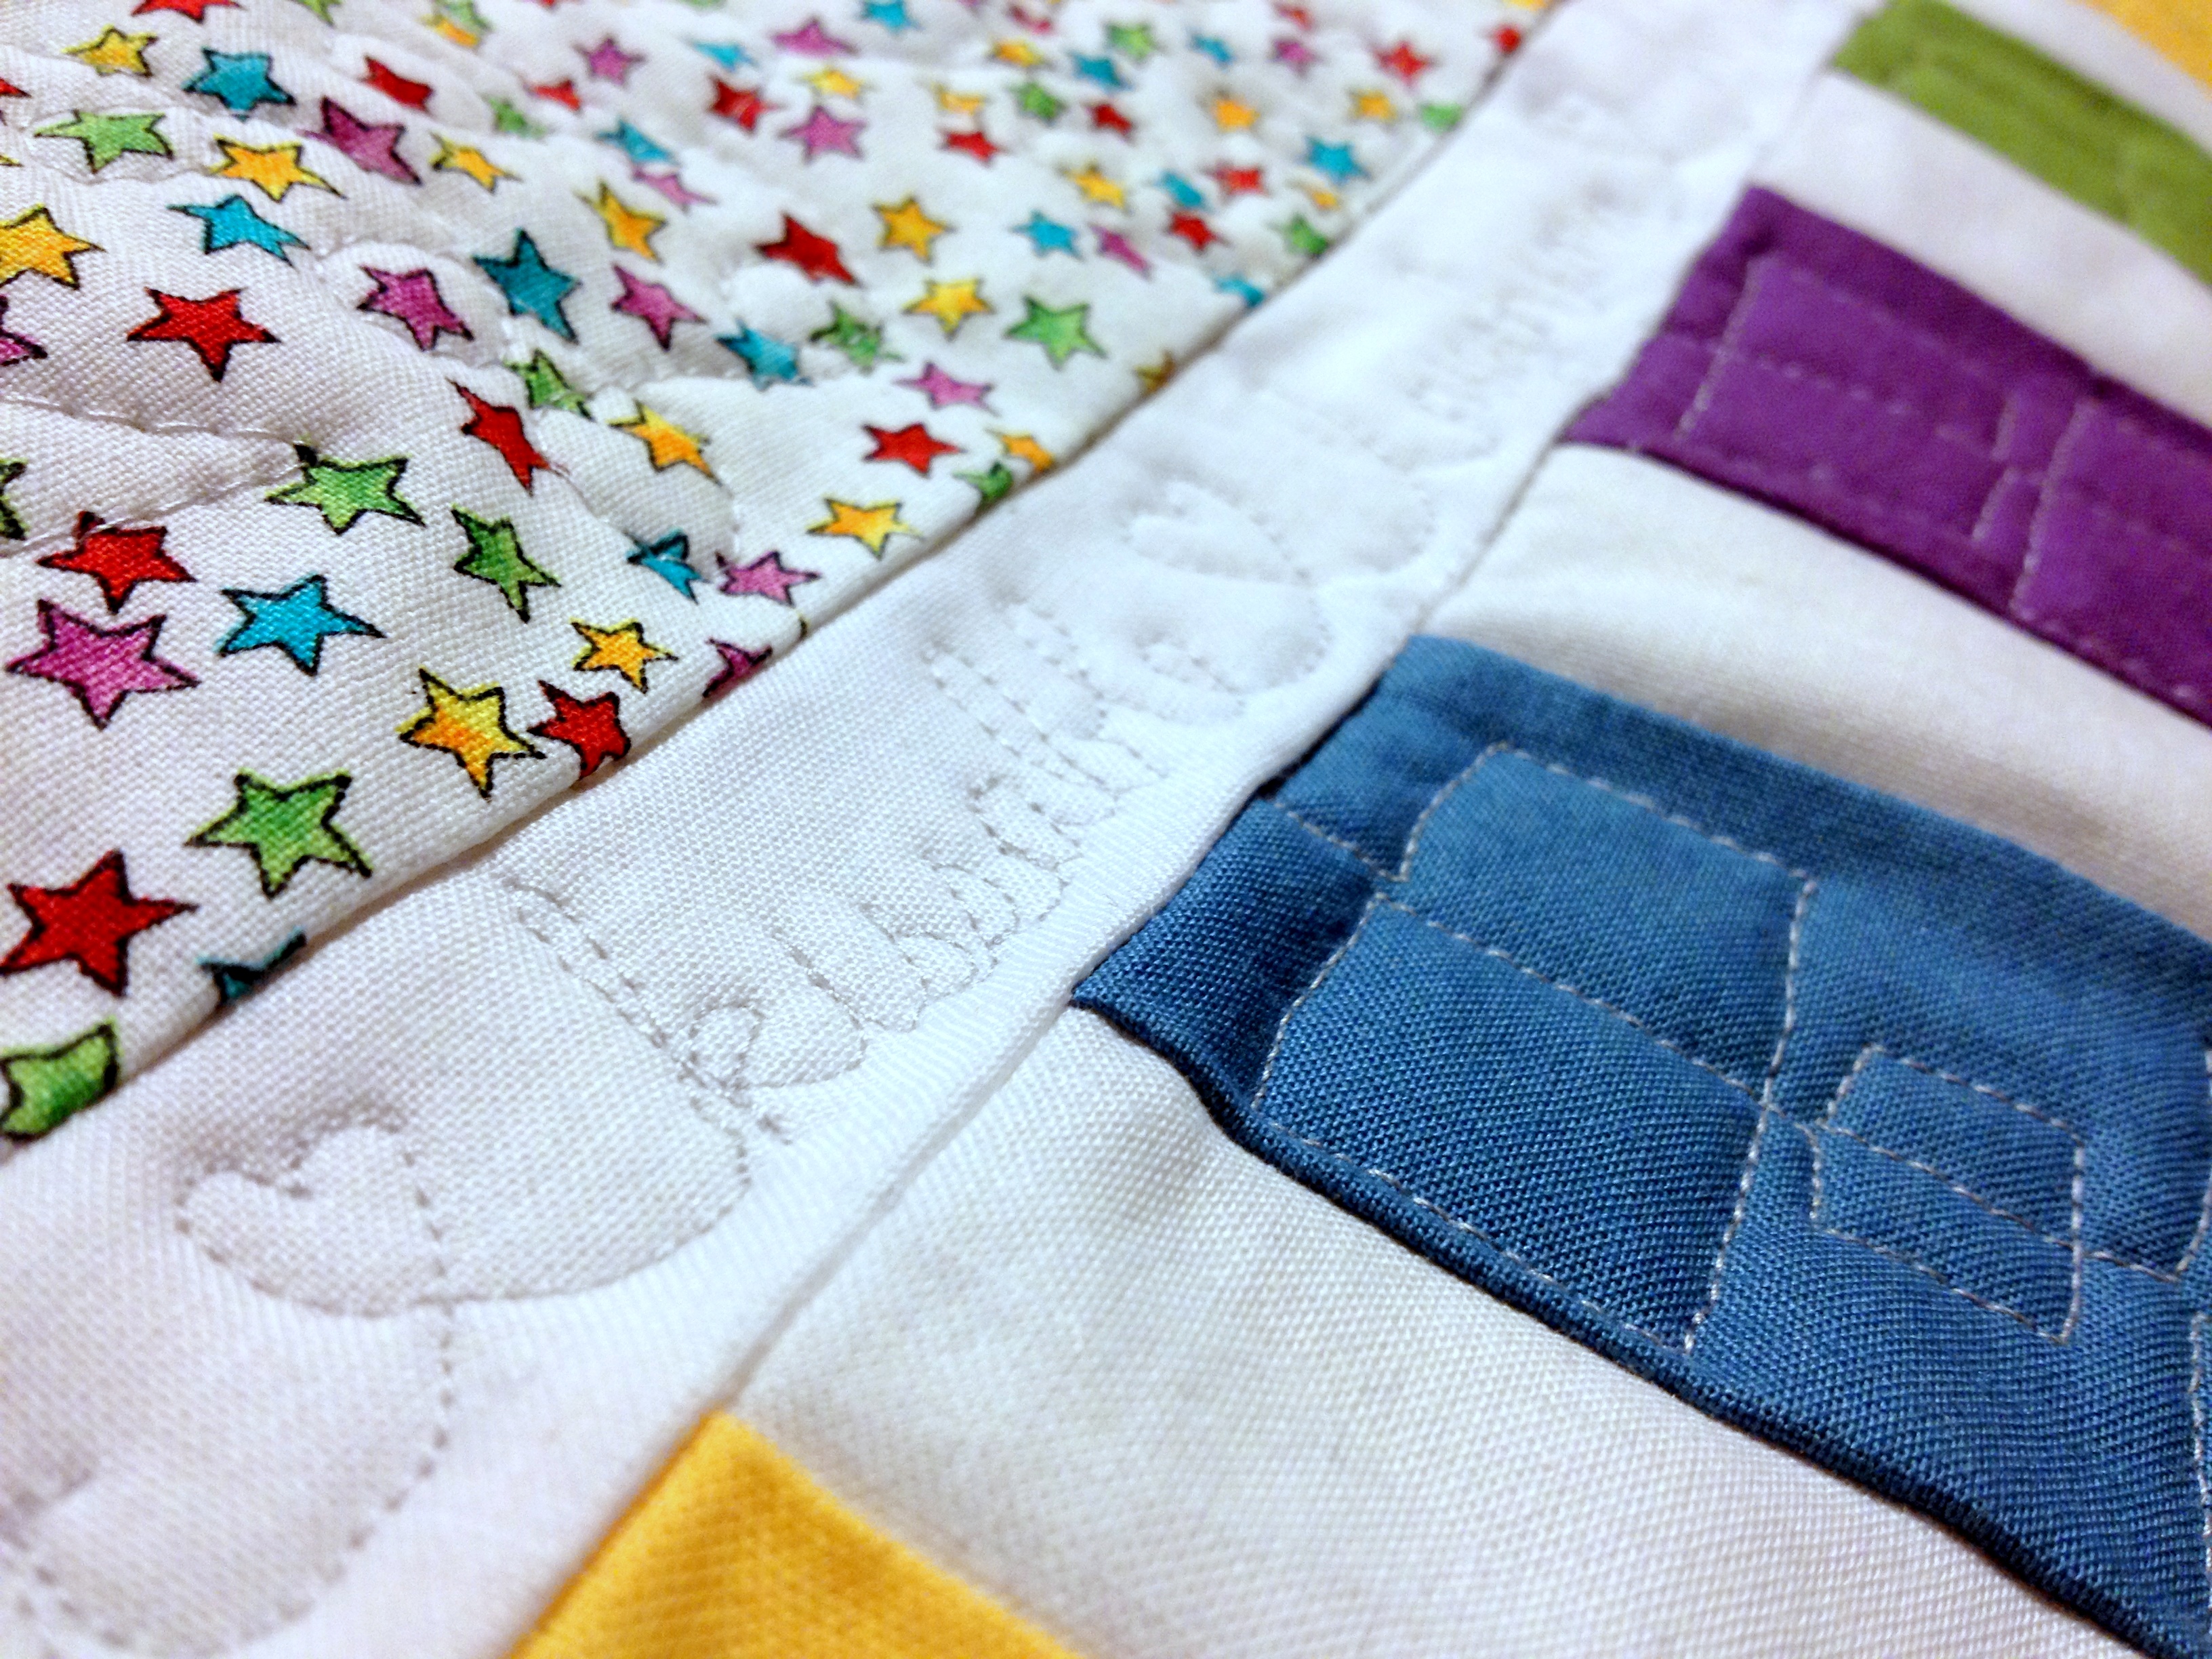
Lillian’s Baby Quilt is one of the quilts of which I’m most proud. It’s one of the largest quilts I’ve made so far at about 58×58″, I designed the outermost border including the heart corner stones, and I kind of went crazy free motion quilting it. It was my first large-scale free motion quilting foray and I dove in head first. I even FMQed alphabetical baby-related words around the outermost white border.
There are many blog posts outlining my process and featuring better photographs of the free motion quilting, here, here, here, and here.
I’ve also been designing paper piecing patterns. I tend to gravitate toward more modern quilts, yet I also love paper piecing. Go figure. Here are some of my latest paper piecing patterns:
Lupine 10×10″ paper piecing patternCircling Gulls 12×12″ paper piecing pattern
What are you up to now?
I’m making a quilt for myself!
I’ve teamed up with a couple of new-found quilting soul sisters to start a new Facebook Group called Late Night Quilters Club, where we share projects, tips, inspiration, and support. We also just kicked off a Tuesday Stash Swap which has been a smashing success.
I’ve also found a way to bring my love of nature into my blog and the quilting world by using Play Crafts’ Palette Builder 2.1 to create color palettes from my photographs, posted every Thursday.
Finally, I’ve posted my very first tutorial on Basic Foundation Paper Piecing. I’m working on a series to outline what next–now that you’ve made a paper pieced block, what can you do with it? Stay tuned!
To finish off my post, here are some tips and fun facts:
Blogging tip: Take great photographs. The aesthetic pull of an artistically arranged and naturally lit photo is STRONG. Learn to use the manual setting on your camera (try P) and wait for the right lighting. It makes a world of difference!
Quilting tip: Pressing seams open helps improve accuracy of piecing, and helps make matching seams a breeze. Also, when trying to match seams, pin right after the seam. This creates the least torque and at least in my experience, the most consistently matched seams.
Question for you: Who is your favorite fabric or quilt designer, and why? I have my top favorites, but I’d love to expand and see whose fabric you just can’t live without!
Fun facts: Dream vacation spot: Galapagos Islands Favorite book: tough question! My Side of the Mountain, 1984, or The Housekeeper and the Professor Favorite movie: Overboard, or Pride and Prejudice, the Colin Firth version Favorite TV show: I don’t have a TV, but I’ve been sucked into Downton Abbey on Netflix! Random bits:
After each blog post or email I write, I go back and take out 2/3 of the exclamation points and all of the :). I’m a happy, excited person but even I get annoyed when I read something with a gabillion !!!!!!
I hate olives. I try them every year to see if I like them yet, but I still hate them.
I was a competitive swimmer through high school and college. If you start talking swimming, I’ll talk for hours.
Now that you know more than you ever wished to know about me, go check out these other great bloggers involved in the hop. Have fun!
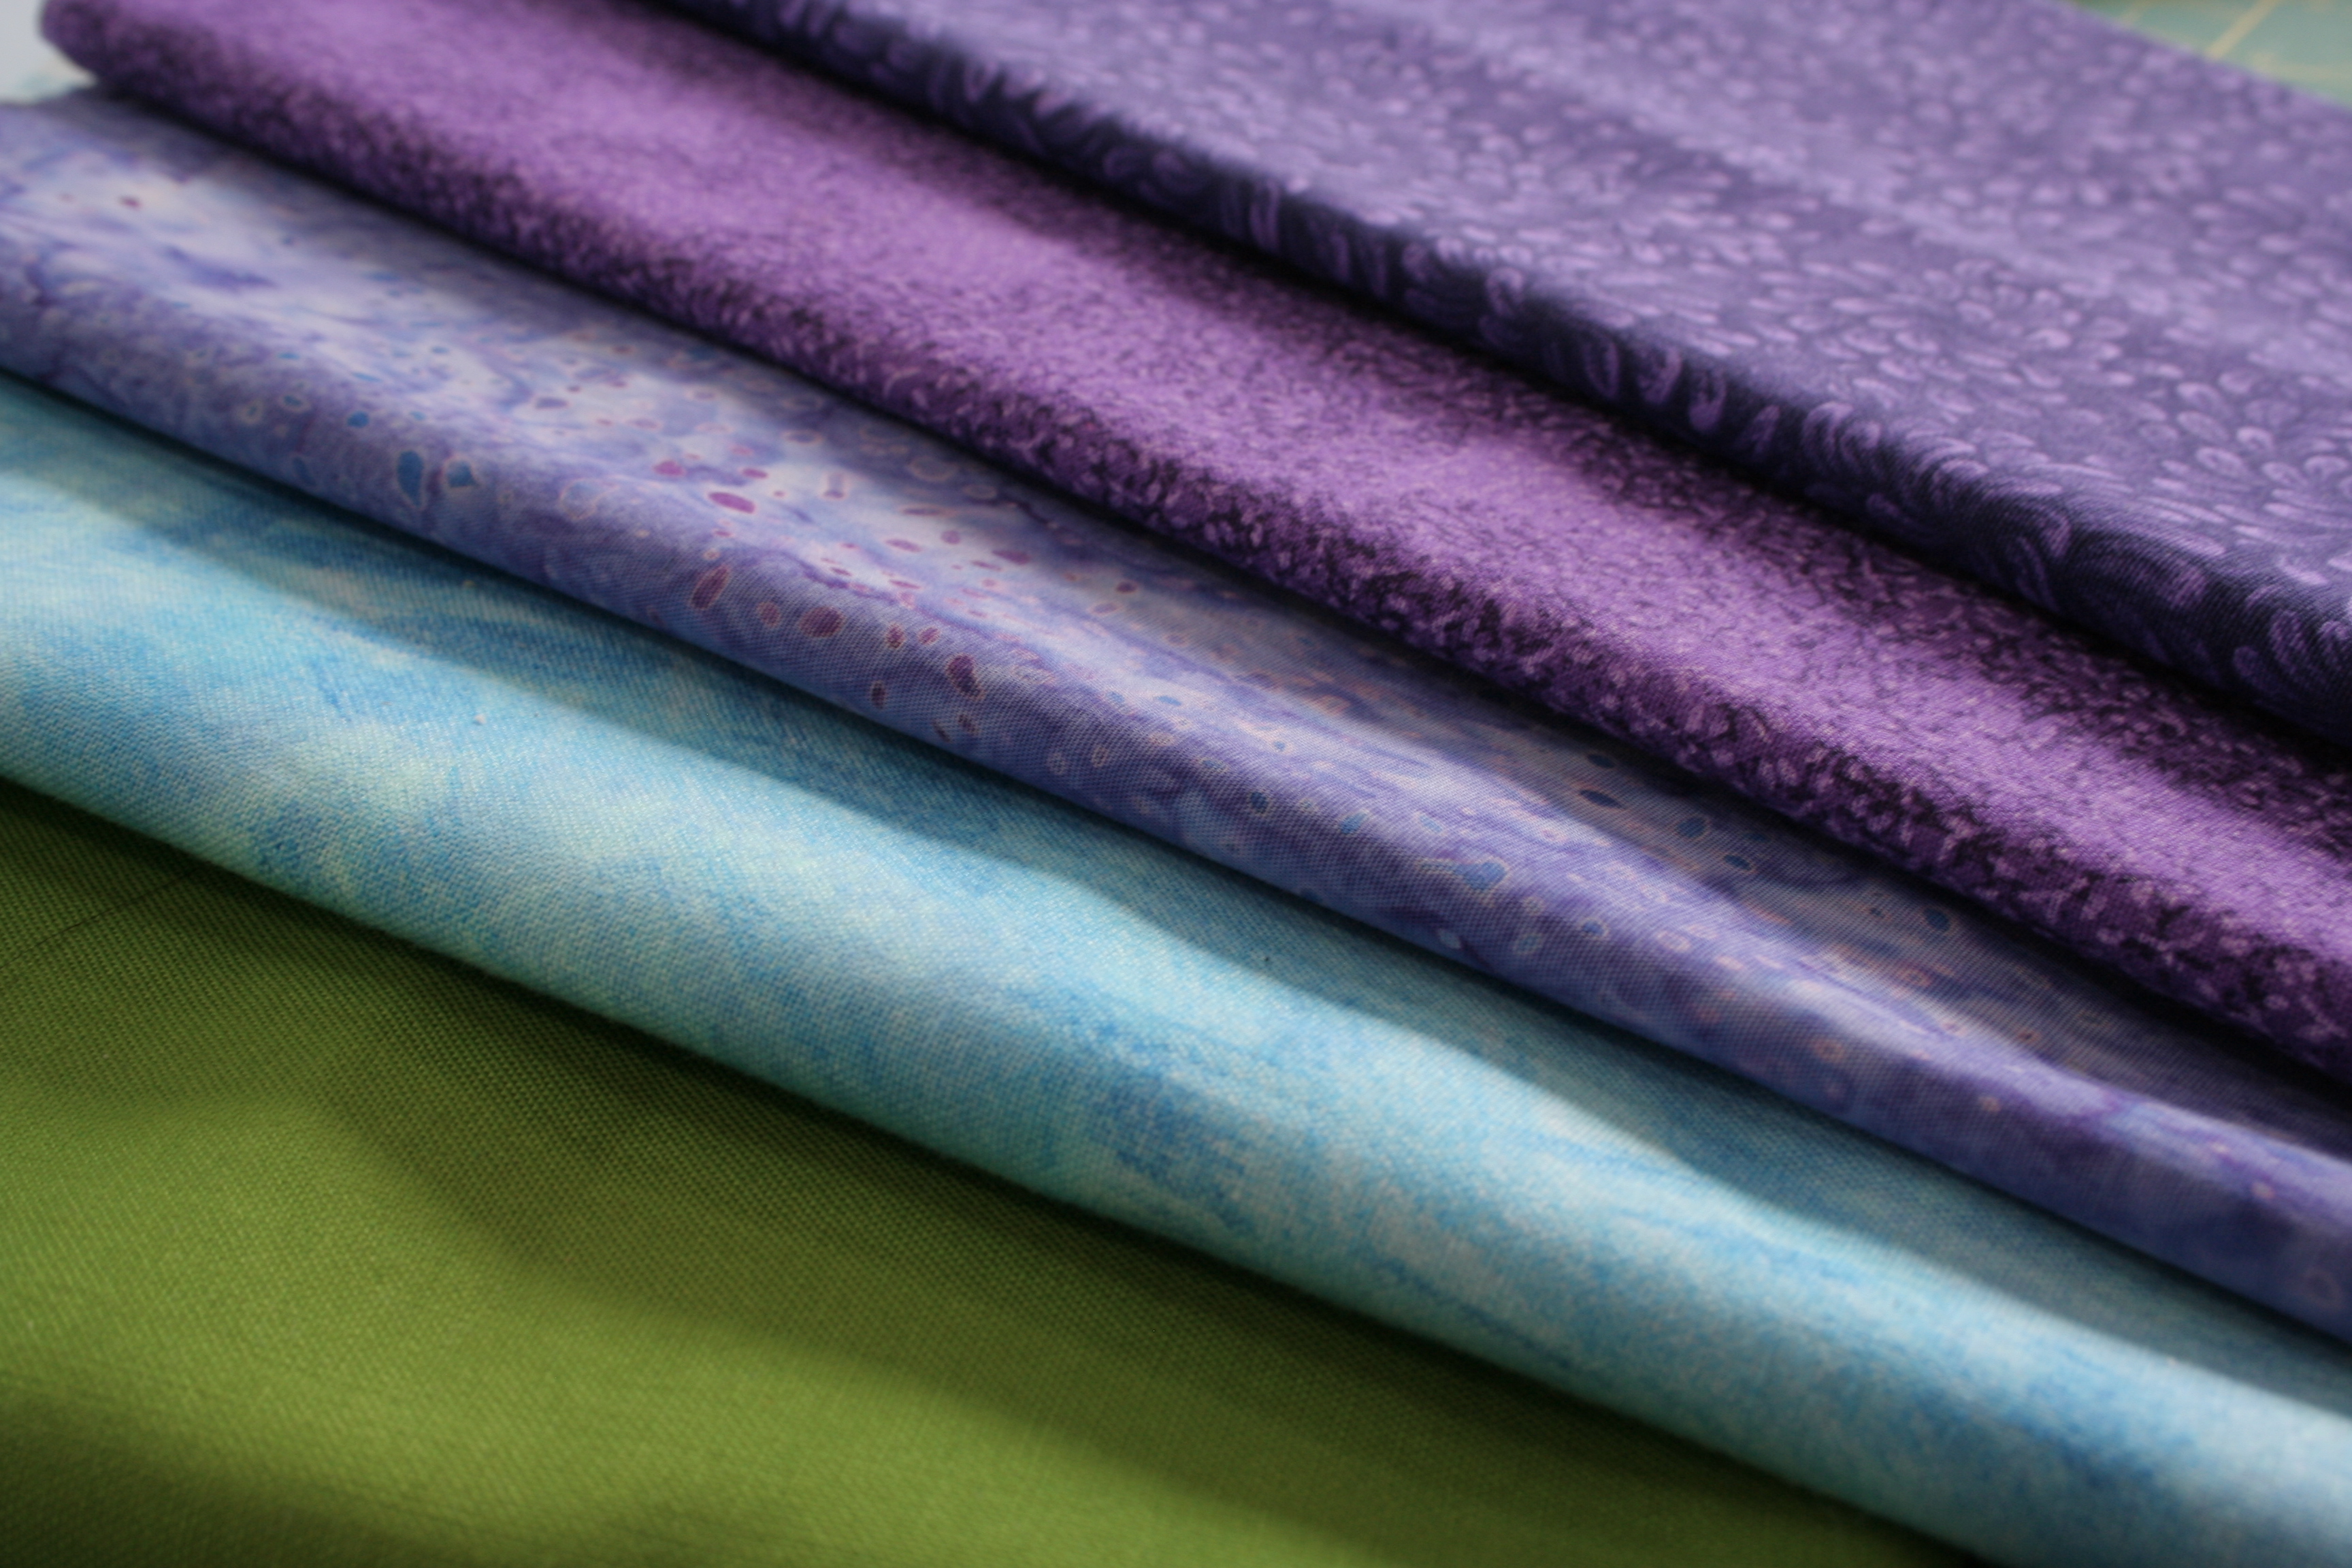
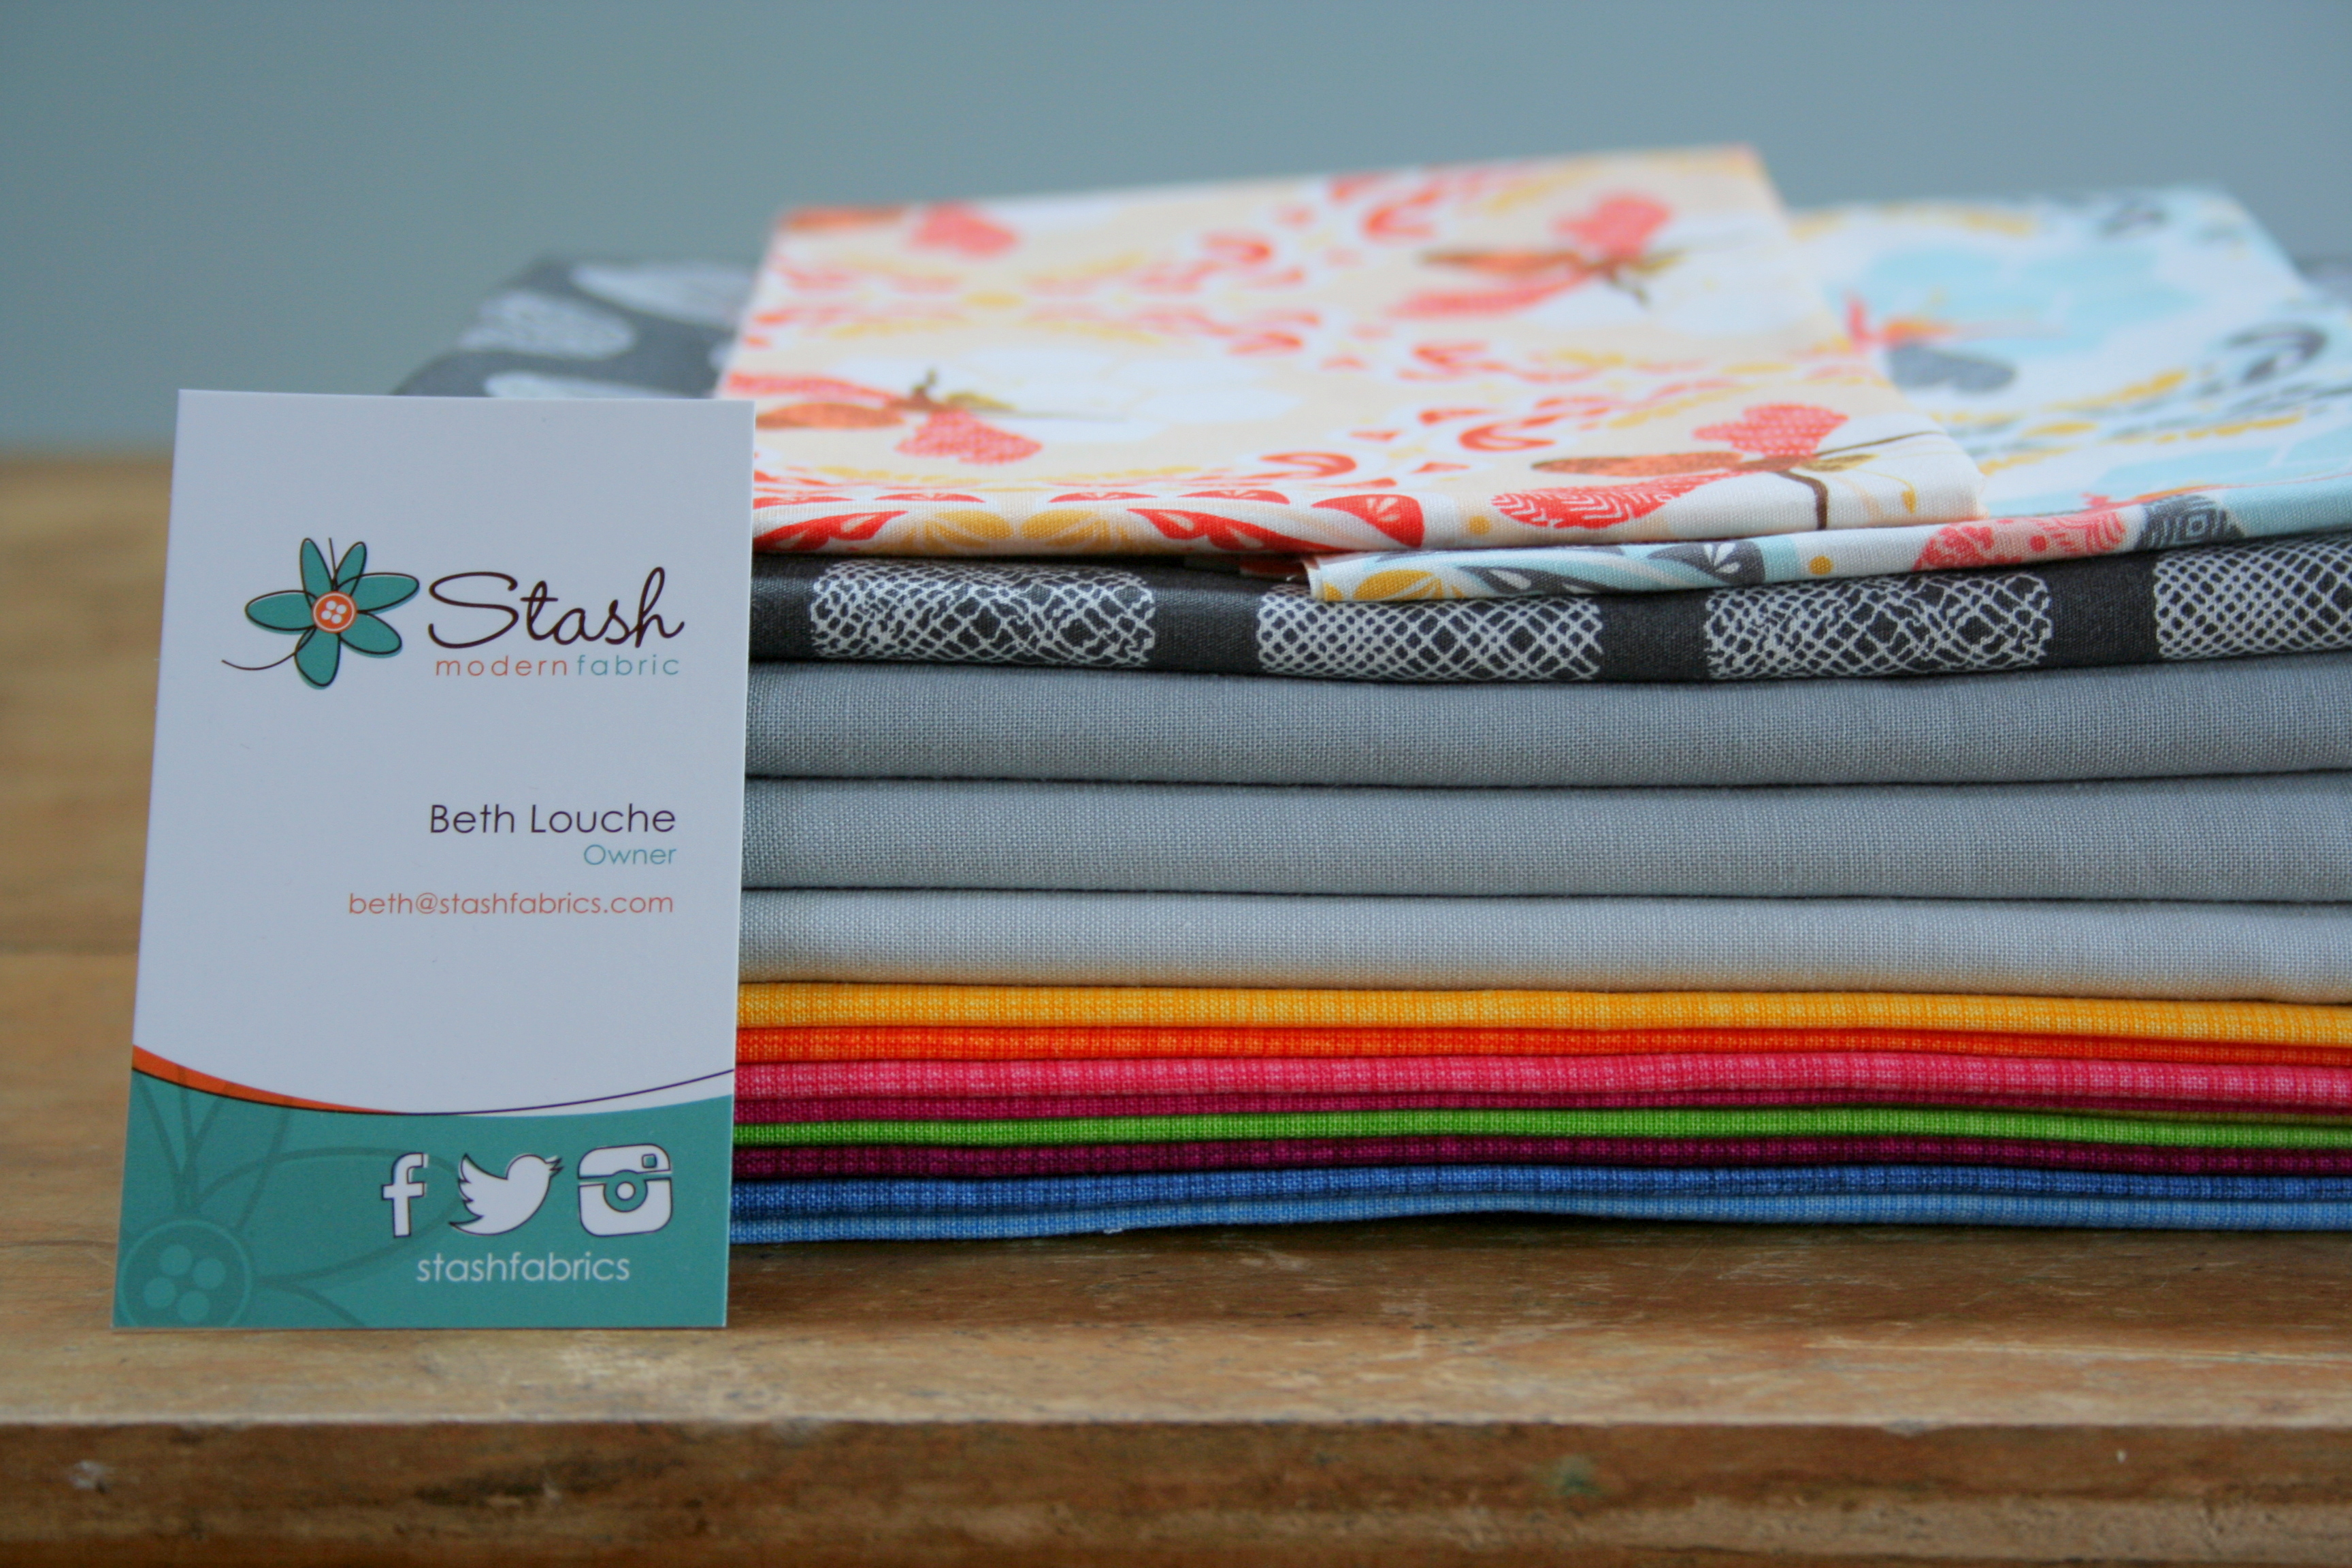
I’m one of those online window shoppers, with about fifty items in a “shopping cart” at a variety of fabric shops at all times. One of the bundles that has been in my virtual shopping cart forever is the Jewel Tone Sketch Fat Quarter Bundle at Stash Fabrics. Last week, when I saw Stash was having a sale on all Bella Solids, I knew that the time had come. I needed some more gray yardage as a background for my in-progress Canvas place mats, so with the sale on solids paired with free shipping on orders over $50, I decided to build my stash 56 dollars worth. Here’s what I bought:
Stash building from Stash Fabrics.
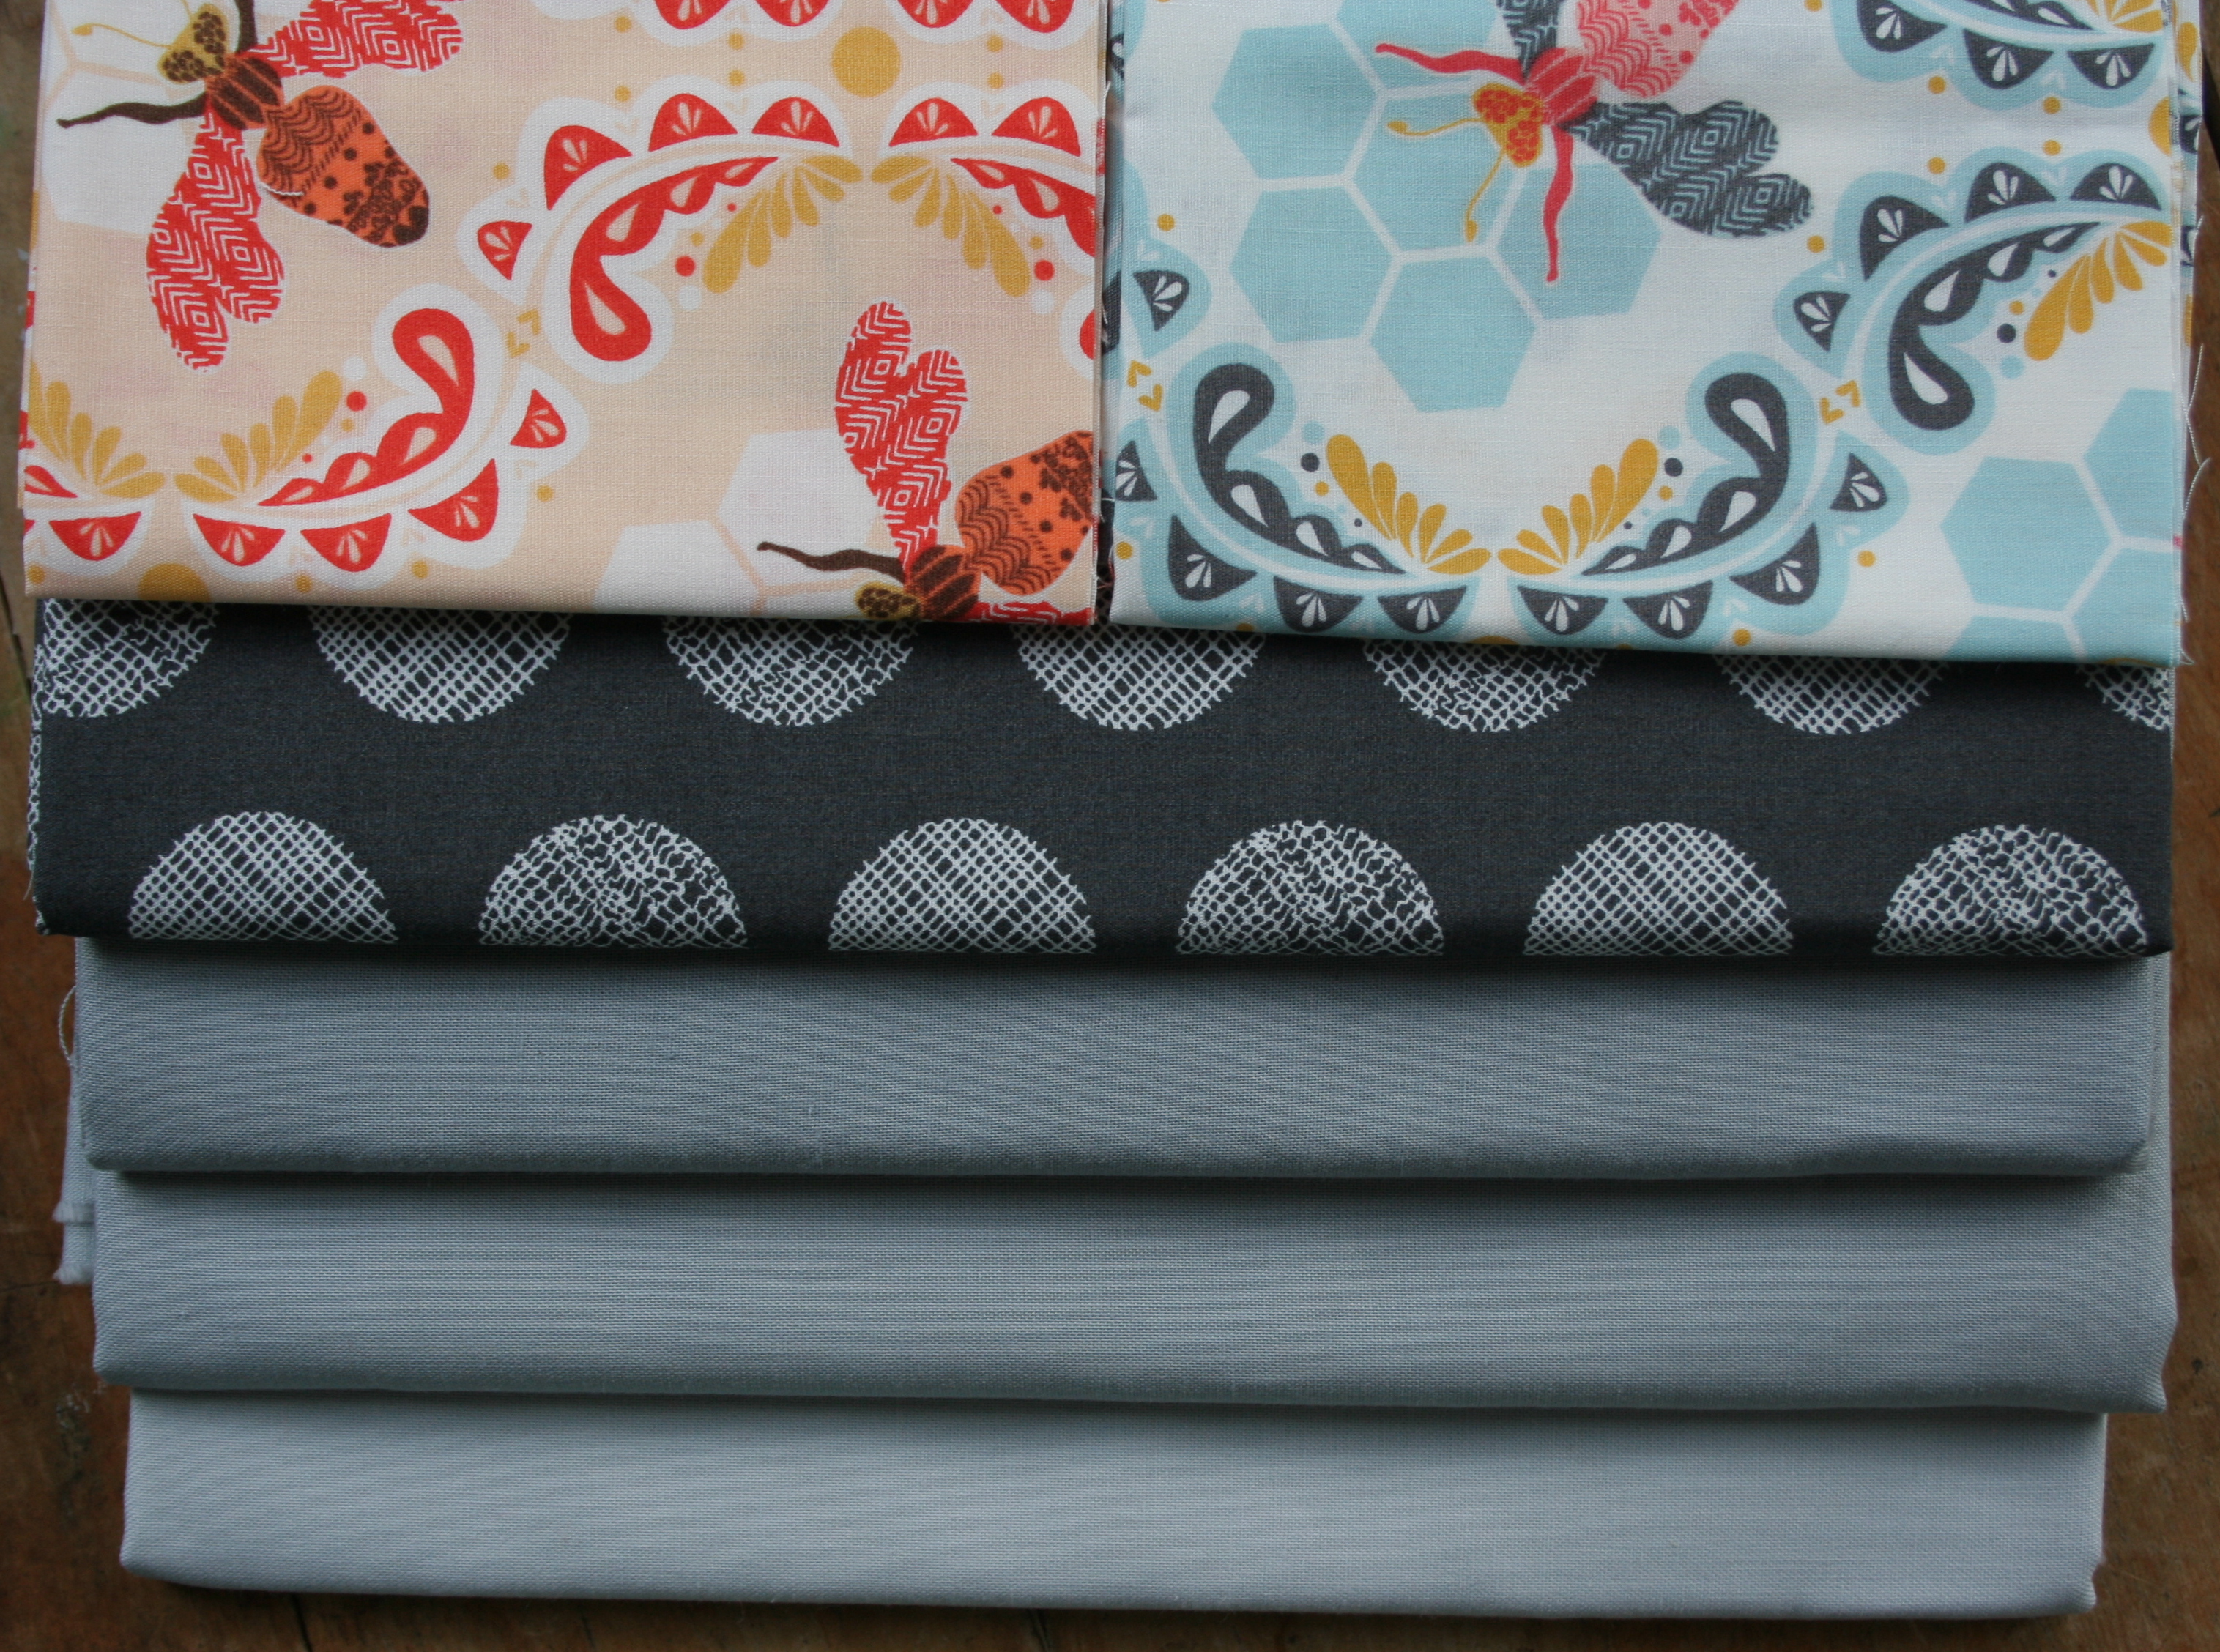
Let’s take a closer look, since who doesn’t want to get a closer look at fabulous fabric?
From bottom to top, I got 1 yard each of Bella Zen Gray, Silver, and Steel, as well as 1 yard of Pointelle in Noir from the Art Gallery Fabrics Chromatic Collection (swoon). I also added in 1/4 yard each of Bee Sweet in Sunset and Morning colorways, from the Sweet as Honey line by Bonnie Christine for Art Gallery. I’ve been eyeing them for ages and just couldn’t pass up the chance to have even a bit in my stash.
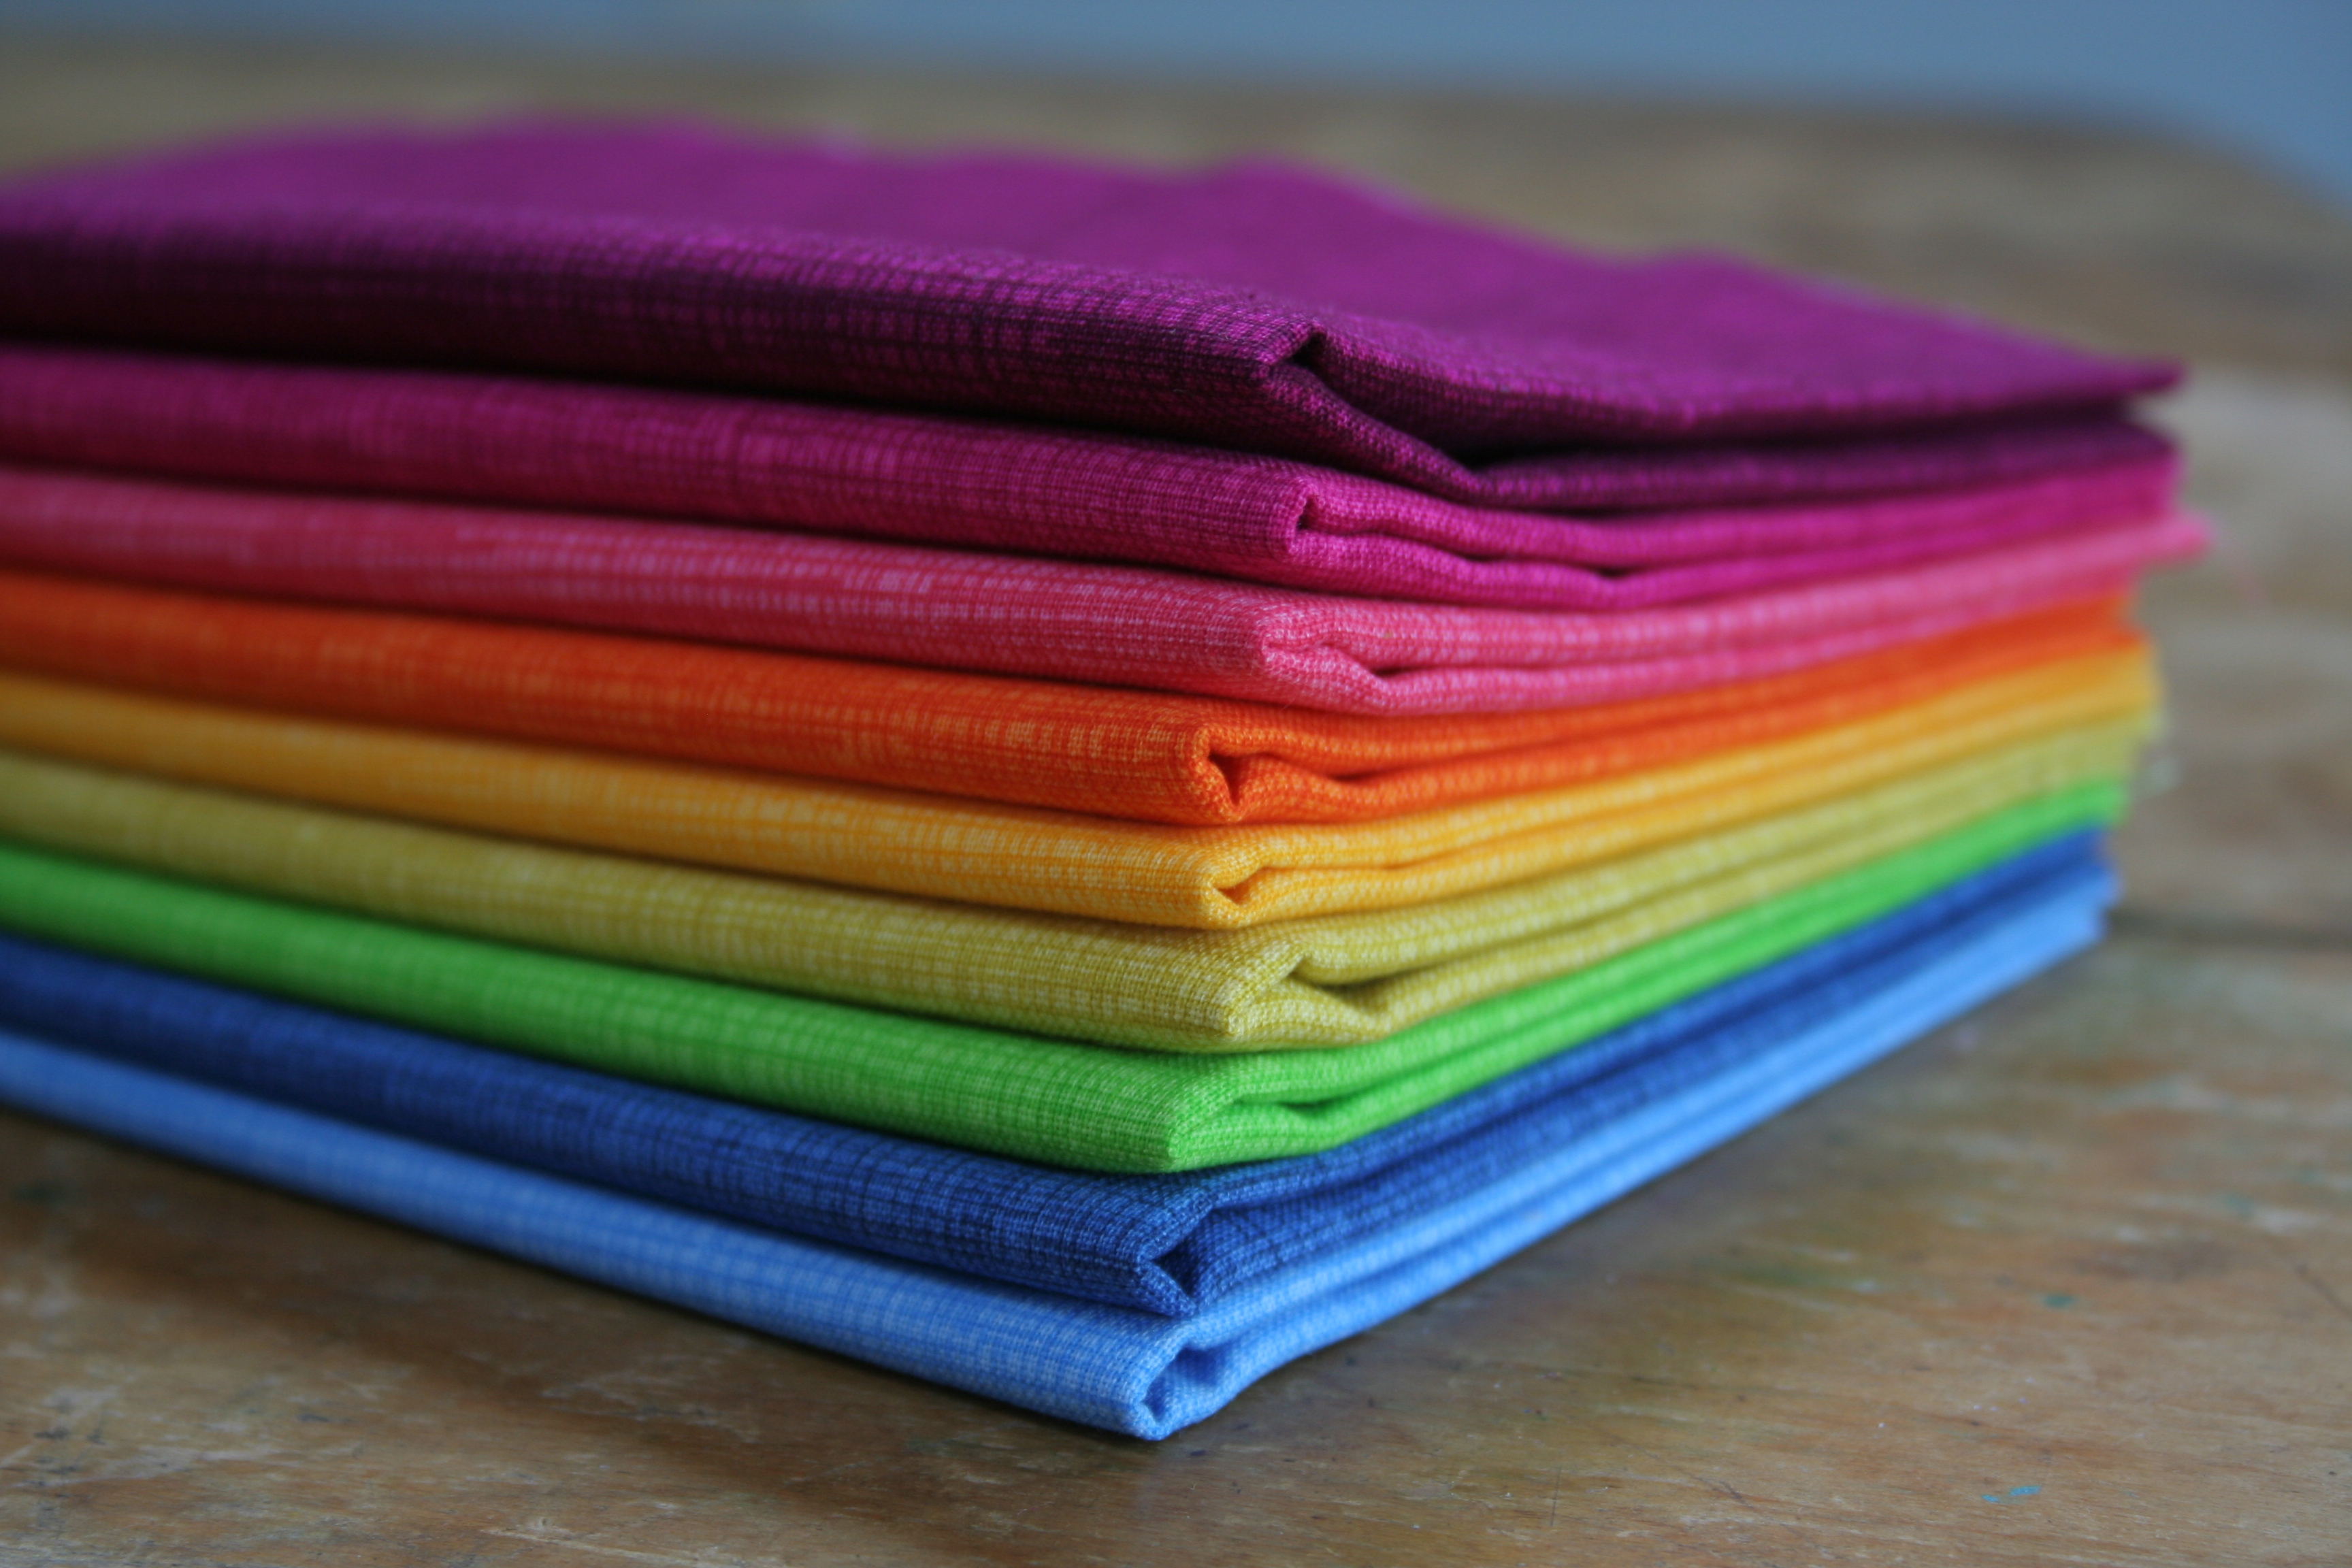
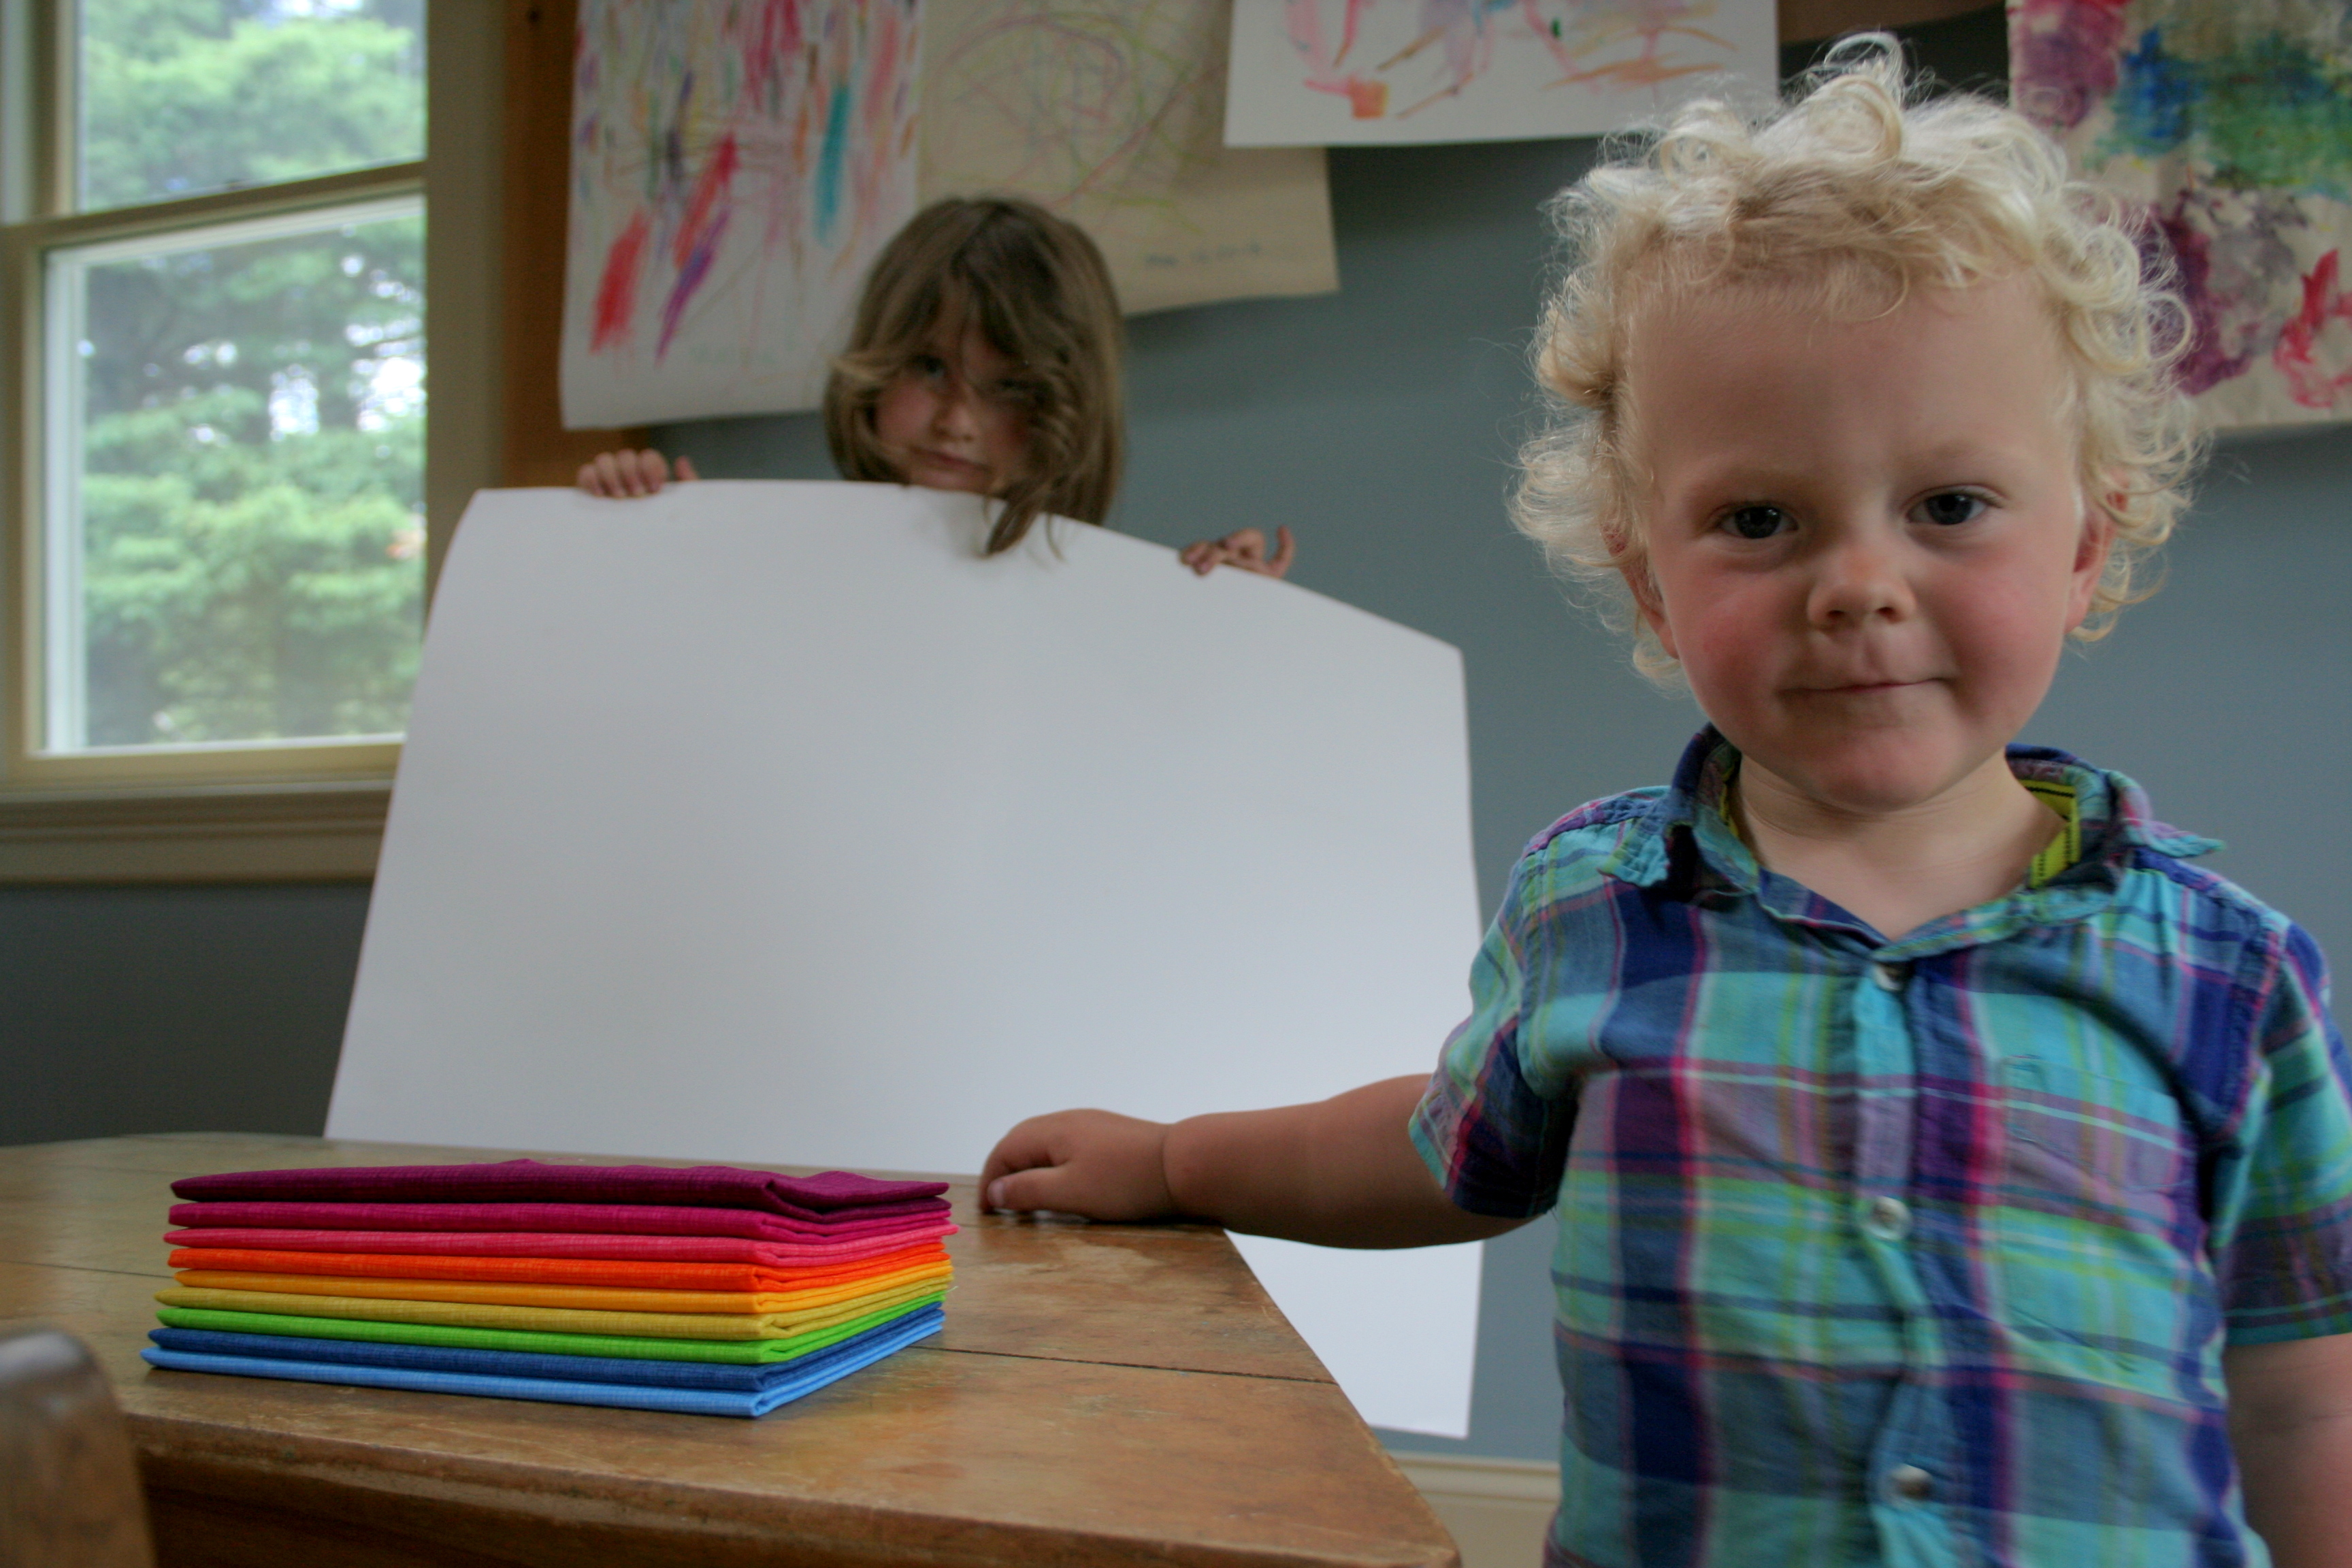
Of course, the Jewel Tone Sketch bundle got a photo shoot all its own. How could you resist!? Mid-photo-shoot, I decided that these lovely colors really needed more of a white backdrop. The only problem is, we have blue walls. Here was my solution:
Blue walled background + some momentarily helpful kids who had refused to nap + 1 white poster board = whiter background to help the rainbow colors pop!
Yes? Yes! I love the difference the slightly different angle paired with the white background make.
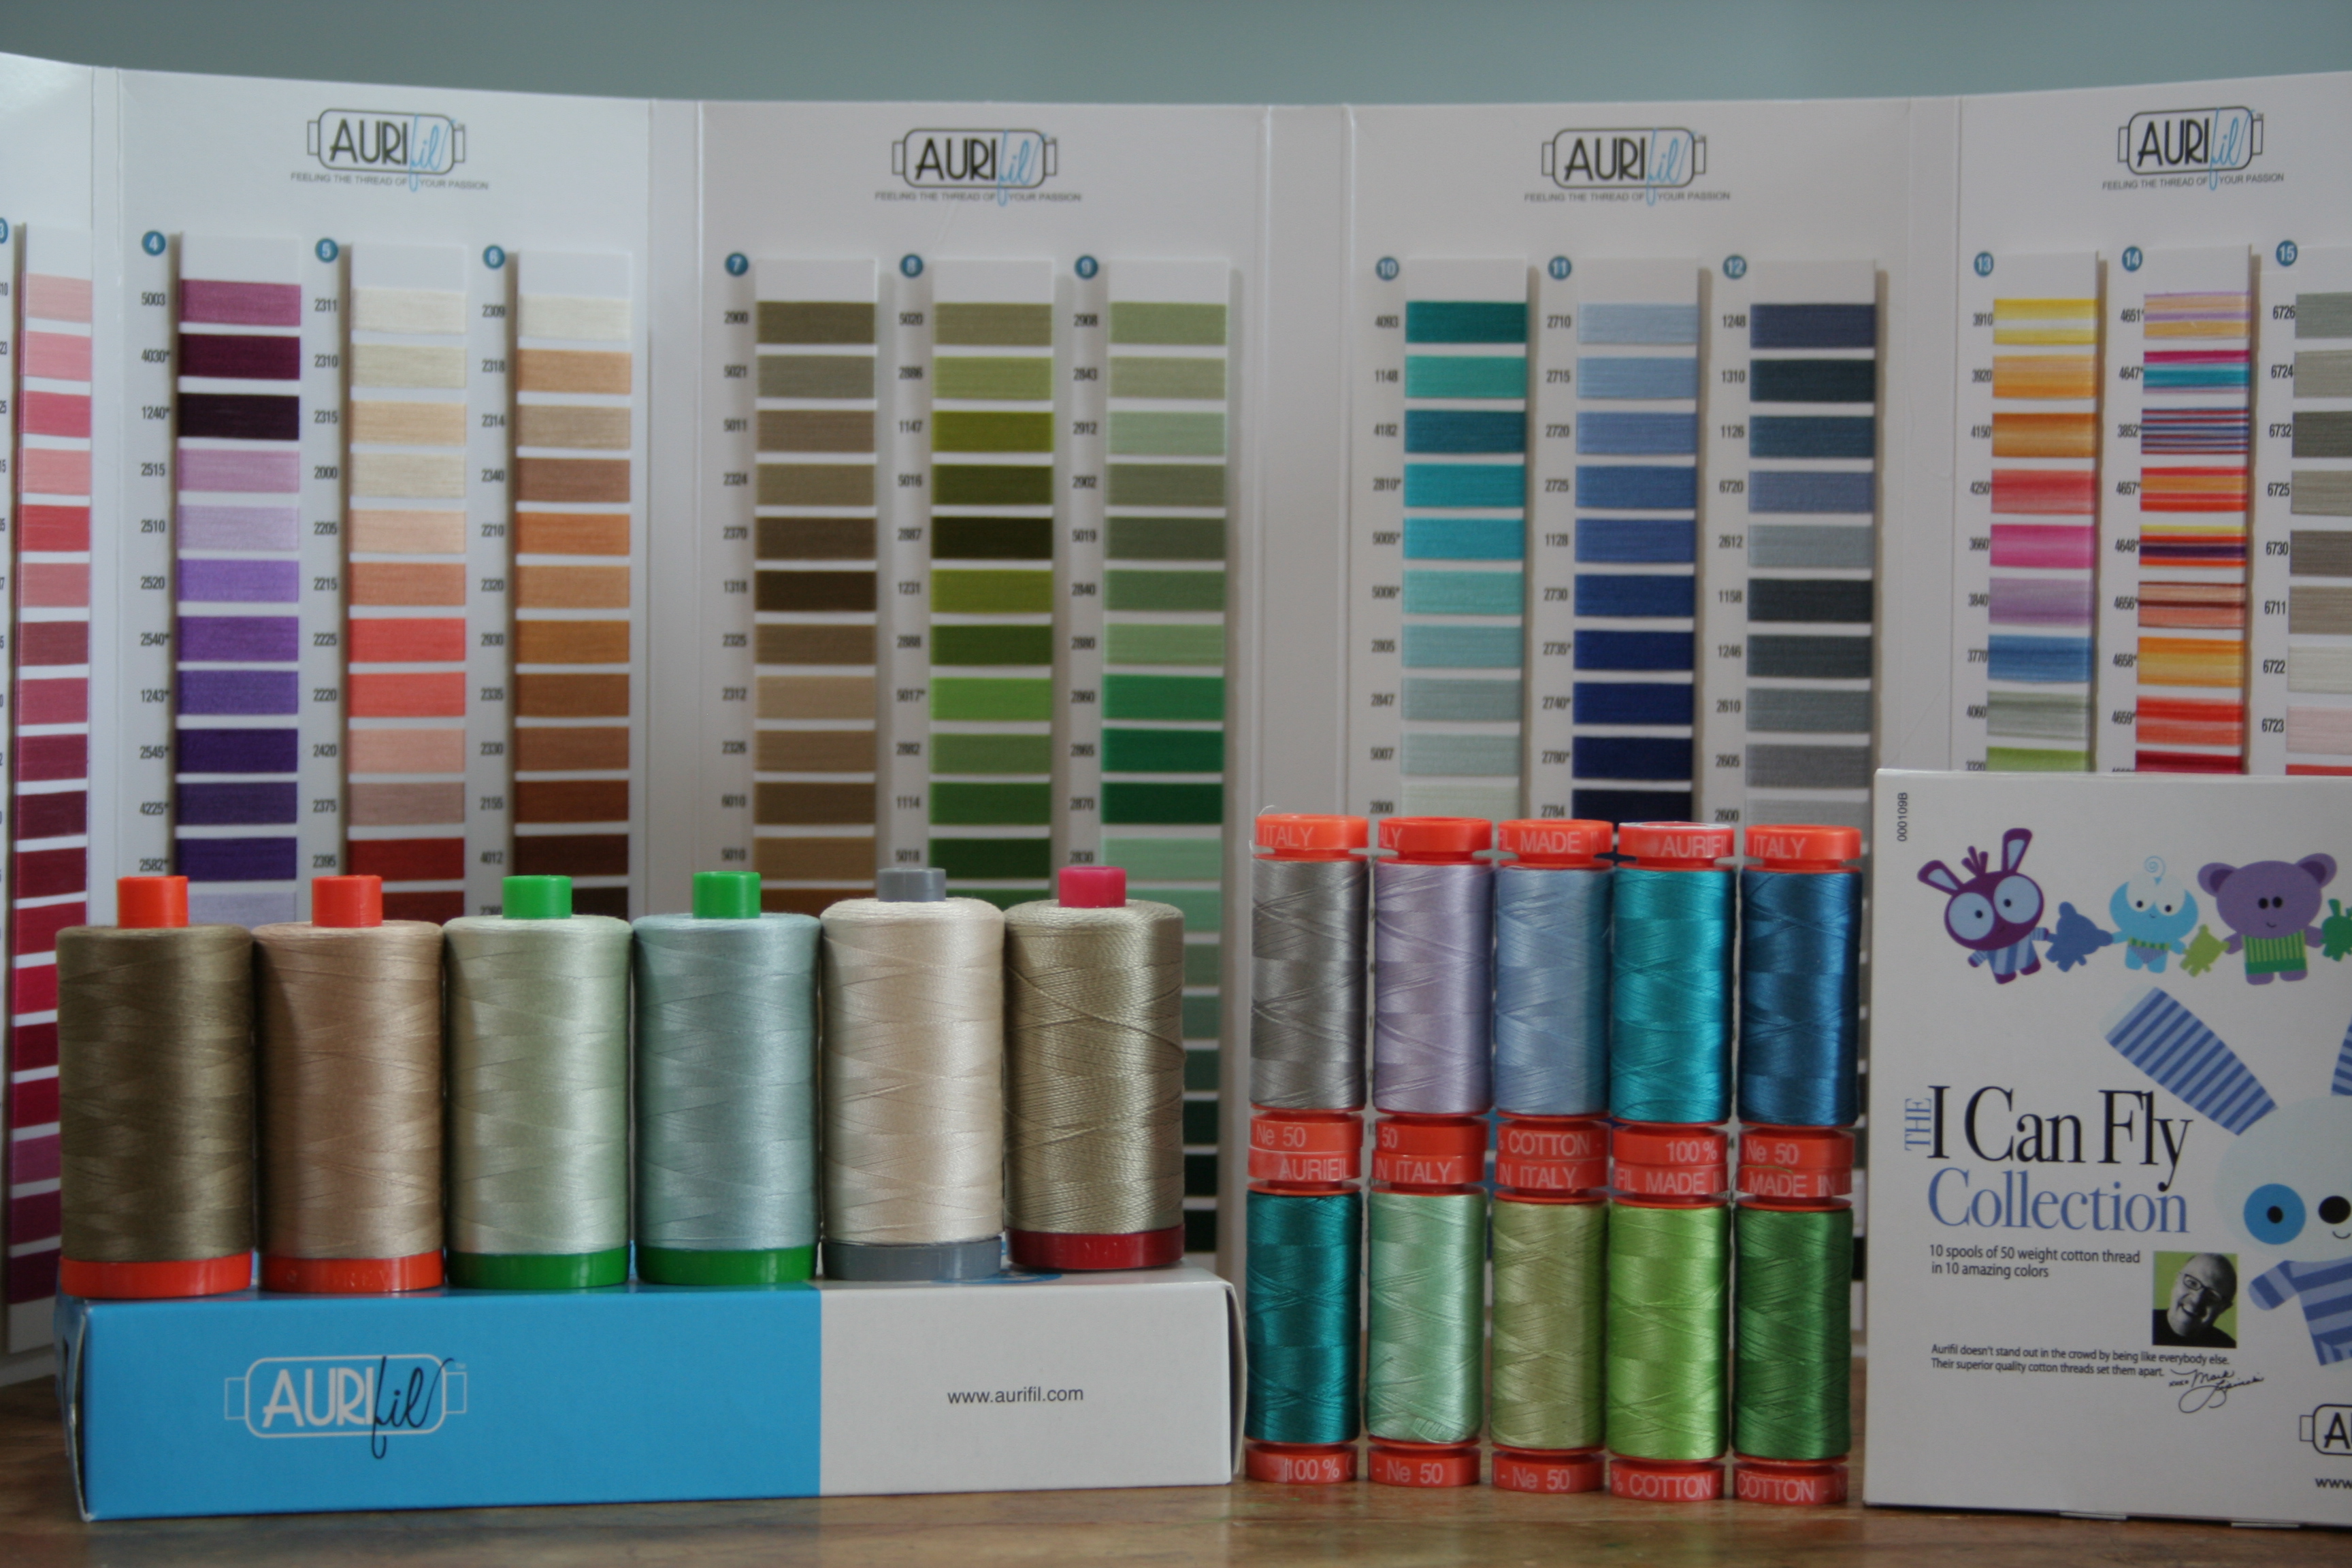
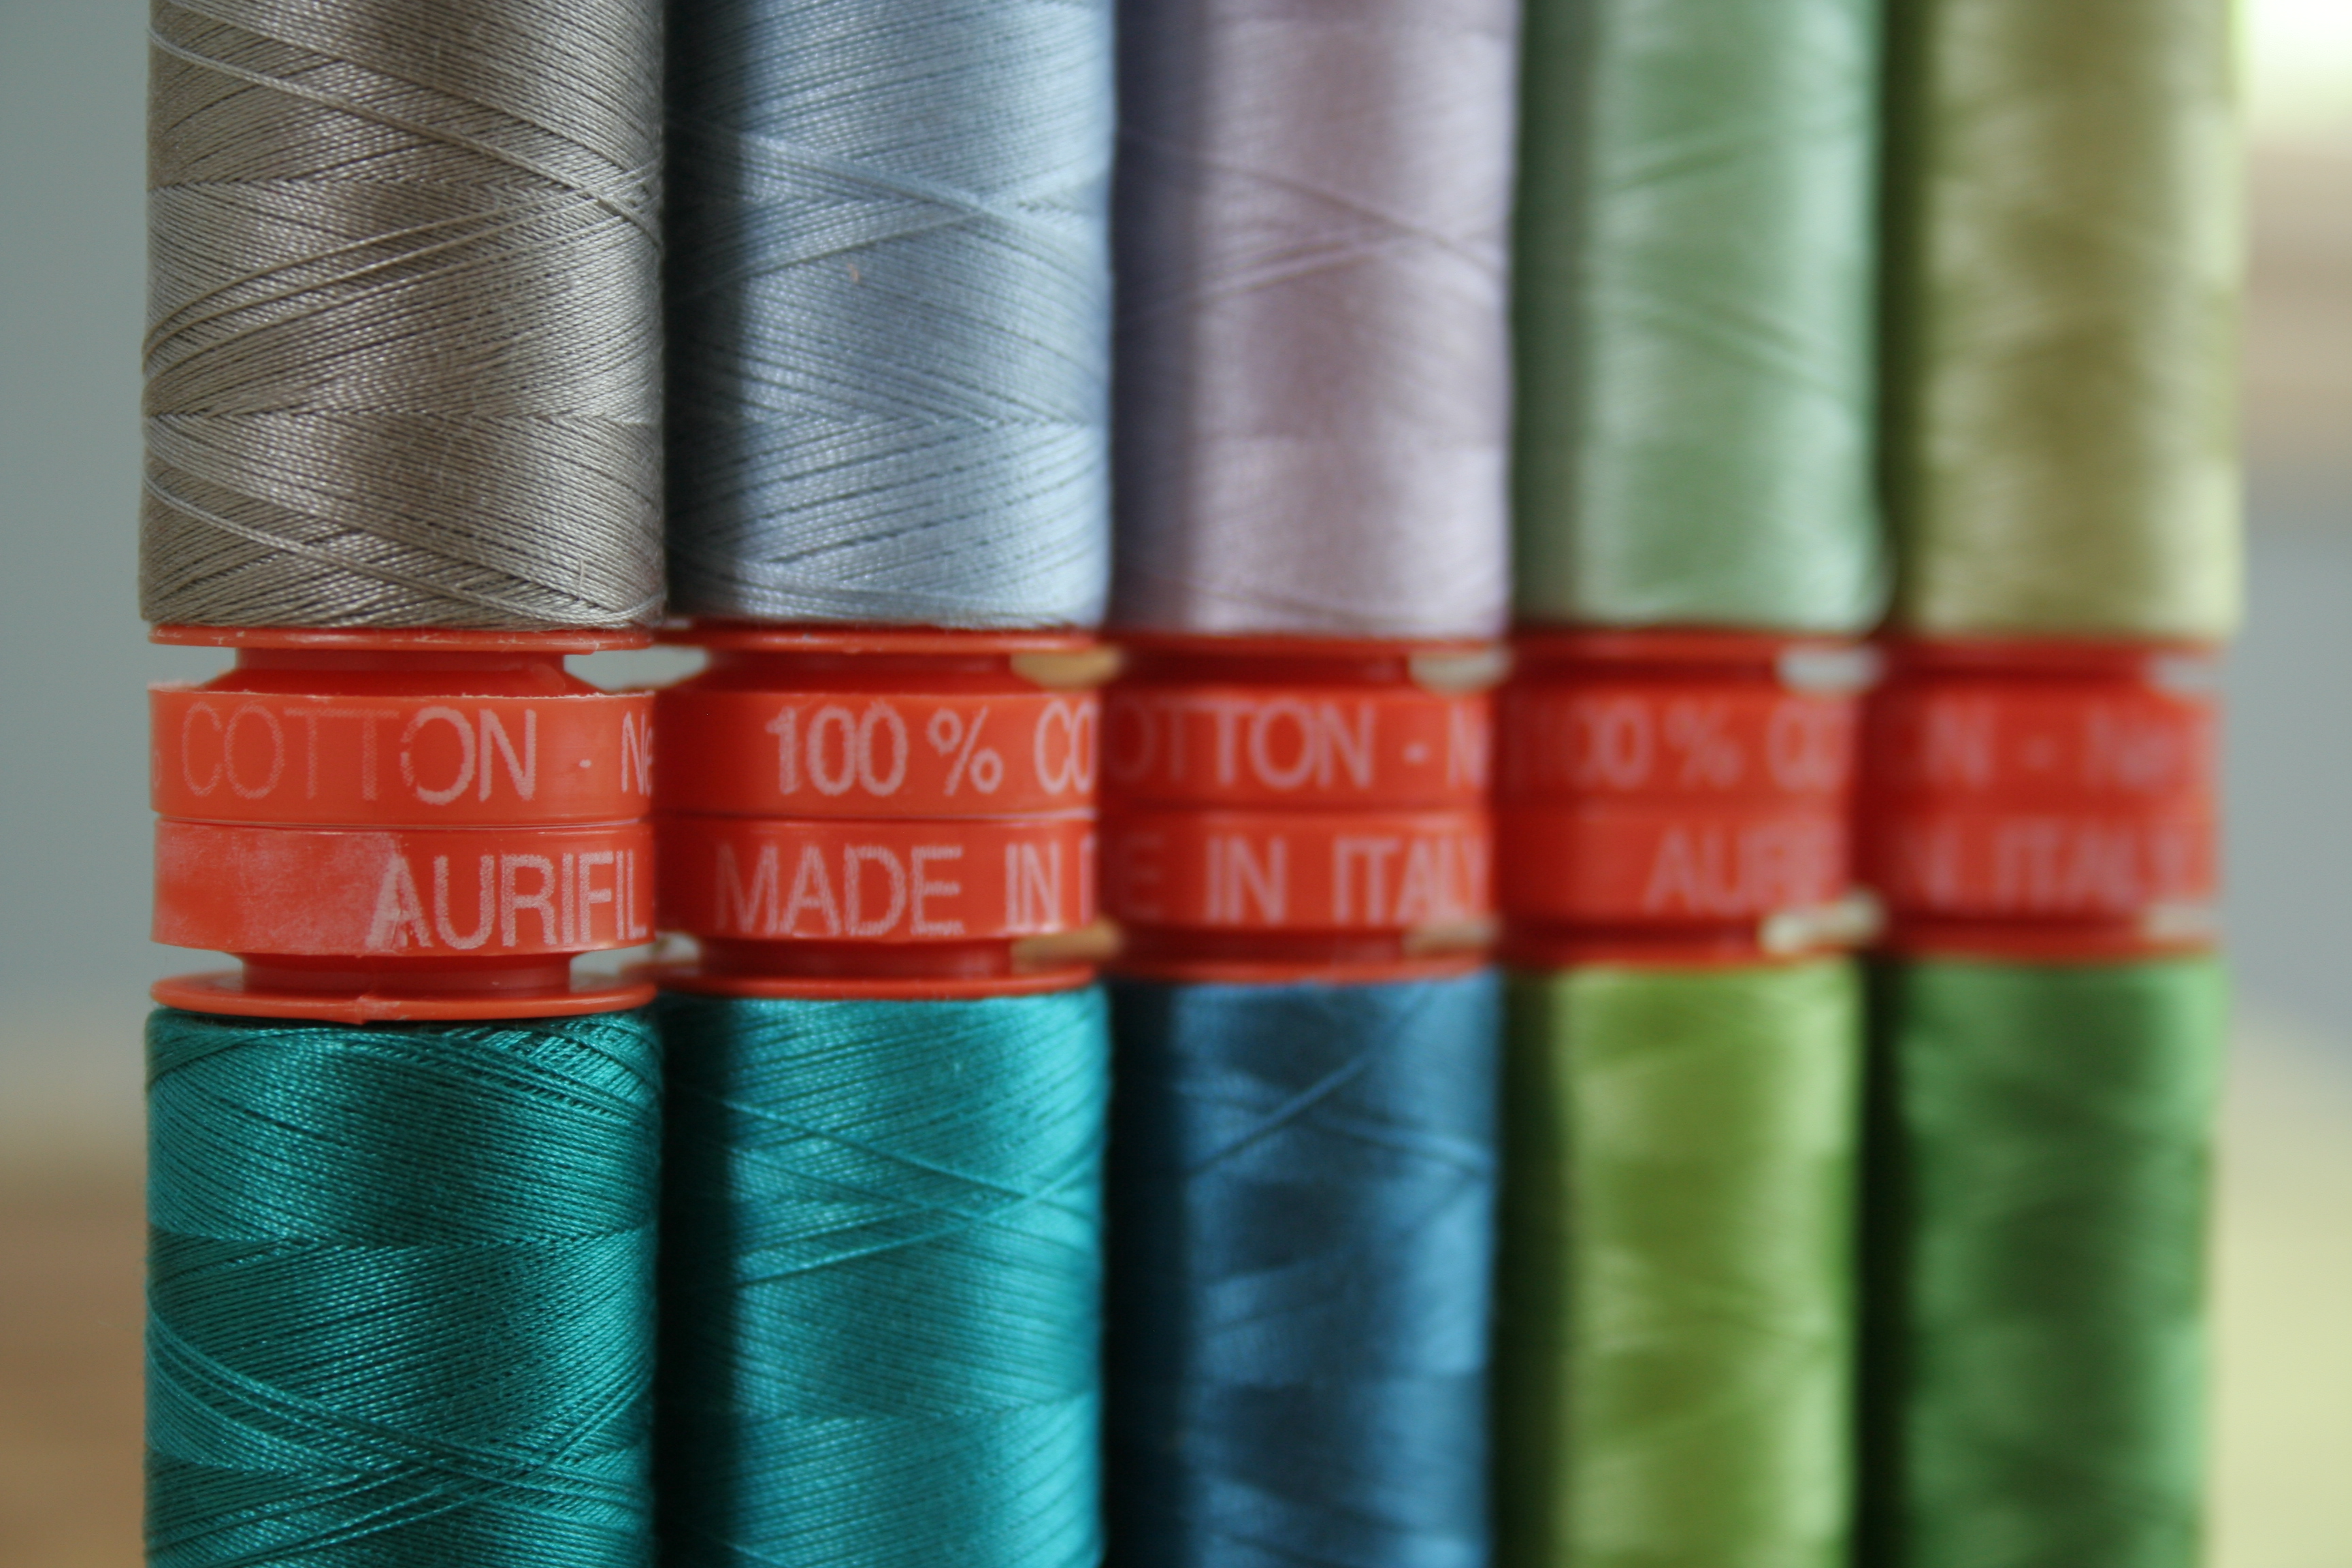
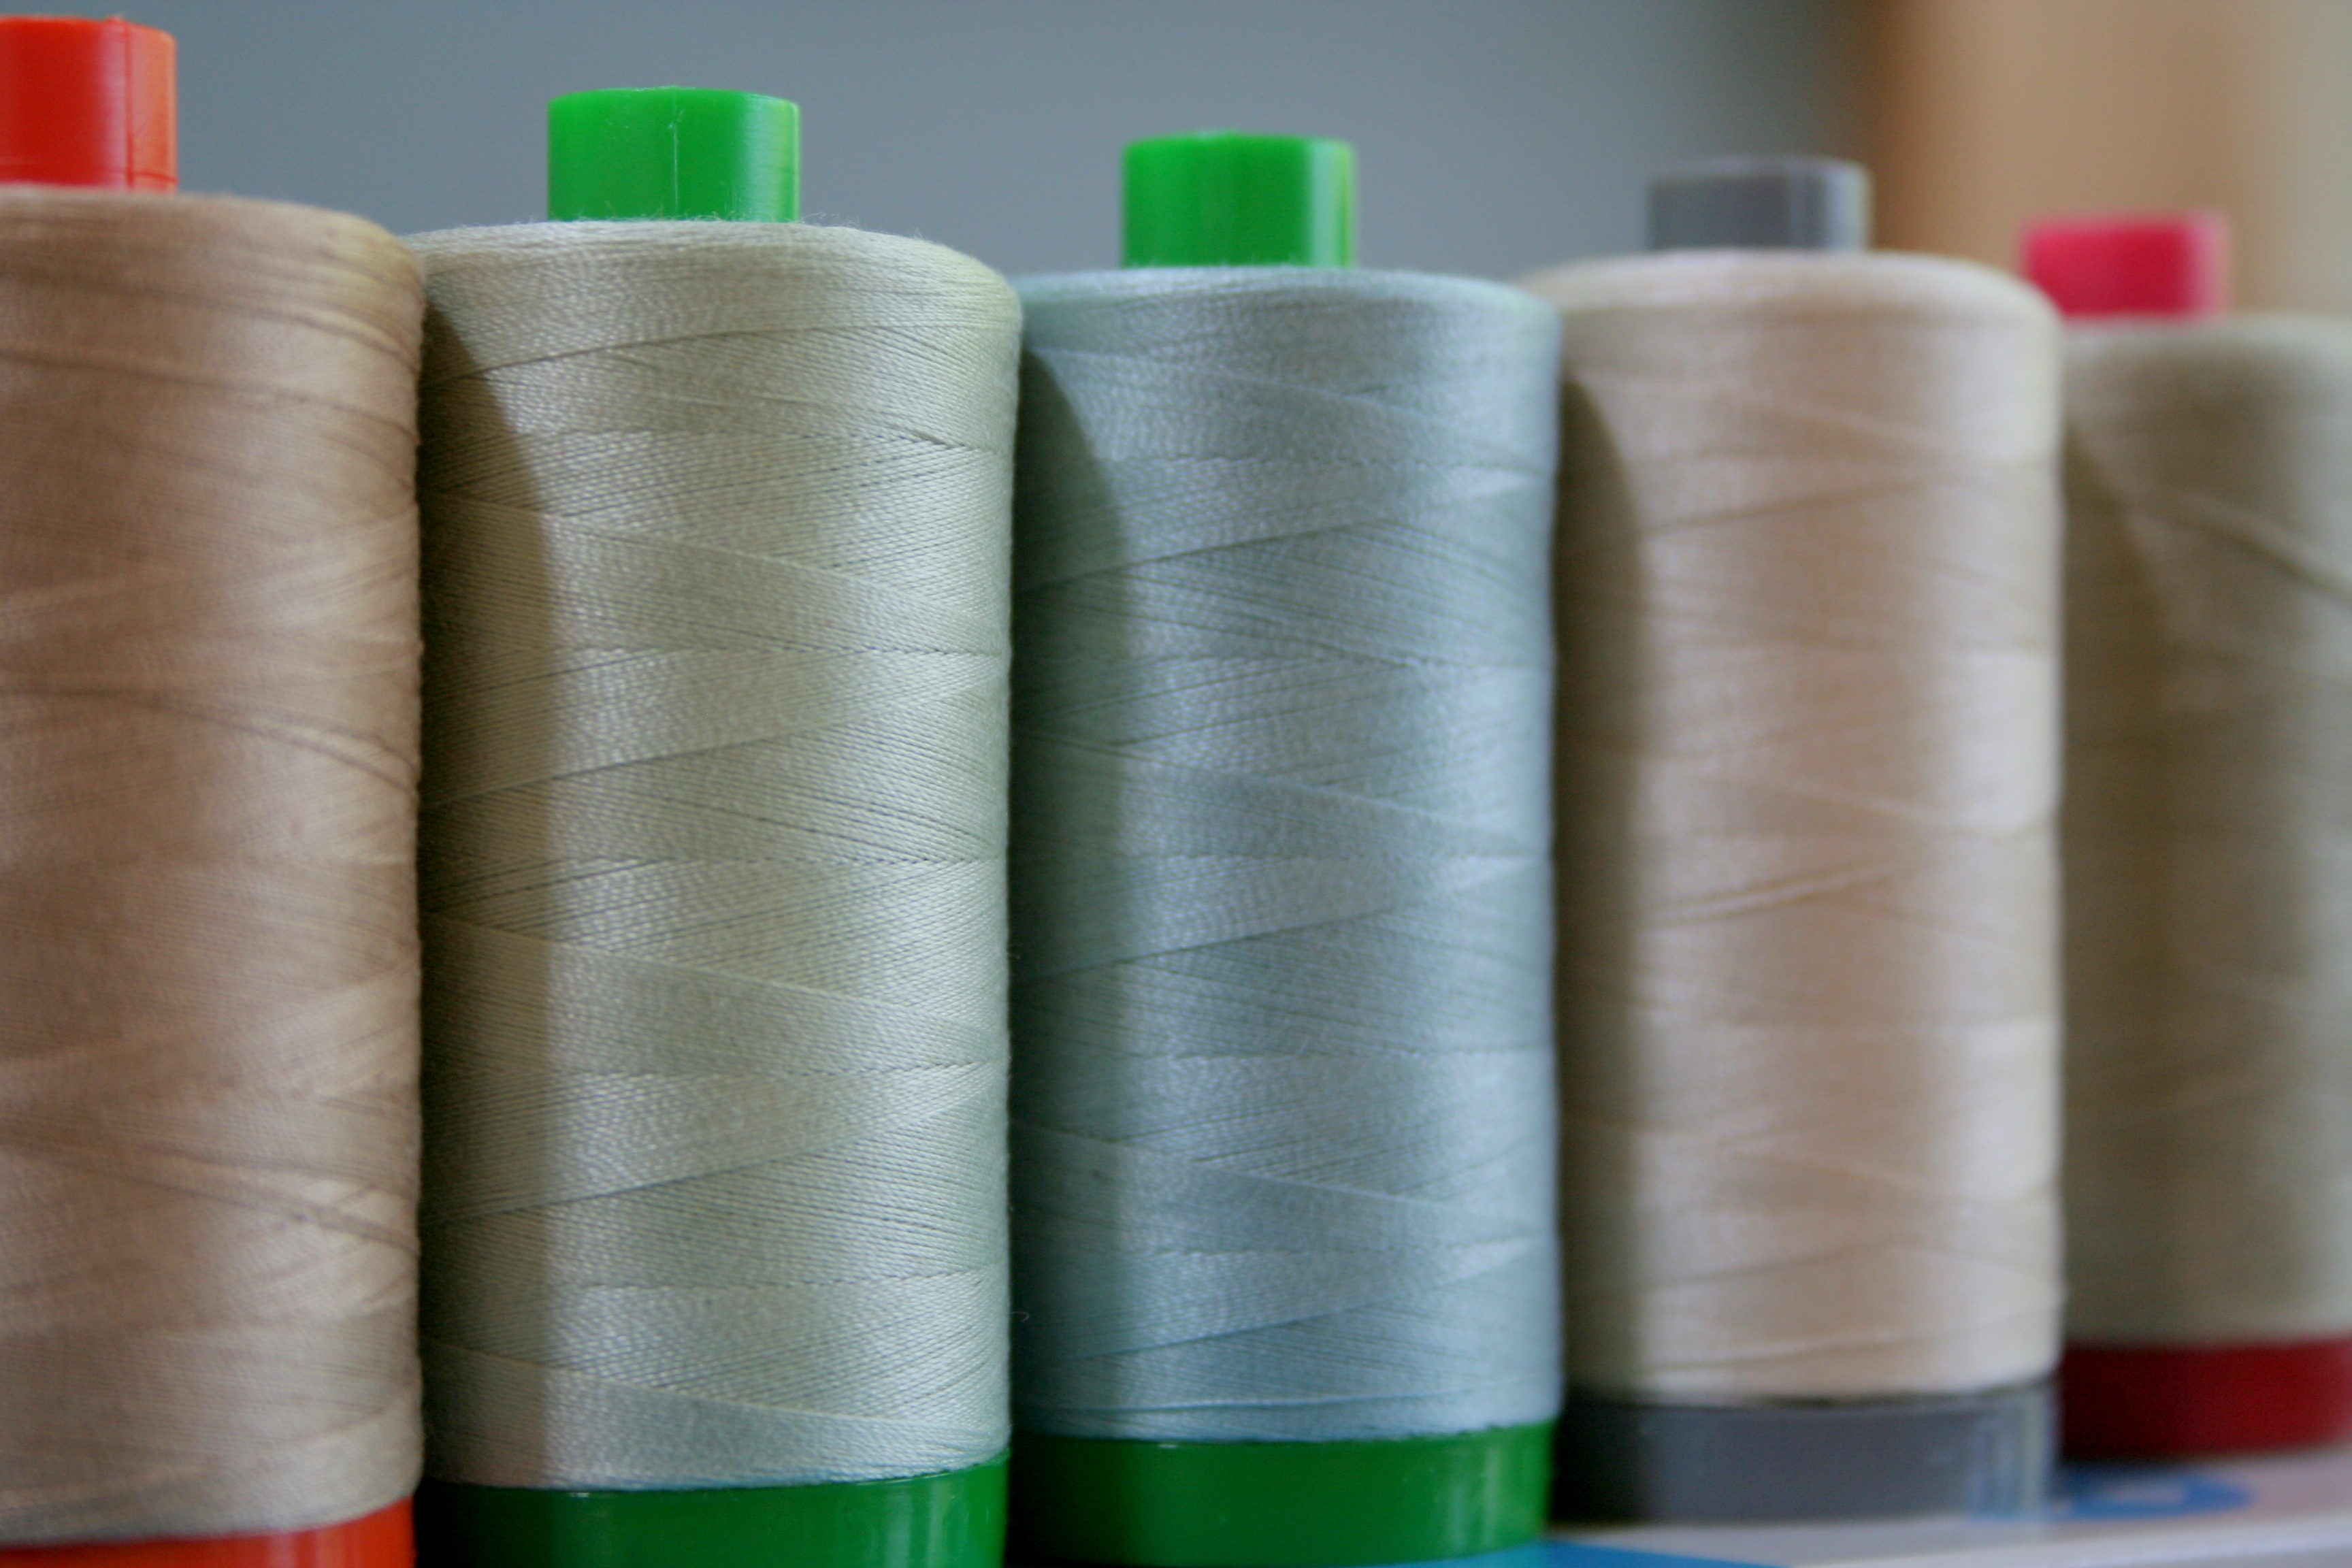
This week, I also got a fabulous package from Alex Veronelli of AURIfil. A few weeks ago, I semi-jokingly, very-hopefully tweeted:
@CrystalblueRT@alexveronelli if Aurifil is ever looking for another quilter-blogger to supply with gorgeous colors of thread, I’m your gal!
Much to my excitement, yesterday I received the best package ever!
It didn’t take me long once I started quilting and getting into the modern quilting community to realize that many of my favorite quilters raved about AURIfil thread. I finally found a local shop that carried AURIfil and bought my very first spool: a gorgeous all-purpose gray. I haven’t used anything except AURIfil since. Look at it-you can see the shine even in photos. The colors are fabulous, the thread is smooth and I haven’t had a break yet.
Rather than swoon, here are some more photographs so that you can see for yourself:
I’m very excited about the color cards, since now I will be able to order the perfect color thread for every project, even though my LQS doesn’t carry the full spectrum. You know how I am about color; I am thrilled to have these added to my stash. I can’t wait to play!
I’m linking up with Molli Sparkles’ Sunday Stash because, well, it matches my favorite bits on the aurifil color card!
Foundation Paper Piecing is one of those things that when first encountered, may seem daunting enough to send you running for the hills. But once the general concept is grasped, paper piecing opens the door to a whole new world of quilting and fabric-play. Trust me, it’s worth giving it another go. As with anything, the best way to get more comfortable with foundation paper piecing is to practice, practice, practice, and then practice some more. Today I thought I’d share my process with tips along the way, in the hopes that it helps clarify the foundation paper piecing process.
For me, once I wrapped my brain around the fact that I was sewing something backwards while looking through a mirror, it all clicked. I’m a very spatial person, so once I could visualize that the picture was being created on the BACK, I was fine. Yes, the lines along which you sew will be on the back, or wrong-side of your sewn design. Think about that for a minute, and then let’s begin. Take your time, and have FUN!
Basic Foundation Paper Piecing Tutorial
First of all, why paper piecing? The ability to create life-like pictures with fabric is what first got me hooked on foundation paper piecing. Once I got the hang of it, I realized many more benefits to paper piecing:
No other method results in such precision and accuracy when sewing. You can make two blocks that are EXACTLY the same without too much muss or fuss about seams.
It is a great way to use up scraps.
My favorite perk of paper piecing is that it gives me a way to create gorgeous gifts for family and friends without the time invested in sewing an entire quilt. Paper piecing patterns are perfect for wall hangings, table runners, tea cozies, mug rugs, pillows, bags, and even as framed art.
Convinced? Let’s get started!
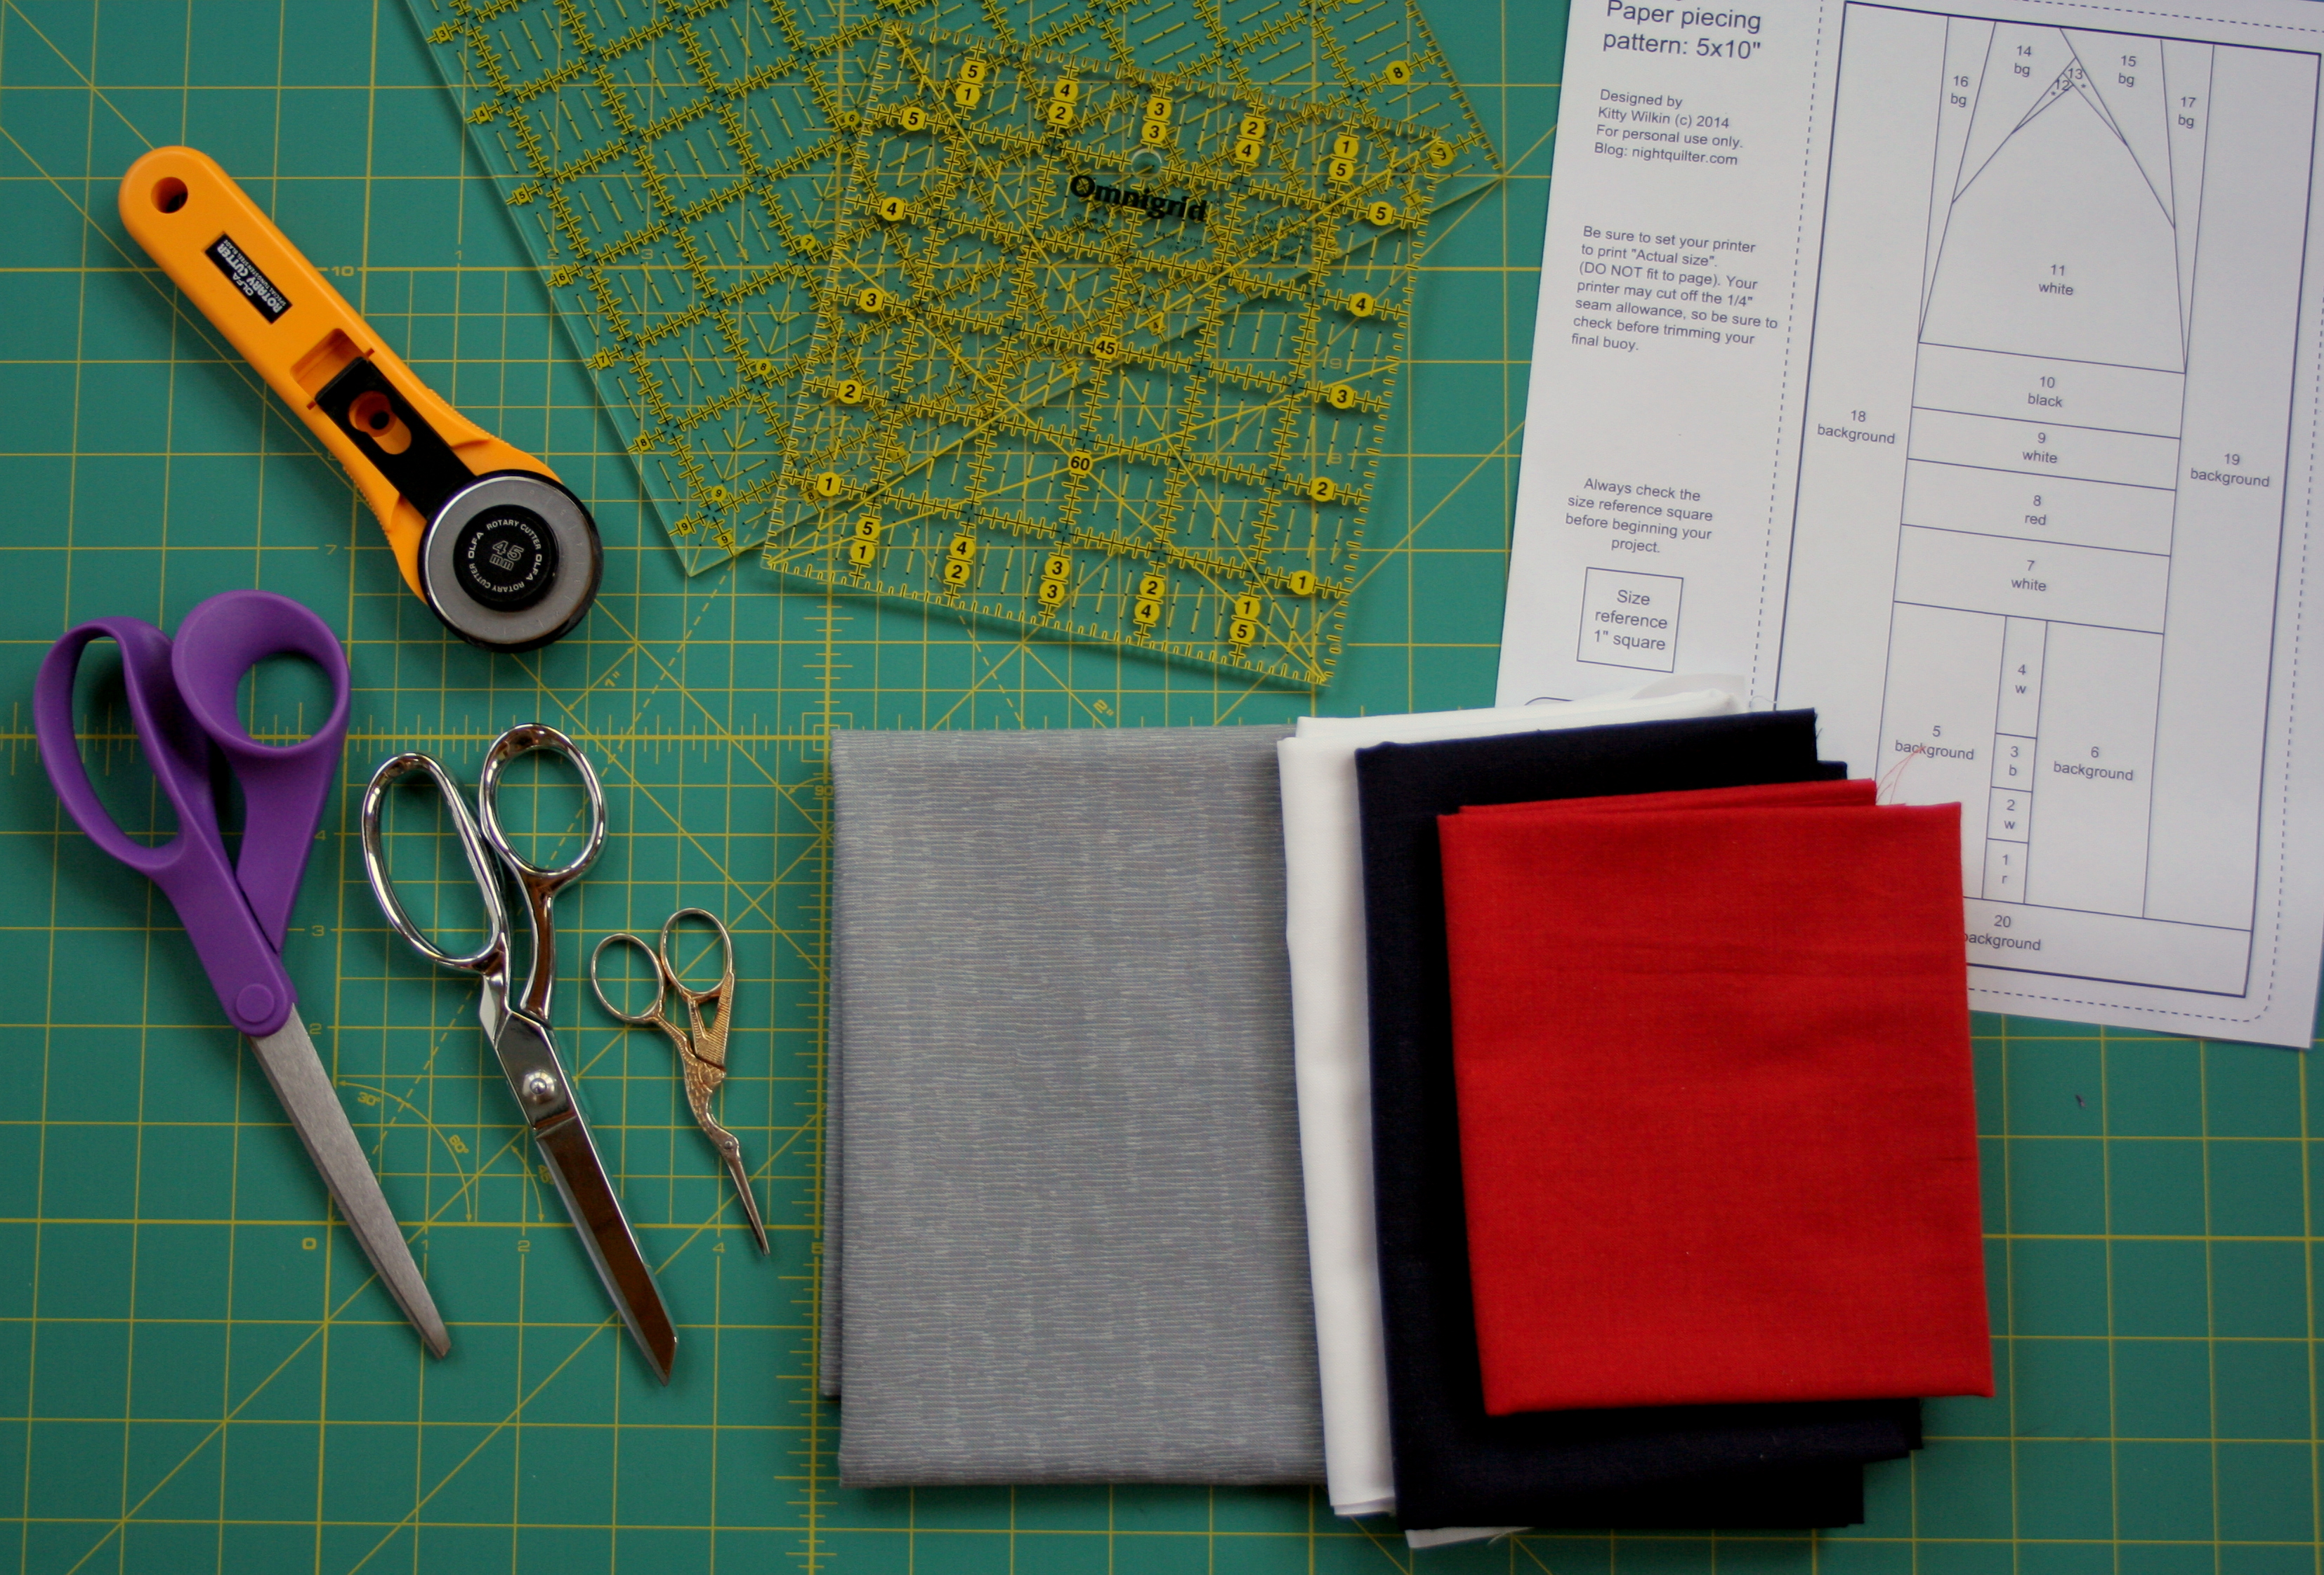
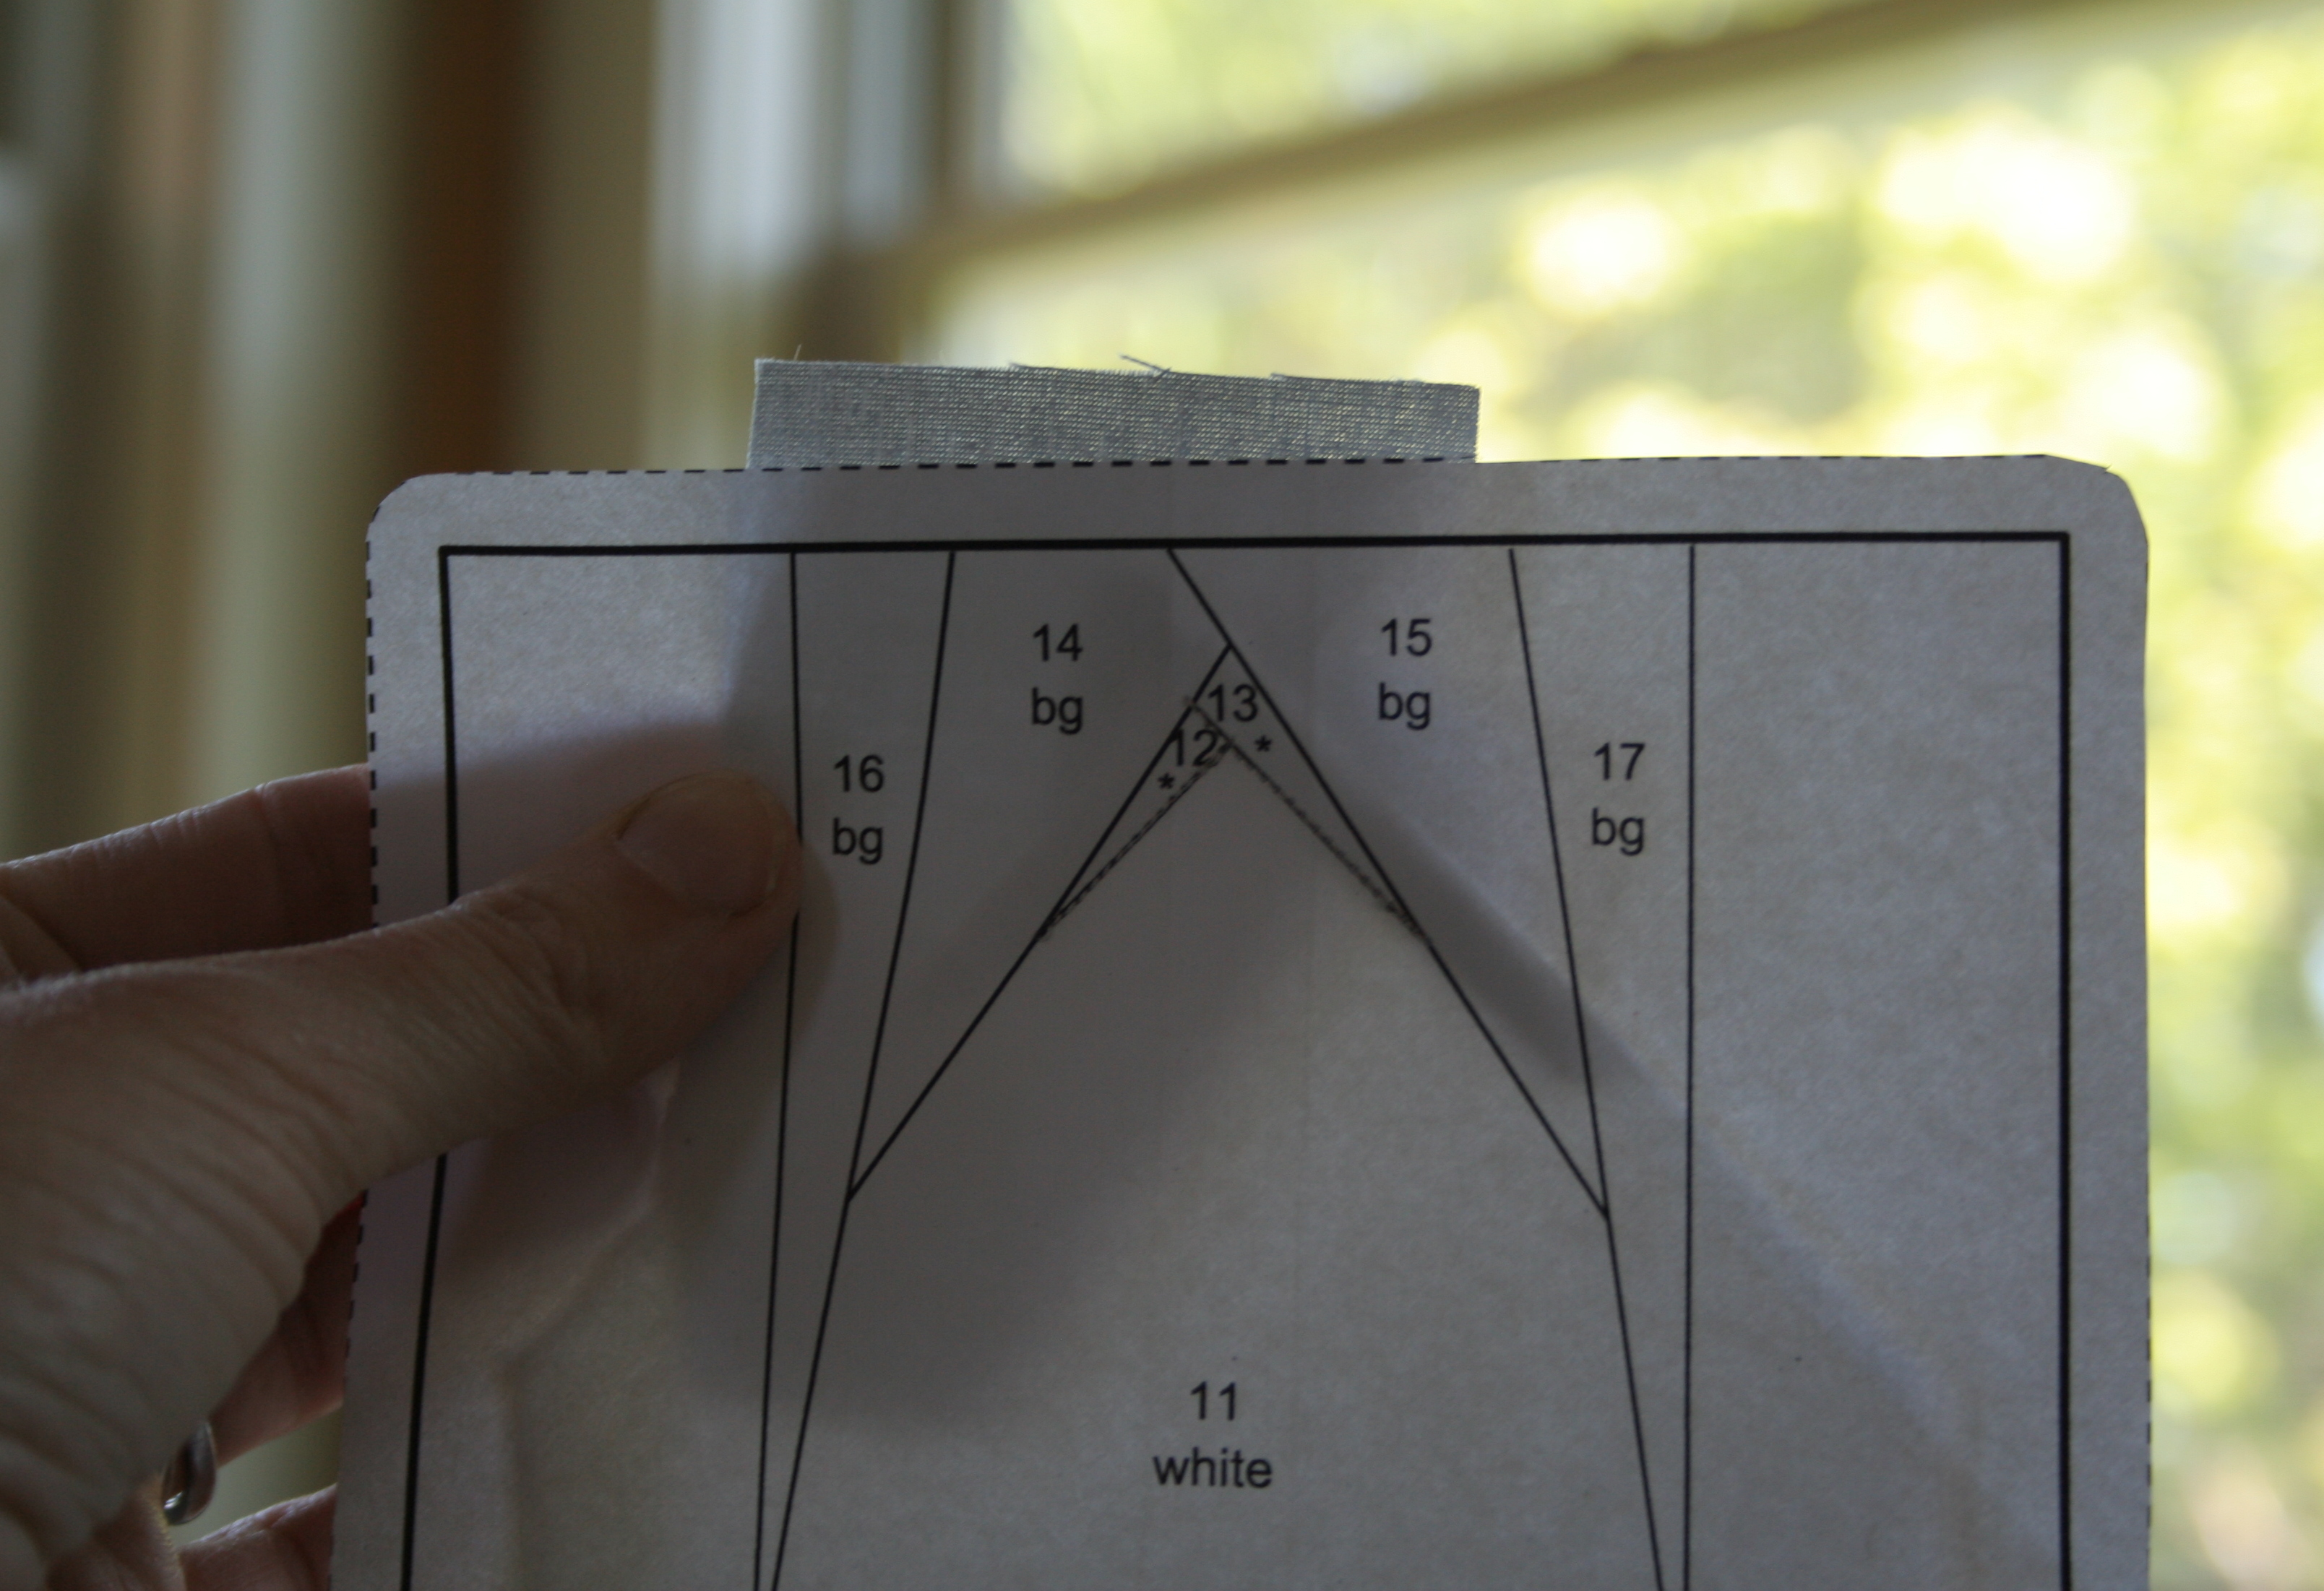
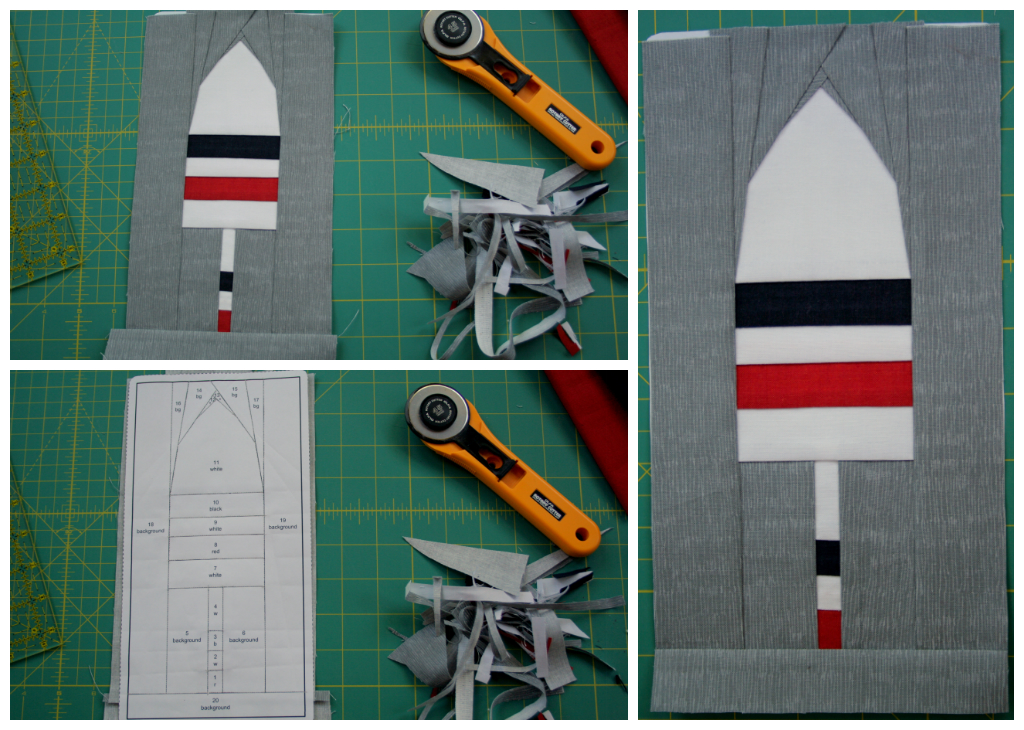
1. Choose a pattern. I am using my Buoy 1 pattern for this tutorial, since it’s fairly straightforward and consists of only one foundation piece. Summertime is calling my name, so this nautical pattern will soon become a pillow perfect for a beach house or someone’s nautical nursery. Buoy 1 used to be on Craftsy but is now no longer available, so you will need use another beginner pattern of your choosing. My available foundation paper piecing patterns are located on Payhip.
2. Assemble your tools. You will need:
– pattern & paper (I use regular printer paper. Some prefer velum or tracing paper)
– fabric & thread (I love Aurifil)
– rotary cutter and mat
– scissors (be sure to use non-fabric scissors to cut out your pattern. I suggest having fabric scissors, craft scissors, and small scissors for trimming threads)
– ruler (add a quarter rulers work well, but so do any quilting rulers with a 1/4″ measure)
– iron and pressing surface
– sewing machine
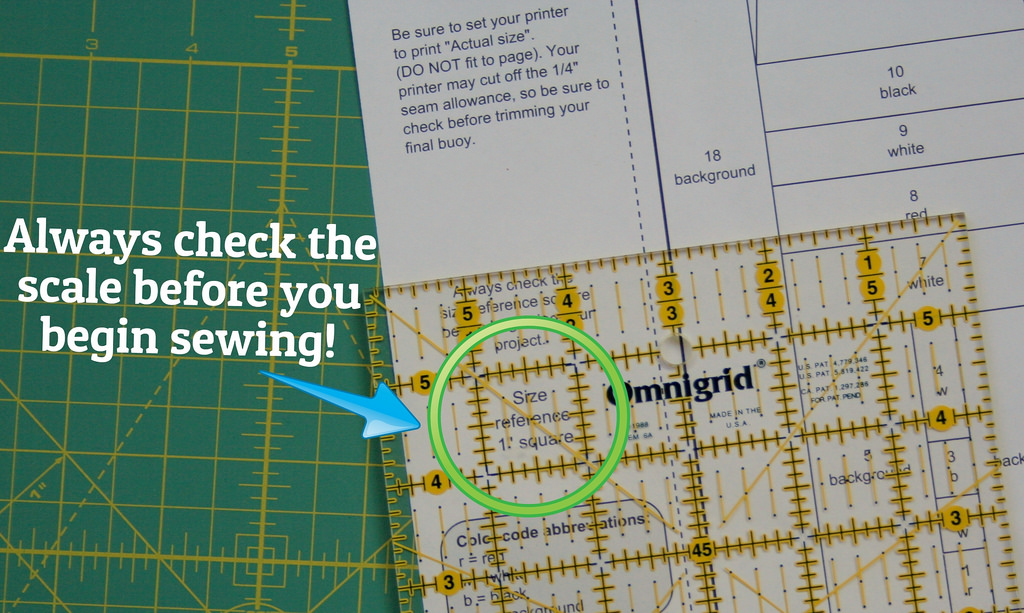
3. Print the pattern with your printer set on “Actual Size” and check the scale. ALWAYS check to make sure the pattern is printed to the correct scale before beginning to sew.
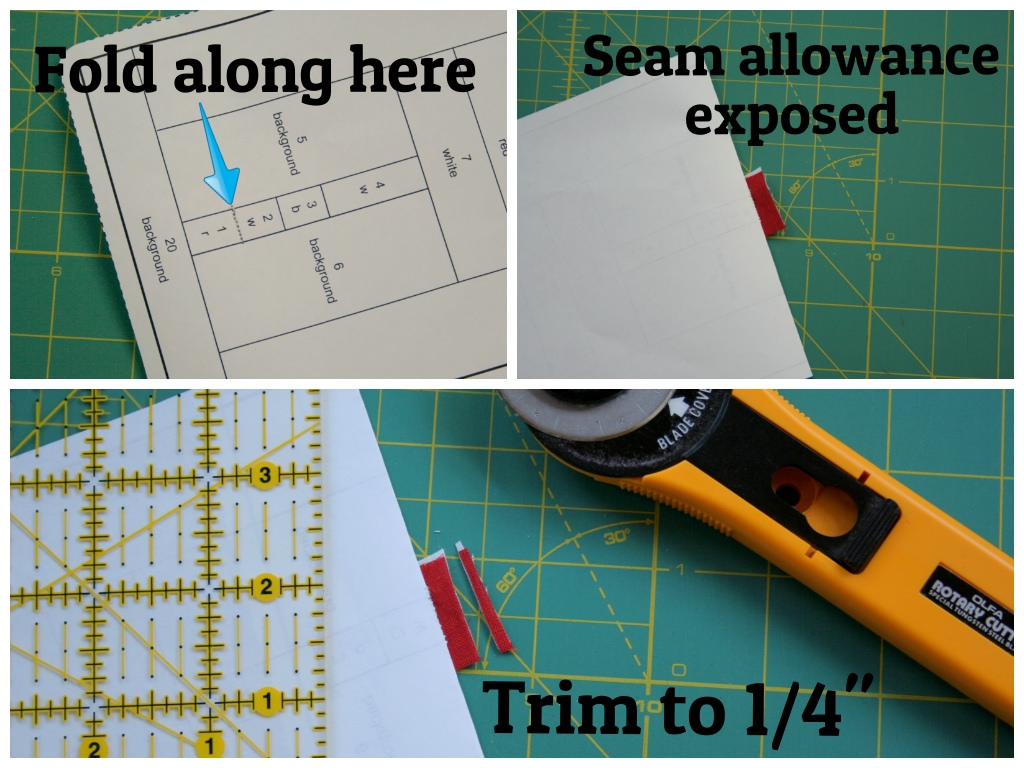
Cut out pattern using craft scissors. Many patterns have a dotted line showing a 1/4″ seam allowance on the pattern. Be sure to check that the seam allowance is included, and if it isn’t, add it on before you cut.
*Here, some people like to color their pattern with colored pencils to help with accurate fabric piecing. I only do this for complicated patterns or when I am using different fabric colors than indicated on the pattern, but you are welcome to get out the colored pencils and do some coloring here if you want!*
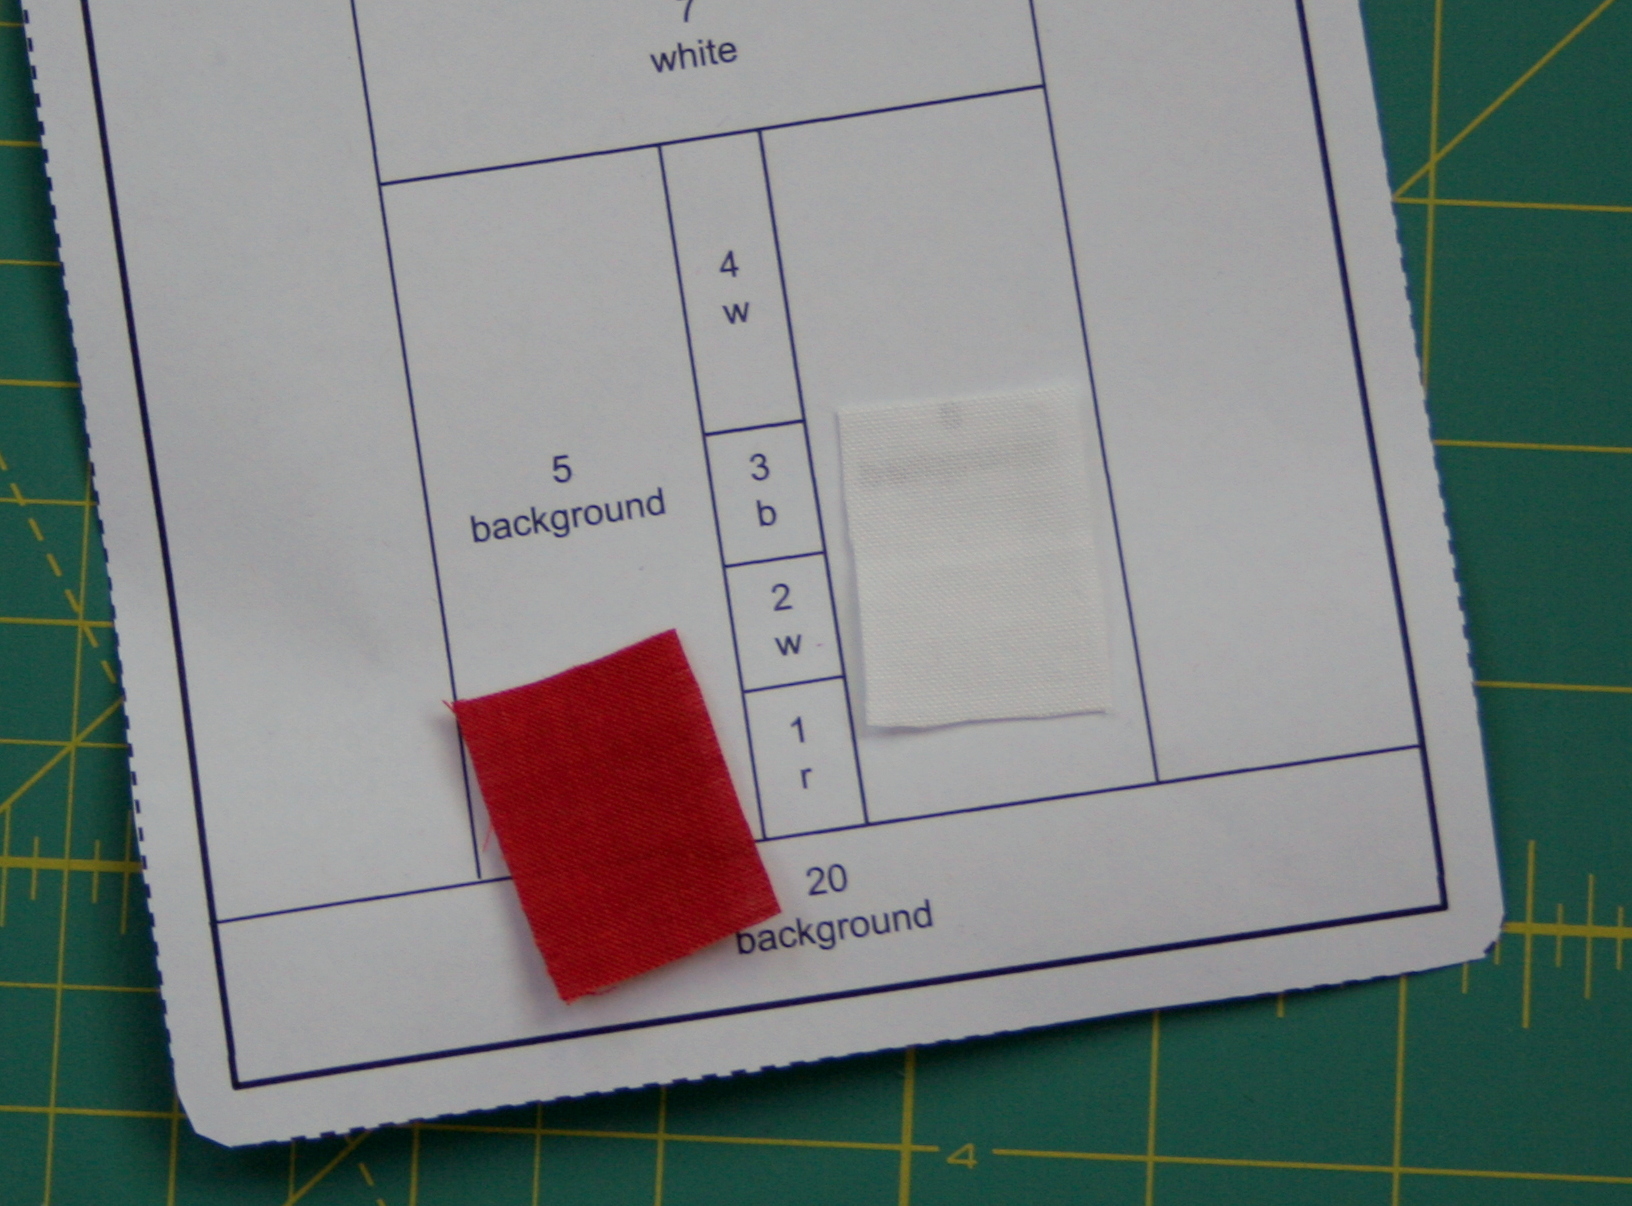
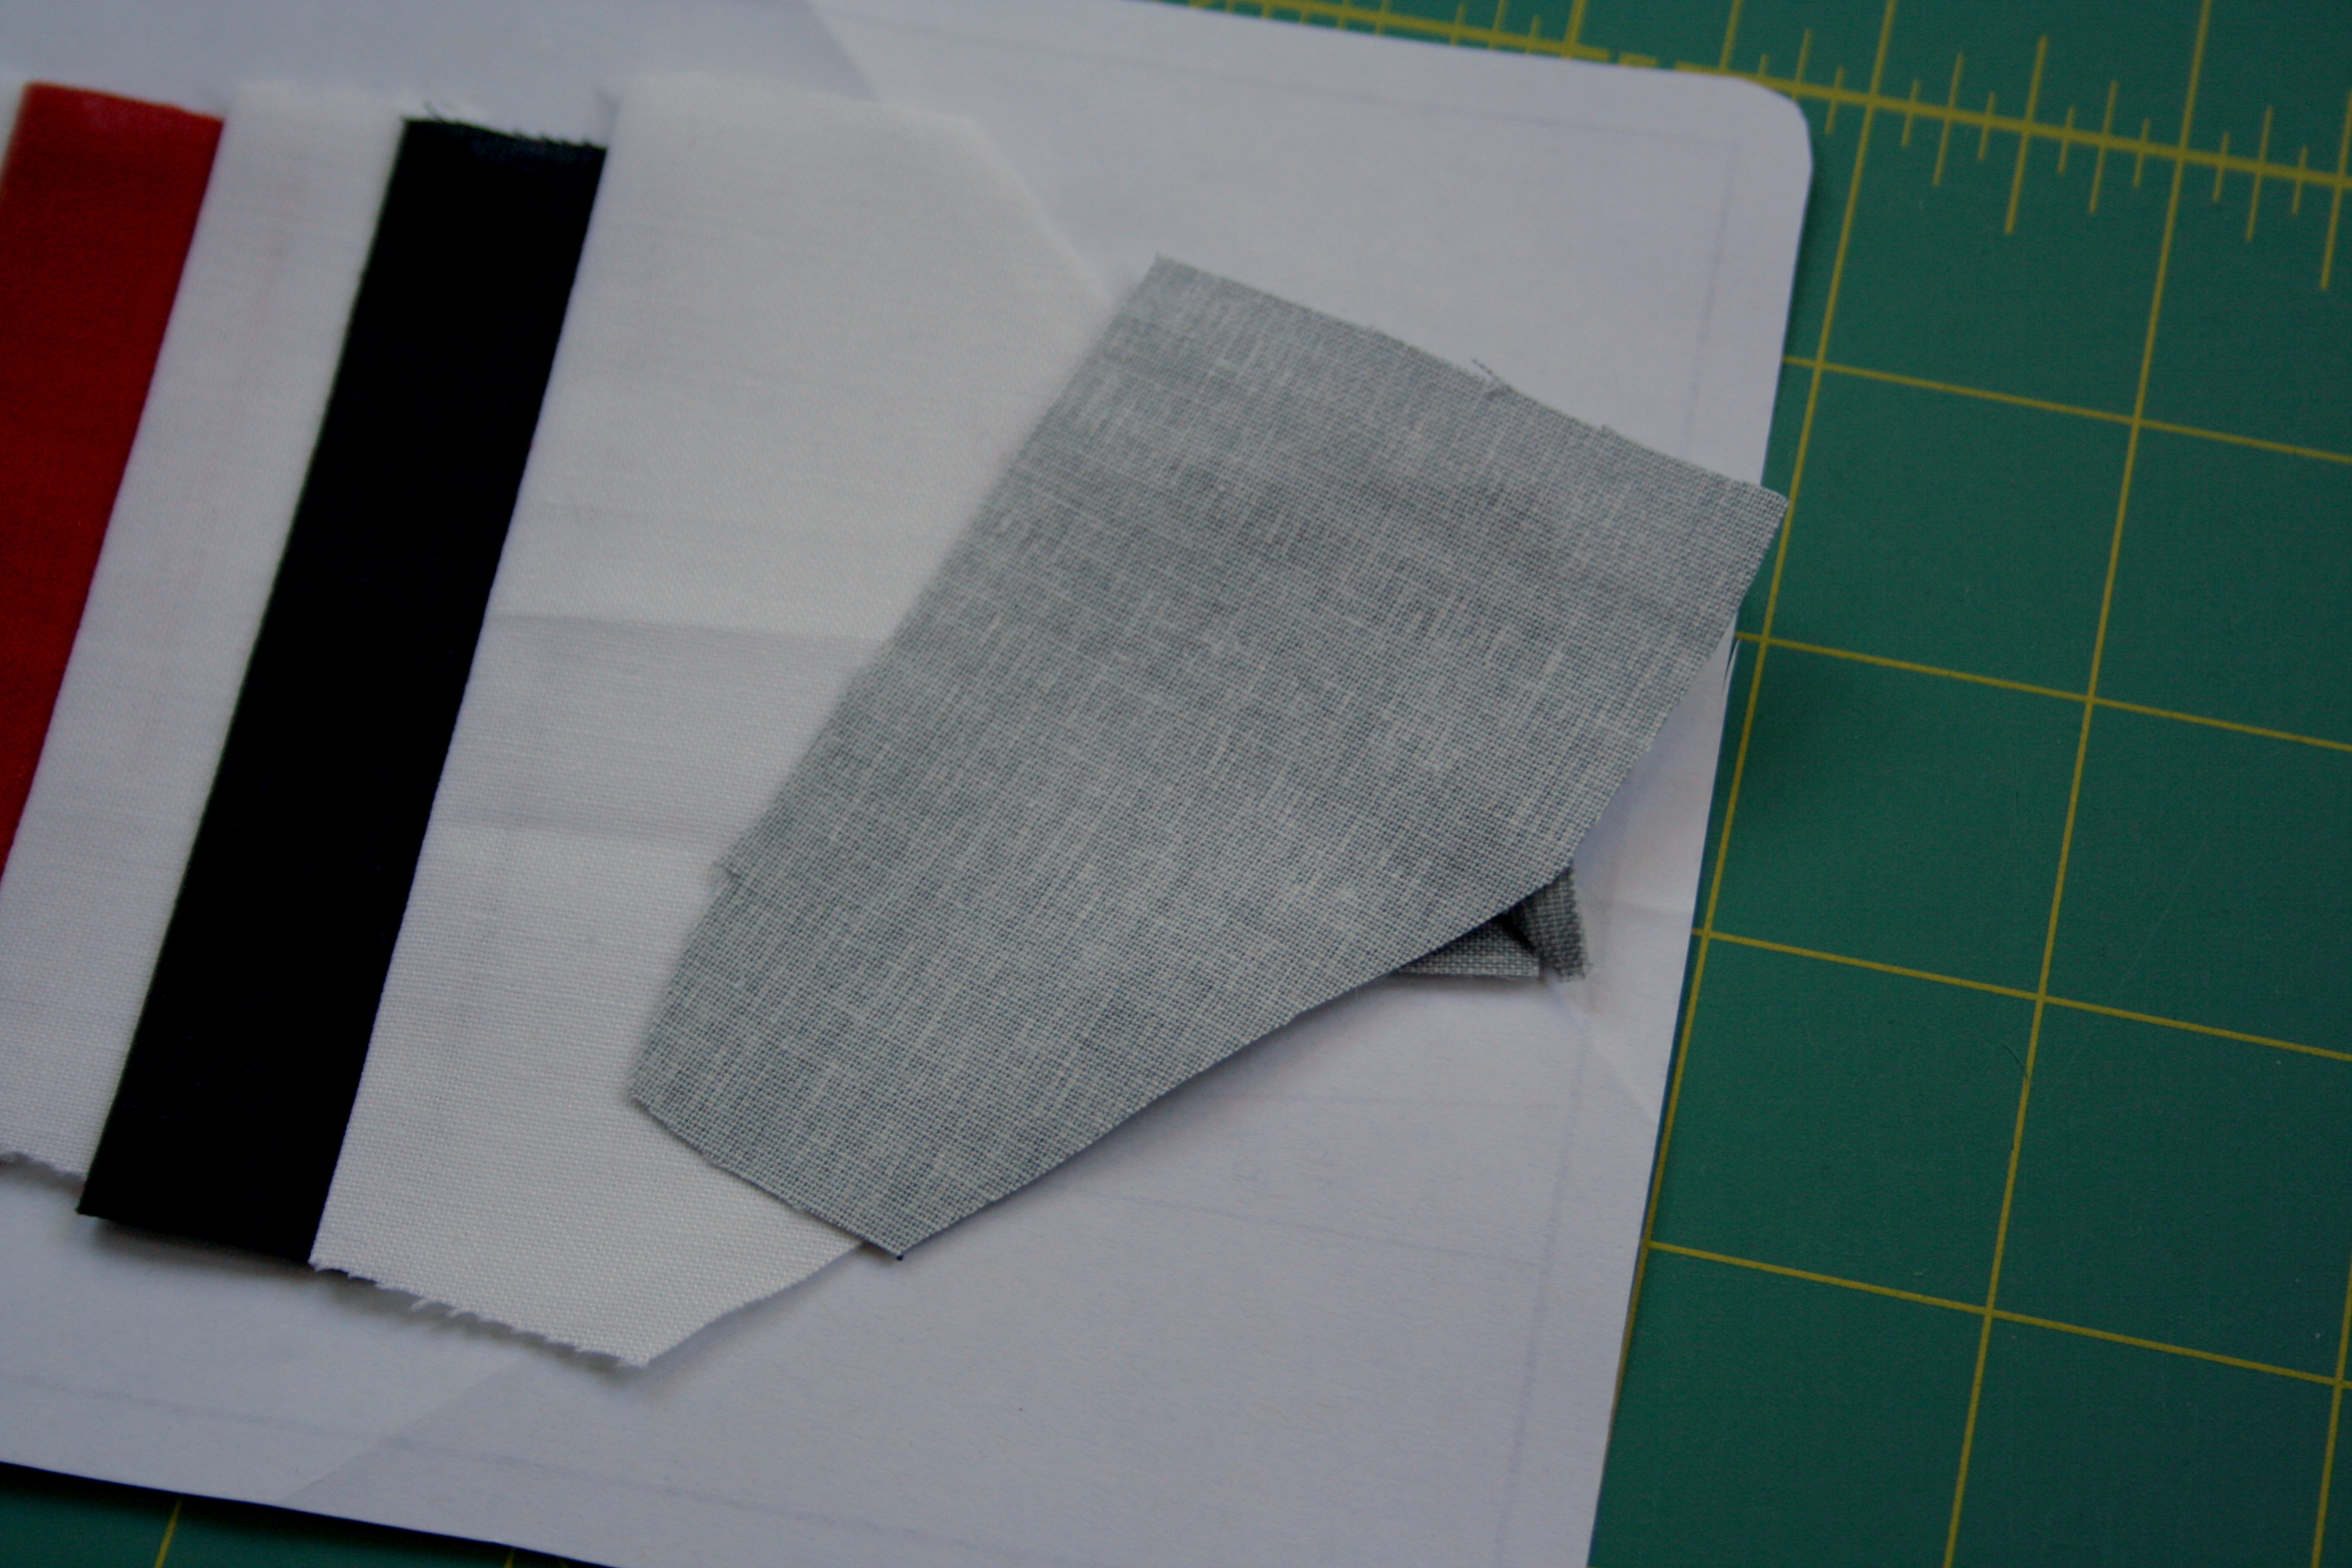
4. You’re ready to begin! Cut fabric pieces (or find scraps) to fit spaces 1 and 2 on the pattern. Be sure to include a 1/4″ seam allowance on all sides. Paper piecing is kind of like paint by number, but with sewing, and always in order. You start with piece 1, sew on piece 2, then piece 3, etc. *When cutting fabric for paper piecing, I am generous in my cutting. I cut pieces that are amply large enough to cover the space and seam allowance and then some–lots of wiggle room. Yes, it may waste a bit more fabric, but it makes the process a lot smoother. To me, smooth (no seam ripper required) sewing is worth more than a few tiny scraps of fabric. Also, when you trim your seam allowances, any large pieces of excess fabric can be used for other pieces of the pattern. Go big!*
5. Here’s where the spatial part comes in, so get ready. Remember, you are using the paper foundation to help you make the pattern on the back, as if you are looking through a mirror. Ready?
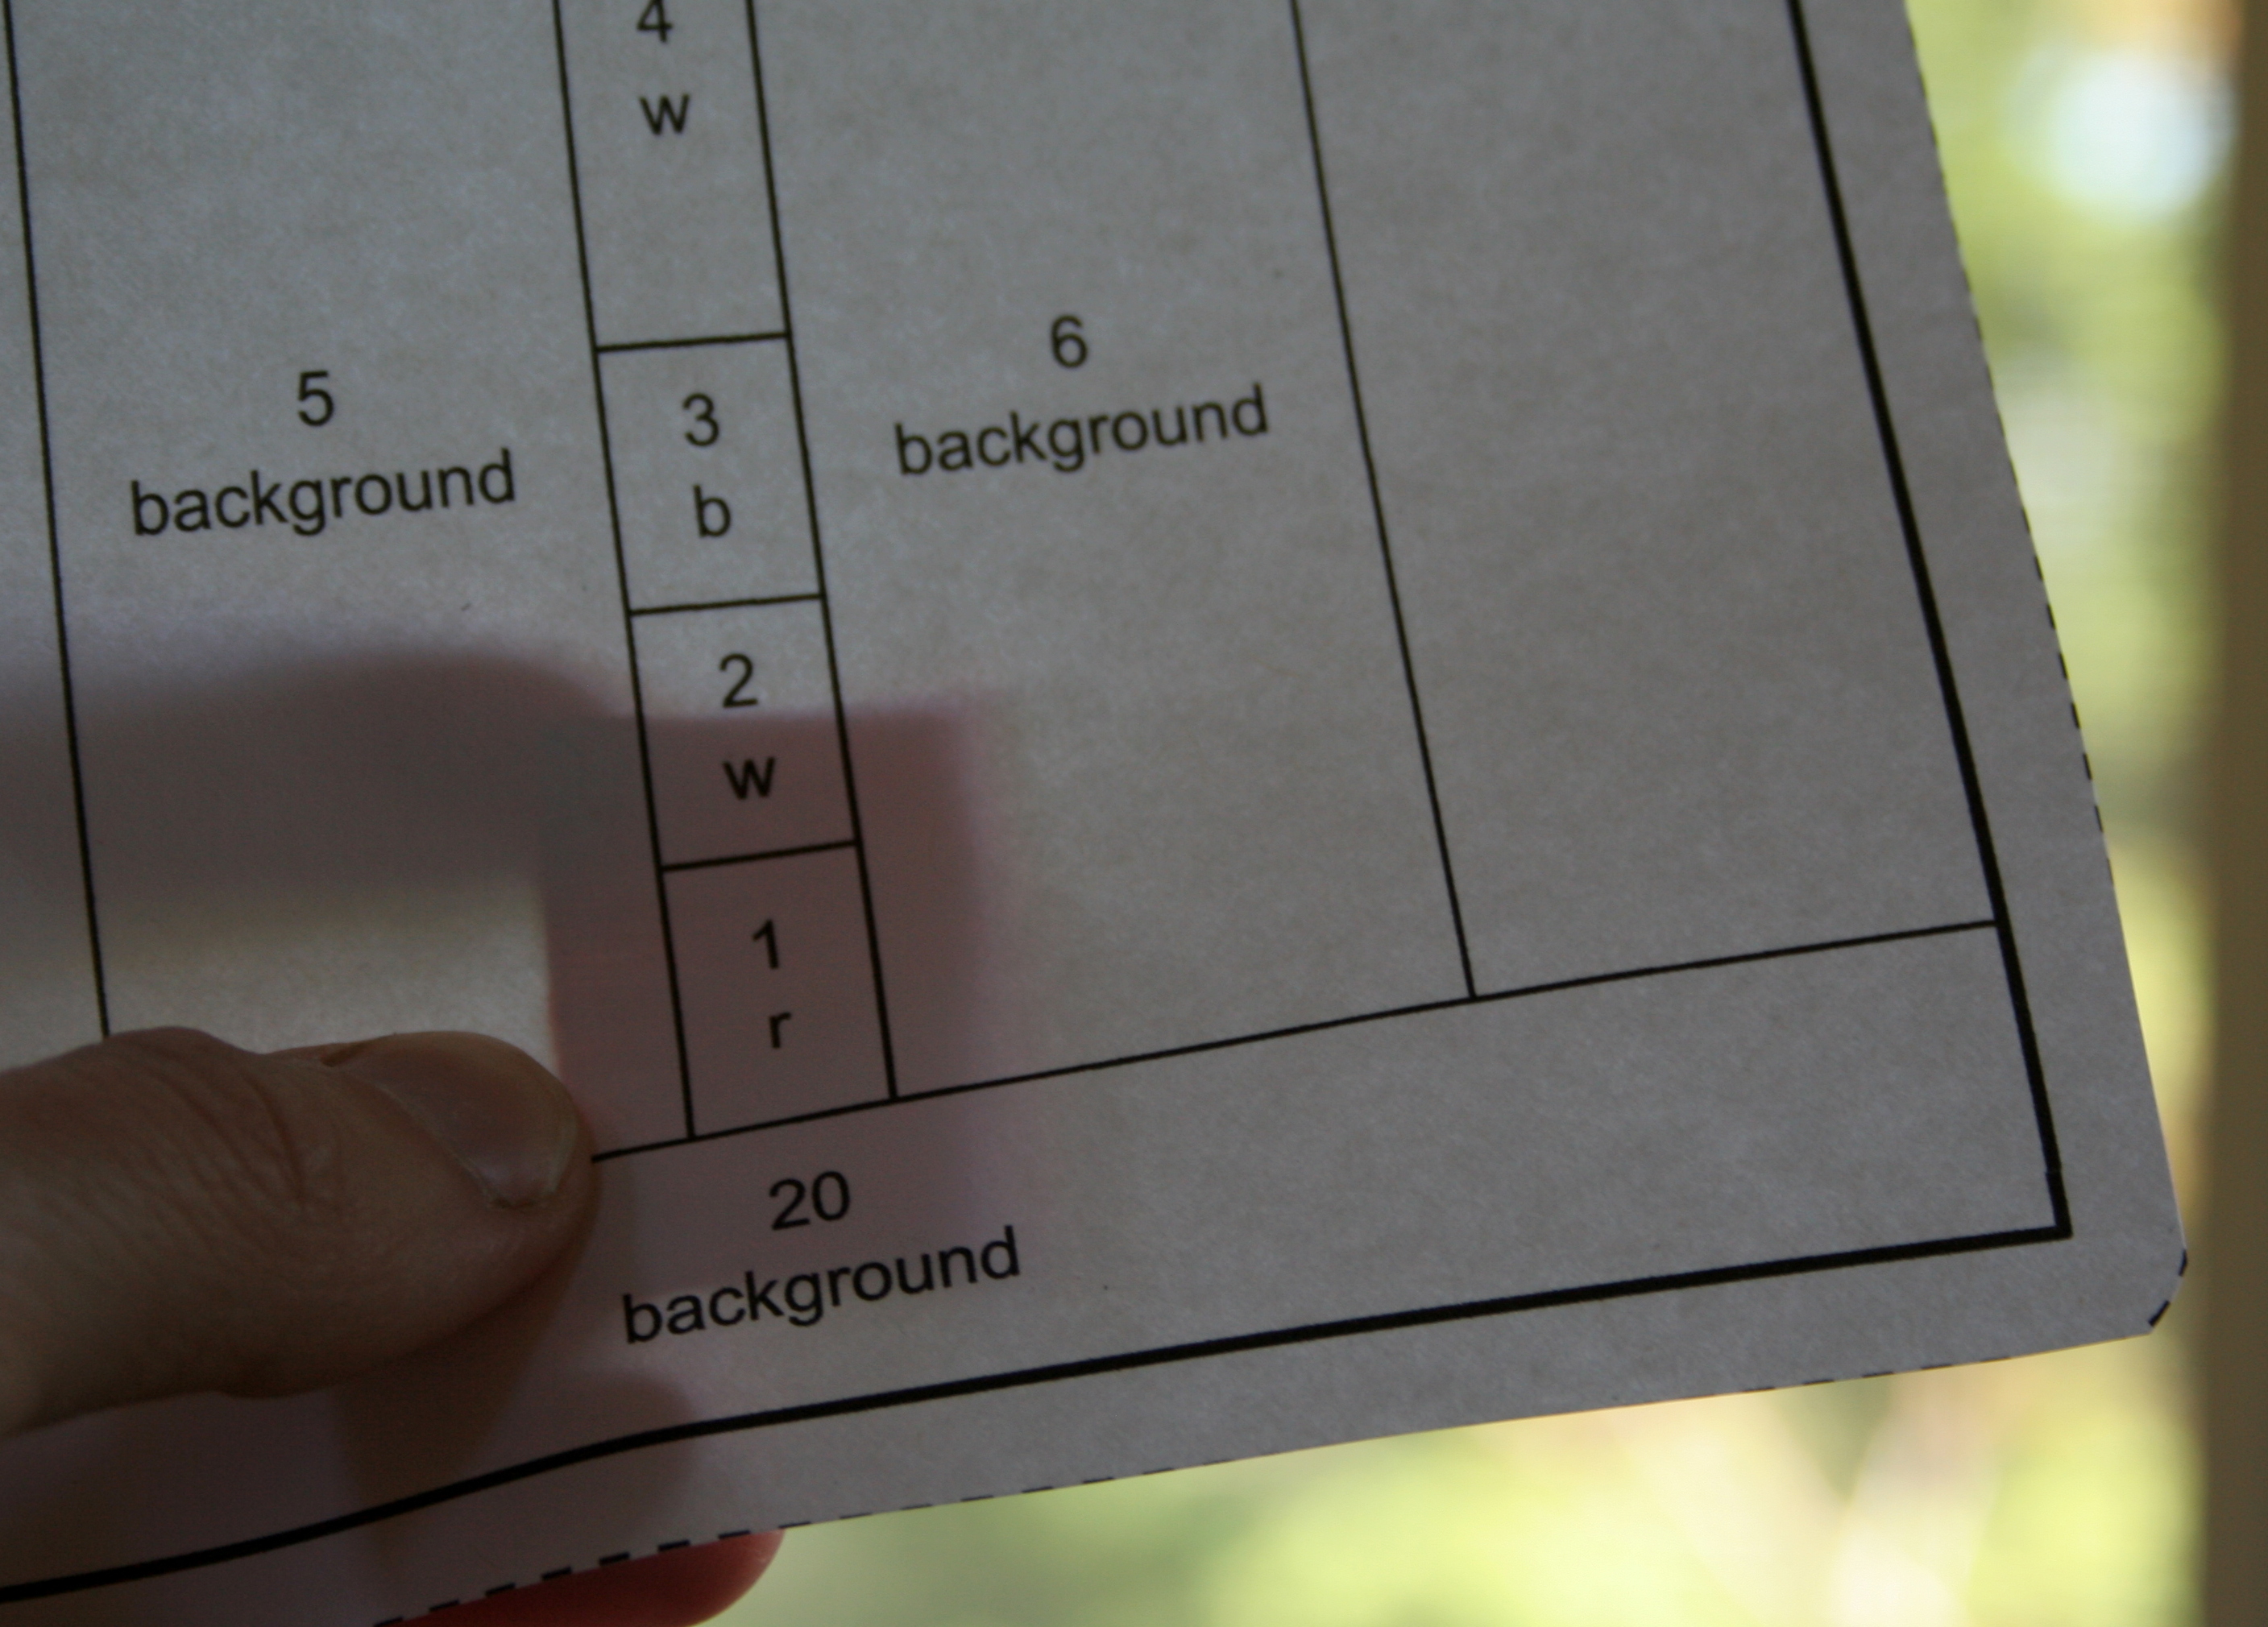
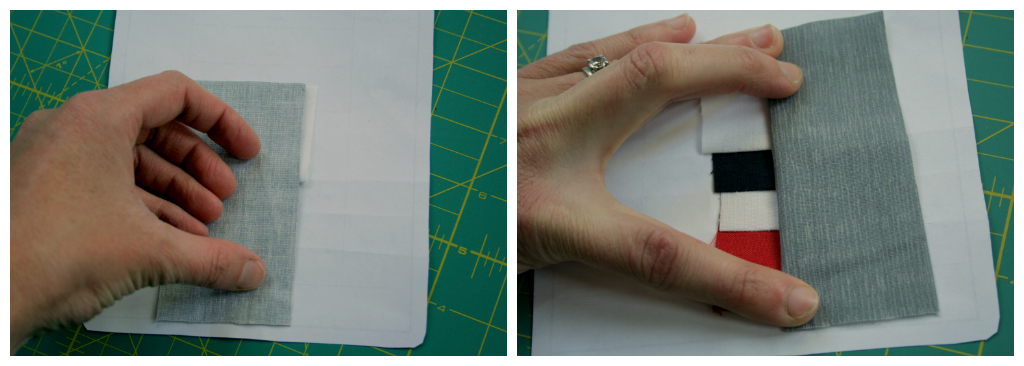
Place the fabric for piece 1 on the back of the paper, wrong side of the fabric facing you (against the paper). Hold it up to a window or a light-box to ensure the fabric fully covers the #1 space, plus seam allowances.
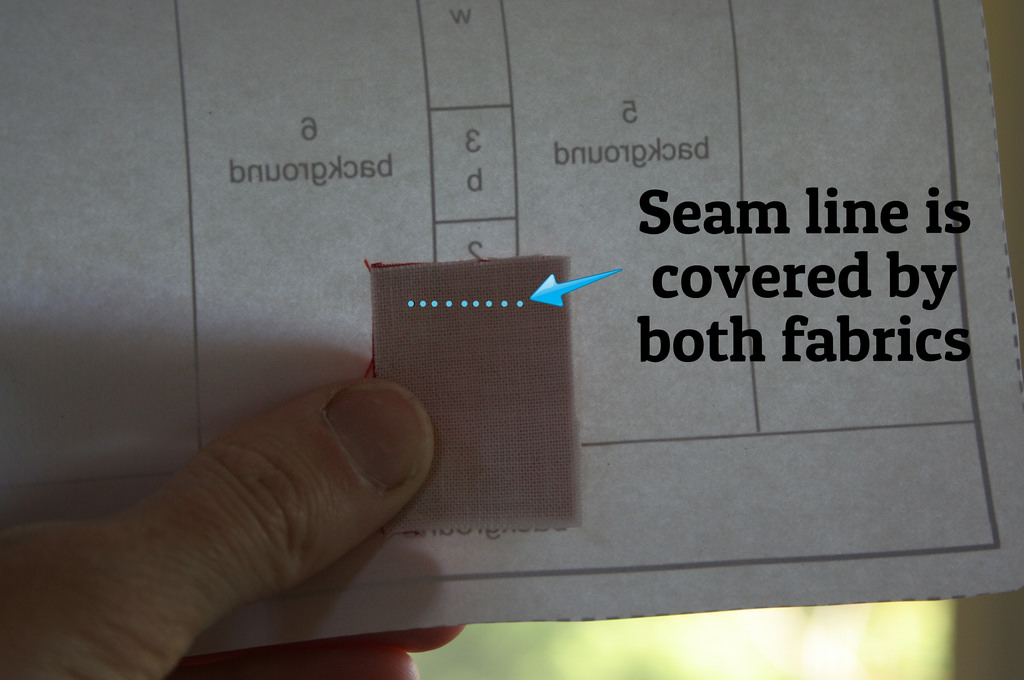
6. Holding fabric 1 in place, position the paper so that the printed side is away from you. Take the fabric scrap for space #2 and place it right side down, on top of fabric 1. Be sure the seam line between 1 and 2 is covered by both fabrics, holding up to the light if needed. The fabrics should now be right sides facing each other, and when you sew along the seam line and fold fabric 2 up, it should cover the #2 space plus seam allowances.
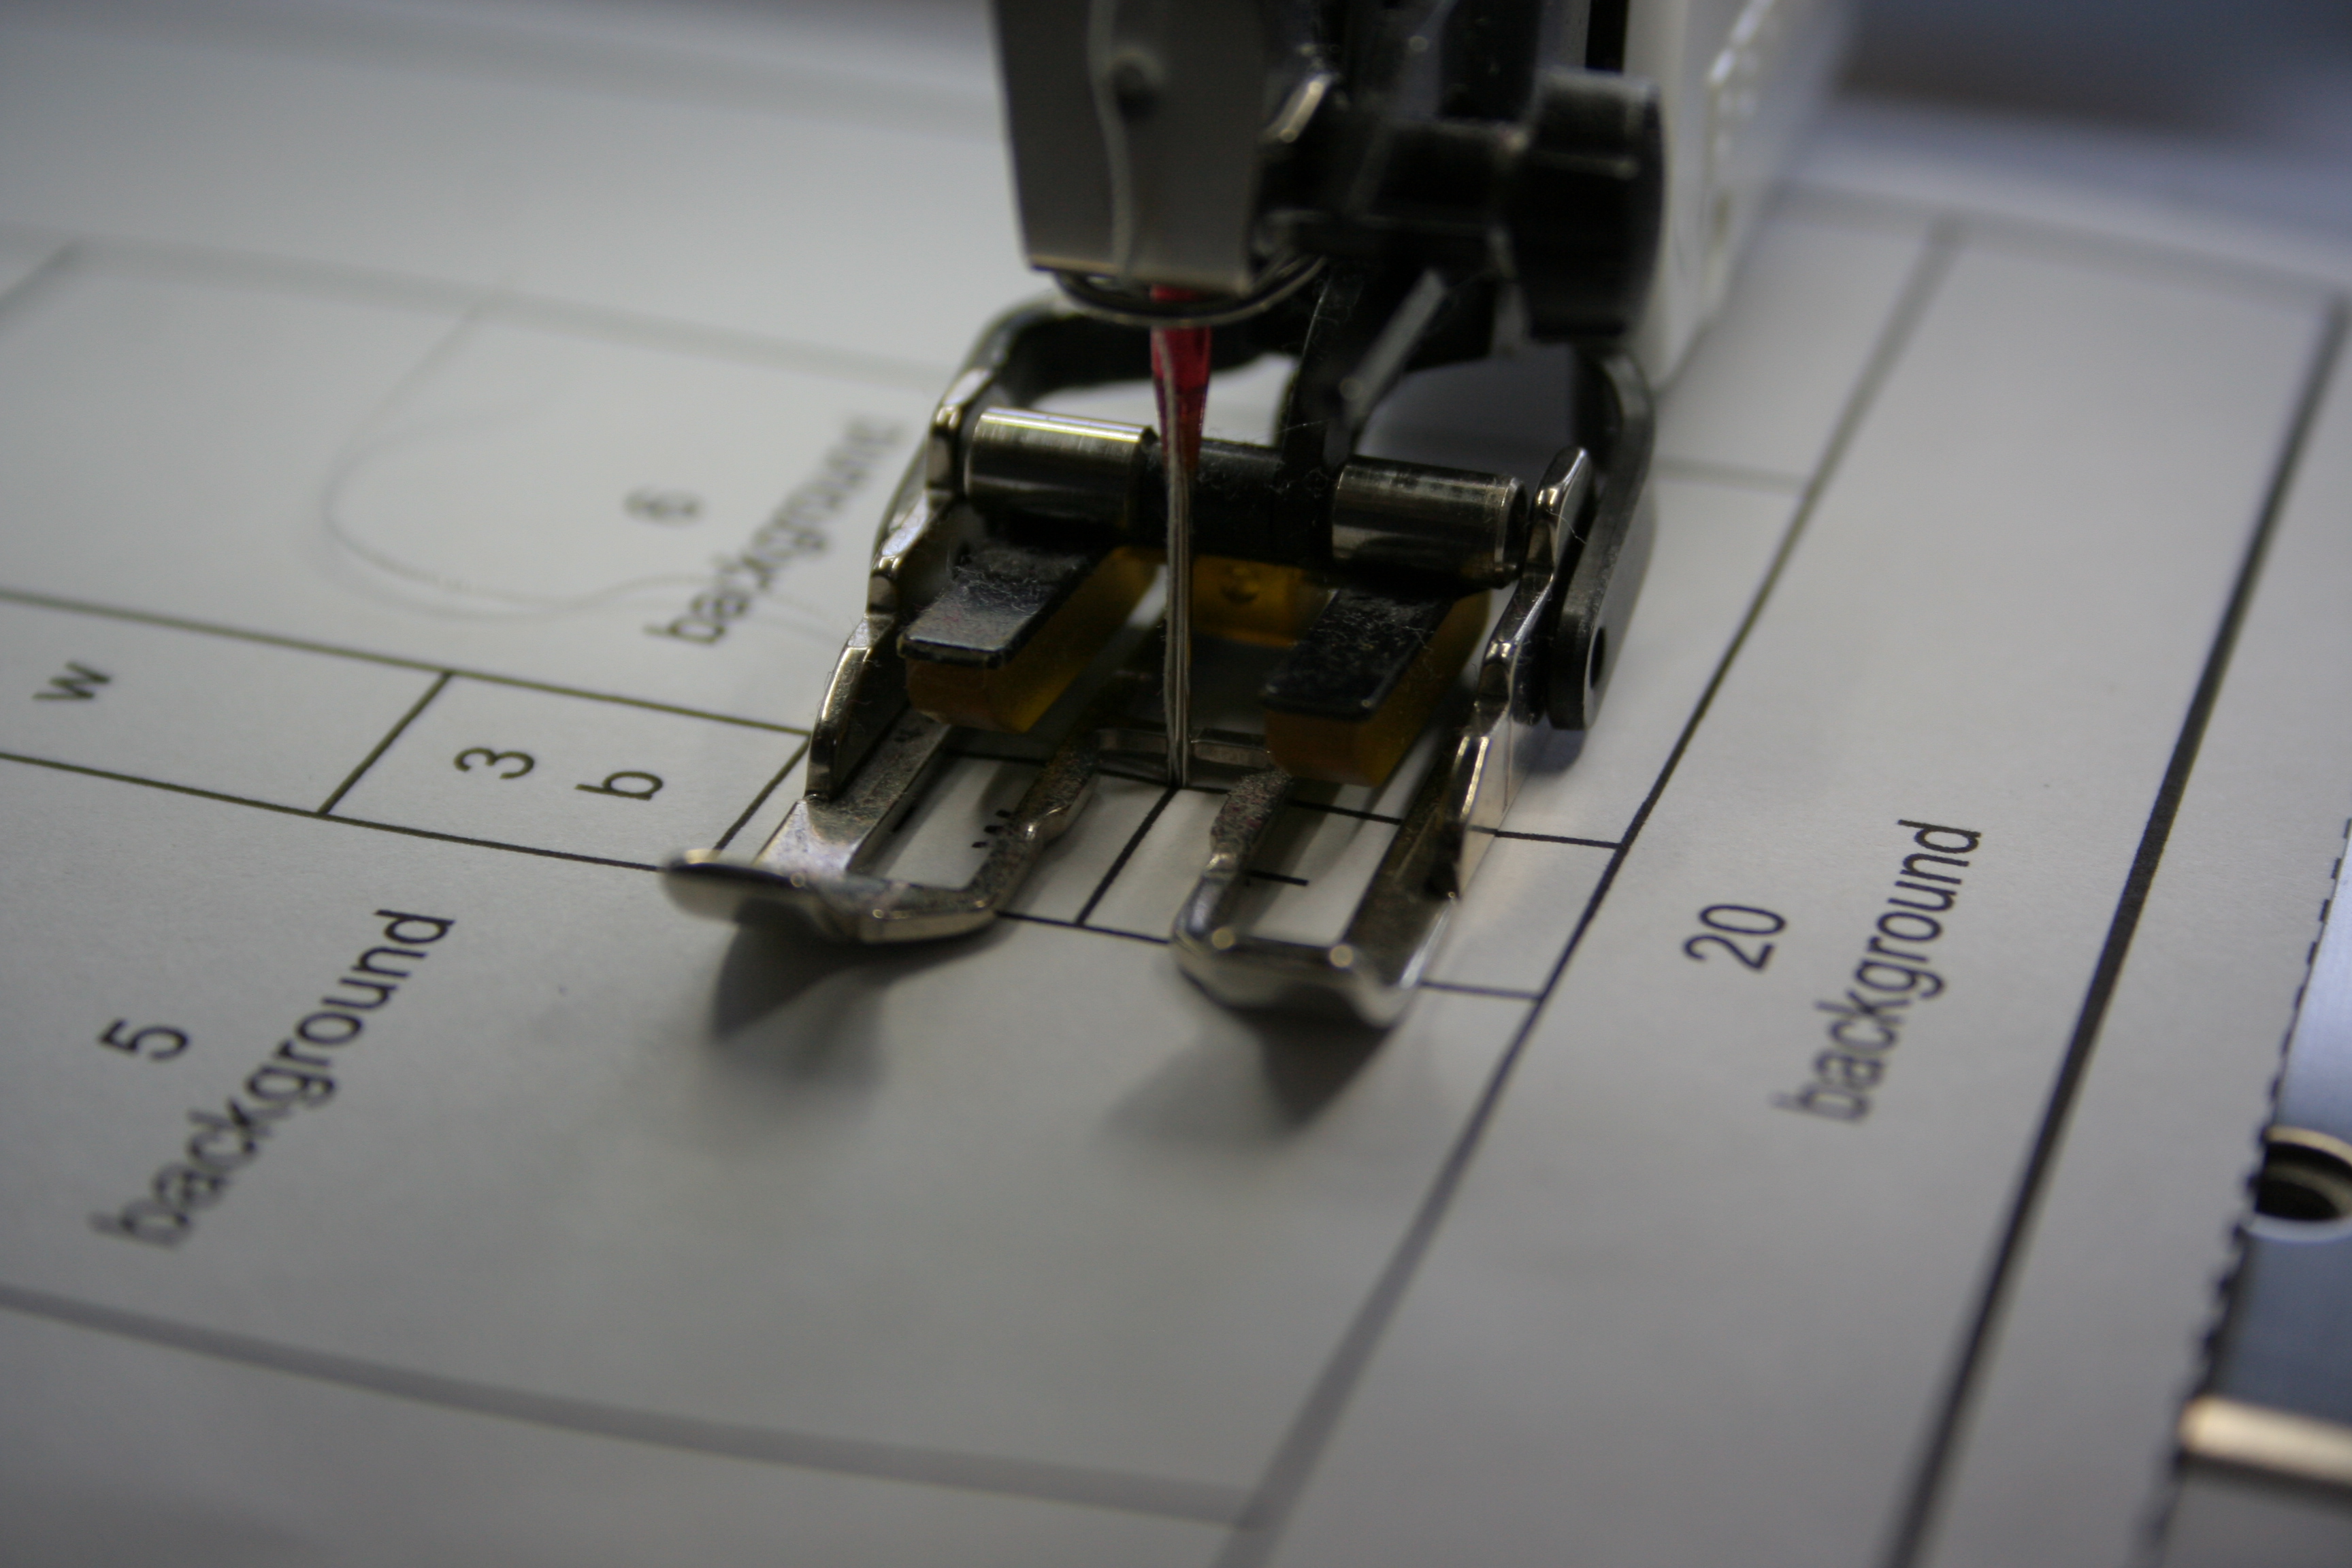
*Before you sew, shorten the stitch length on your sewing machine. I set mine to anywhere between 1.4 and 1.5. That way the paper is very easy to remove at the end.*
7. Holding both pieces of fabric in place, sew along the line between spaces 1 and 2, with the paper on top. Some people like to pin or even glue their pieces in place before sewing, since the fabric is underneath the paper. I personally just carefully hold them in place with my finger. I haven’t had a problem yet, and it’s one less step if that works for you.
Accuracy tip: Lower the needle by hand for the first stitch, ensuring that your sewing will be straight along the line. Back-stitch for one stitch at the end to secure your threads.
8. Trim thread ends. (If you want to make yourself a cute little thread catch, I have a free tutorial HERE!)
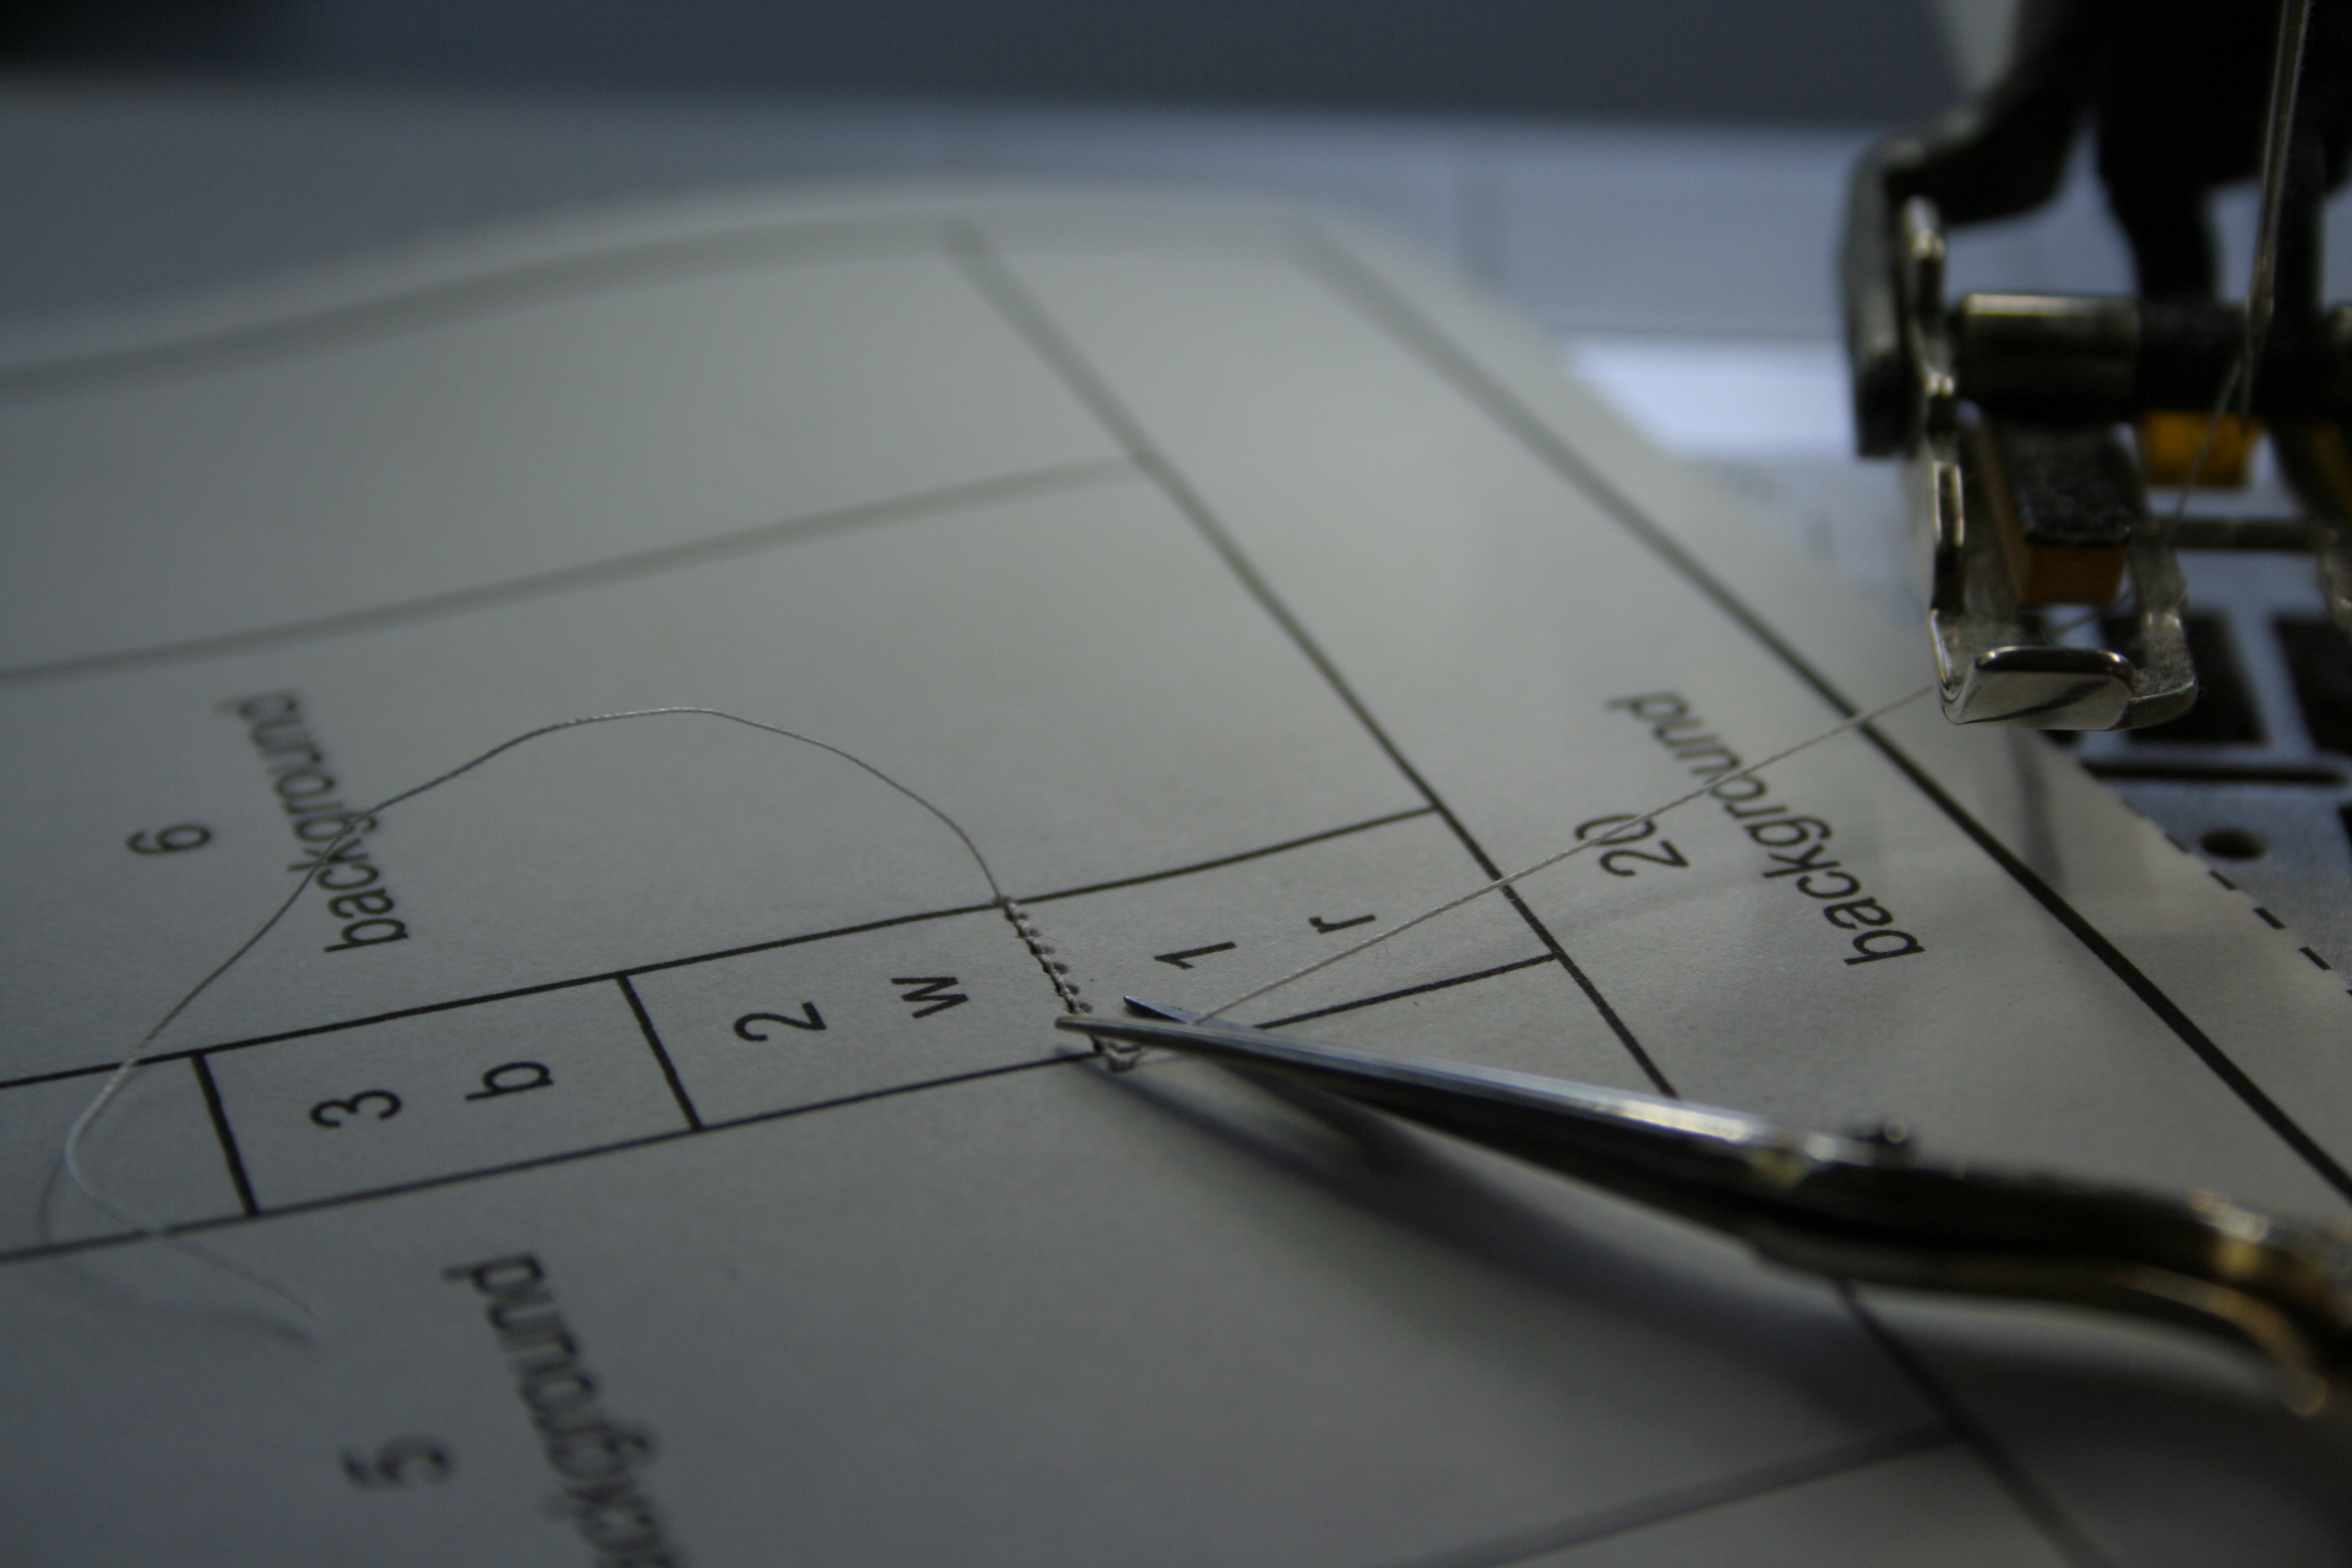
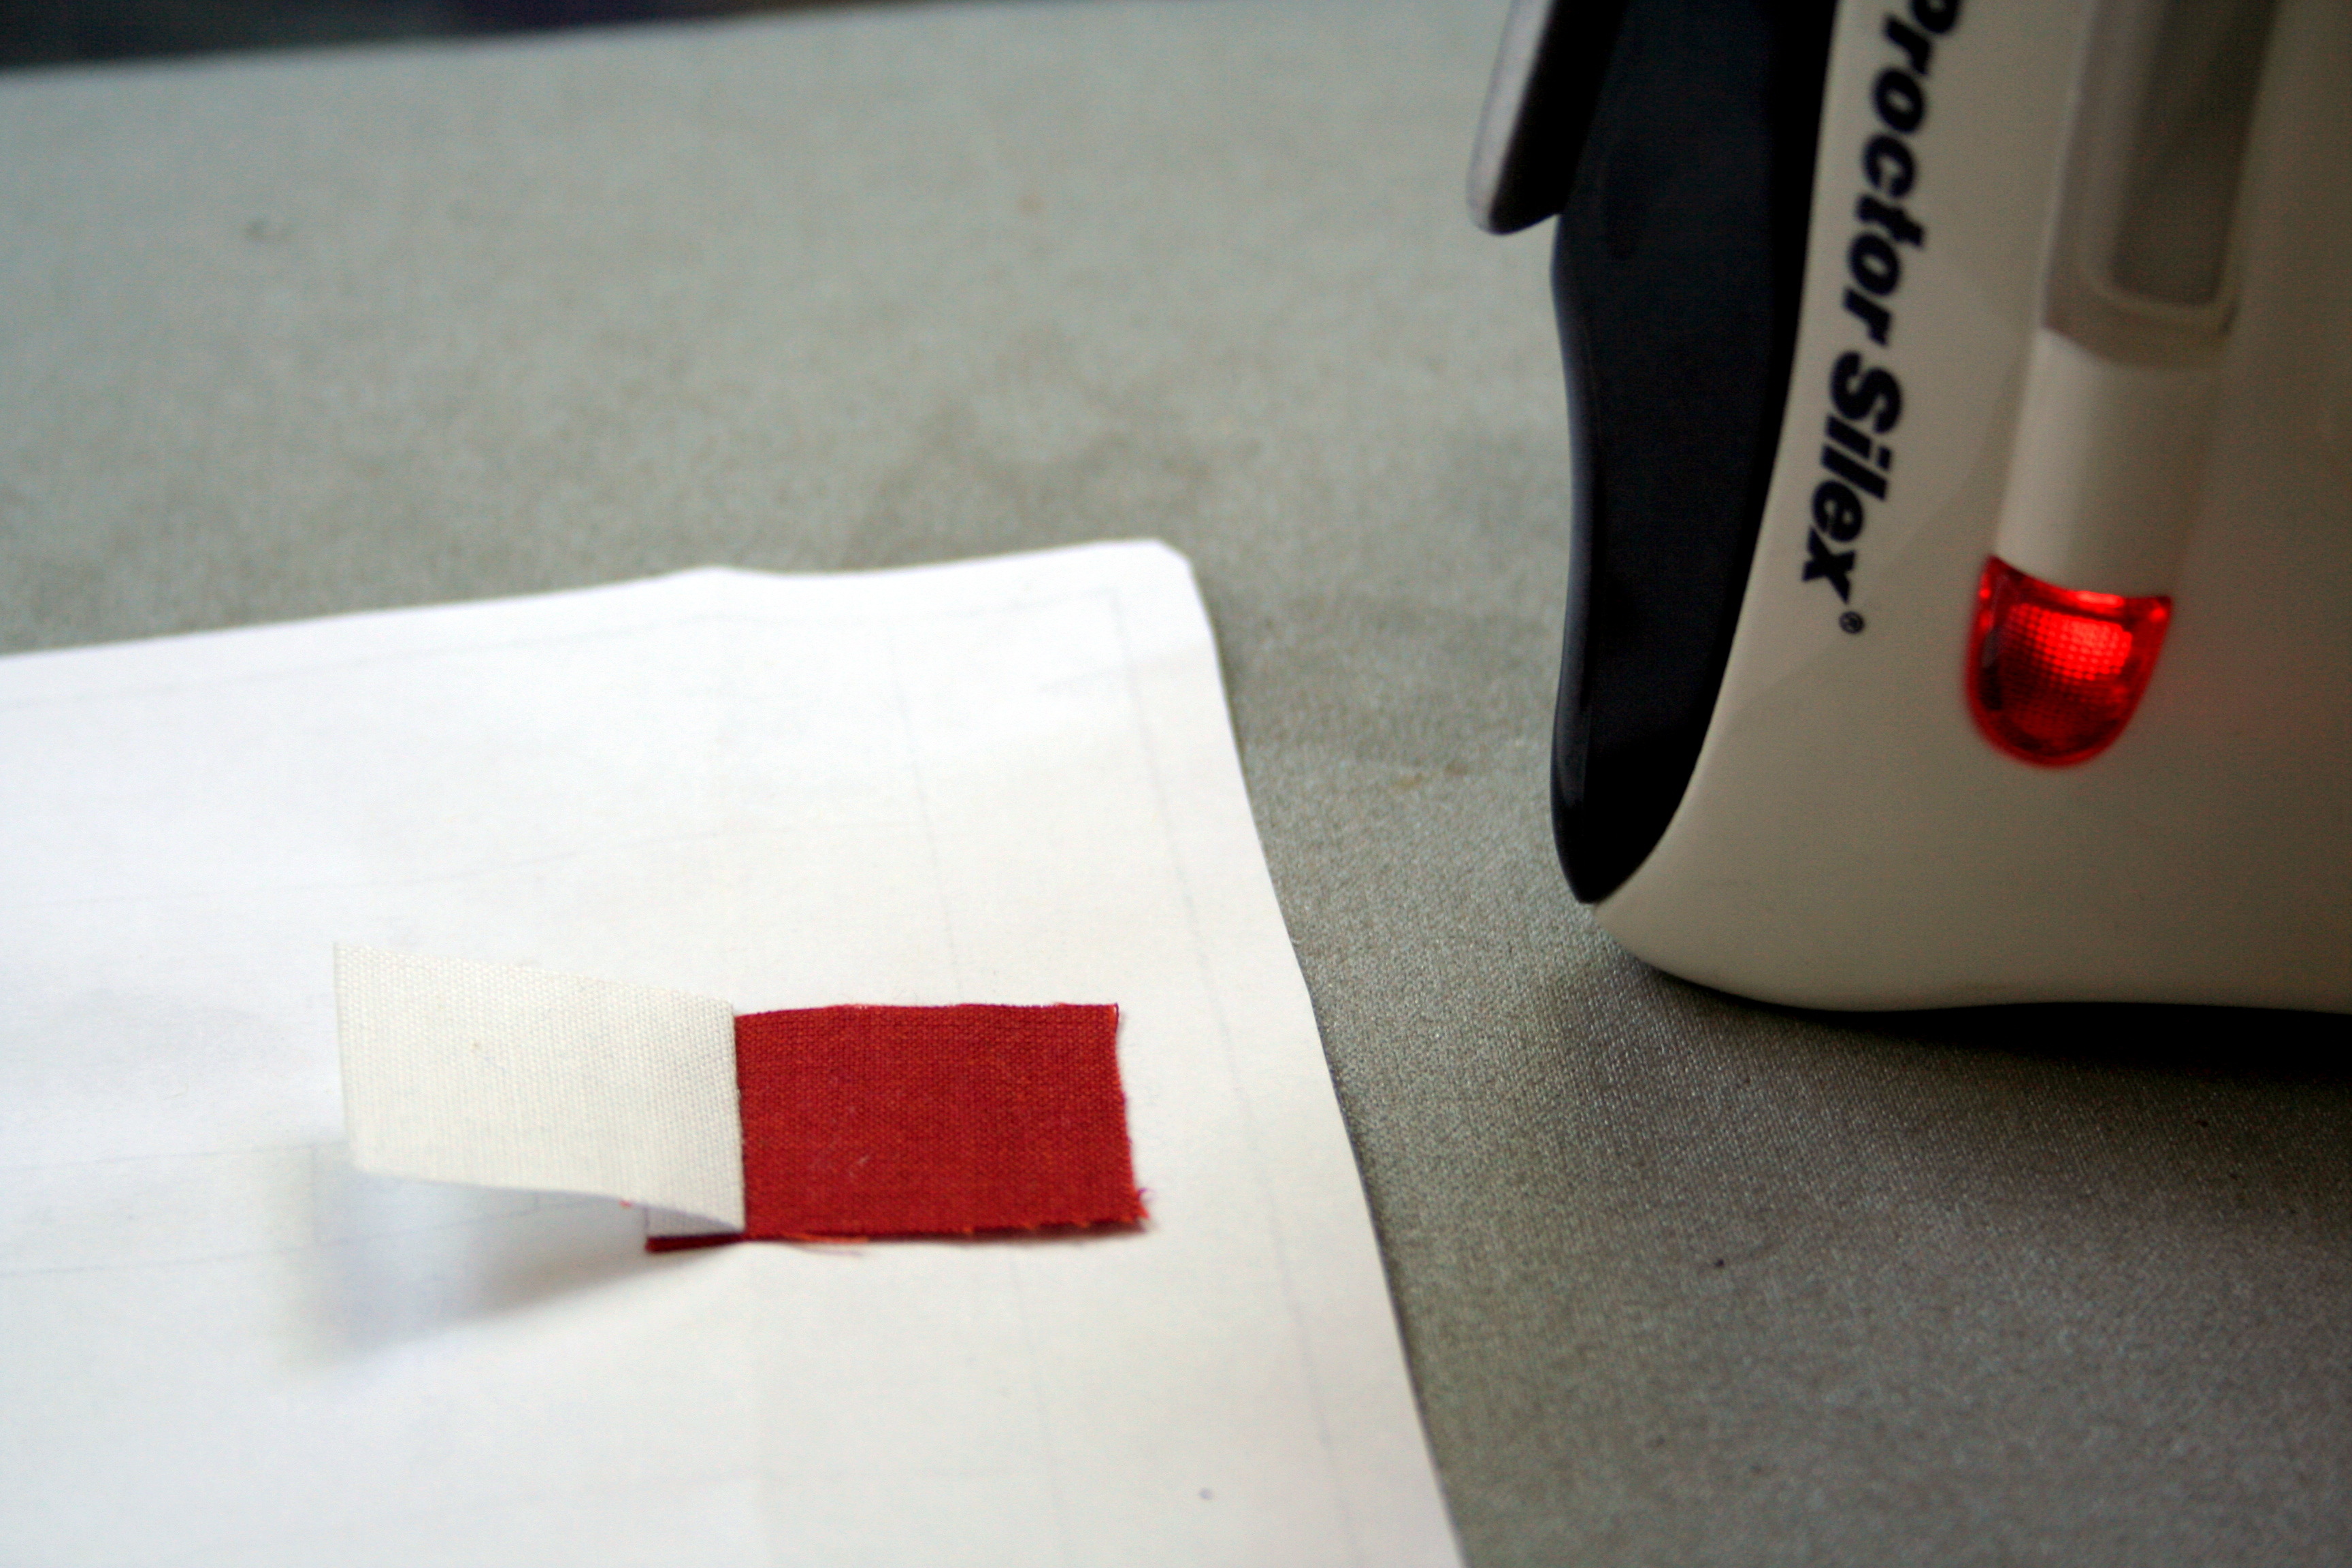
9. Fold the paper down along the seam you just sewed, and trim the fabric to 1/4″.
10. With the foundation paper flat and unfolded, press and set the seam with a hot iron (no steam). Finger press fabric 2 up to cover its space and press again.
When you hold the paper up to the light, you should see that fabric 1 covers the #1 space and fabric 2 covers the #2 space, with seam allowances.
11. Continue this method for the rest of the pattern pieces. Cut, line up, sew, fold & trim, press. Cut, line up, sew, fold & trim, press. Repeat.
Getting ready to sew on piece 3–front view.Getting ready to sew on piece 3–back view. Remember: the fabric has right side facing the pattern paper, with the seam along the top edge. Once sewn, the fabric will be pressed up so that the right side is showing.
If you’ve got the hang of it, you can skip the next few parts and just scroll down to the finishing steps. For those of you who run into tricky spots along the way, here are some additional tips to help smooth the process.
Tips for Lining Up Seams:
If you are truly generous in your fabric cutting, this tip is not as necessary since you’re bound to have enough fabric even if your seams end up being larger than 1/4″. However, if the frugal part of you just can’t cut those fabric bits ginormously, here’s a tip to get accurate 1/4″ seams to conserve fabric. Note that this works best for straight-forward seams, and not nearly as well for long, skinny, tricky angles (I’ll address those in a bit).
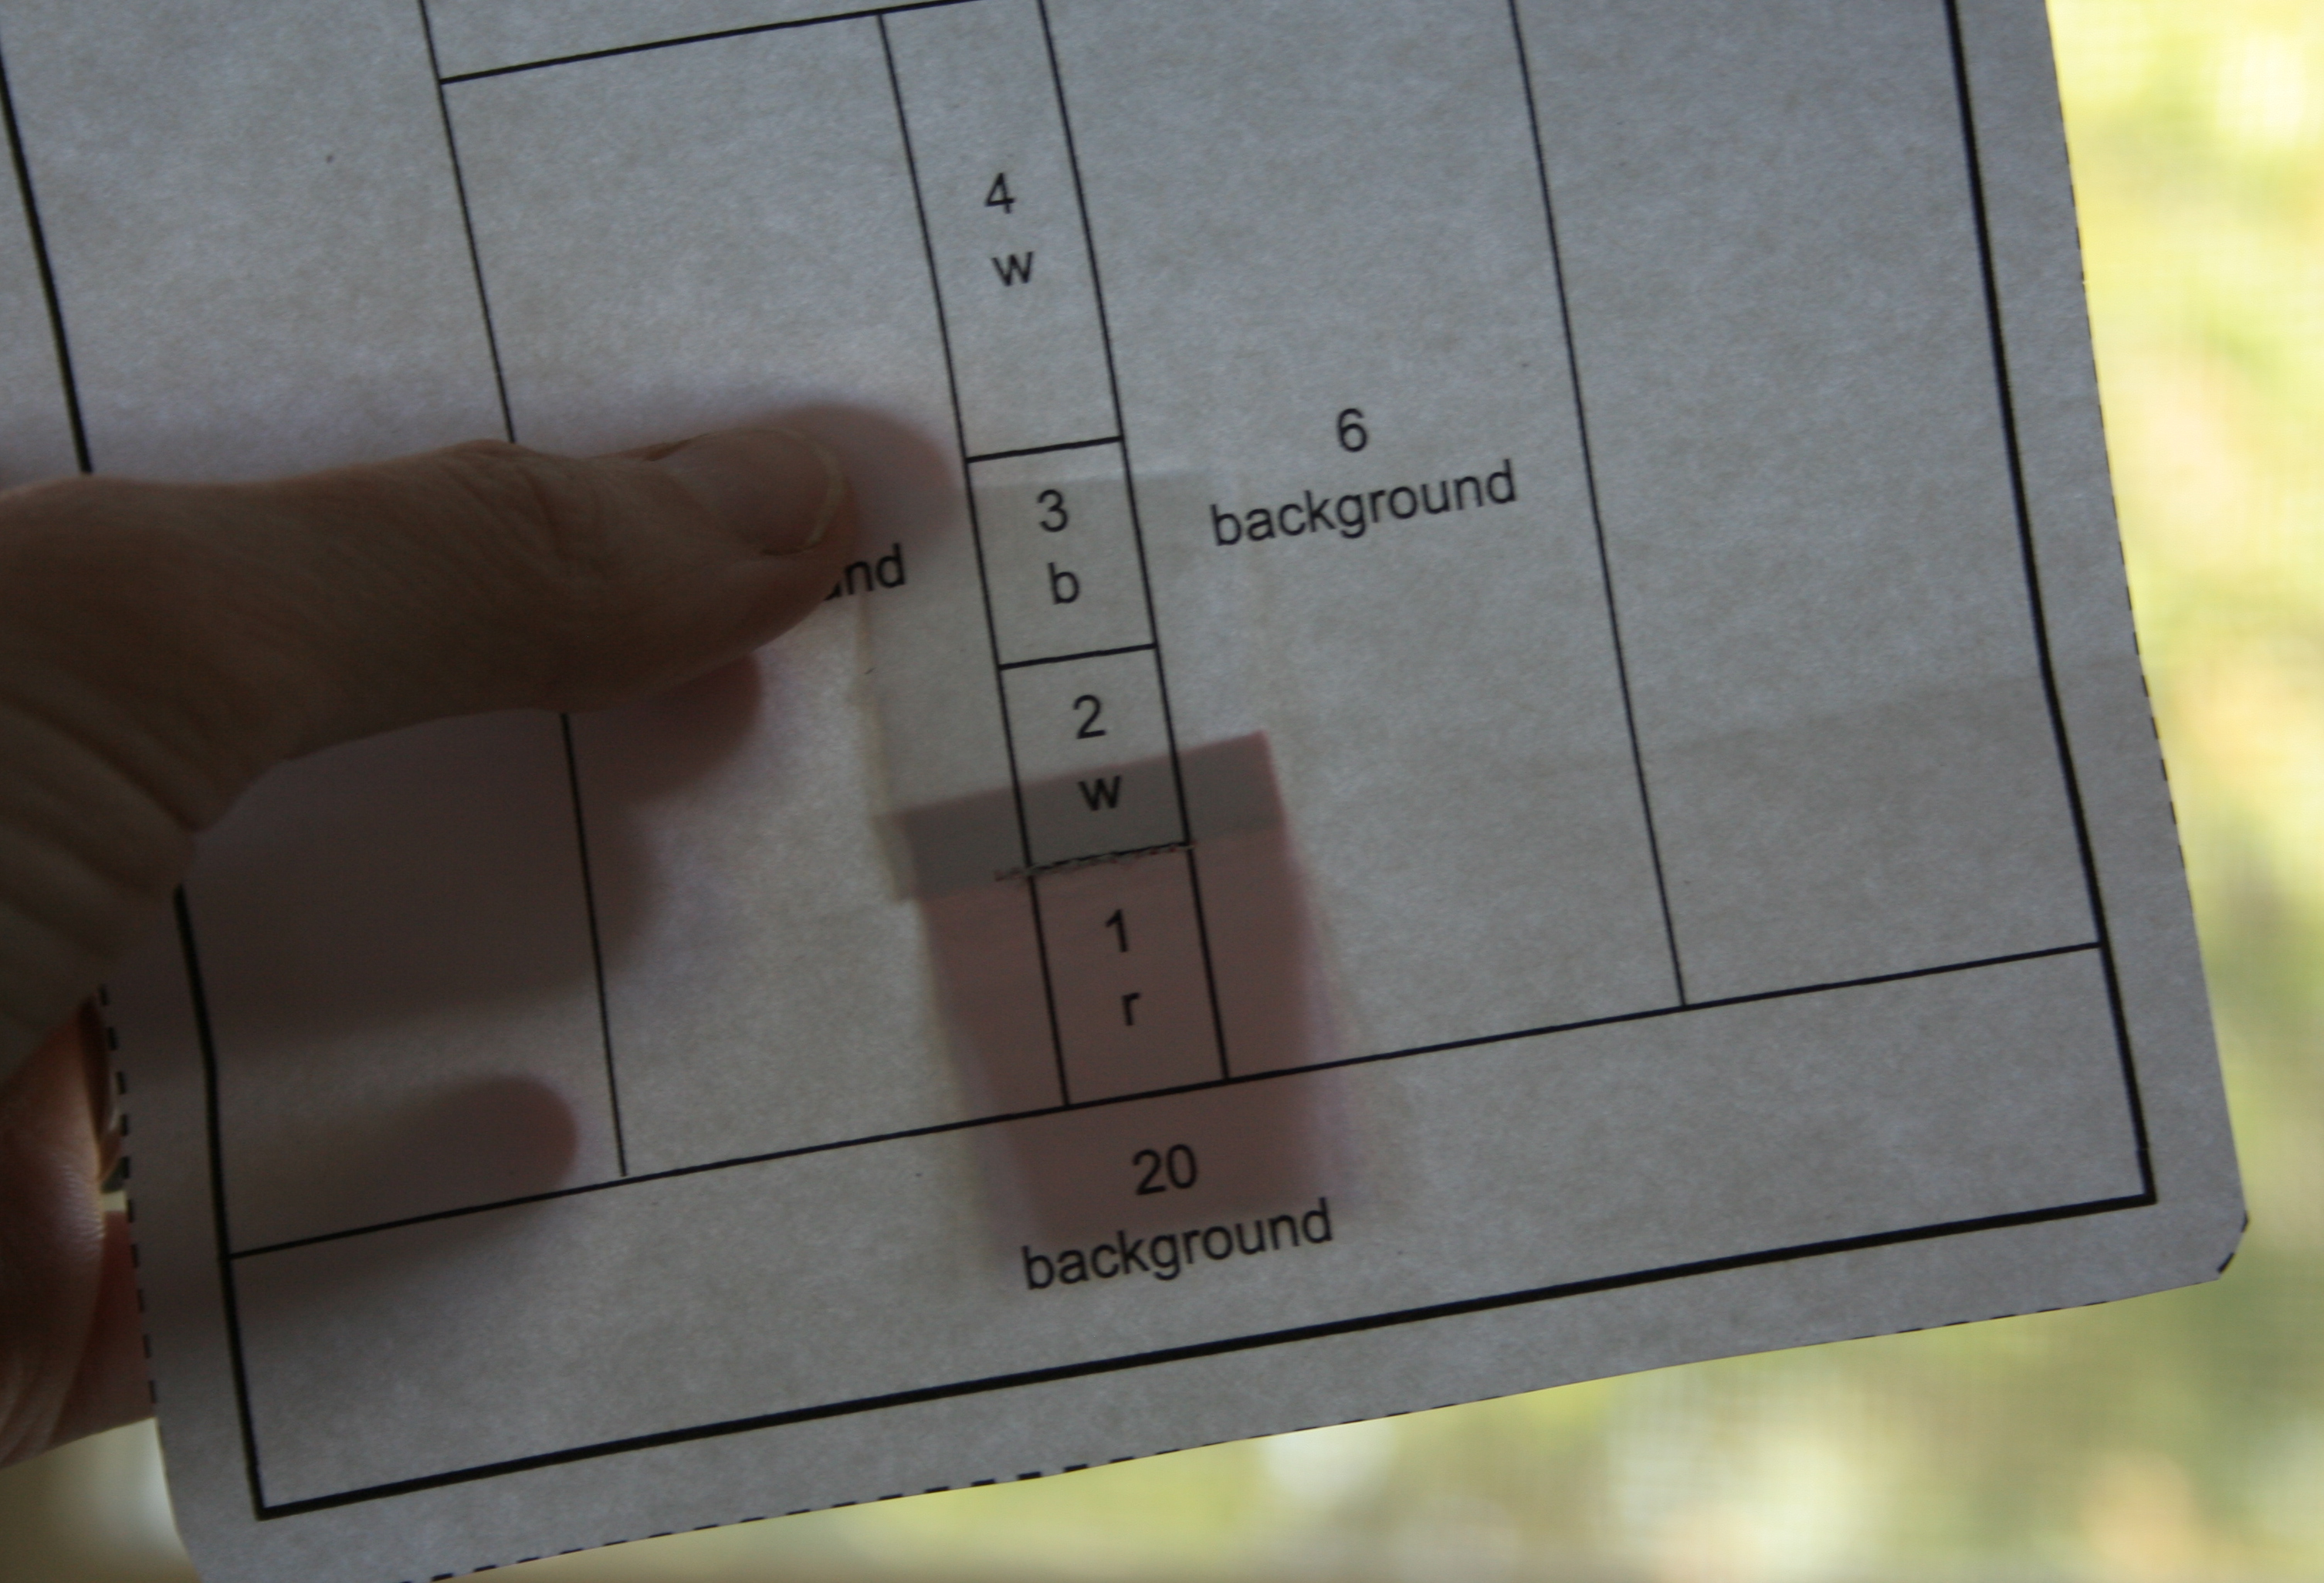
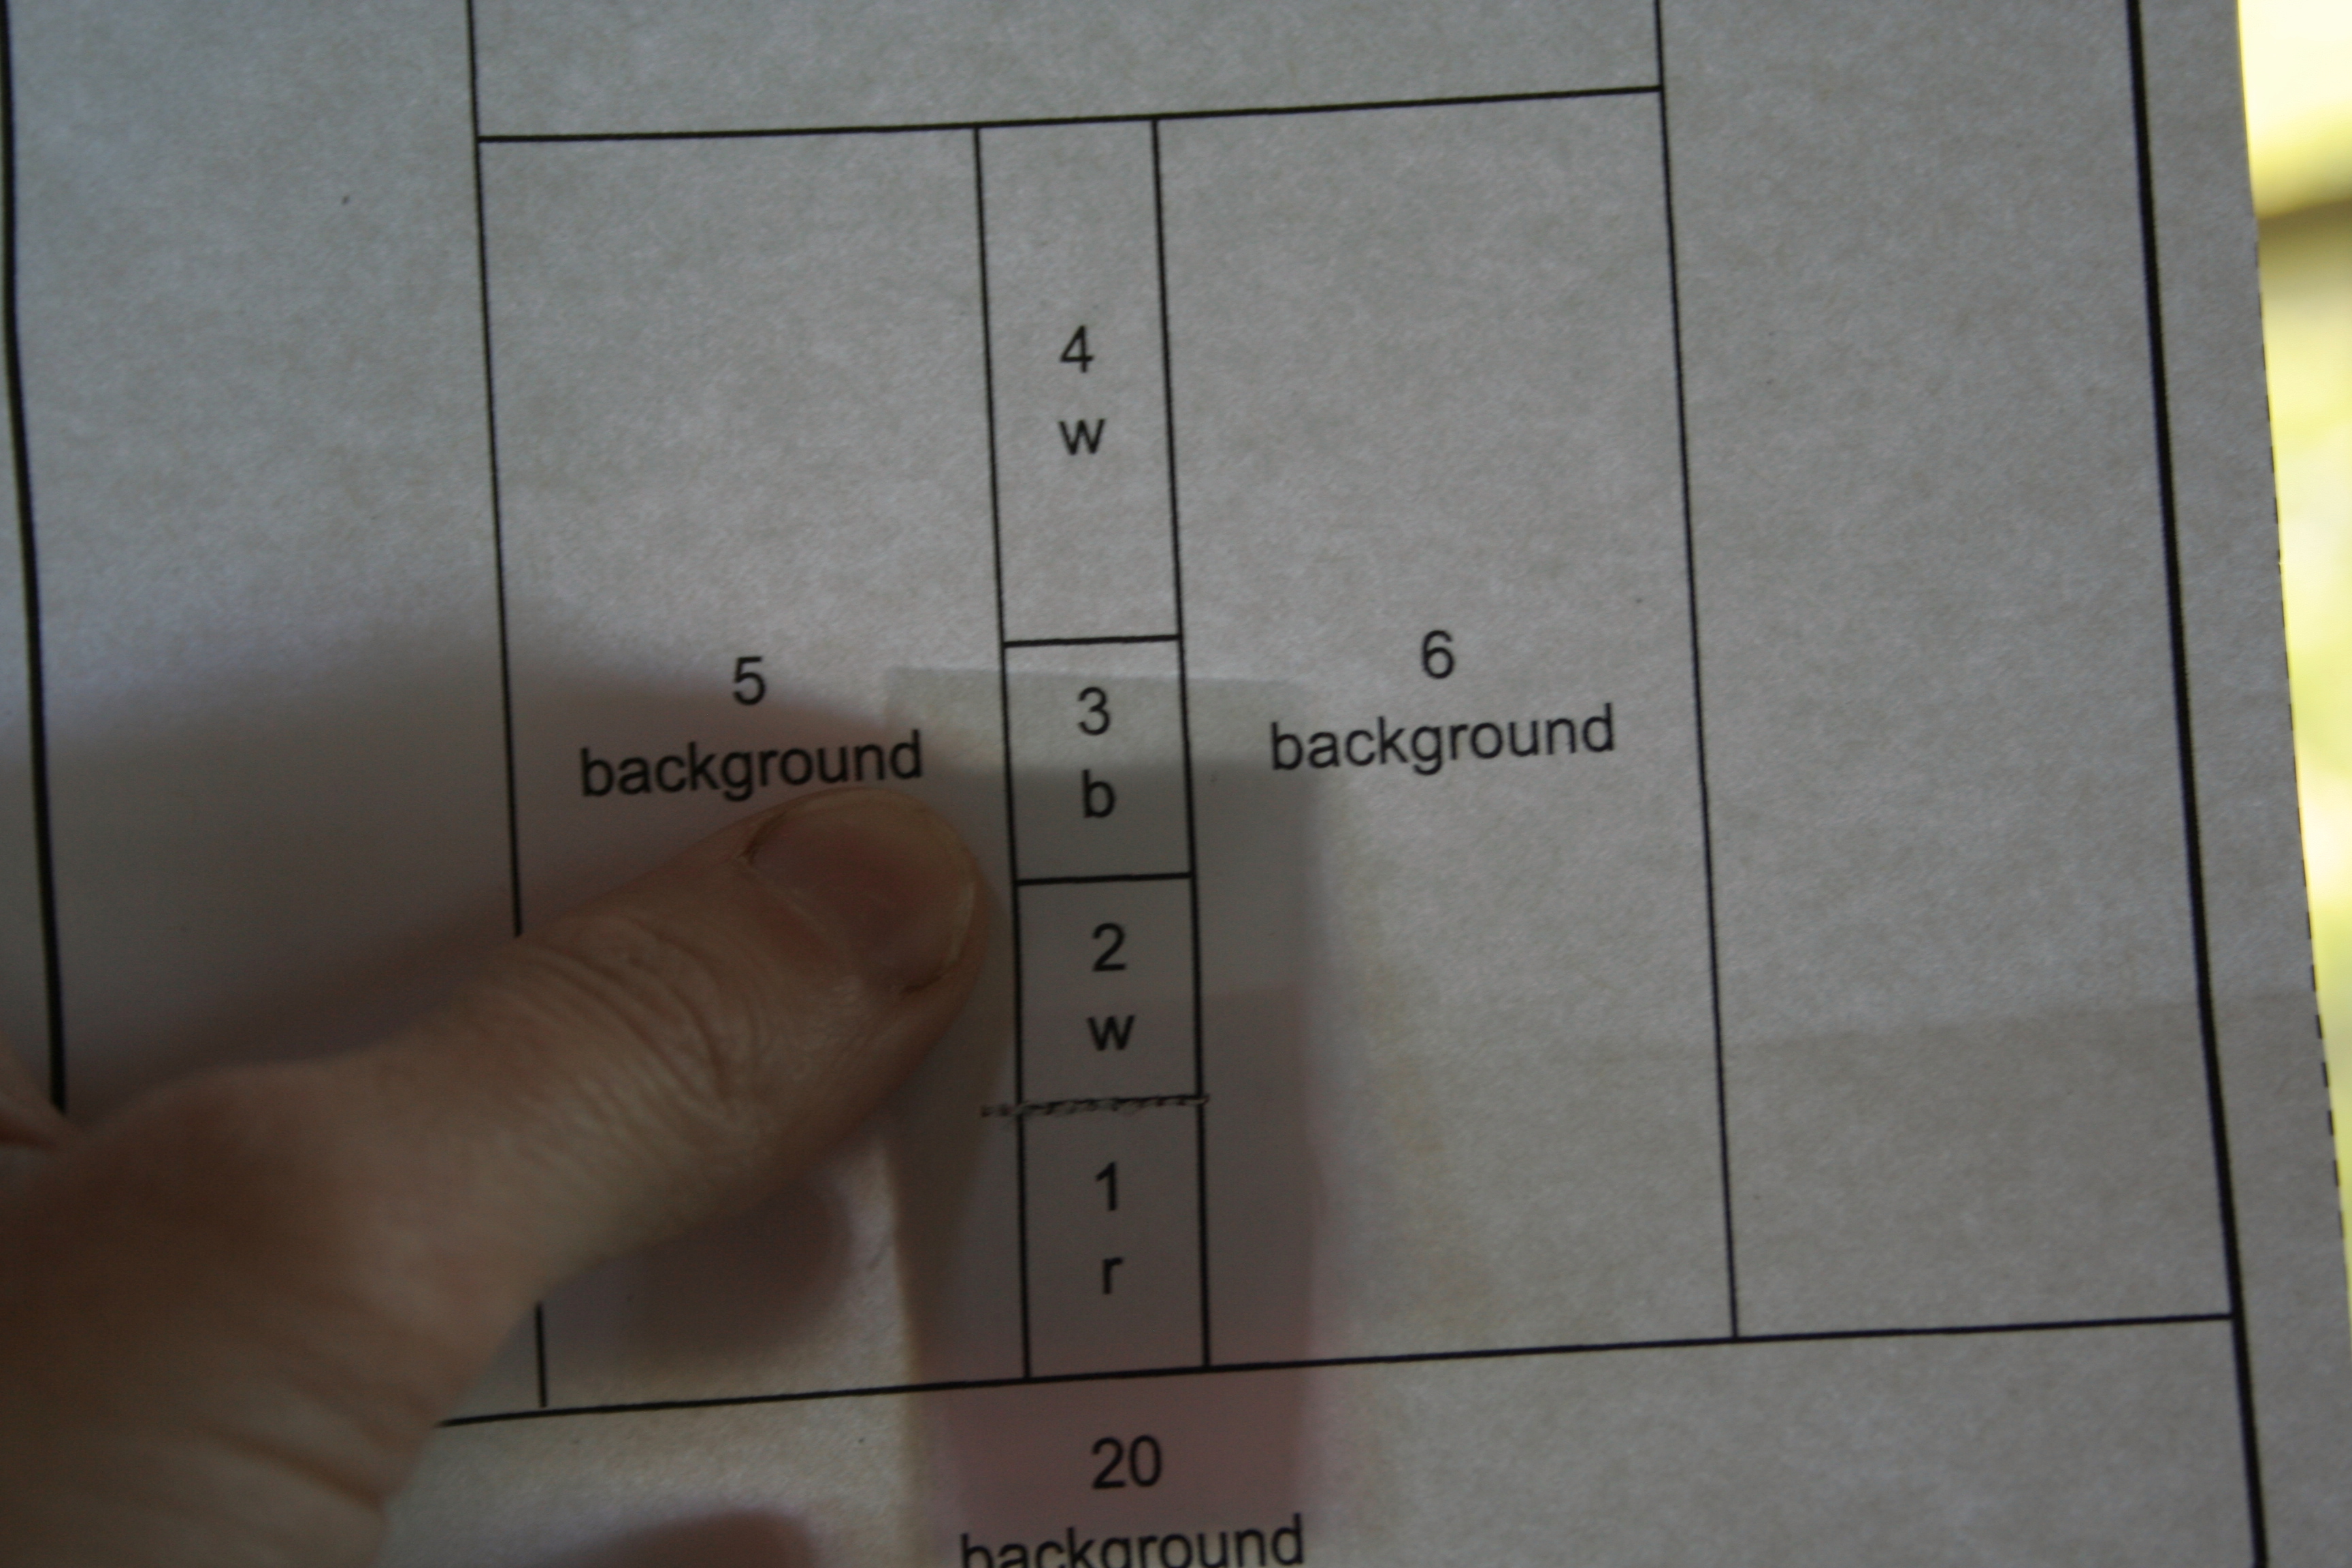
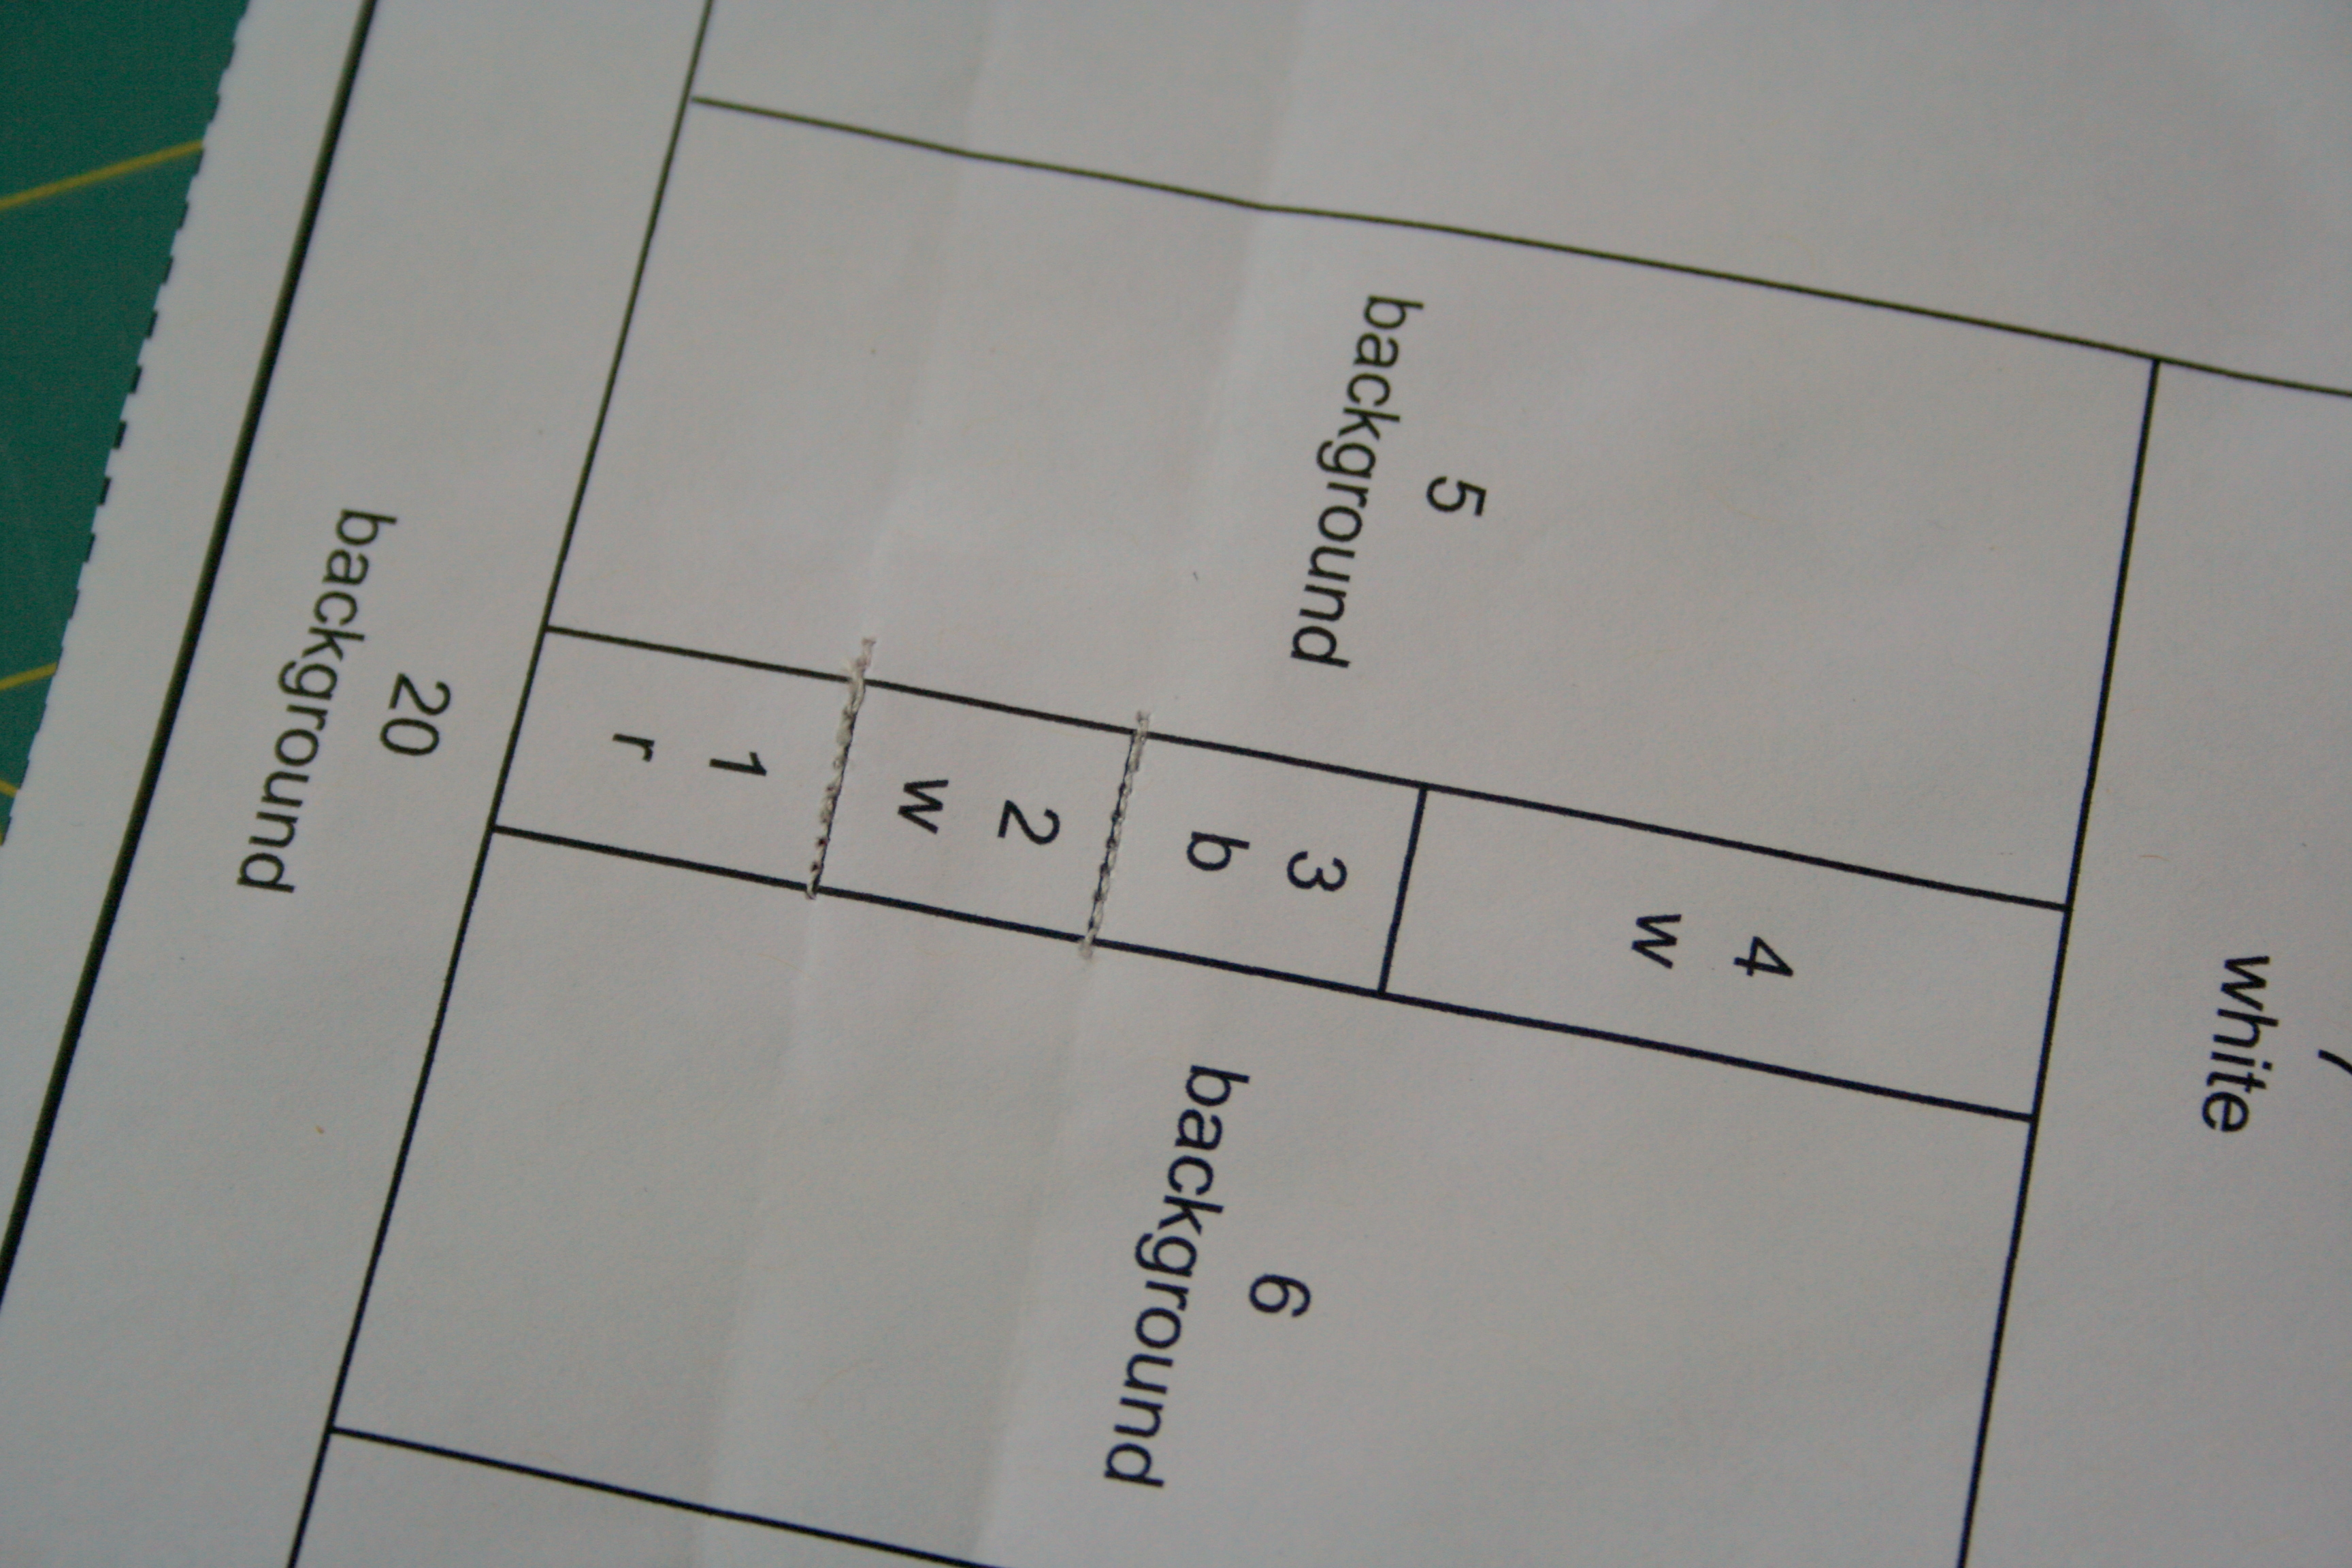
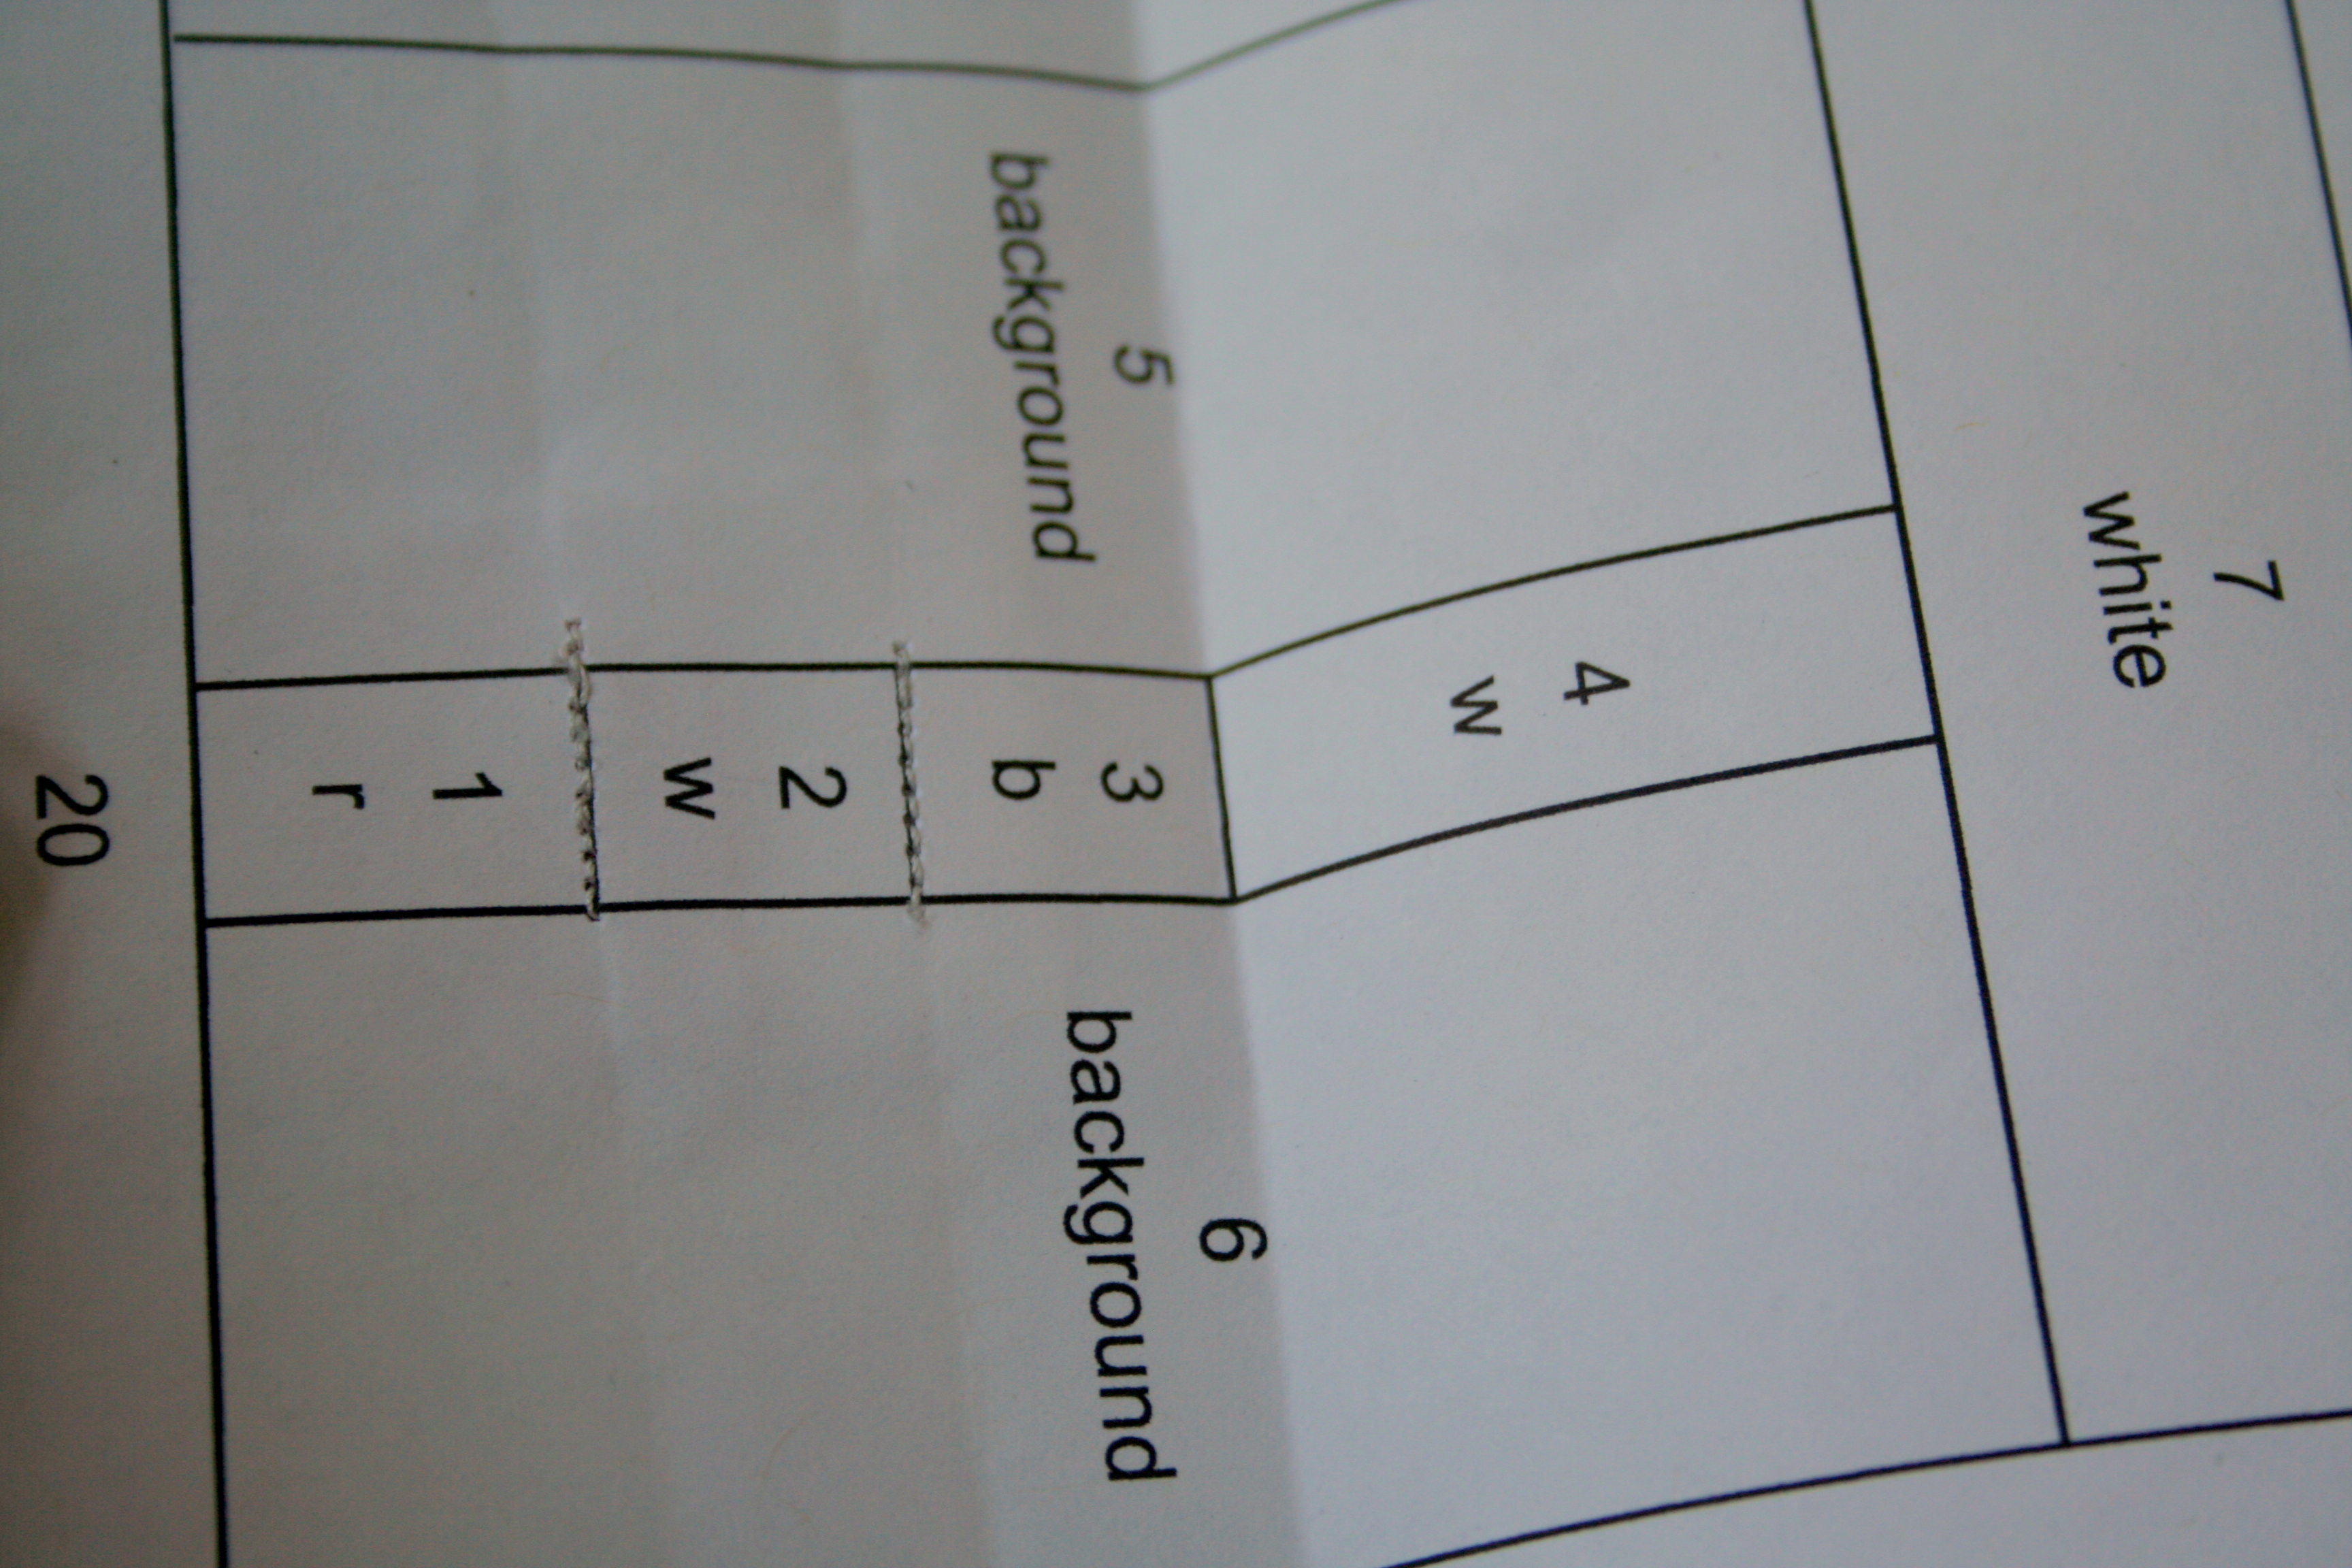
For this example, I have just sewn on piece 3, and I’m getting ready to sew piece 4.
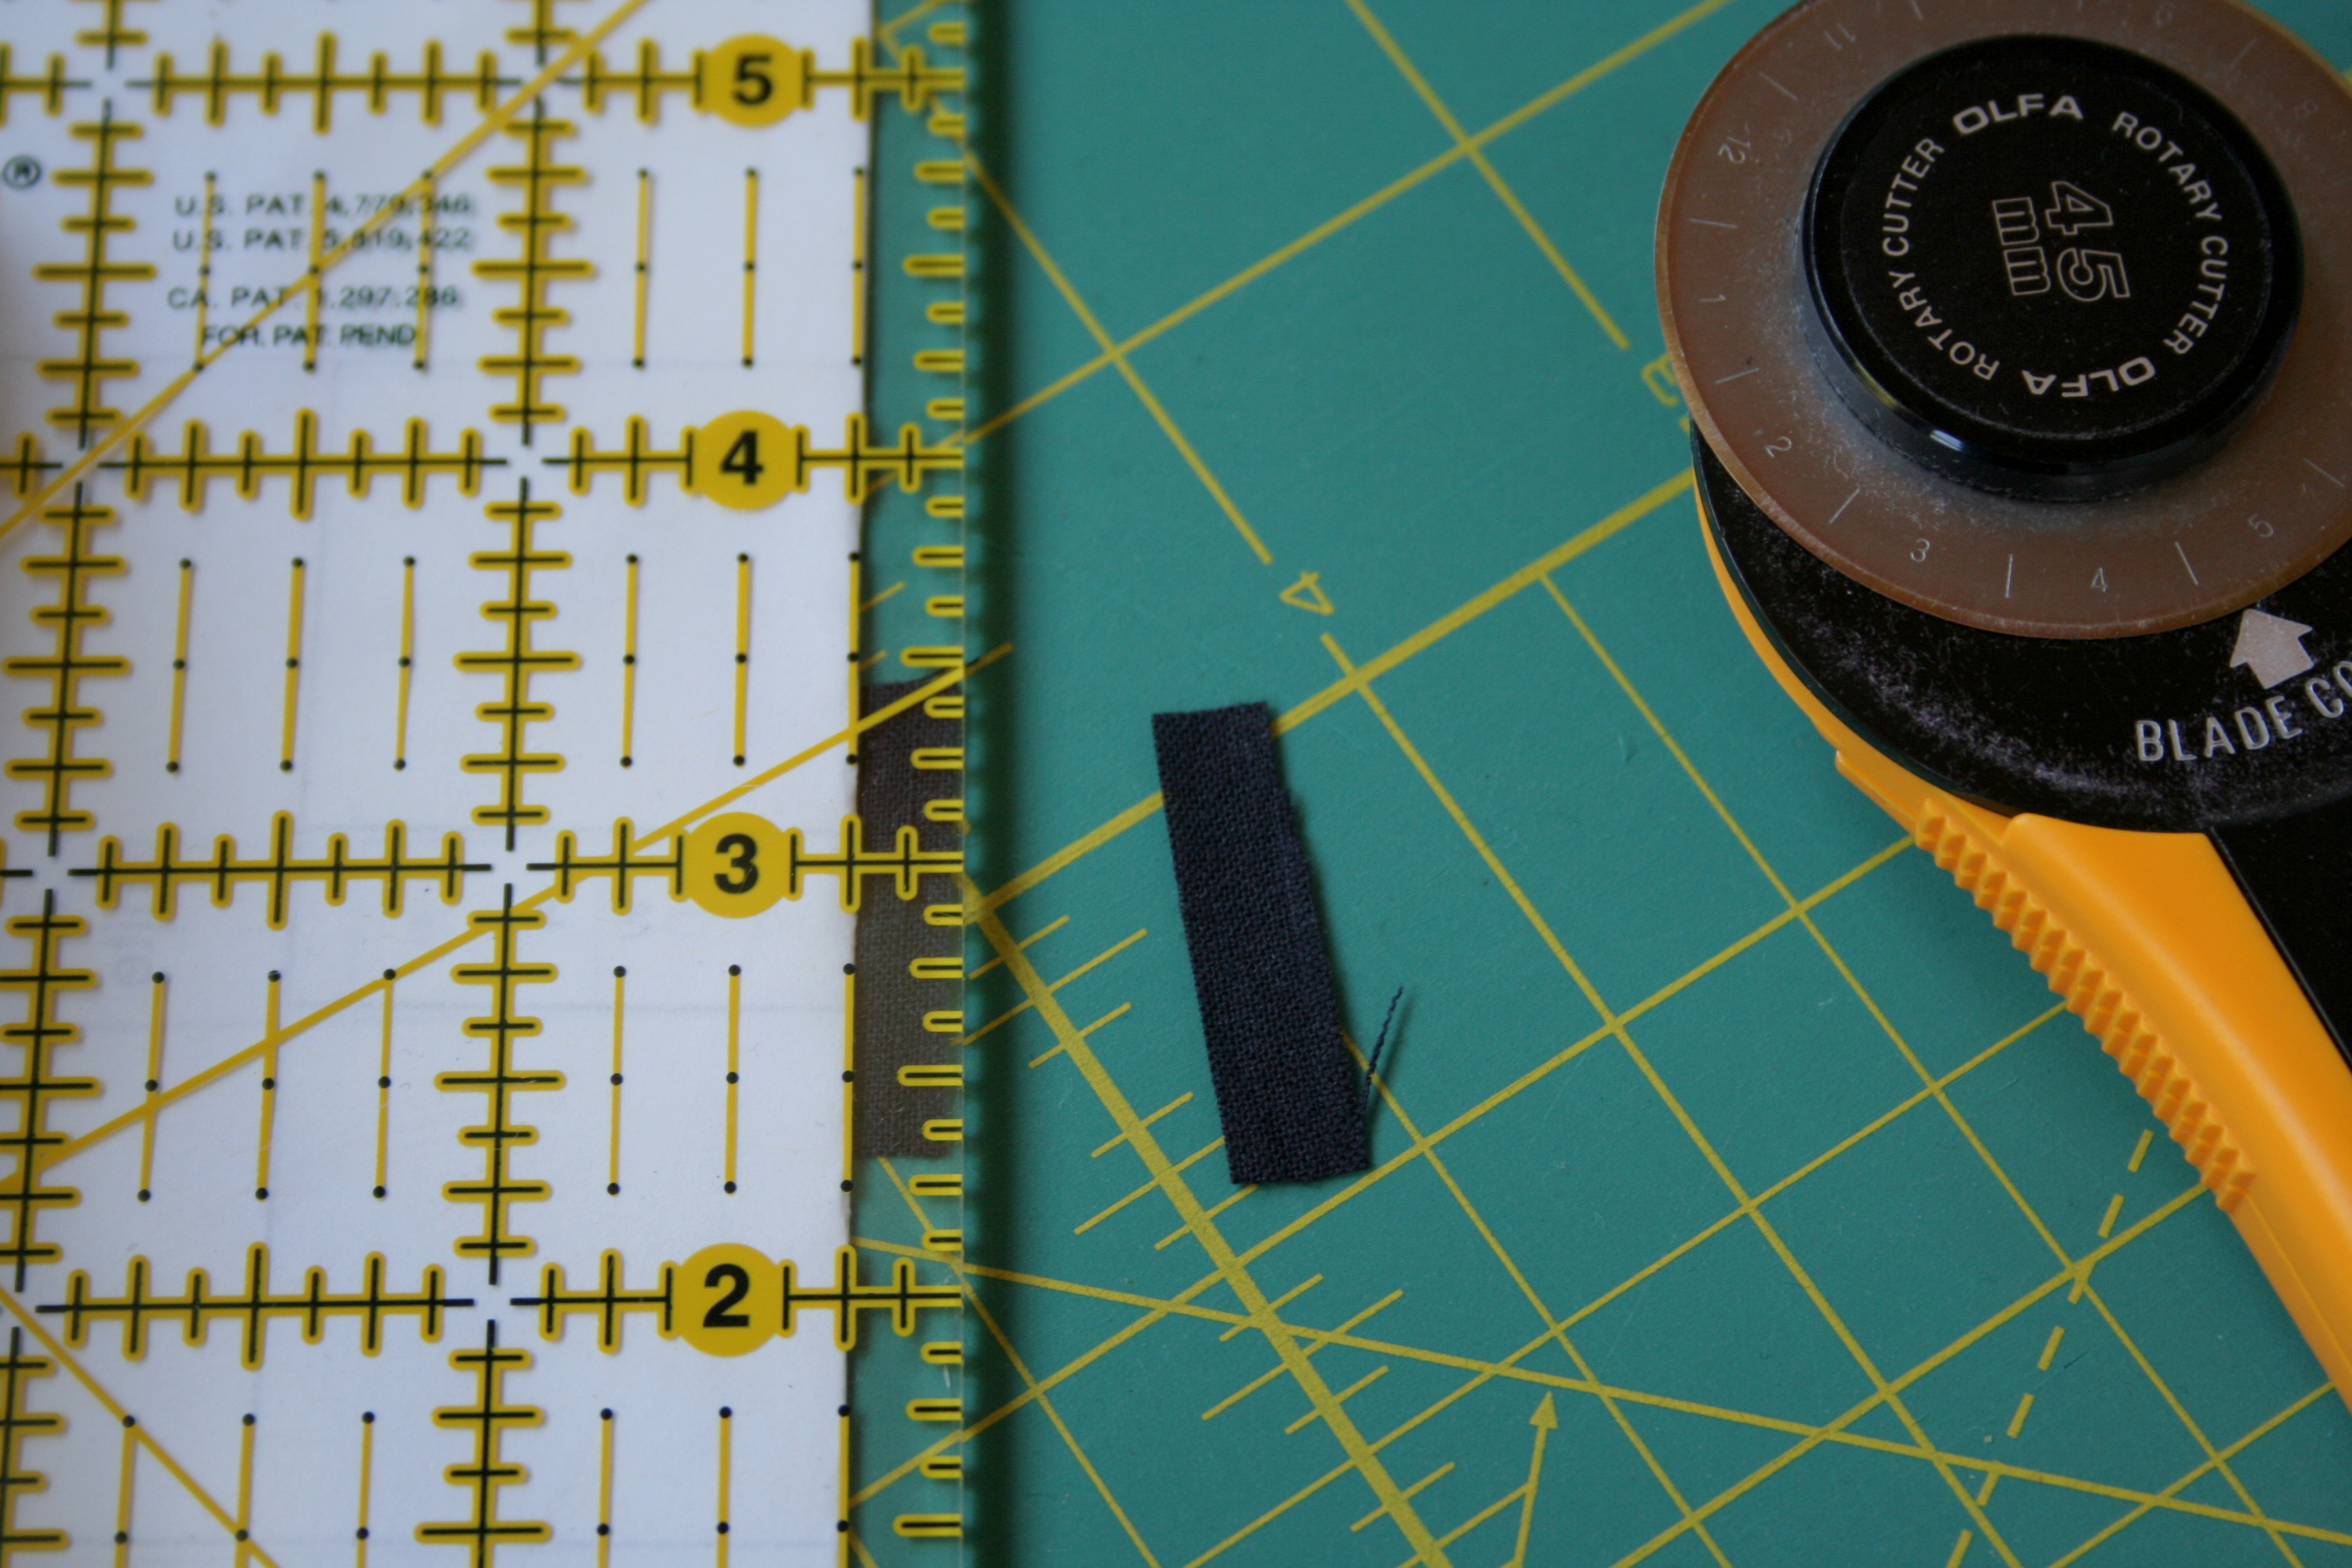
First, fold the paper along the seam line between pieces 3 and 4.
With paper folded over, trim the excess of piece 3 to 1/4″ beyond the fold. This will give you an accurate edge with which to line up the edge of piece 4.
When lining up piece 4 (white) with the edge of piece 3 (black), if you match the edges, the seam will be exactly 1/4″. Note that the right side of fabric 4 is facing the right side of fabric 3. Hold in place, sew, and you’ve got as close to a perfect seam as you’re going to get!
Tips for Using Directional Fabrics:
Using fabrics without a directional flow is fairly straight-forward, but if you are using a fabric with a directional pattern that you’d like to keep consistent, it takes a bit more forethought when you cut. First, line up your pattern and your fabric to decide in what direction the fabric should go. To cut the fabric, position the pattern with the printed lines up, and the fabric wrong side facing up. This way, since you are creating your pattern on the back, the shape of the fabric piece will be accurate (note that the above photo shows the fabric right side up, before pieces were cut).
Once your piece is cut, proceed as usual, paying close attention to the direction of the fabric. Remember, right side of fabric piece is placed facing the right side of the emerging picture, on the wrong side of the foundation paper.
Until you get the hang of aligning the fabric correctly, it’s a good idea to check the direction of the fabric before sewing. Unpicking paper pieced (tiny stitches!) seams is less than desirable (trust me, I know!). To check the fabric direction, simply place the fabric wrong side down, hold along seam line, and fold back. Once you are sure the direction of the fabric is the way you want it, fold it back and sew.
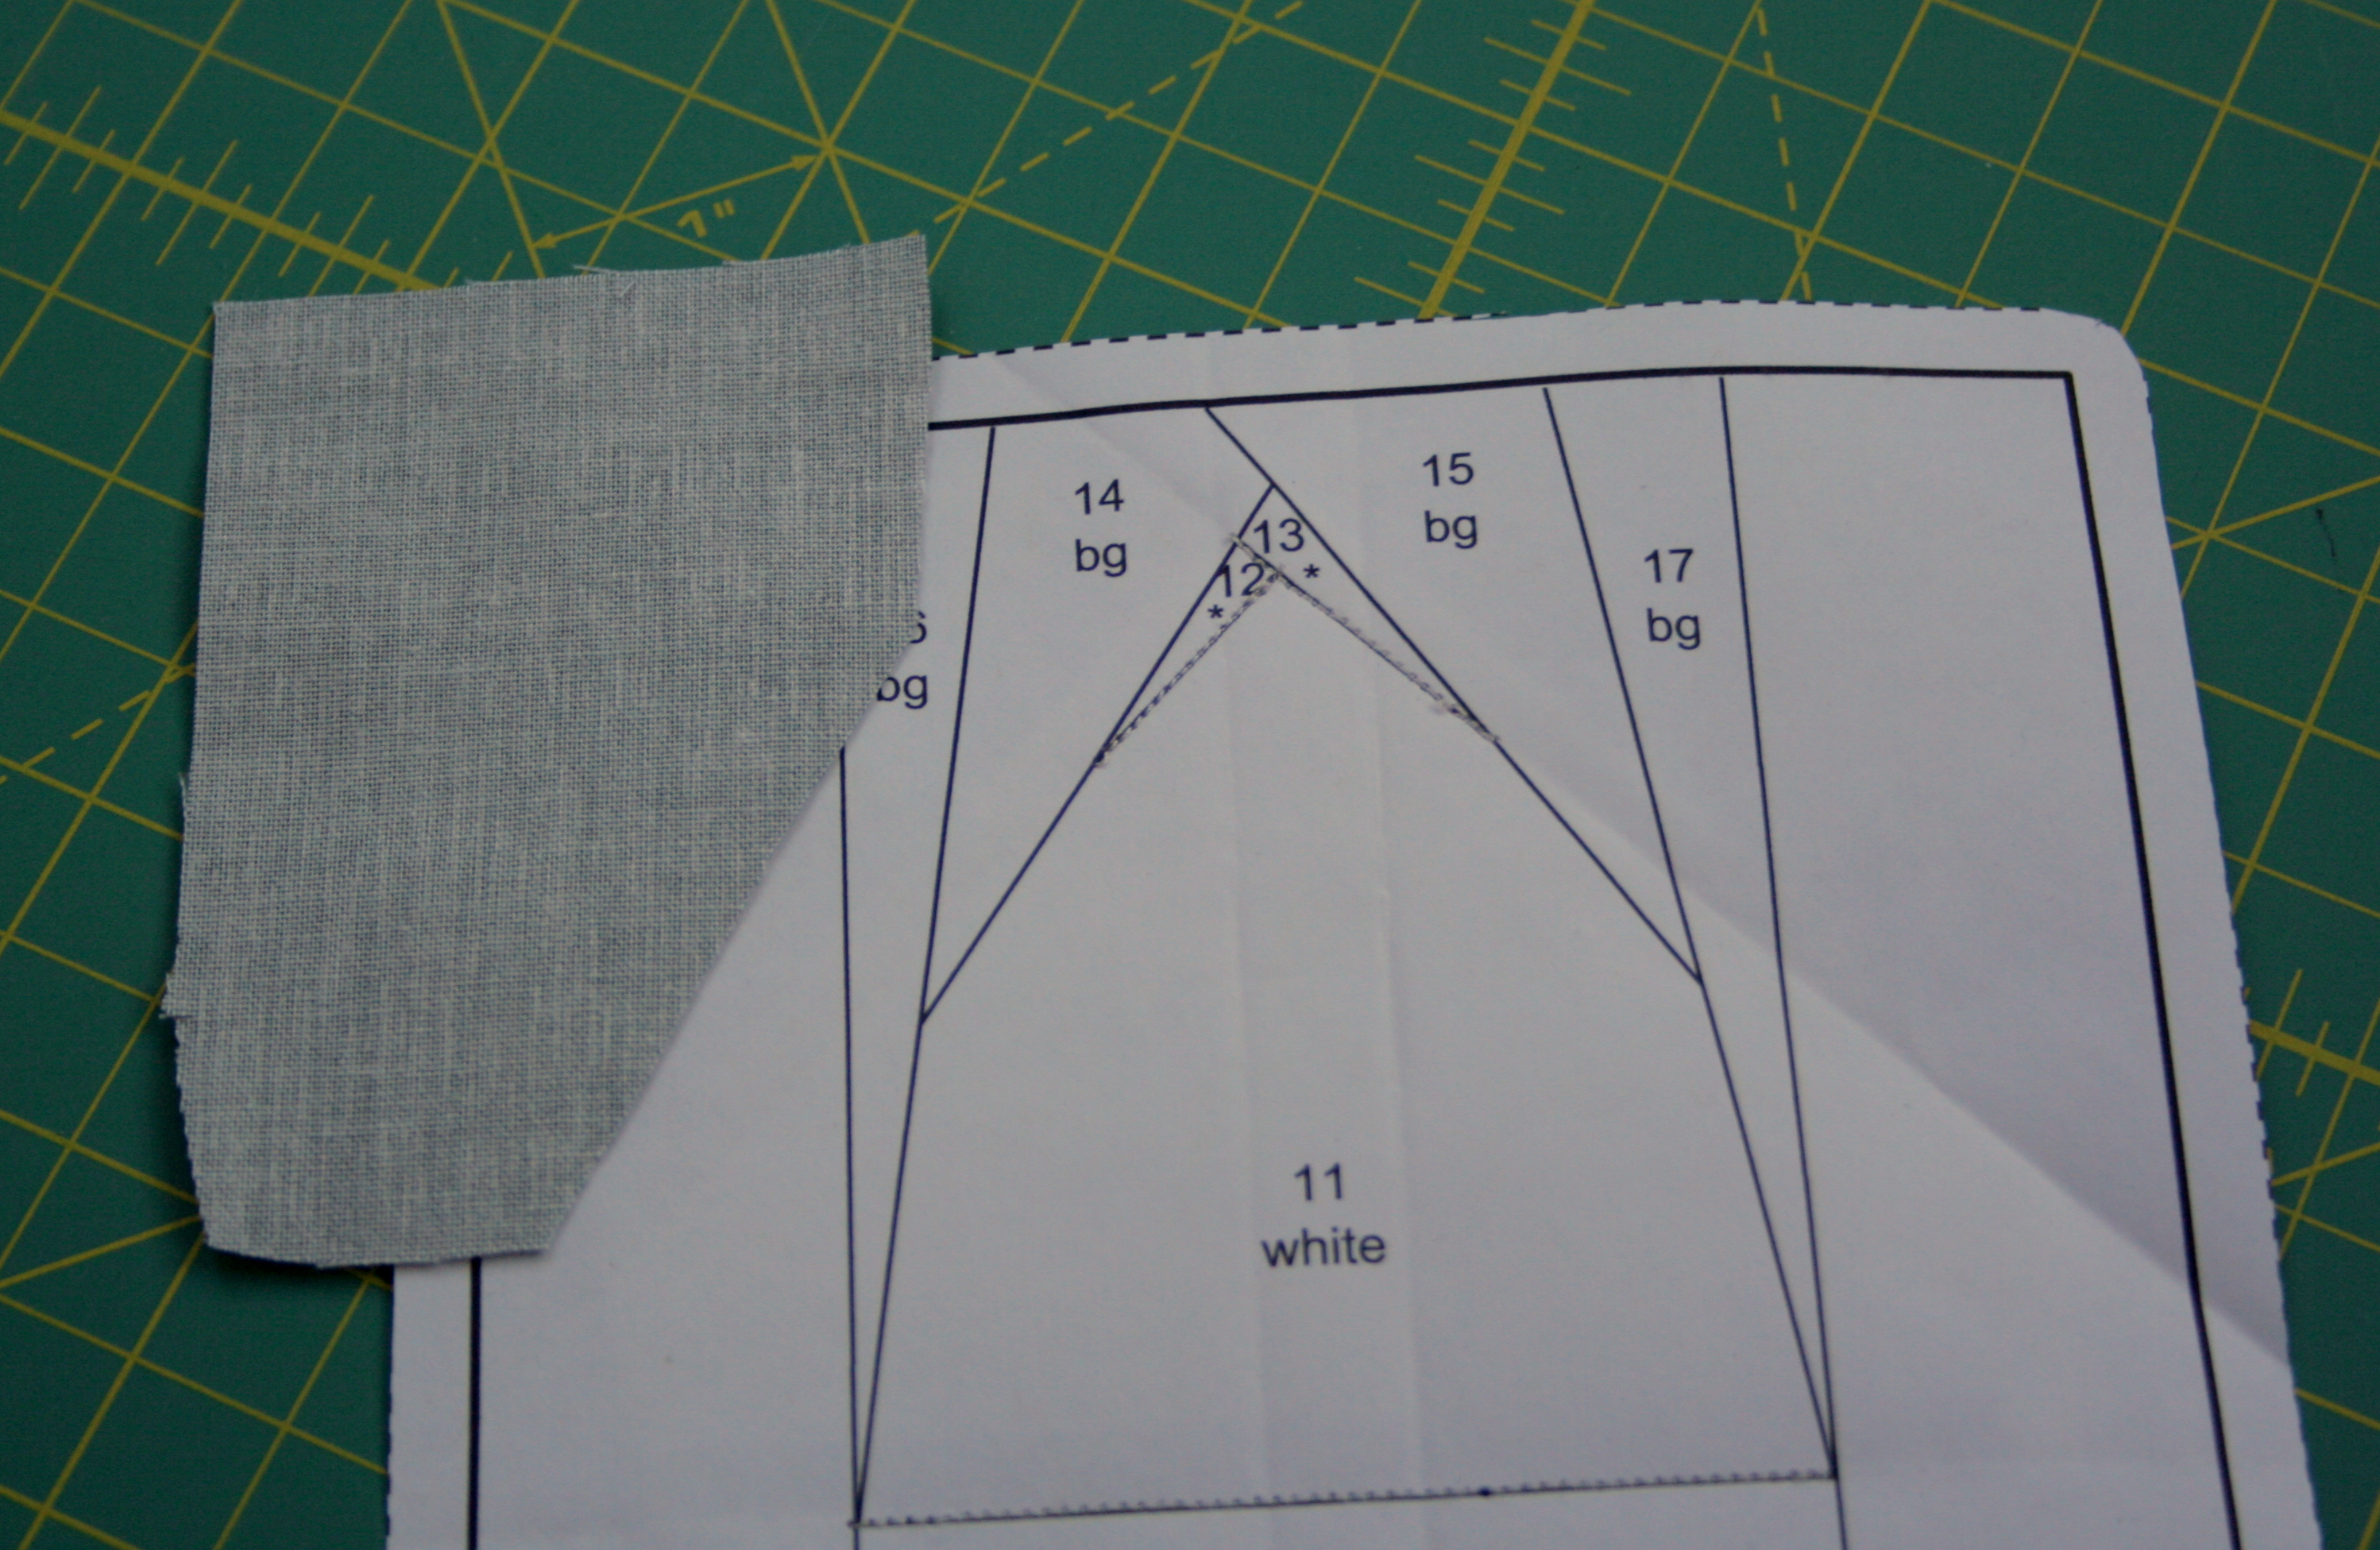
Tips for Tricky Angles:
Many angles in basic paper piecing patterns are fairly straight forward. Sometimes, though, you have an angle that really makes you crunch your brain to properly line up the fabric before sewing so that it fully covers the necessary space with seam allowances. Rather than sew, unpick, sew, unpick, sew, unpick, here are some tips to help get it right the first try.
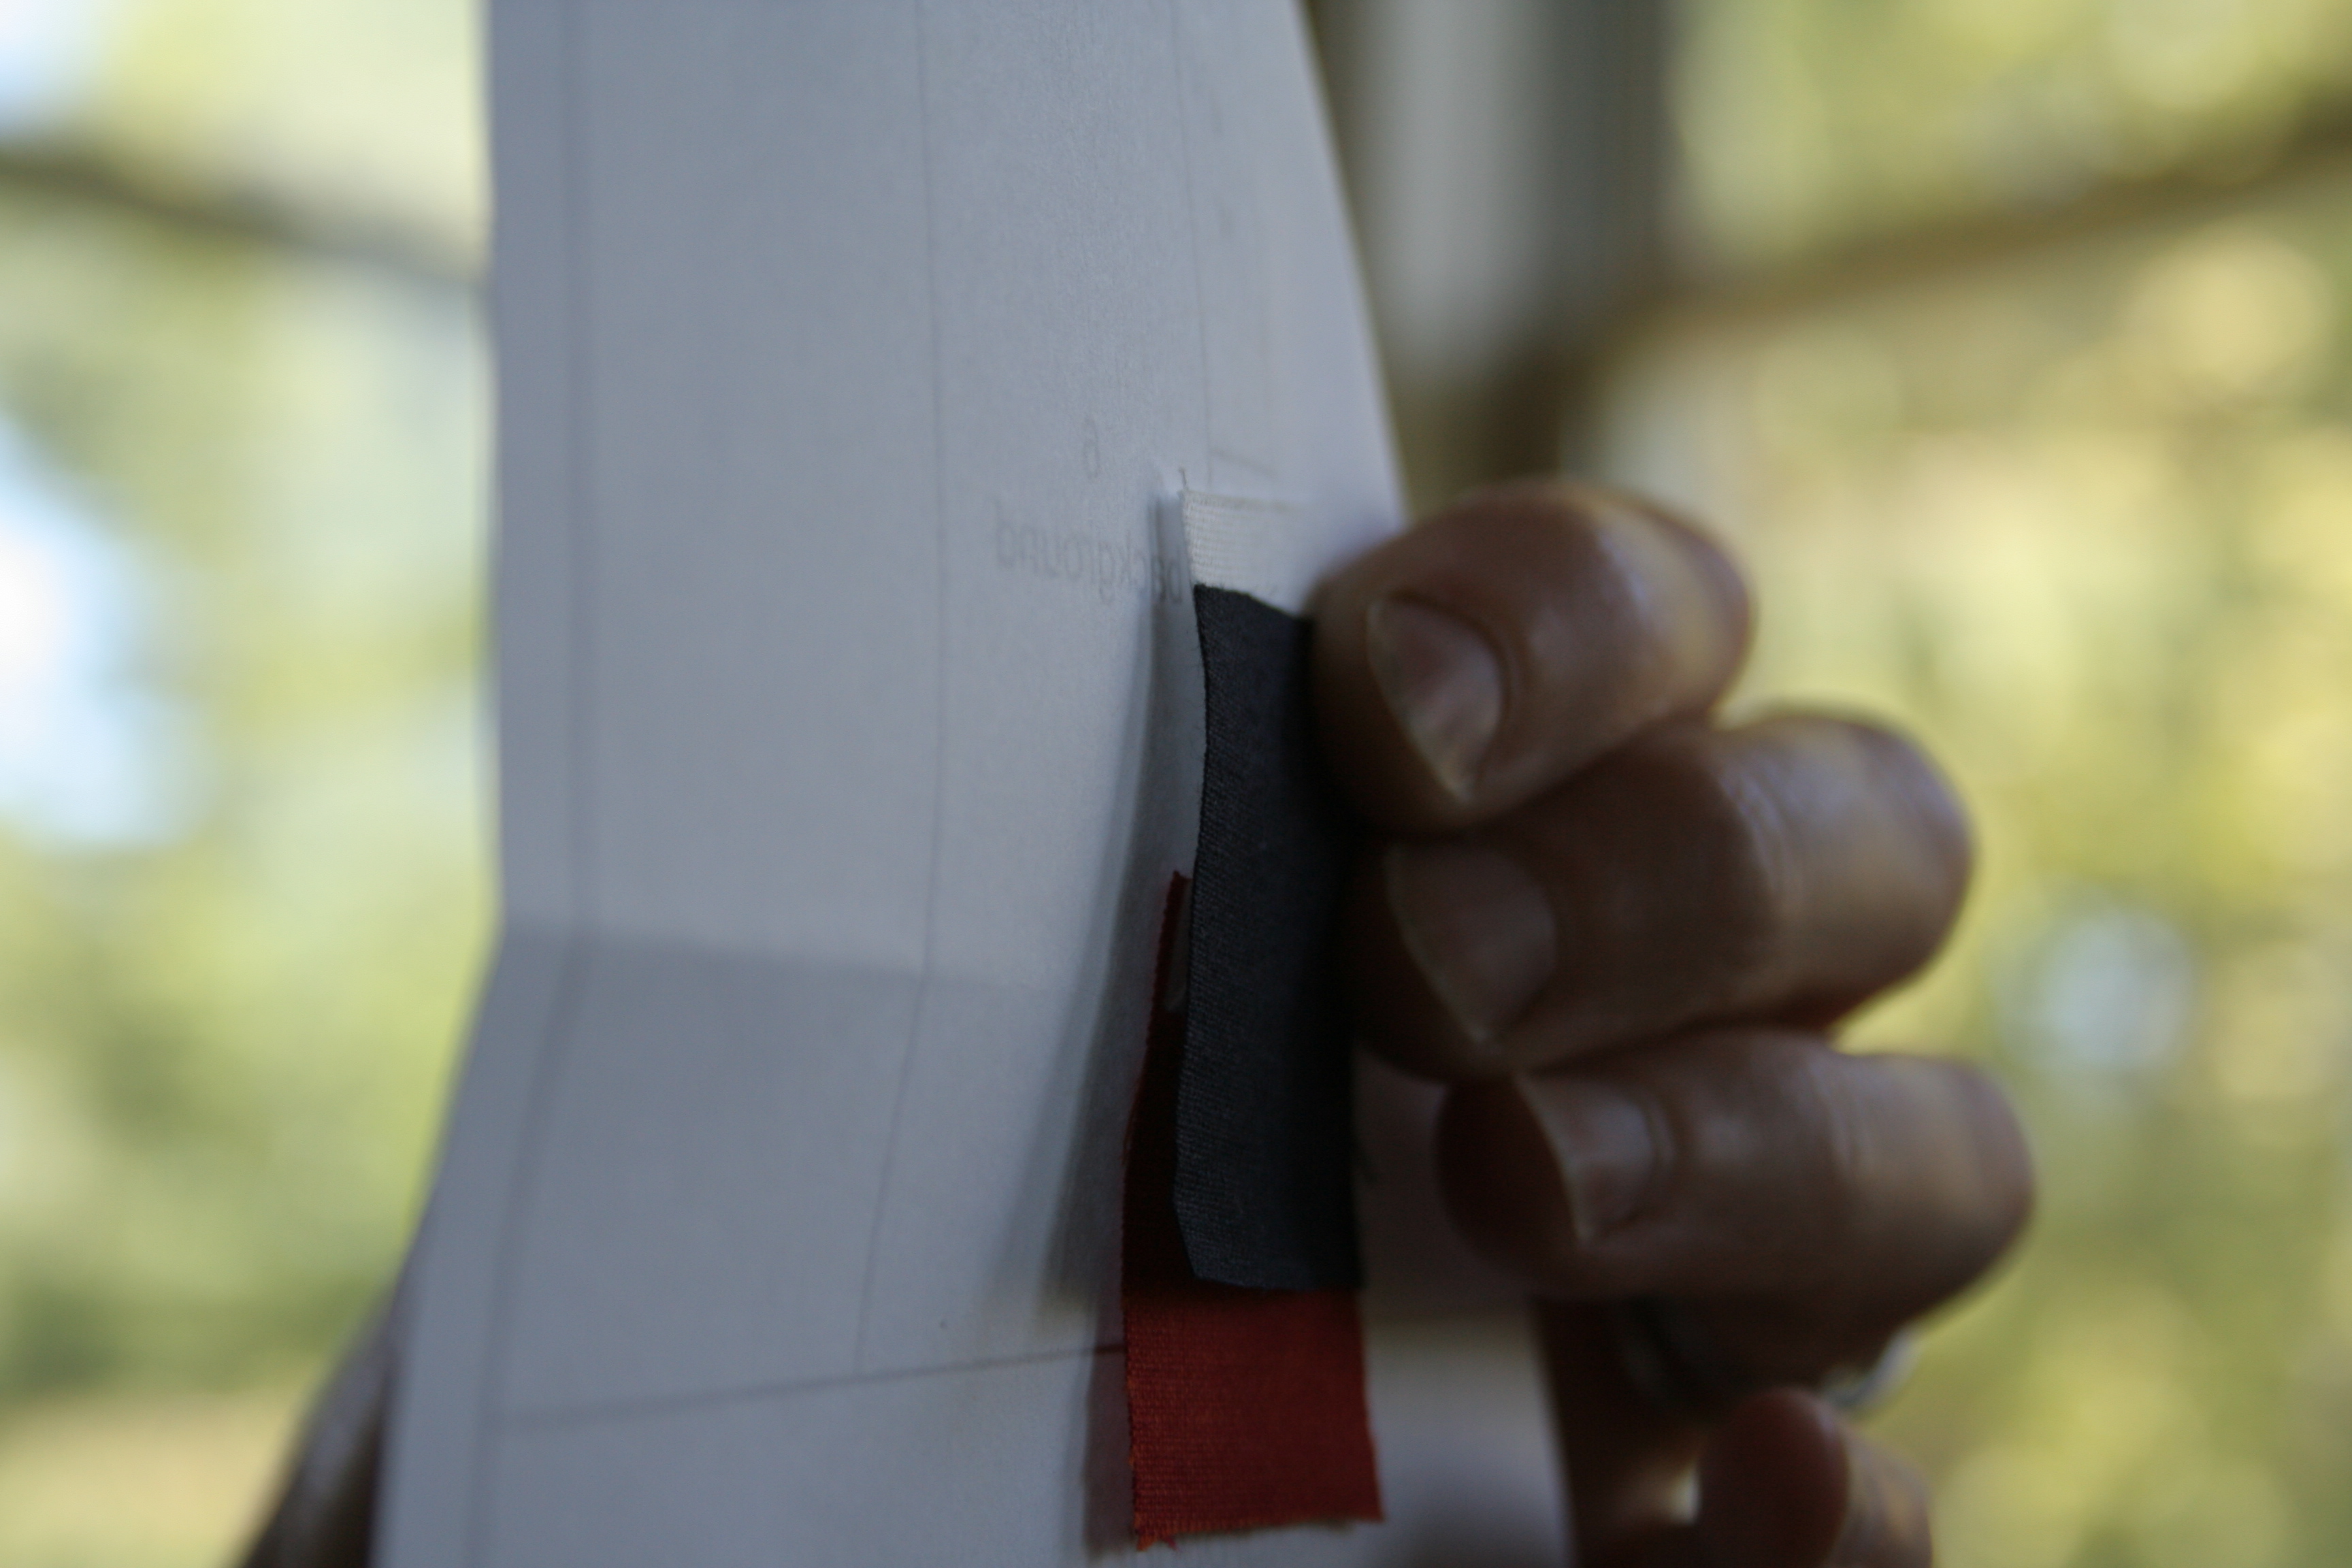
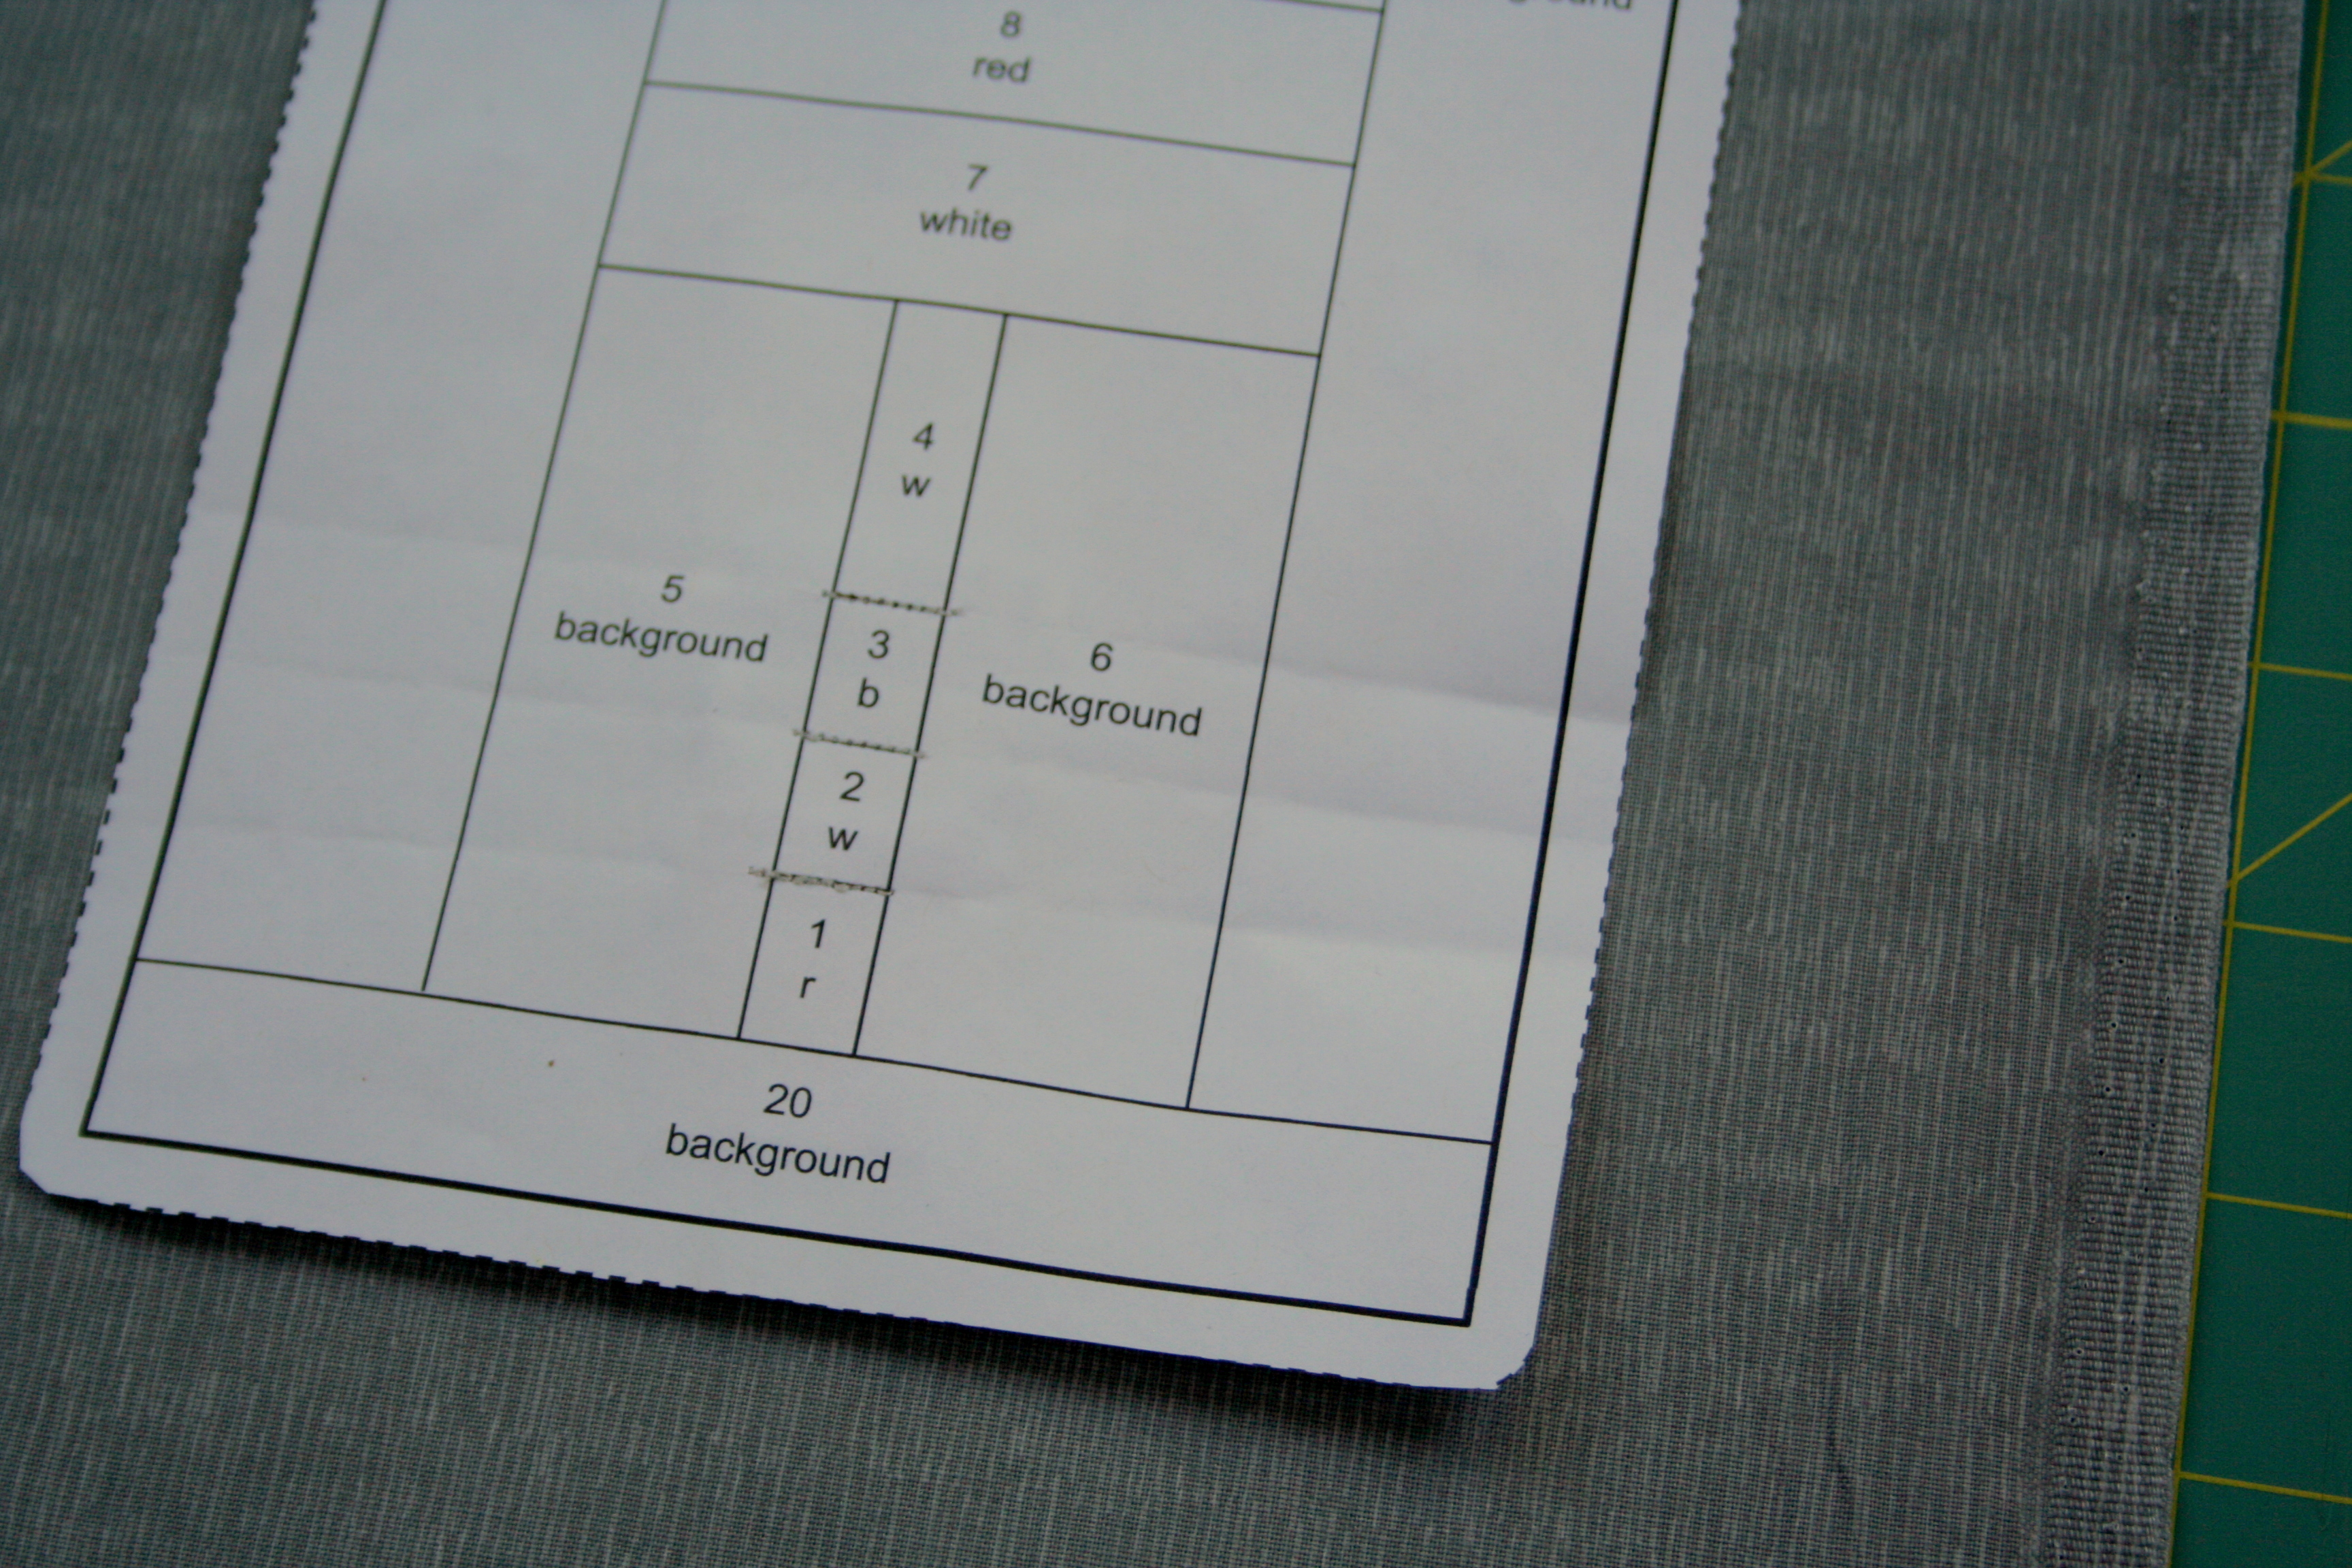
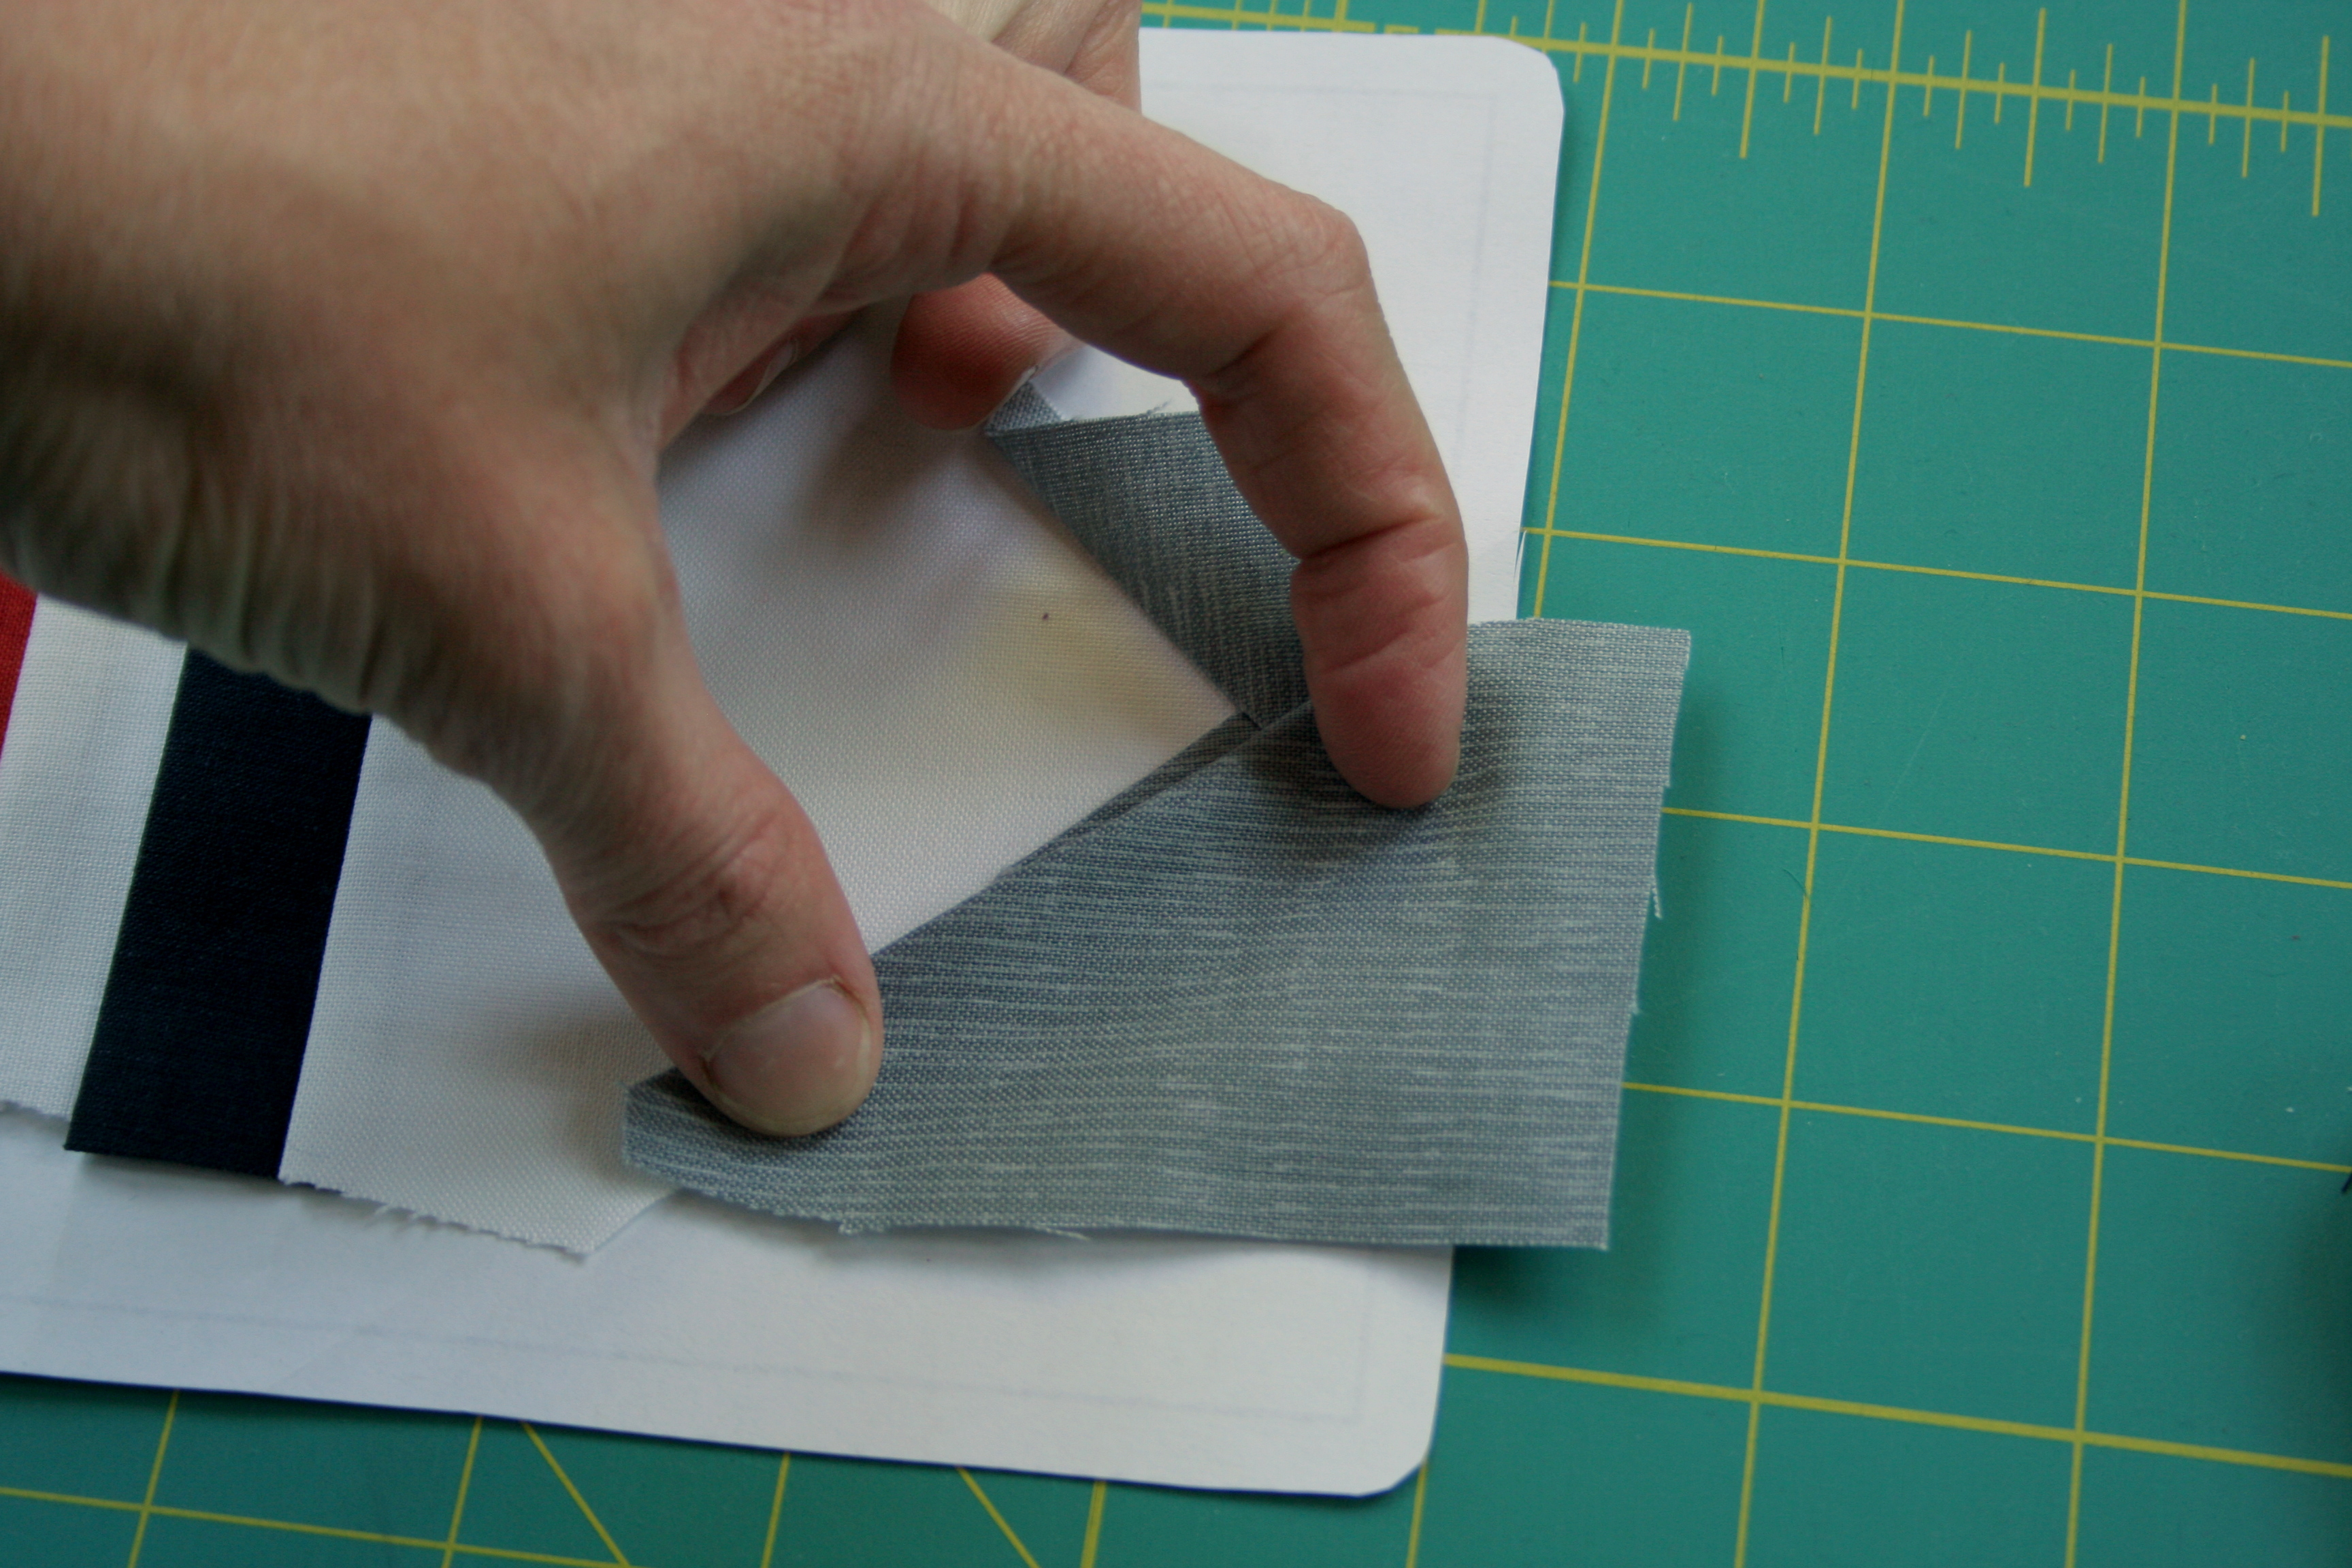
Here I’m trying to piece section 14. When cutting my fabric piece, I’ve been generous with size, and included the angle of the seam I’m about to sew. Note that the fabric is wrong side up, with my foundation paper right side up.
The fabric piece generously covers the space needed, with lots of wiggle room. The angle cut into the piece is key, since that will help align the seam correctly. If just eyeing the angle while cutting doesn’t work for you, you can put your pattern paper on top of your fabric, and using a Herra marker, deeply mark the seam line. Add 1/4-1/2″ to all sides and cut your fabric piece.
Holding it up to the light, I can see that my fabric piece covers the space, extends amply beyond the seam allowance, and that the general angle of the seam line is consistent with the angle of the fabric piece.
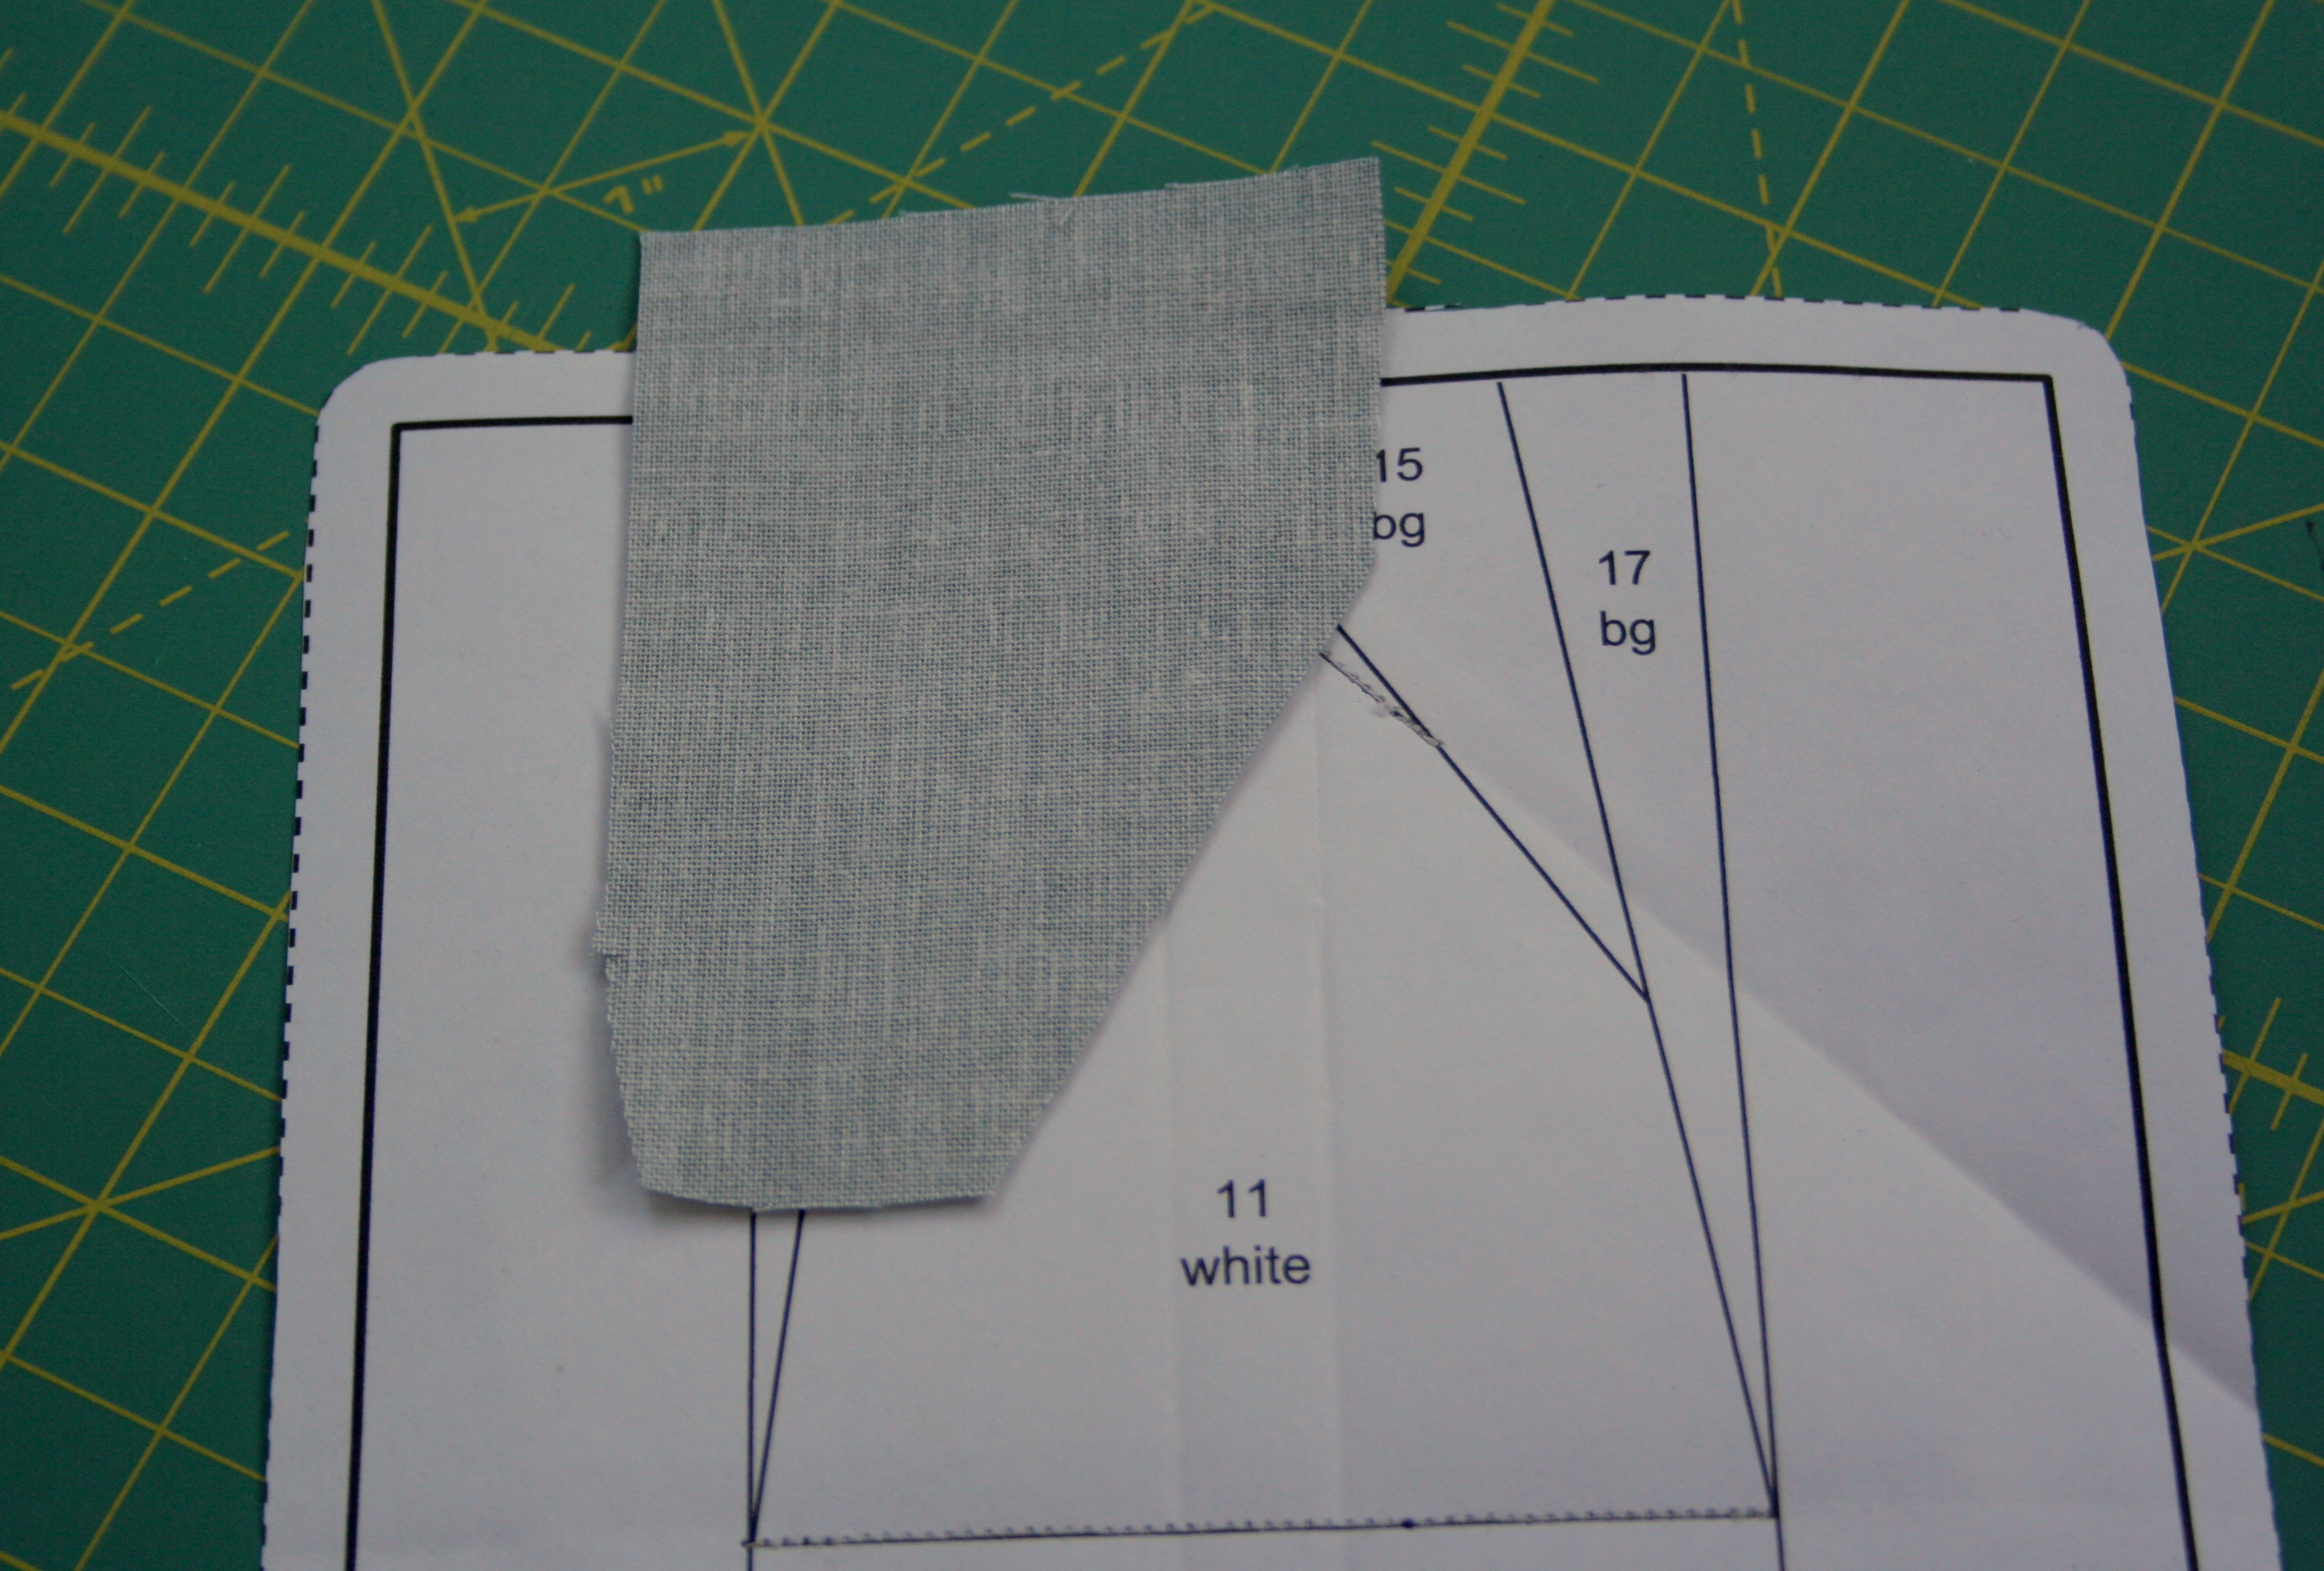
Here’s the tricky part. Placing your fabric right side facing the wrong side of the foundation paper, line your angled seam edge with the seam line on your block. It will look wonky, and may seem like it is headed in the wrong direction.
Fold along the seam line to ensure the fabric will cover the correct area. Once satisfied that it’s all lined up properly, fold back and sew the seam. With particularly wonky angles, I sometimes pin along the seam line, both to ensure I’m accurately checking the fold, and to hold the fabric in the proper place before sewing.
So now you’ve got the basics of foundation paper piecing! Once your entire block is pieced, square up the edges being mindful to keep the 1/4″ seam allowance around the block if you plan to sew it into a quilt, pillow, or just about anything else.
I often will leave the paper on if I plan to sew the block to another paper pieced block, since the 1/4″ seam allowance line helps me with accurate sewing. If you are already a pro at 1/4″ seams or are planning on using a single block for your project, now comes the fun part–removing the paper!
To remove the paper, gently tear away, holding the main block in place and pulling gently away and to the side, similar to how you would tear any perforated piece of paper. With your narrow stitch length, the paper should come away easily.
Once one side of the paper is off, the other side often will just pop out. Go slowly and tear gently to ensure your seams stay tight. If you end up with bits of paper stuck in the seams, carefully use blunt tweezers to remove the final bits. Alternately, I’ve heard that spraying the paper with water helps with removal. I haven’t had to try it yet, though, so can’t vouch for the method.
I just love the backs of paper pieced blocks. The precision and accuracy, all the little seams that are proof of my cut, line up, sew, fold & trim, press marathon… they make me happy. Take a good, long, admiring look at the back of your block, and then flip it over and admire your finished block. Gorgeous!
I hope this tutorial was helpful, and that you enjoy paper piecing as much as I do. Coming soon on my blog, I’ll talk about what’s next; now that you’ve made your paper pieced block, what can you do with it!?
Do you have any other tips for beginner paper piecers?
We’ve been having a lot of fun over in the Late Night Quilters Club on Facebook, the group I started with Stephanie and her friend Michelle a few weeks ago. Tomorrow that fun is about to go up a few notches. If you haven’t joined our group yet, now would be a good time to do so!
Tomorrow kicks off a brand new weekly event–Tuesday Fabric Stash Swap! We decided to keep it at swapping rather than buying and selling, and it will be a great way for all of us to destash the fabrics we’ve loved but that haven’t found their way to any projects, while at the same time swapping for new-to-us fabrics to help bolster our stashes. The swap is also open to quilting tools and notions. I am super excited!
I’ve fairly recently entered the quilting world, and my SAHM budget doesn’t allow any major fabric splurges, so my stash is teeny tiny. Even still, I have a few fabrics I bought with the intention to use, but that just haven’t found their way into any of my projects. I figure it’s a good time to pass them along and see what else comes my way.
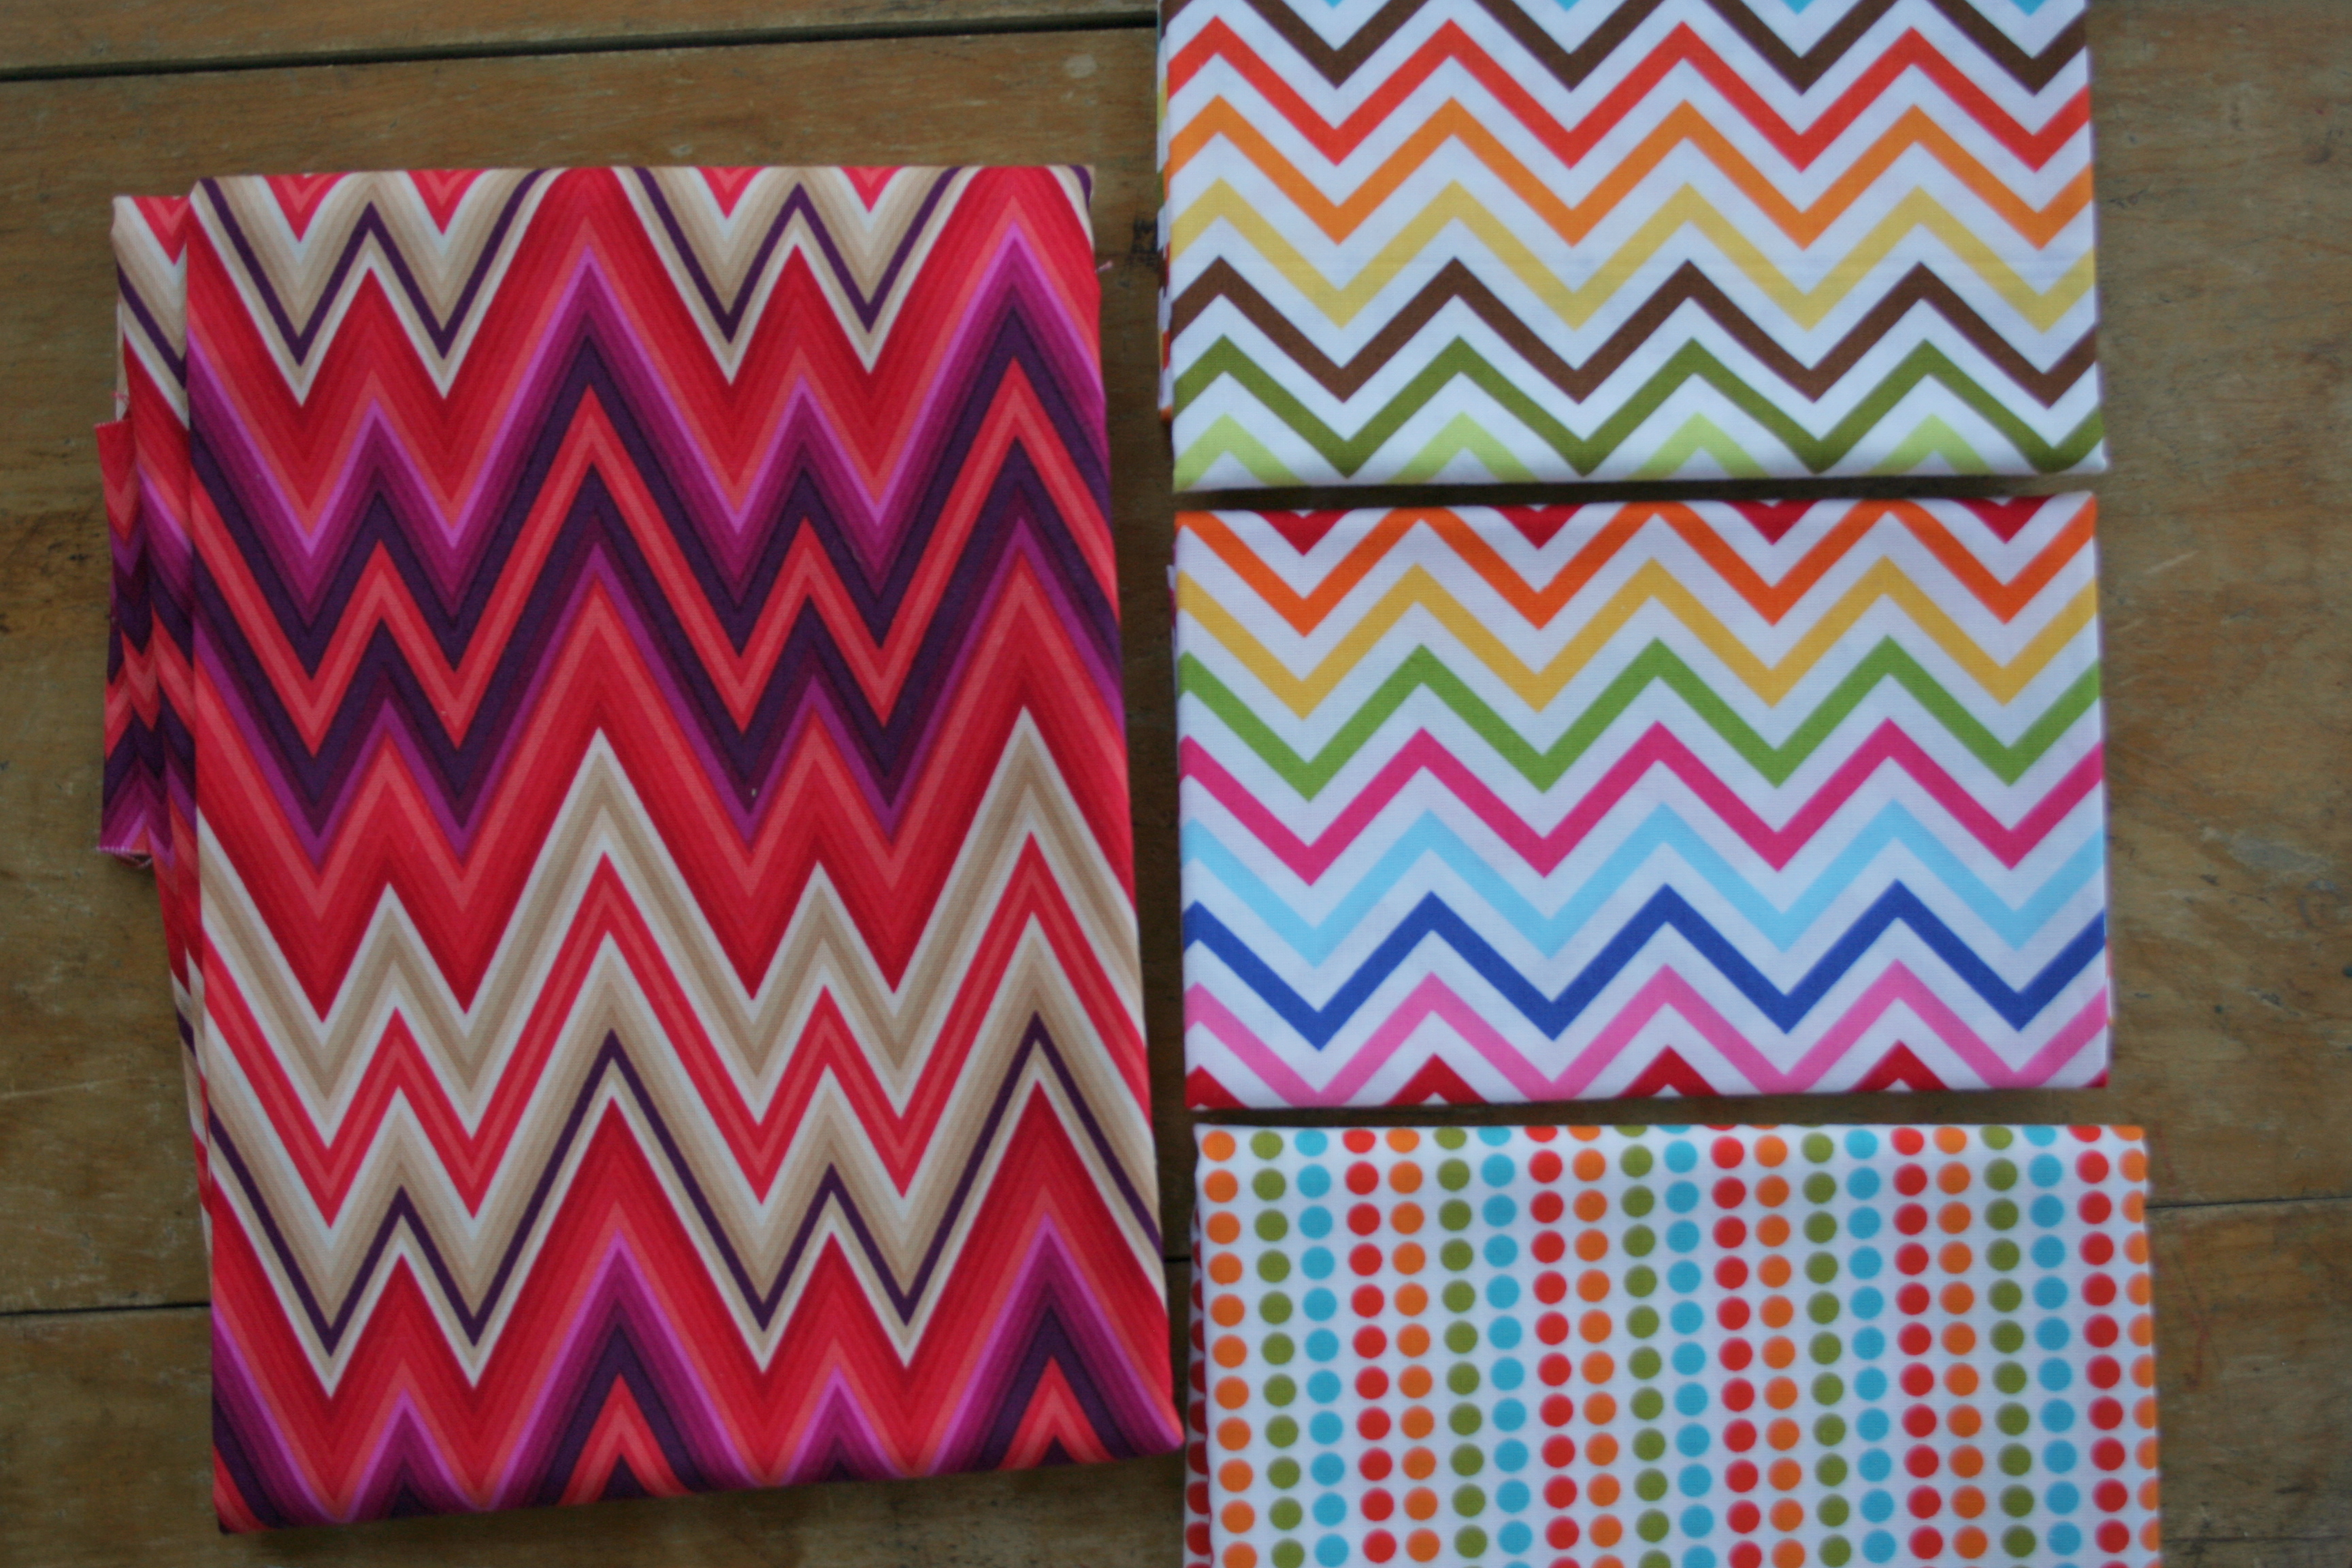
The swap goes live tomorrow, but here’s a sneak peek at what I’ll be offering to swap:
Chevrons and Dots
“Mixxoni” by Greta Lynn for Kanvas Studios in association with Bernatex: 1/2yd
Remix by Ann Kelle for Robert Kaufman, Bermuda Chevron: 18″x21″ (a hair shy of a fat quarter)
Remix by Ann Kelle for Robert Kaufman, Bright Chevron: 13″x20″
Remix by Ann Kelle for Robert Kaufman, Spring Dots: 10″x44″
I’ve tried to love chevrons, really I have. I know they are all the craze in the modern quilting world, and I do like large chevron patterned quilts, sometimes. I bought these chevrons thinking that one day they would just hop successfully into a project, but lo… here they still sit, lonely as ever. I know that many quilters love chevrons, so I hope that they find a happy new home.
Watermelon Scrap Pack
Remix by Ann Kelle for Robert Kaufman, Summer (Yellow dots): 22″x25″
Remix by Ann Kelle for Robert Kaufman, Bright (Pink dots): 21″x14″
Remix by Ann Kelle for Robert Kaufman, Garden Chevron: 1/2 yard
These fabrics are super cute, and despite the chevron I kinda love them. They would make a really cute watermelon table topper or other summery kitchen decor. I would hold on to them, but my list of works-in-progress is long enough as it is, so I’m letting go. Let it go, let it go! Can’t hold it back any more! (sorry, I have toddlers)
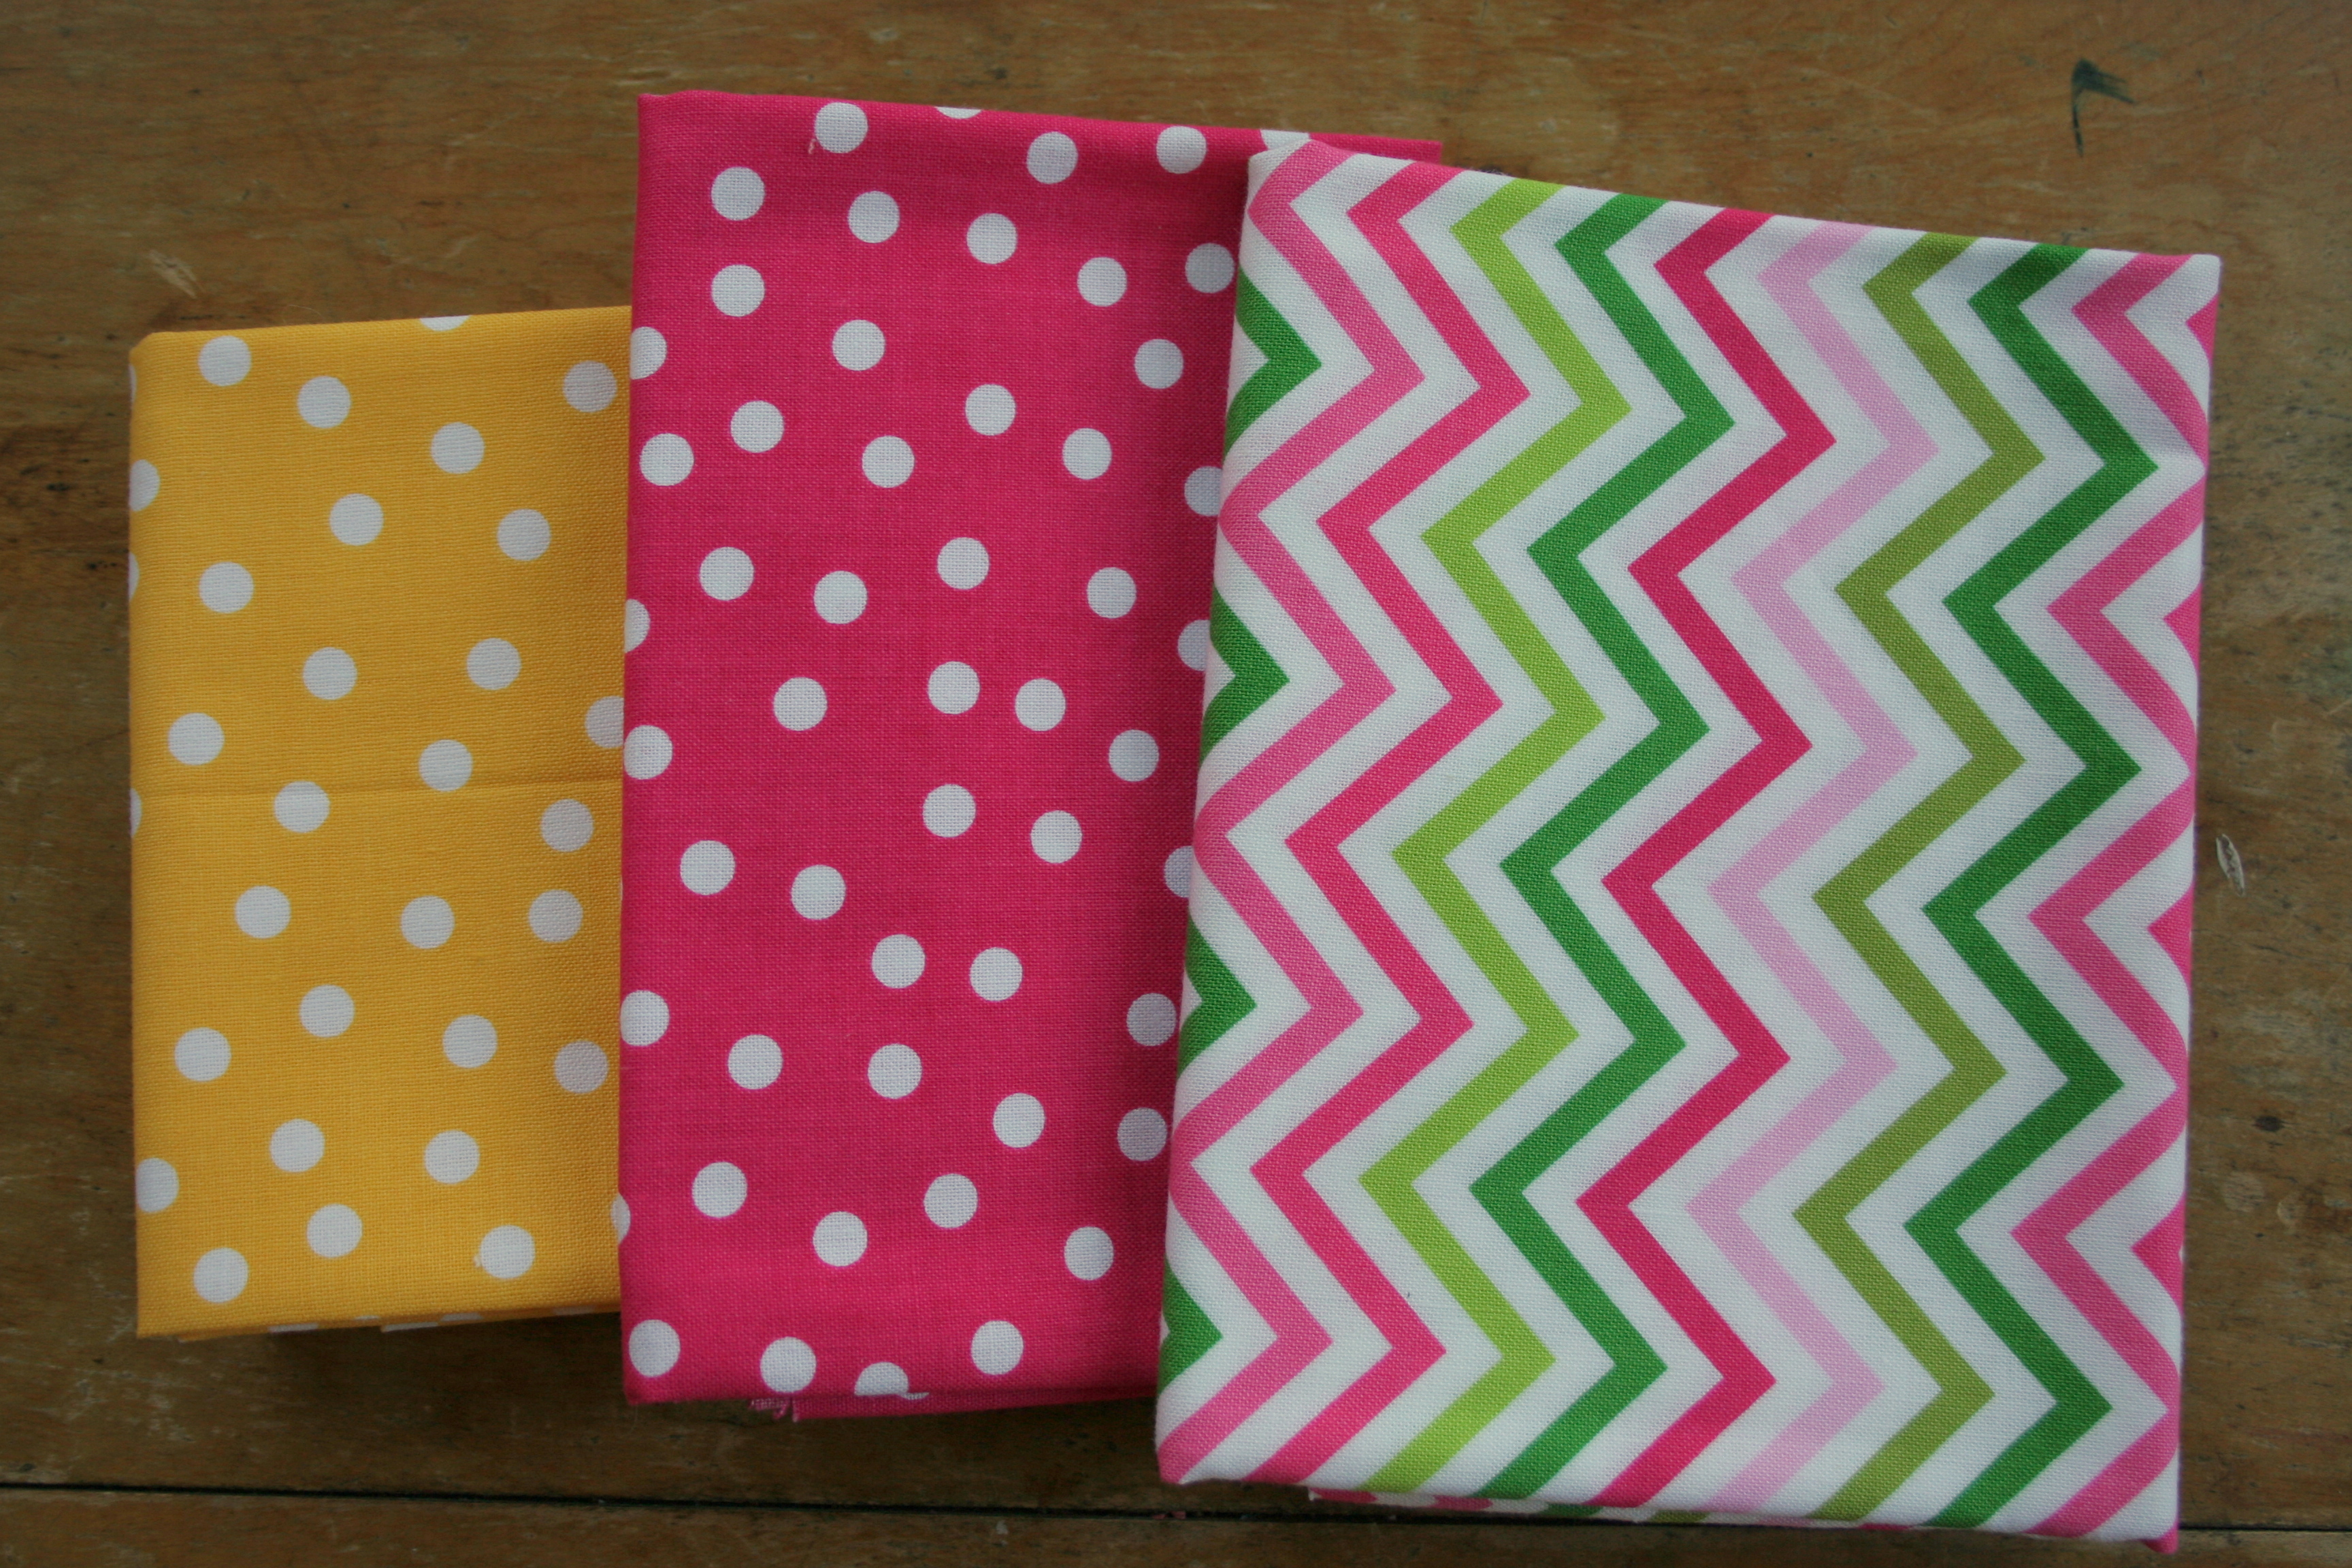
Stripes
Sis Boom Basics by Jennifer Paganelli for Free Spirit, Westminster Fibers, Eliza Stripe (Yellow): 1/2 yard
Sis Boom Basics by Jennifer Paganelli for Free Spirit, Westminster Fibers, Eliza Stripe (Green): 1/2 yard
Richloom Odilon Twill, Jewel: 1/2 yard
When I first started quilting, I joined up with the Spool Along hosted by Laura at Adventures of a Quilting Diva. Since I had next-to-no striped fabric with which to make my spools of thread, I went a bit crazy and bought way more than I needed some. I’ve since realized that the fabric doesn’t have to be striped to make a good spool, and I’ve decided to downsize my stripes a bit. So here you go!
Today is one of those days where I feel like I have a million things “in progress”. I promise I won’t spill my entire brain’s to-do list for you (that would be messy), but here are some of the top projects I have in progress at the moment:
This awesome LNQC banner was created by my talented brother Steven.
About a week ago, my new quilting friend Stephanie and her local quilter friend Michelle and I decided to launch a new Facebook community for fellow late night quilters, since we were getting so much out of our own nightly conversations. It started as a page, but the interest and content was so fabulous after only a day, that when new members requested that we make it a private group, we knew it was the right path. This way, it allows for easier communication and better sharing of pictures and ideas. Facebook “pages” aren’t as conducive to posts by many different people in a community as “groups” are. So we made the change, and the group is hoppin’!
We want you to join us there. Your posts will be front and center so you can get lots of feedback from fellow quilters. You can network, ask questions, share advice, share your own works in progress, or even just be a wallflower looking for inspiration.
How is this a work in progress, you may ask? Well, we have a lot of great ideas still in the works, including the creation of a button you can include on your blog, creating a weekly fabric swap so that you can buy, sell, and trade fabric on the page, and more! If you’re on Facebook, would you please give us a little love and take a second to join the group (Steph, Michelle and I are accepting requests as fast as we can), share it with your quilting friends, and perhaps post some of your projects? We’d all love to see what YOU’re working on!
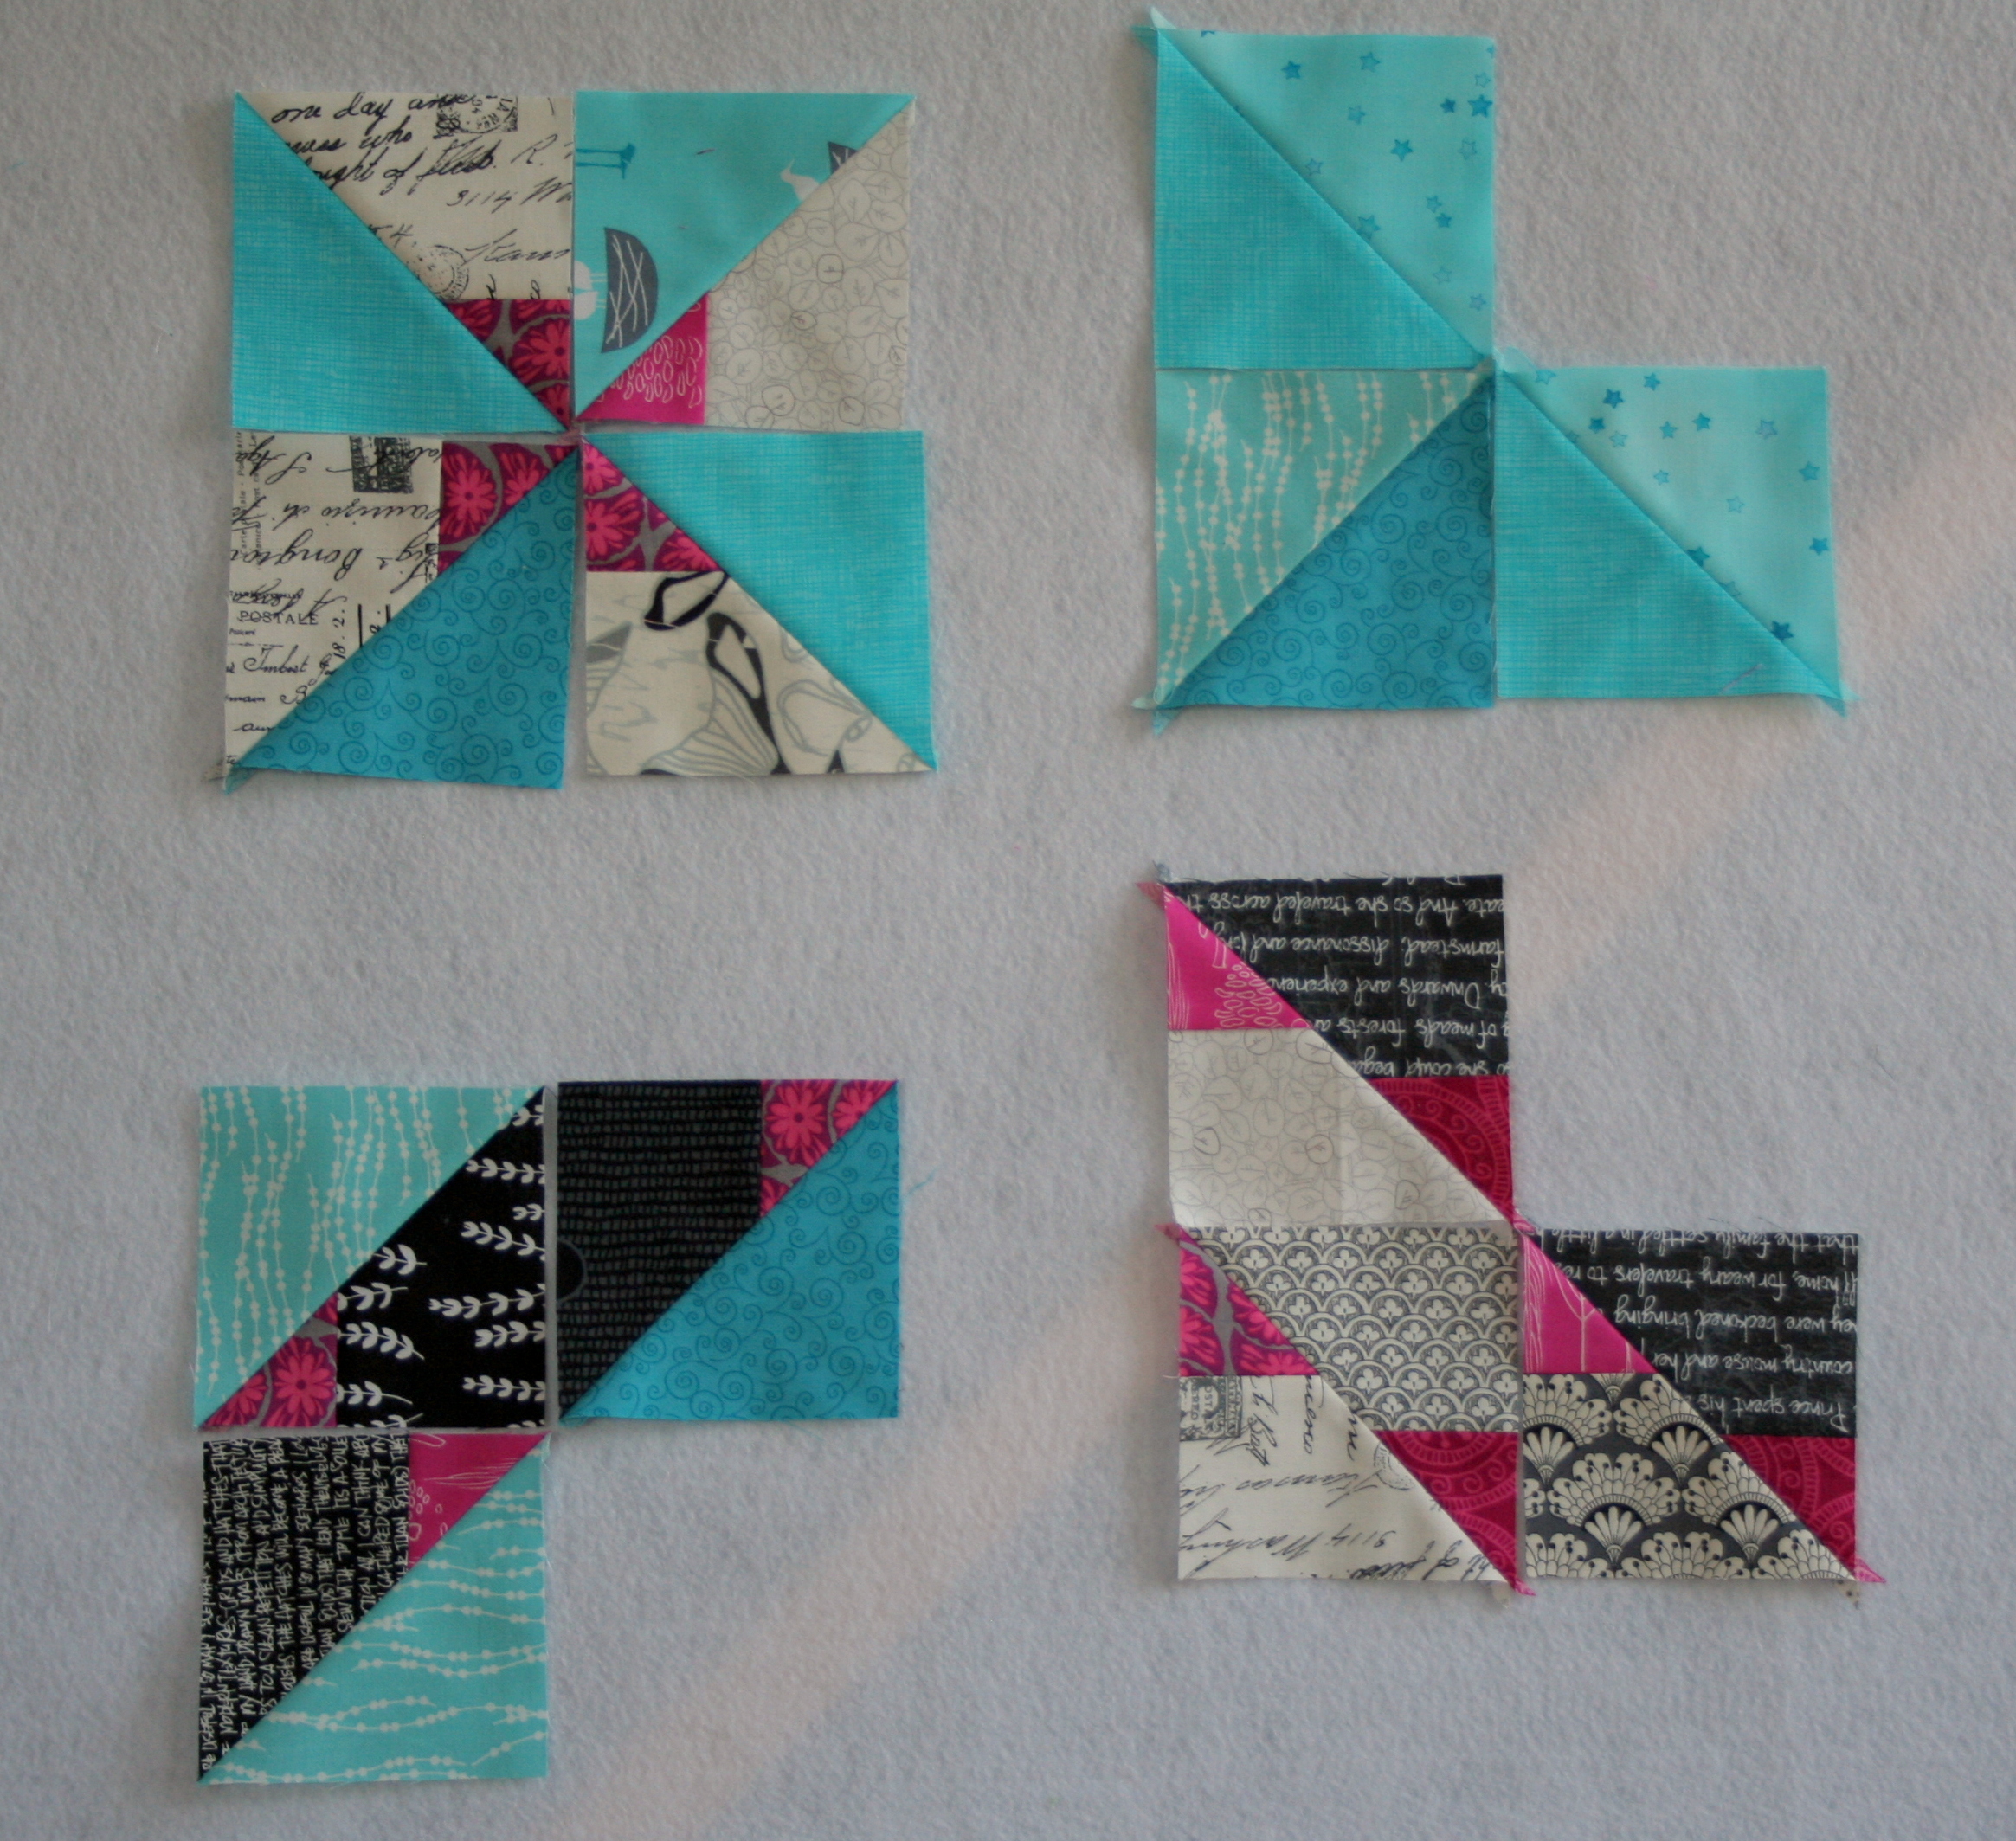
Supernova Friendship Block Swap: Block 1
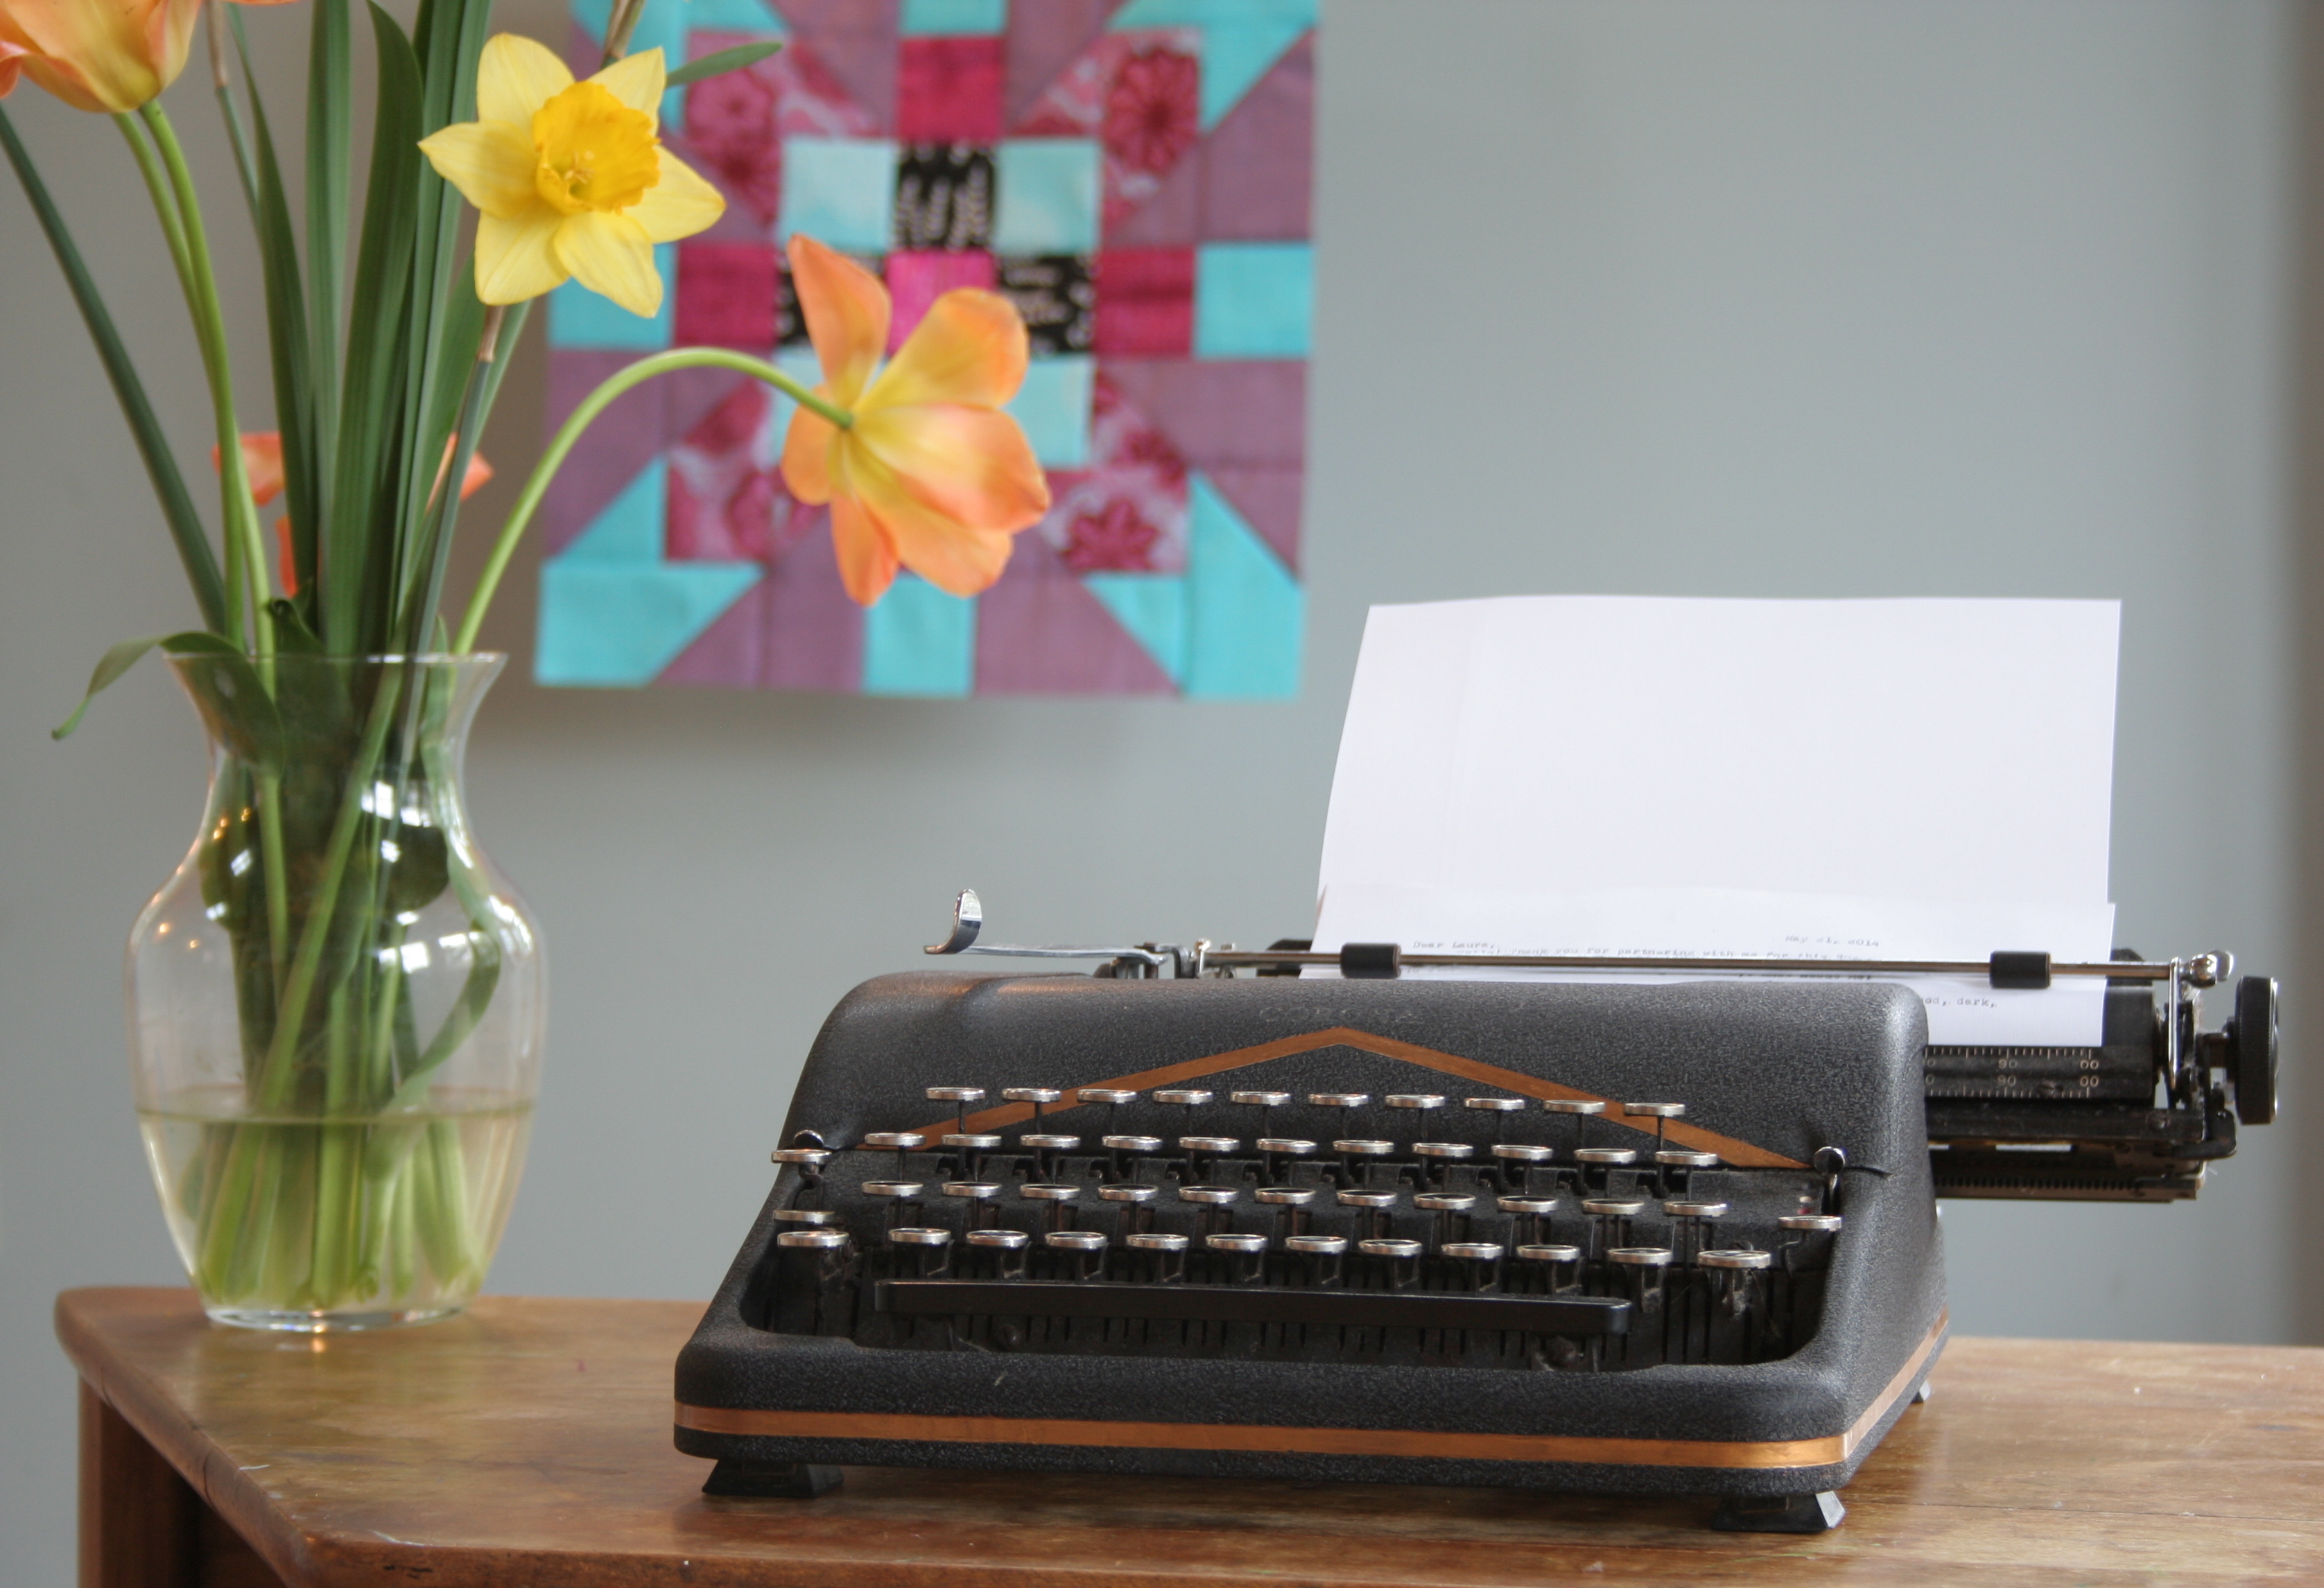
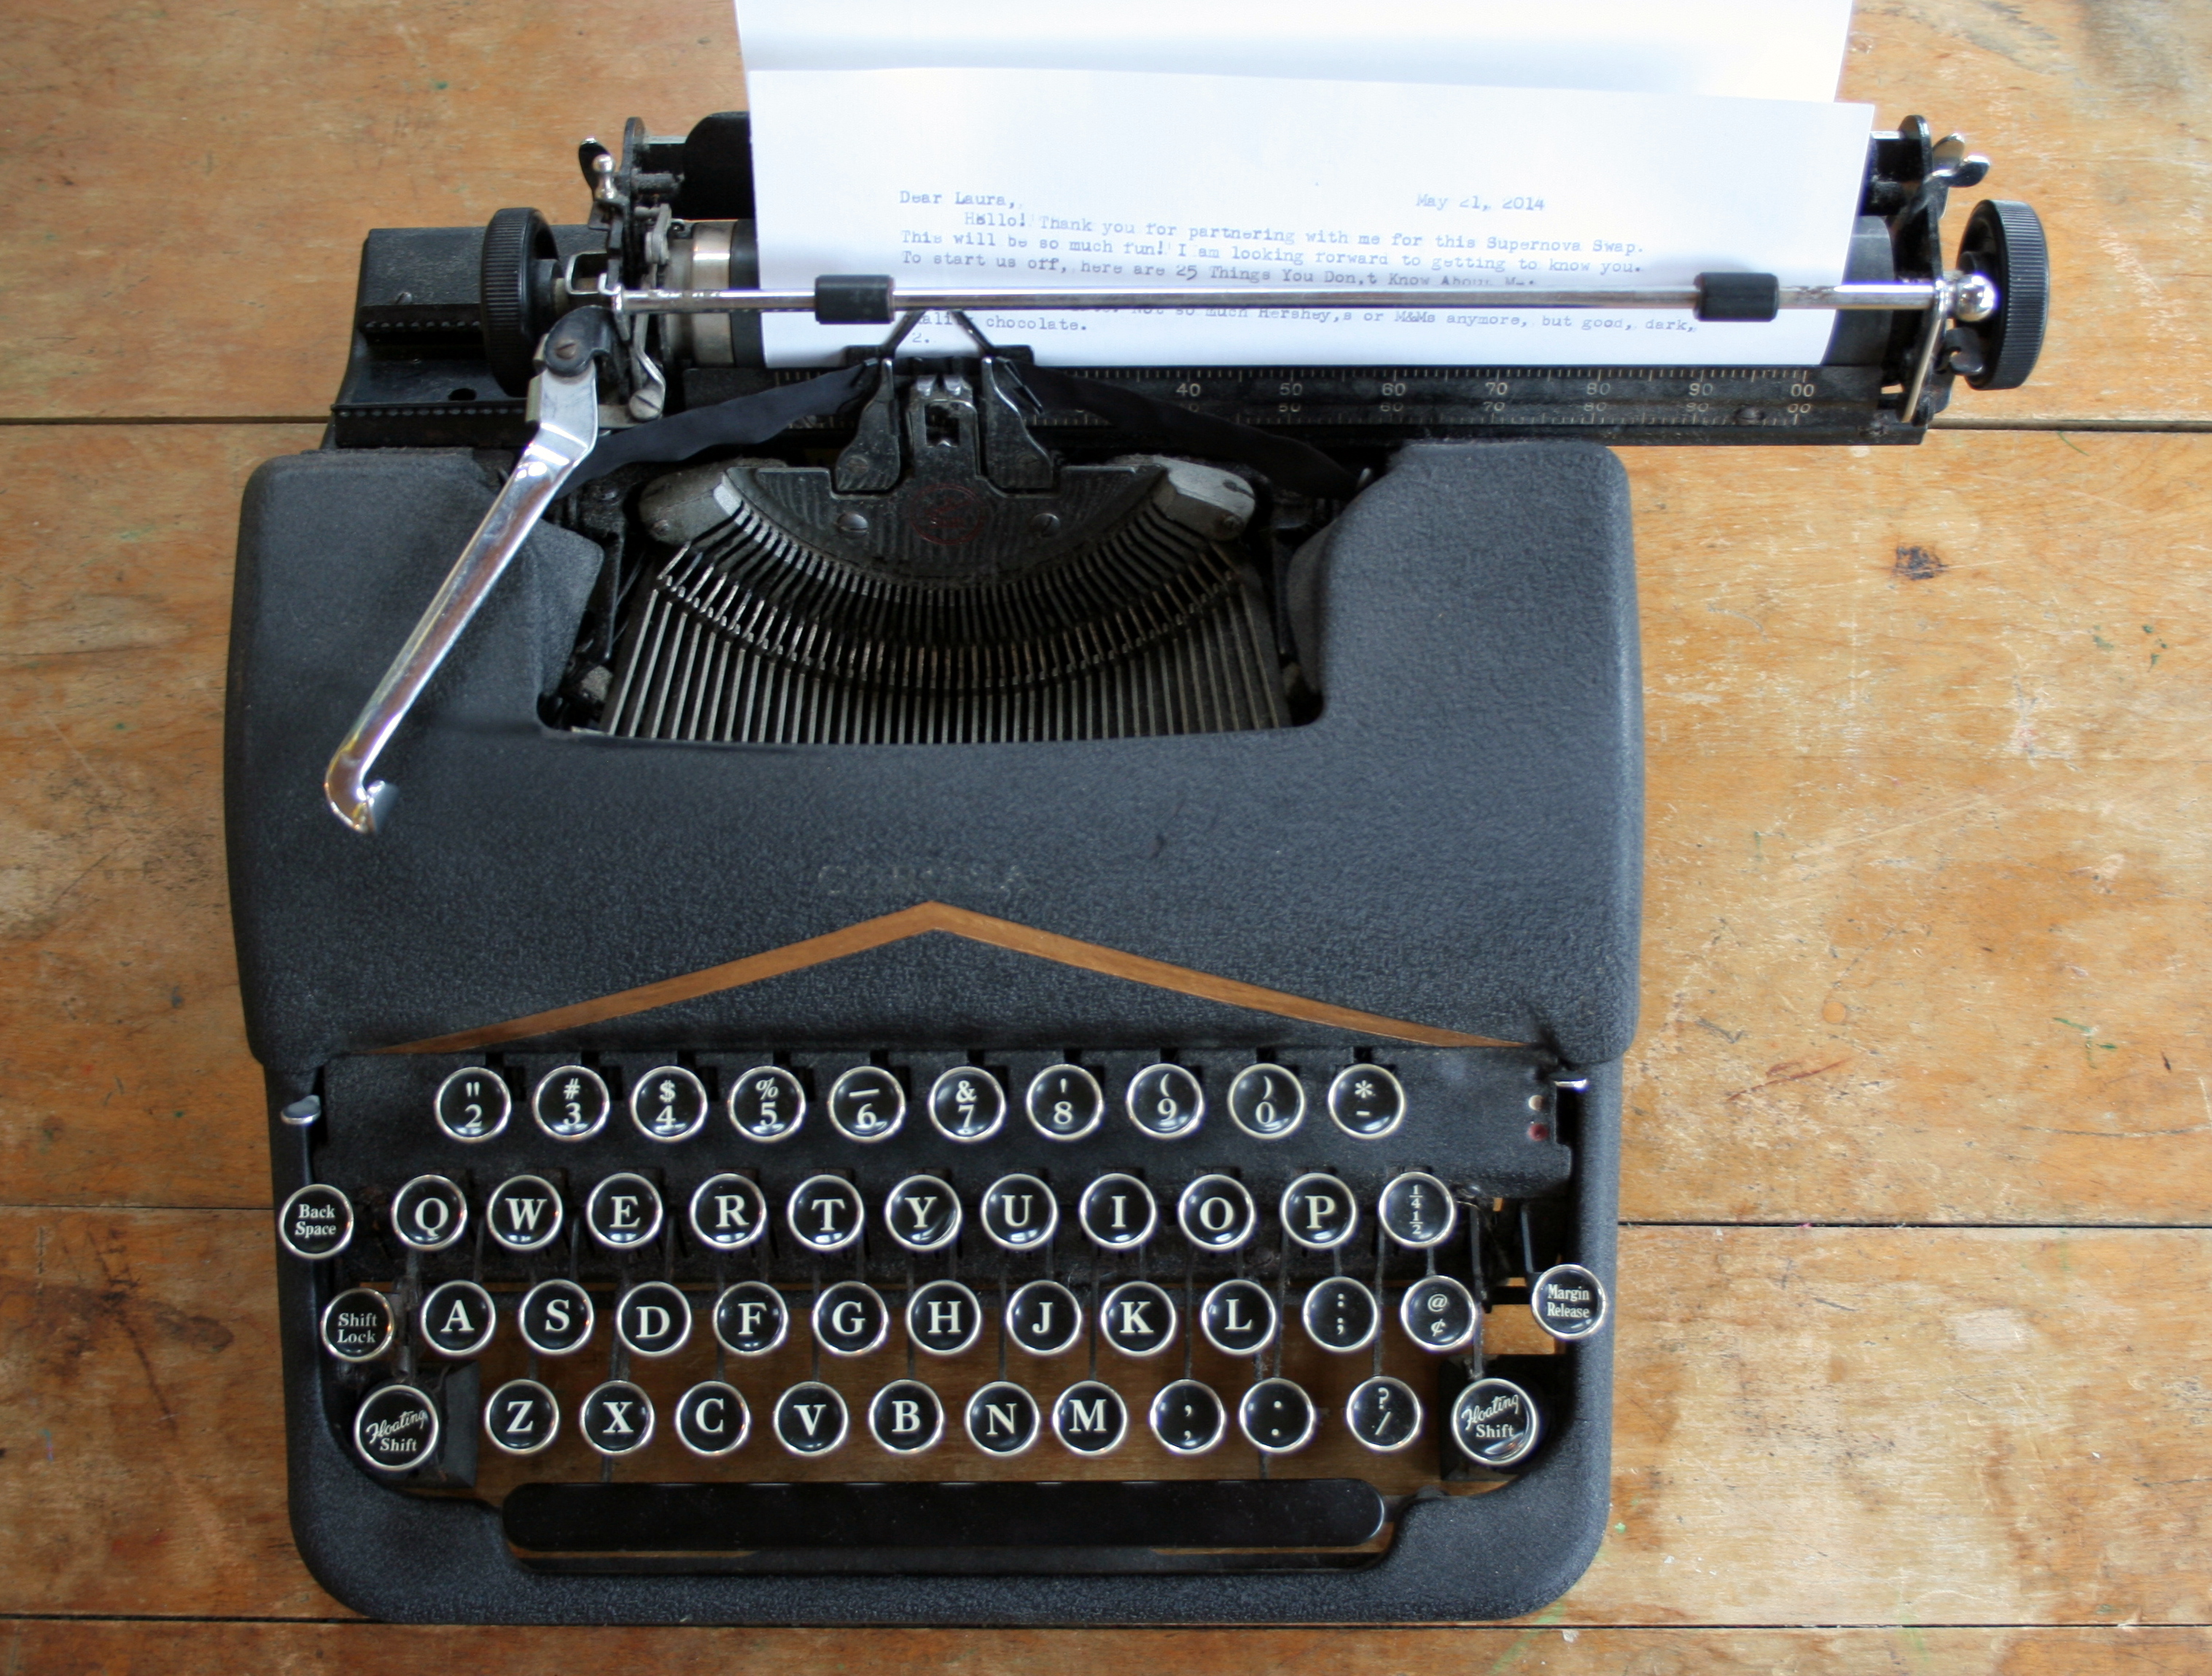
I have completed my first block for the Supernova Friendship Block Swap, and I love it! I still need to make a duplicate for myself, but I figured I may as well stay ahead and start writing my first letter to my partner Laura. The aspect of the swap that really drew me in at the start is the friendship-making in the process. Each month, I will send not only an awesome 18″ supernova quilt block to Laura, but I’ll also write her a letter about myself. I’ve decided to type most of the letters since I have an awesome typewriter and may as well use it.
Besides, how awesome would it be to receive a typed letter in the mail?! I hope Laura agrees.
I think that the swap is partially supposed to be a surprise each month, and I’ve already blown the surprise this month anyway with my tweeting and Instagramming, so I figure a semi-secretive peek at my block is okay. In future months, I promise to only post pictures AFTER Laura has received her blocks! This is going to be fun!
Scrappy Play
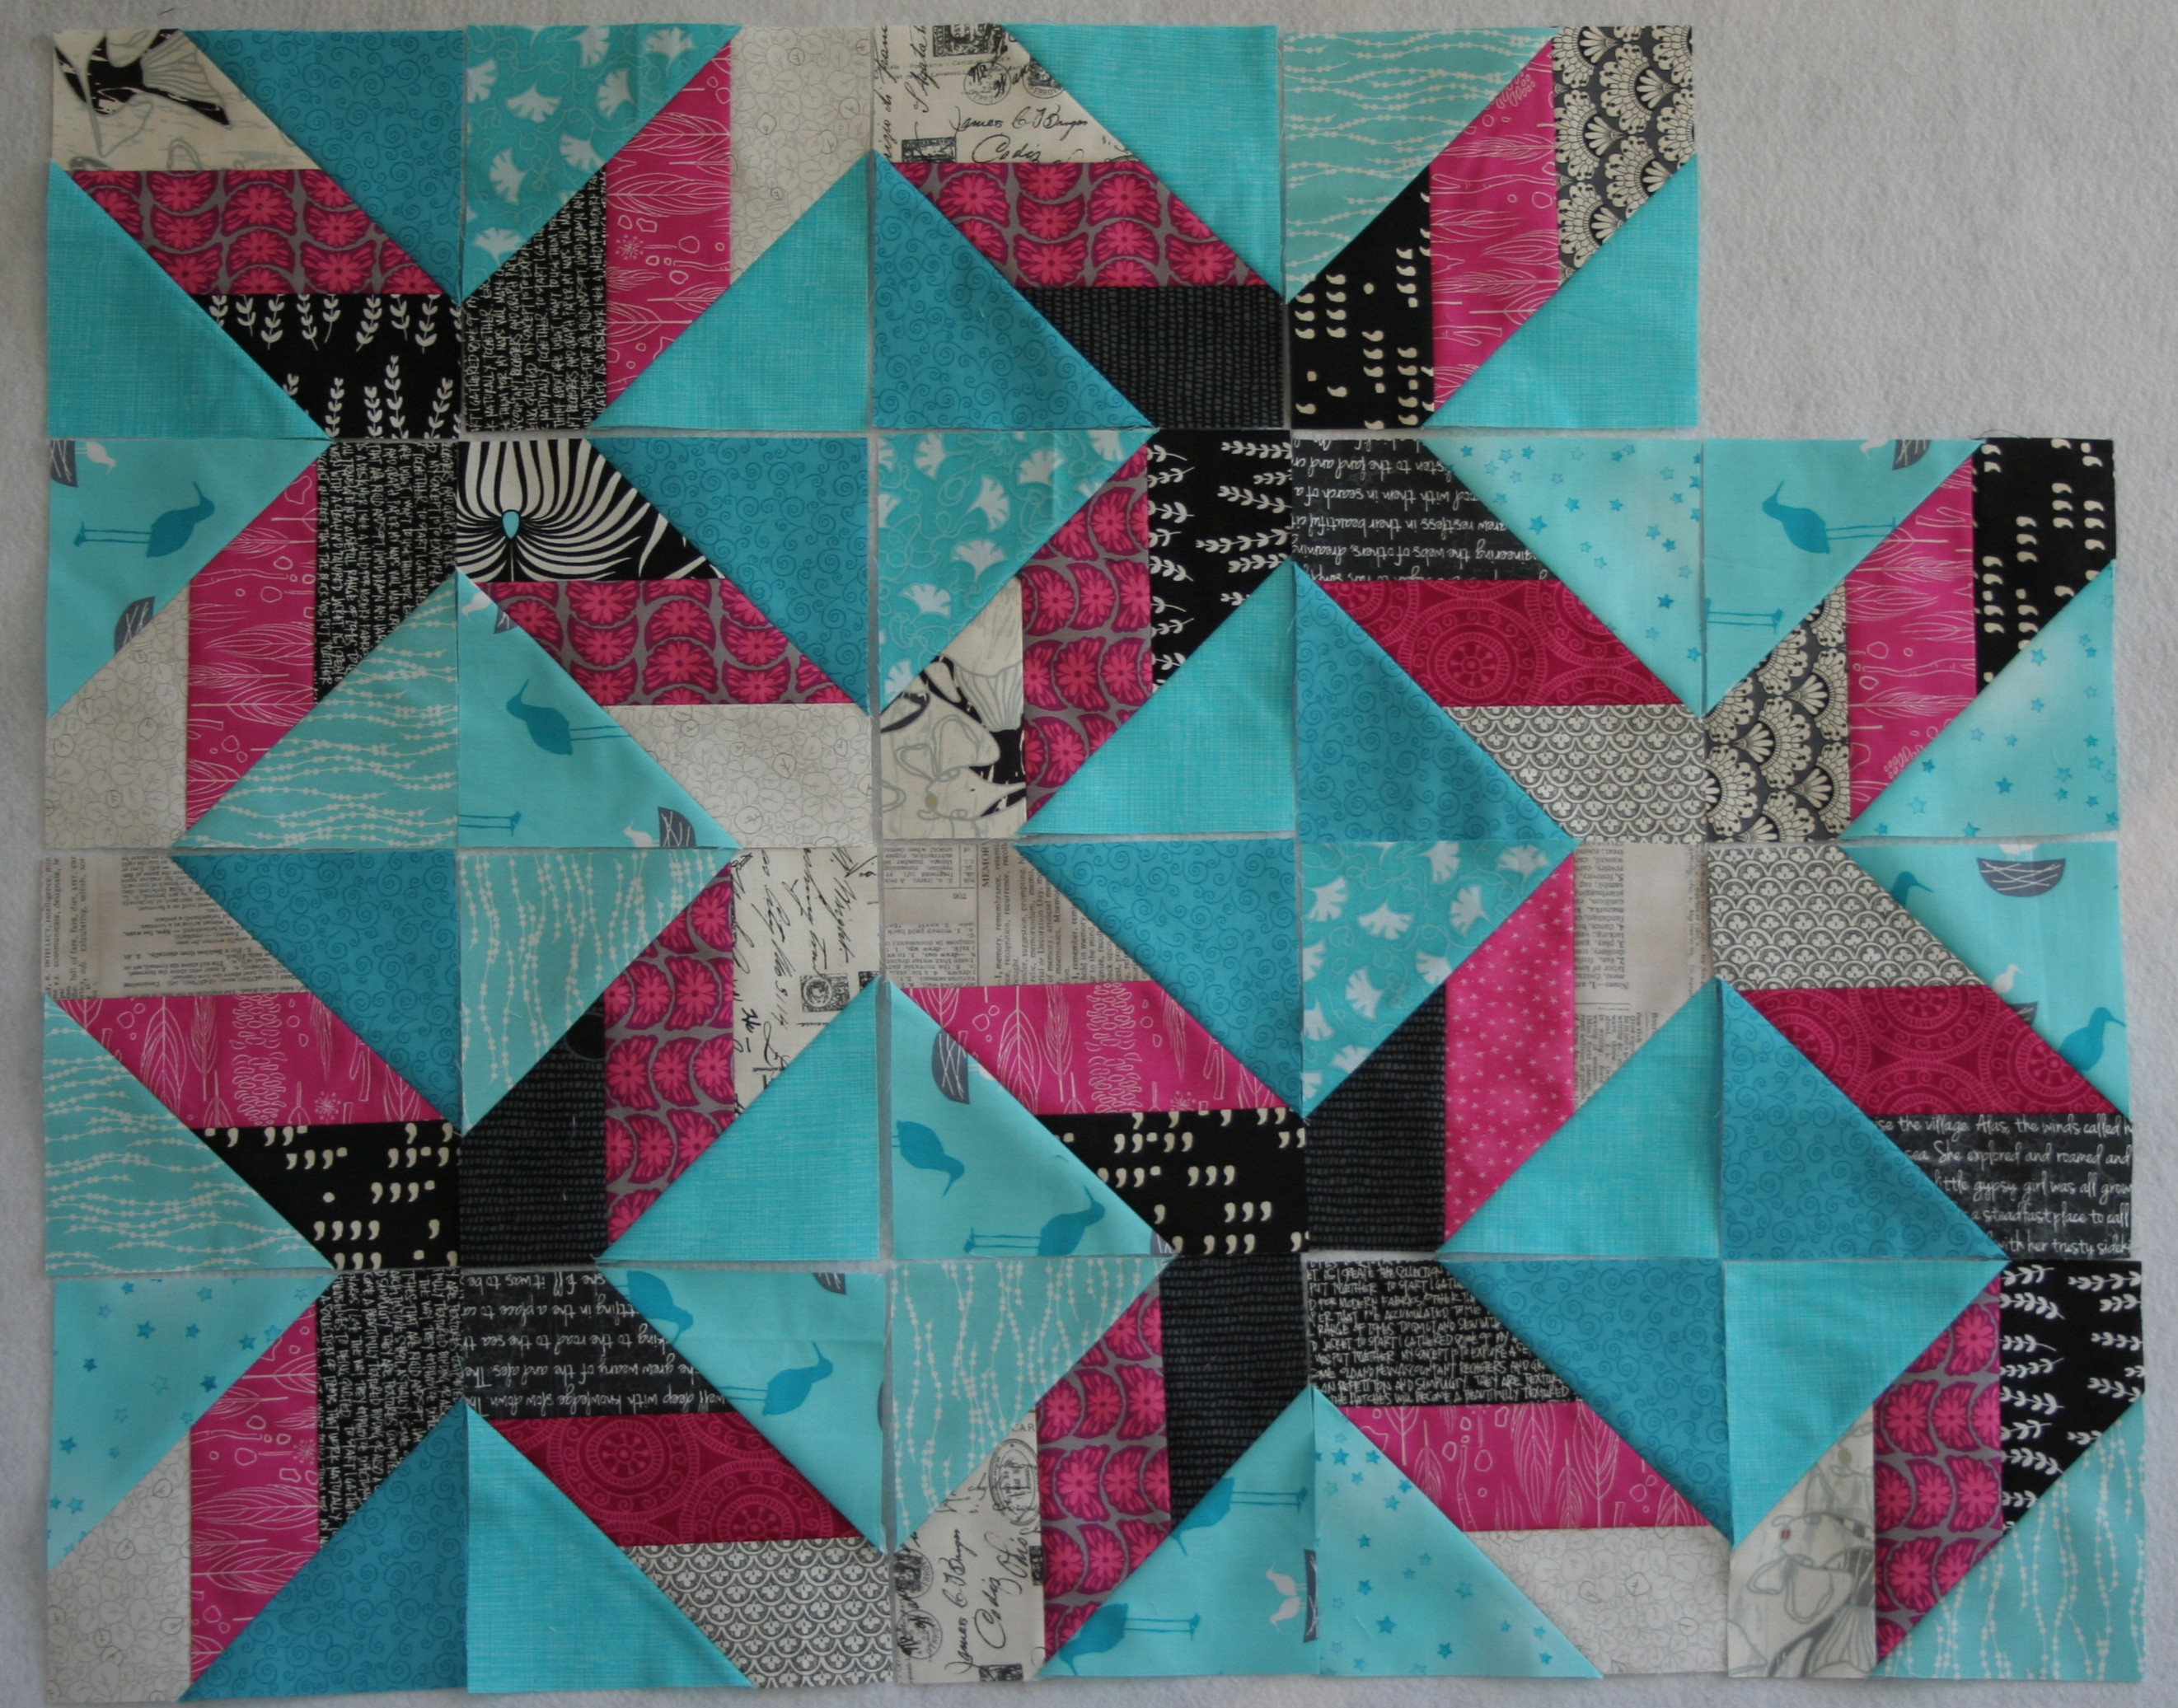
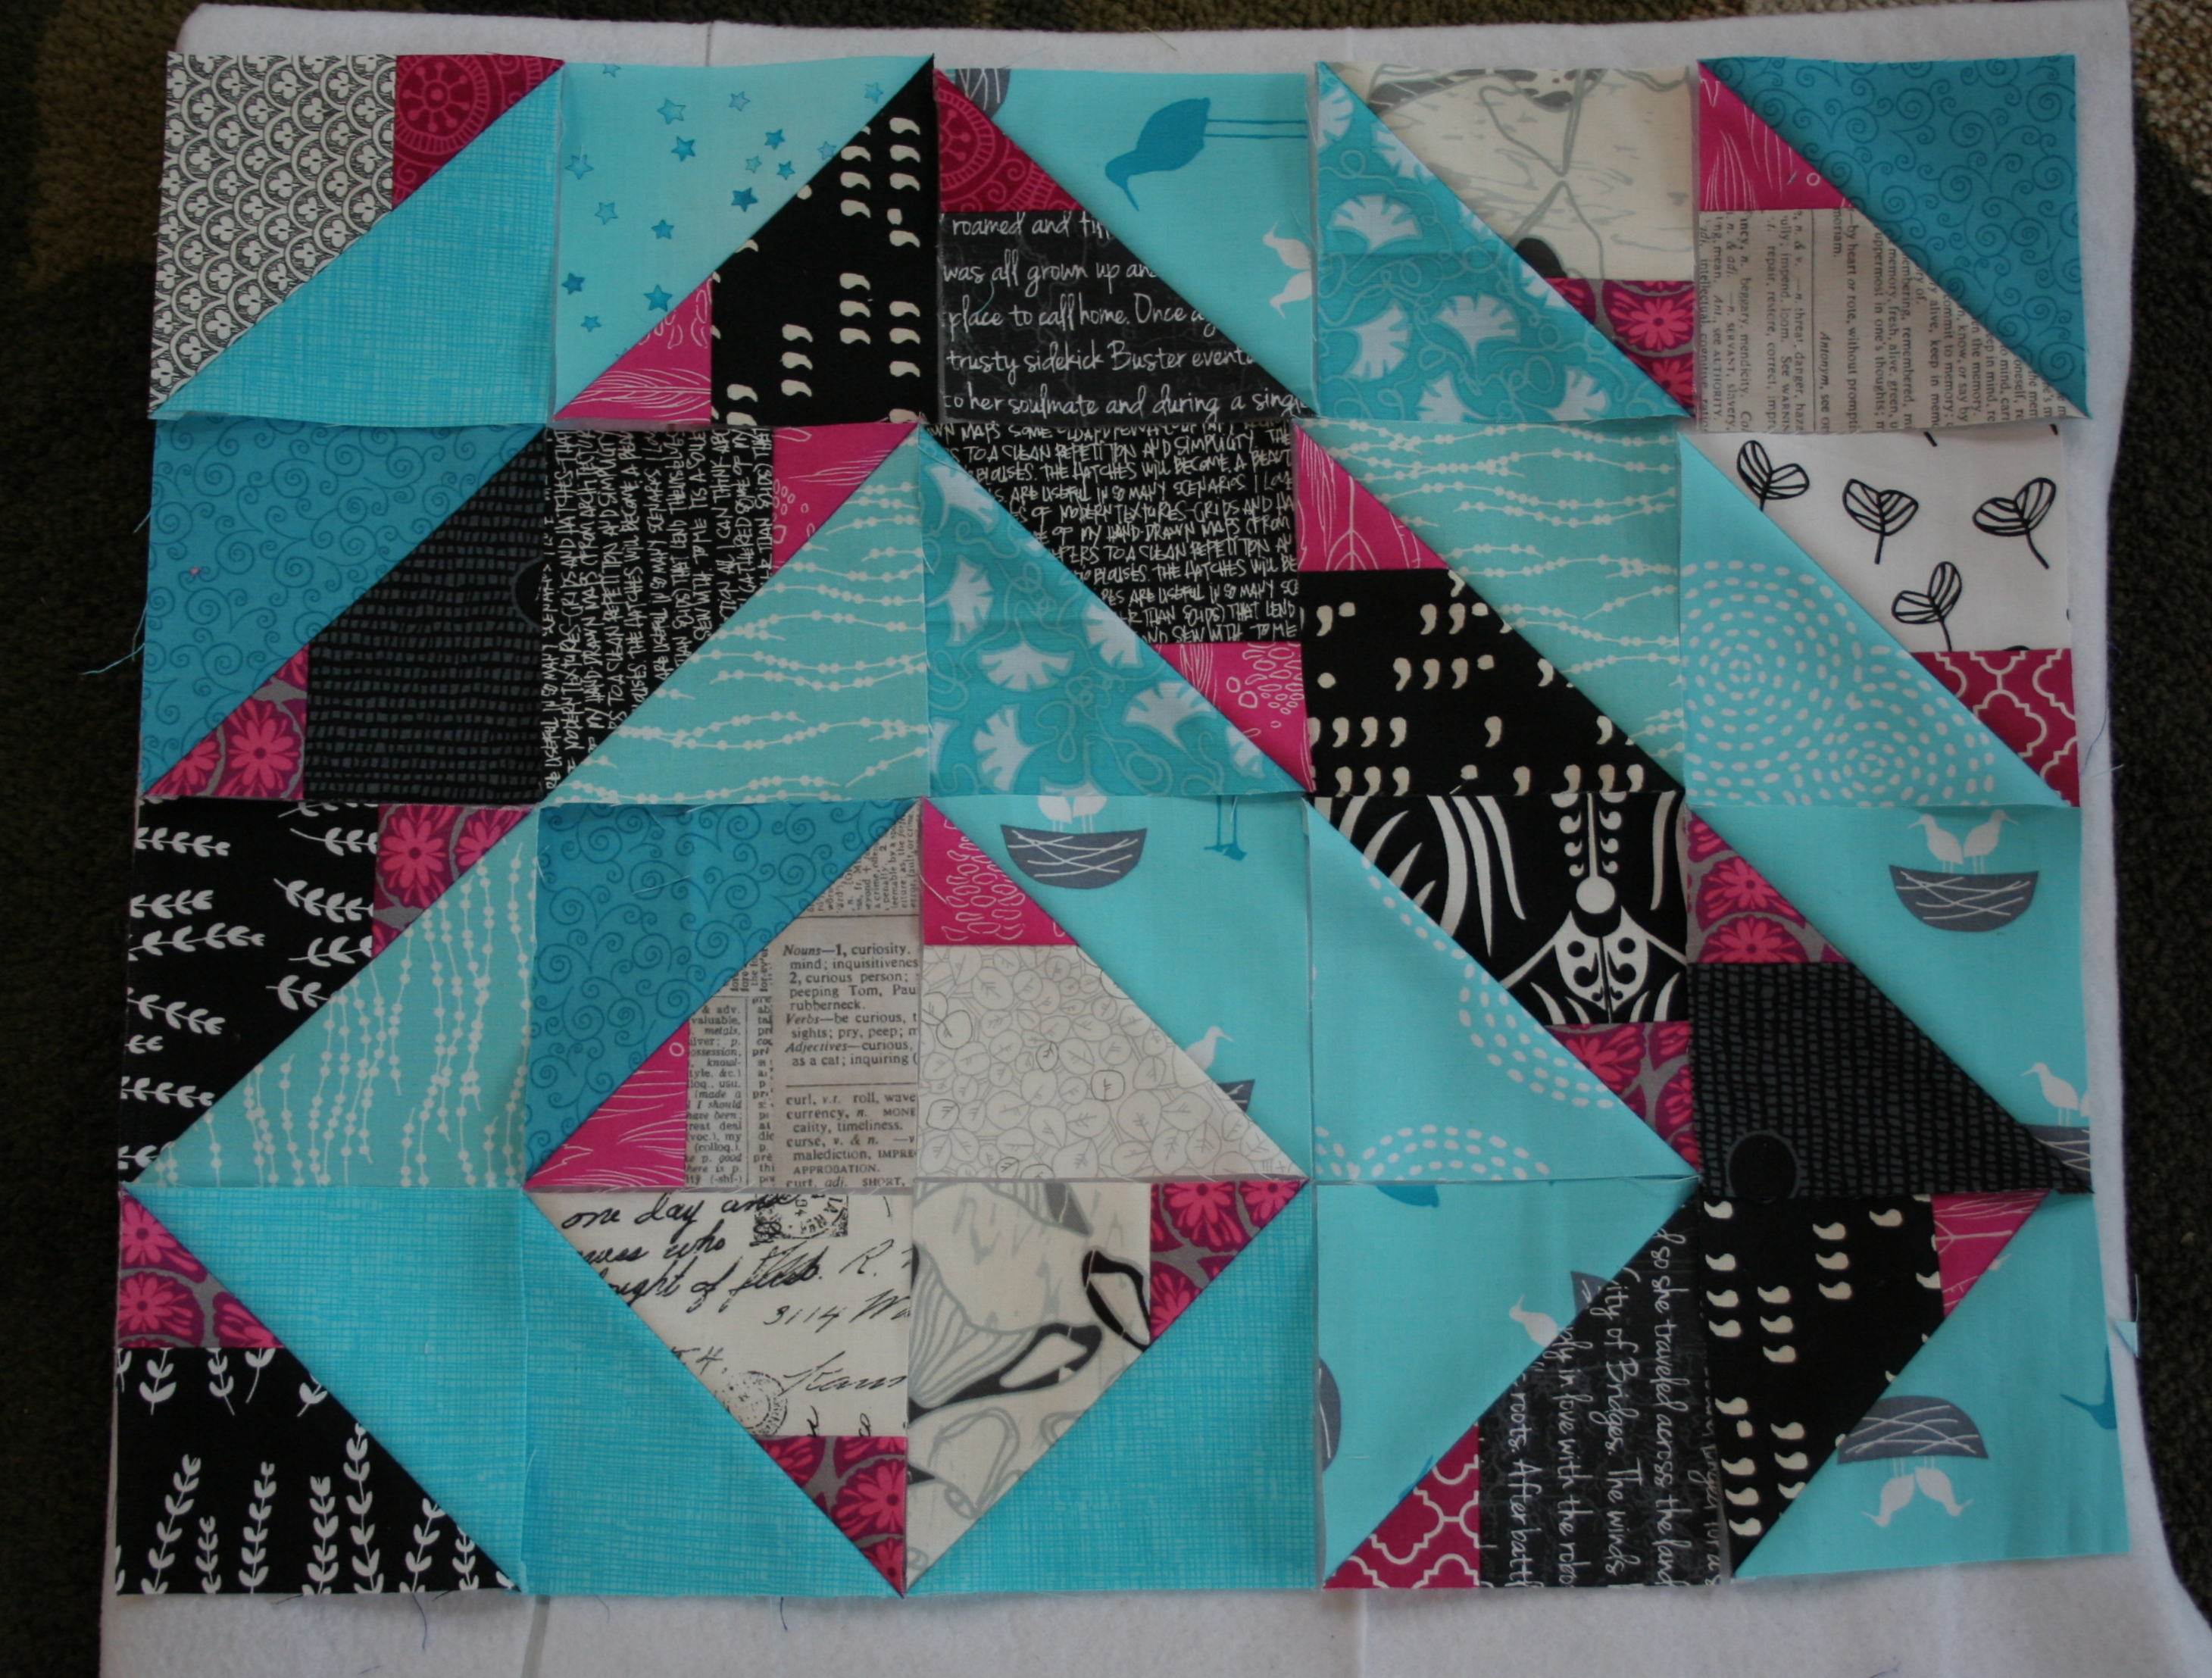
My final work in progress has been a fun little “extra”. My Star Crazy quilt is the first pattern I’ve used that results in many, somewhat large, already cool-looking scraps. I have been having a lot of fun playing around with different possibilities for the scraps.
I think I have decided to make them into a set of place mats, but I think I will wait until the quilt is finished to make sure I have enough pieces to make a sufficient number of coordinating place mats. The alternative, of course is to use them on the back of the quilt. Either way, it has been fun discovering all of the wonderful arrangements possible with half-square triangles (HST).
It has been a busy week!
What do you do with your HST scraps? Do you have a favorite arrangement?
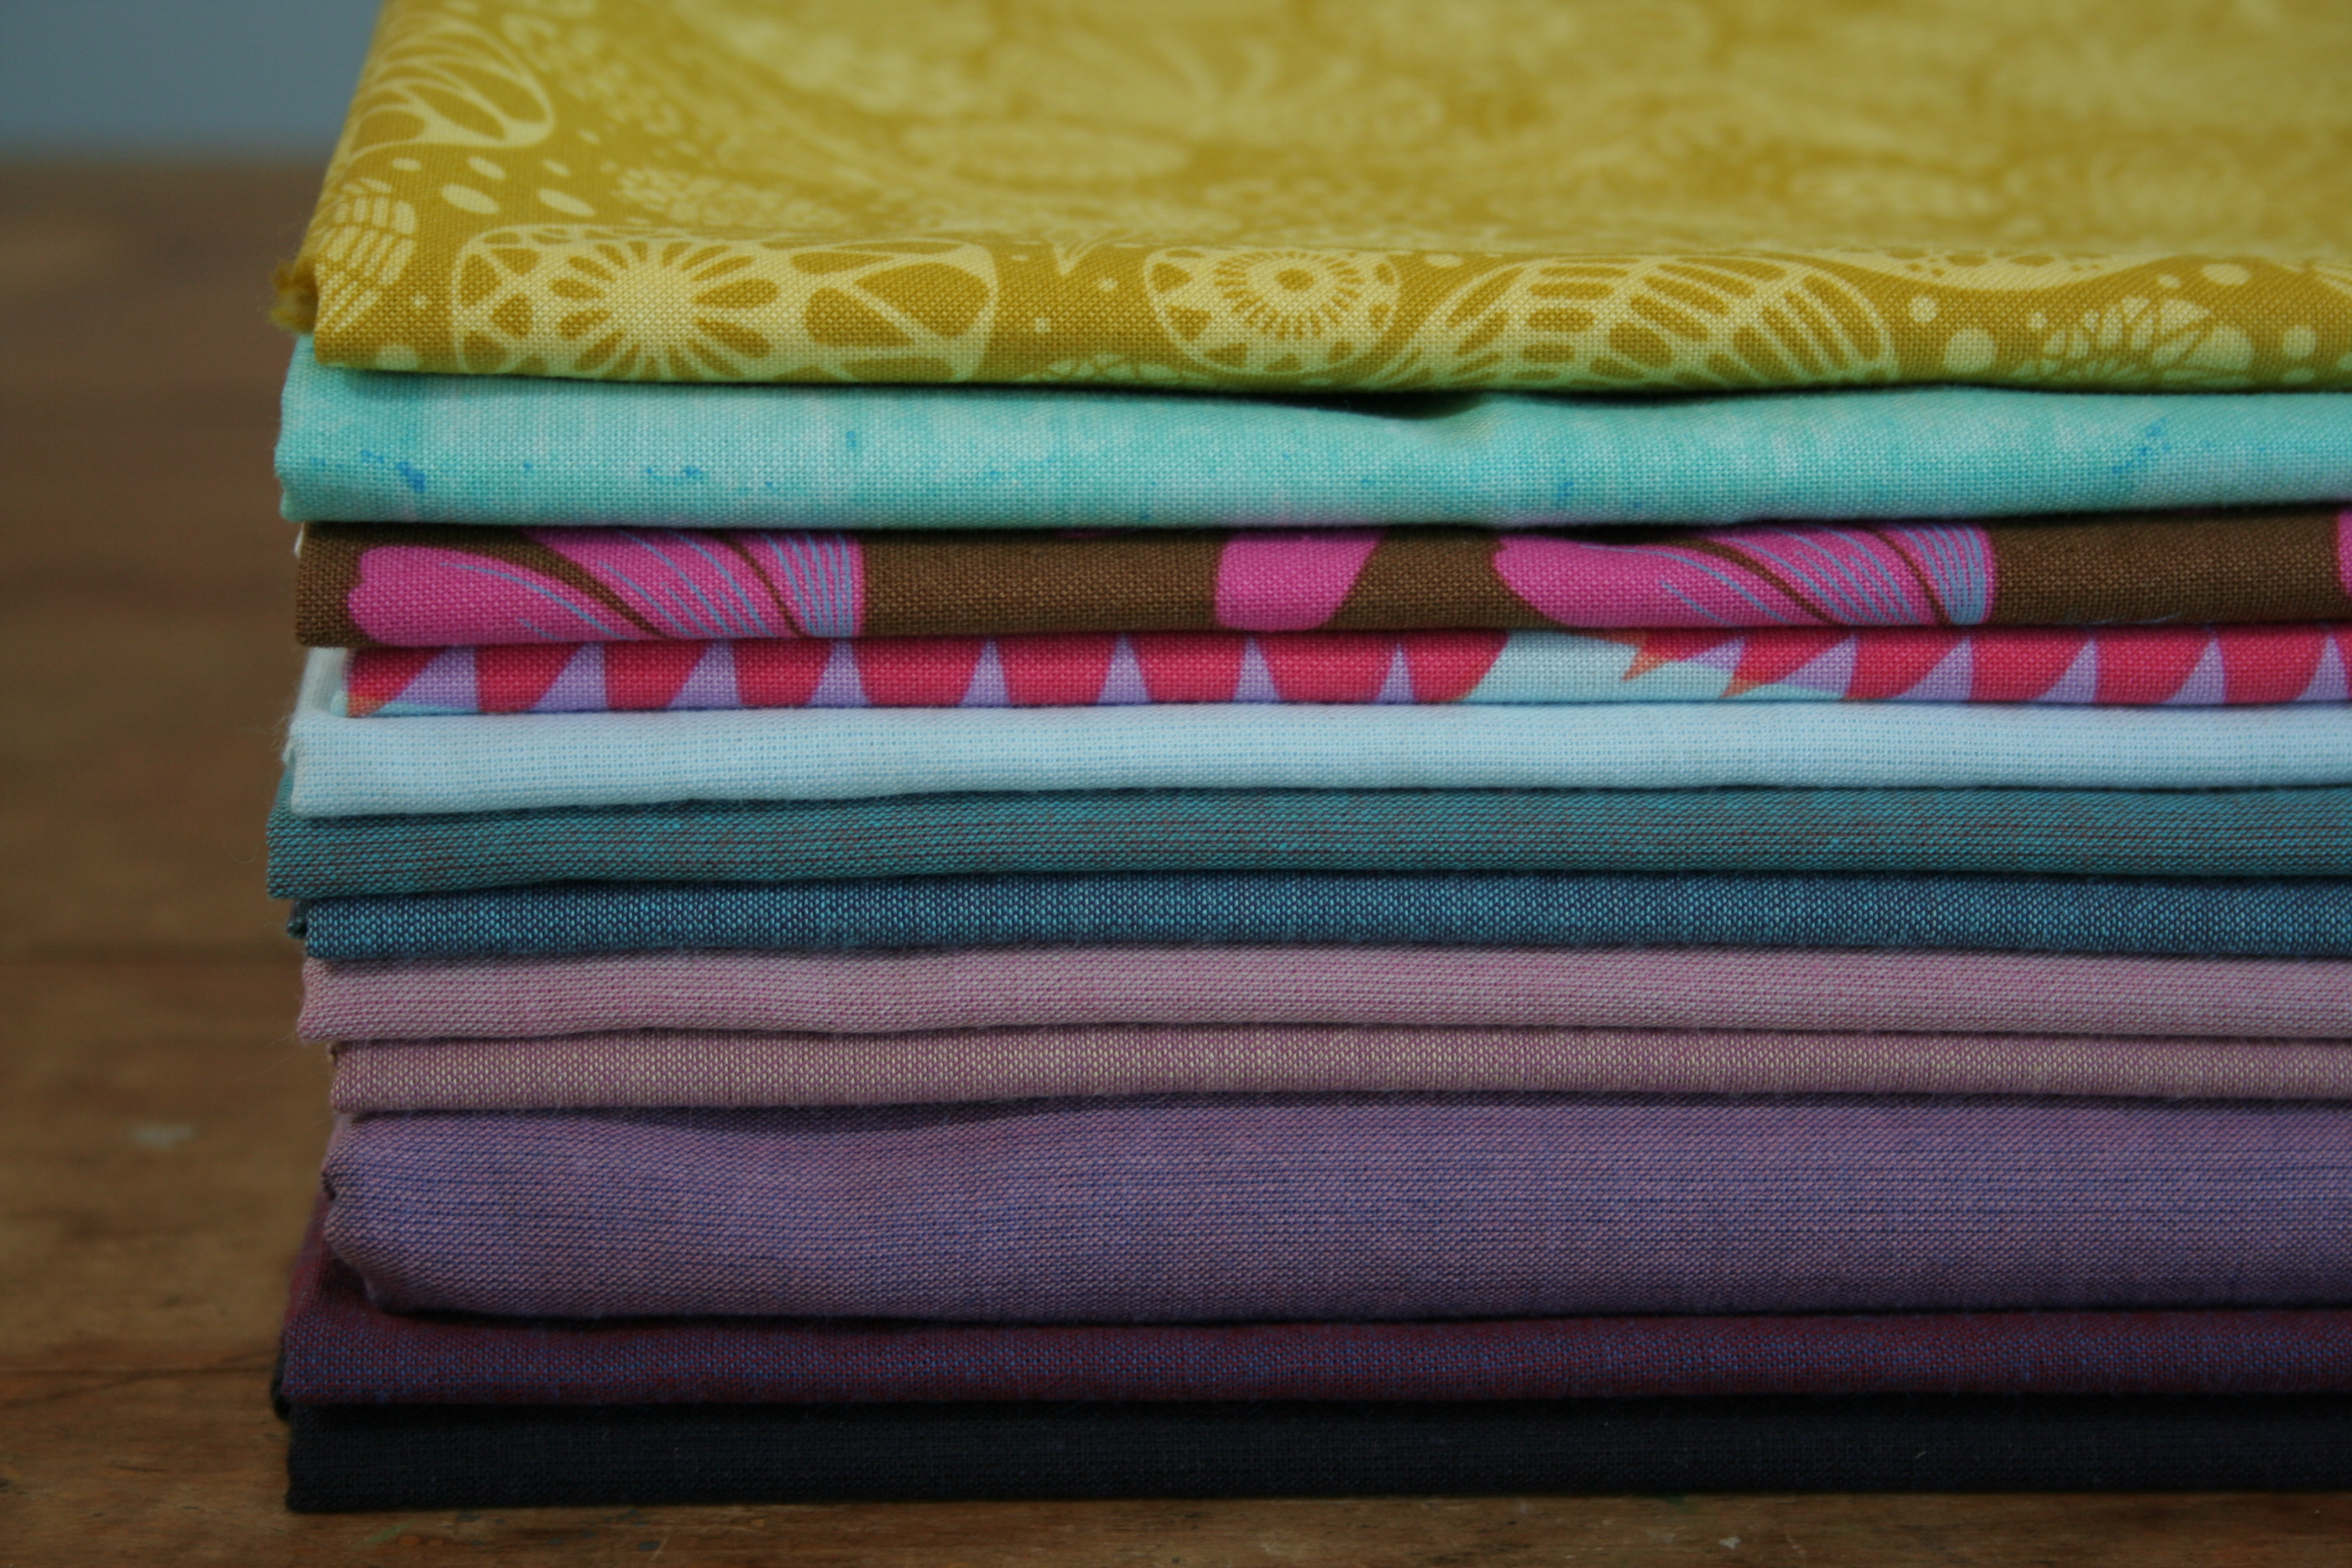
One of the best parts about taking on a new quilt challenge is the fabric shopping that ensues. Since I’ve officially joined the Supernova Friendship Swap partnering with Laura from Adventures of a Quilting Diva, and we finally decided on our color plan and background fabric, I had to do a little fabric shopping.
Since I was shopping online so that Laura and I could be sure that we were getting the same exact background fabric, I ordered a few more prints to bring the total to >$50 (free shipping from QuiltHome!).
I ordered mostly half-yards, and 2.5 yards of our background fabric, since the pattern calls for 2 yards and I wanted a bit left for another project-in-the-works. Here’s what I bought:
Pretty Potent-Candy Fabric by Anna Maria Horner
Pretty Potent-Outloud Fabric by Anna Maria Horner
Edges in Sky by Laura Gunn
Acacia-Honey Fabric by Tula Pink
and some Kaffe Fassett Shot Cottons in:
-Ice
-Spruce
-Eucalyptus
-Quartz
-Heather/Mushroom
-Granite
-Prune
-Coal
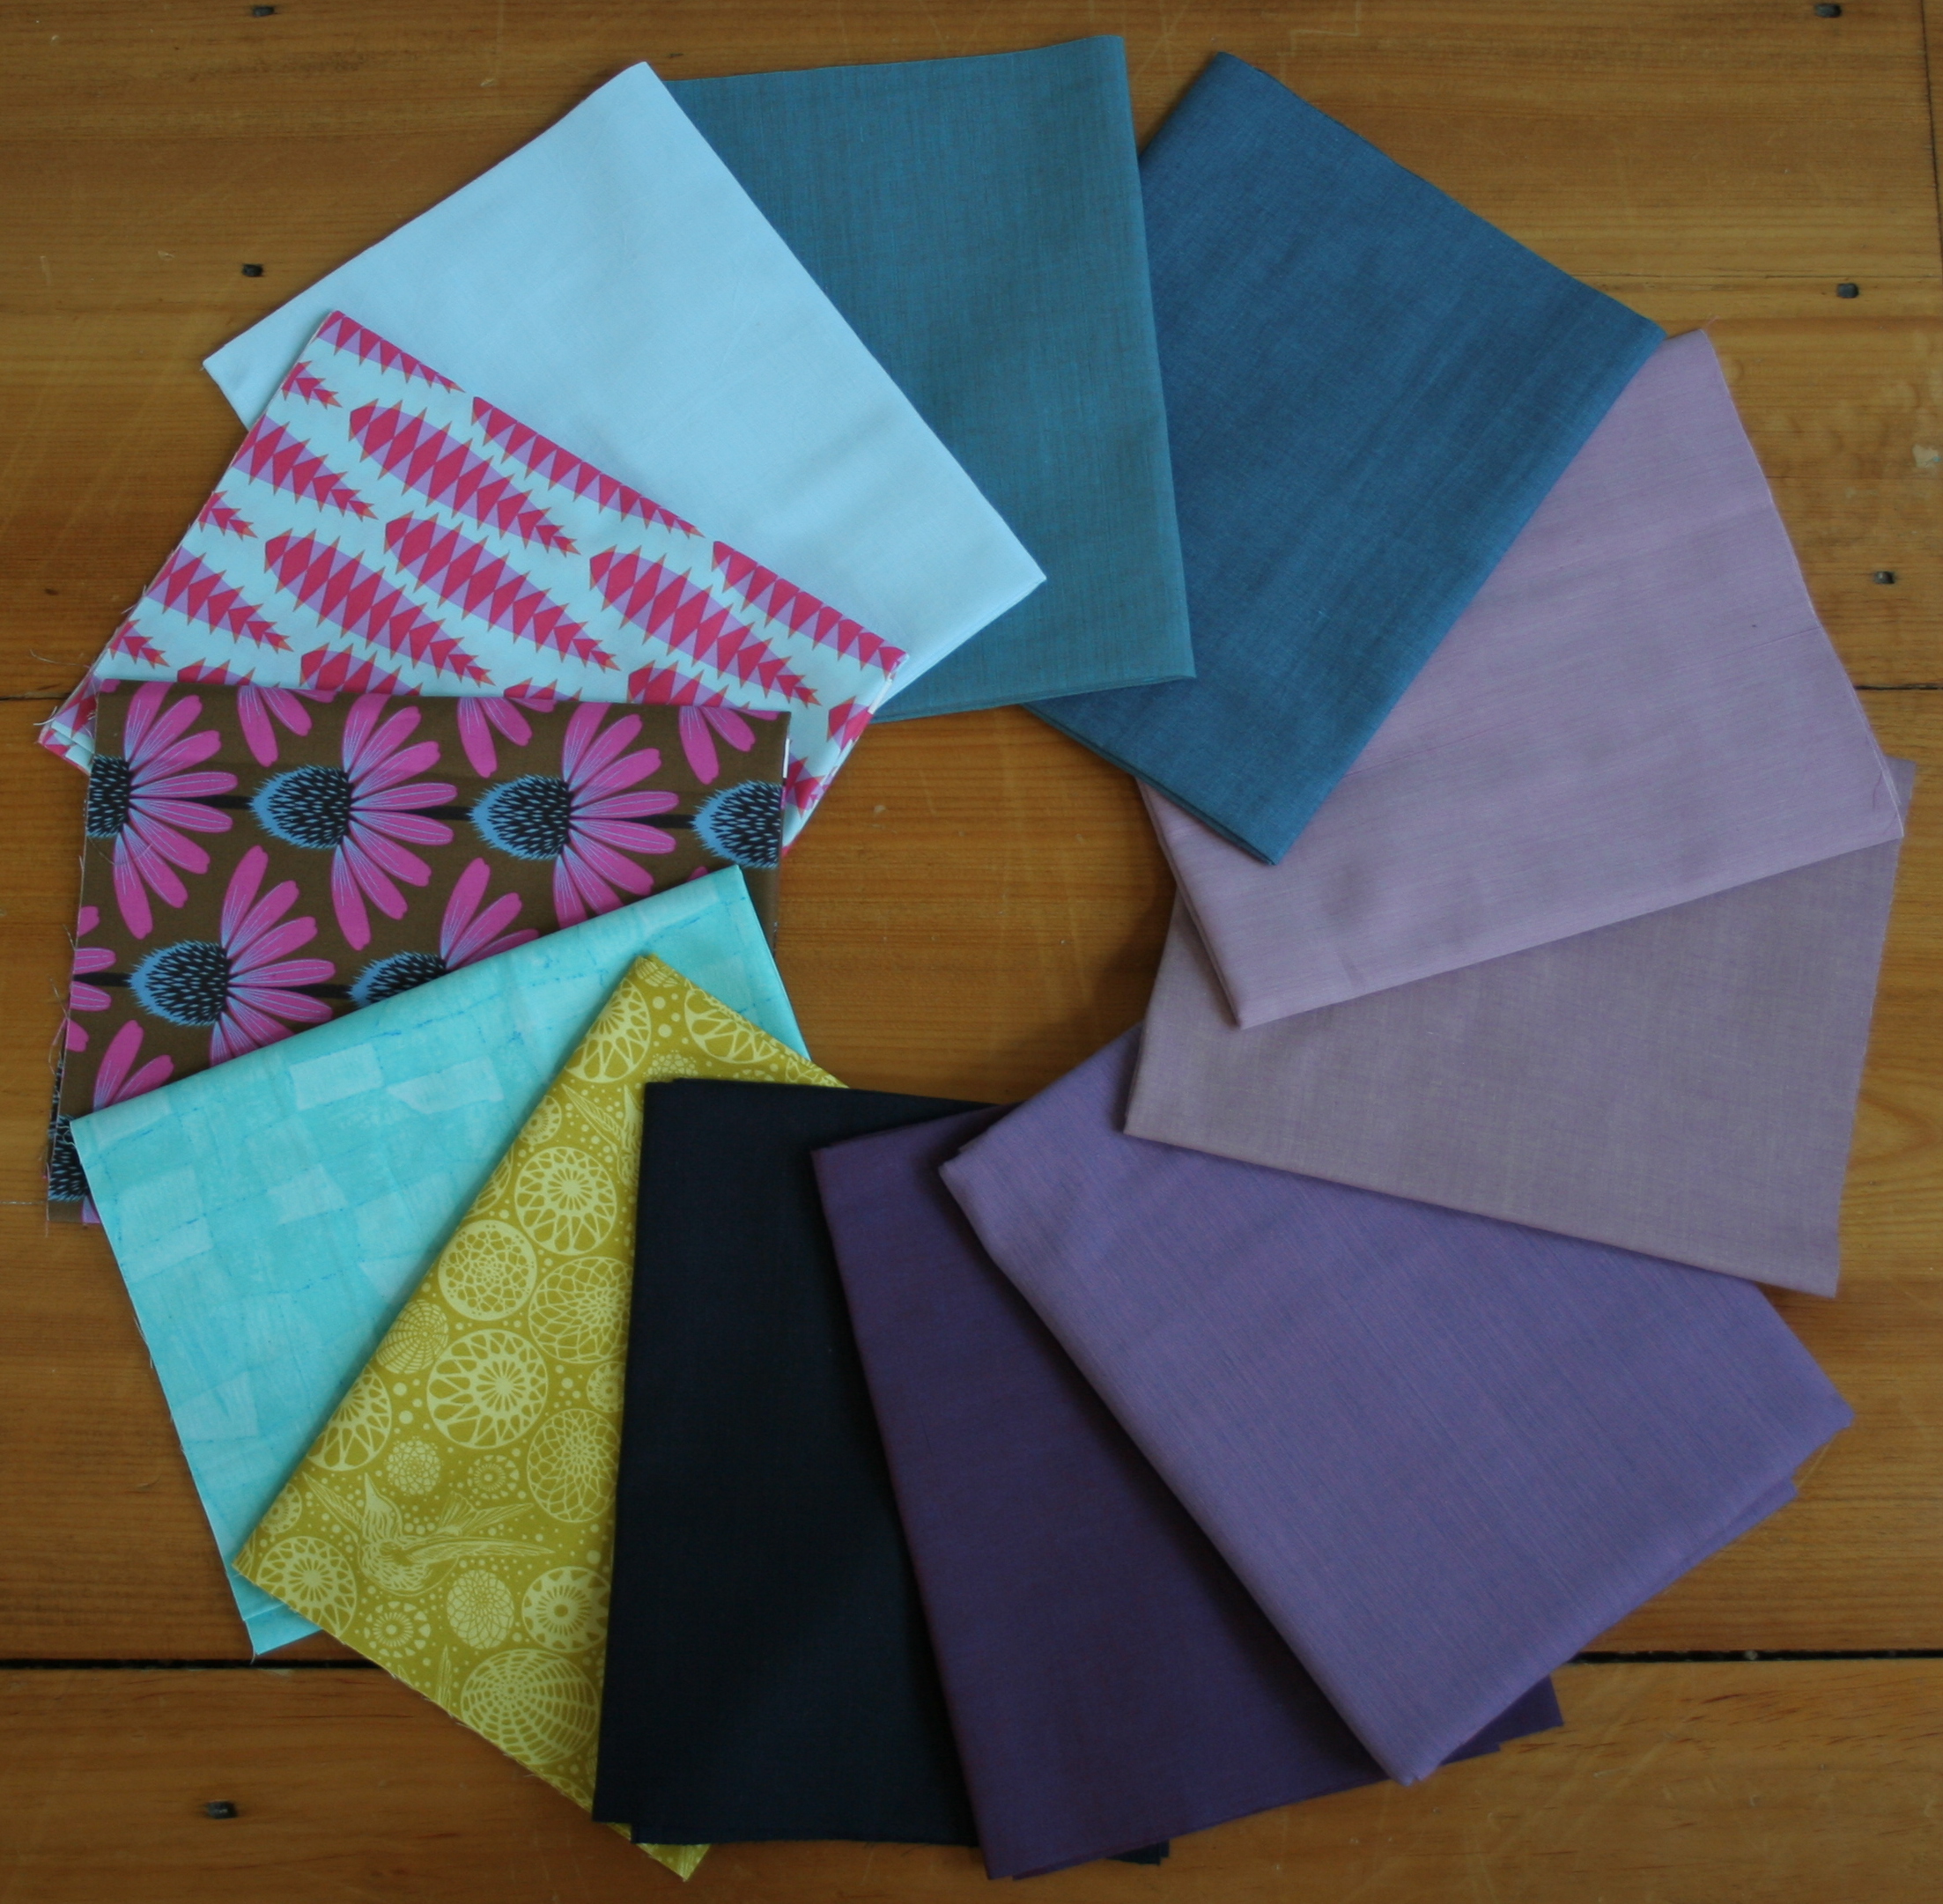
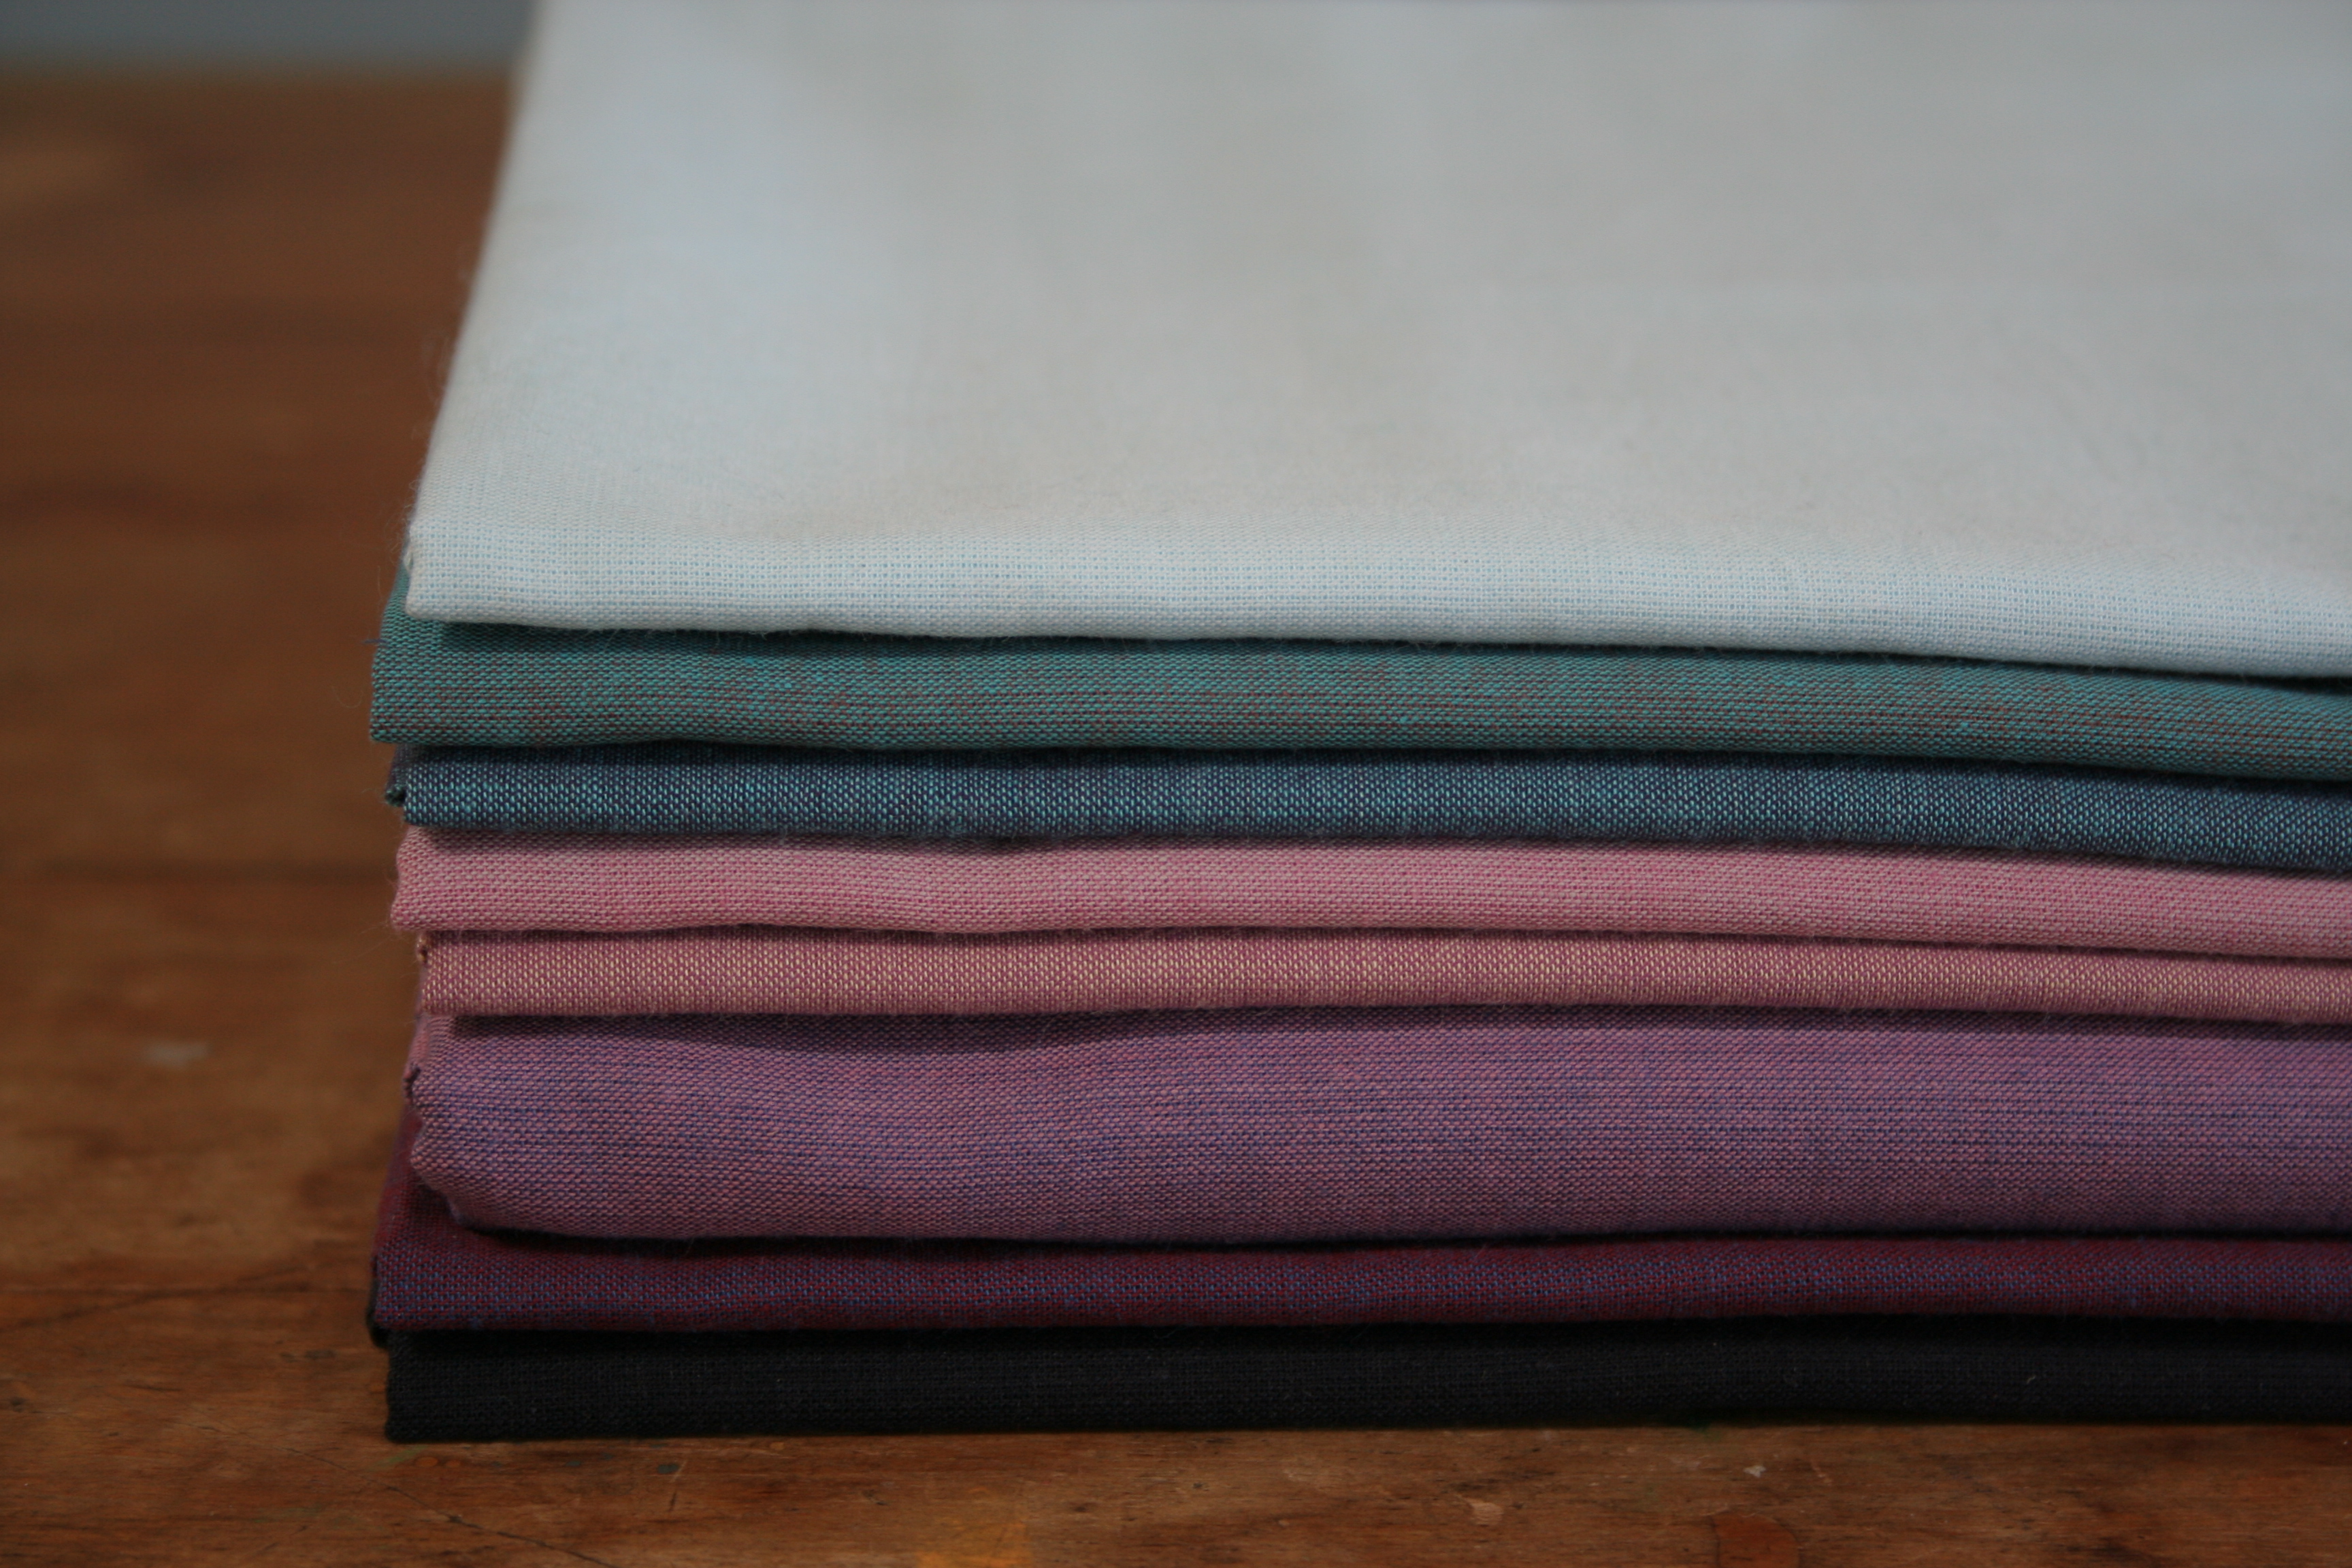
Gorgeous stack of Kaffe Fassett shot cottons.
We chose Kaffe Fassett’s Granite shot cotton as our background, after debating between various shades and textures of gray. As you can see (the third one up in the stack is the granite) it is very purple! Yet somehow, with our jewel tone color choice, we both think the greyish purple shot cotton will be awesome! Everyone uses gray as a background. We’re going to push the envelope a bit. I’m nervous and excited all at once.
Radiant Orchid Color study with the Canvas pattern by Leanne at She Can Quilt.
The shot cottons are all they’re made out to be. The colors are so dynamic and deeply rich; they just beg to be touched. I have a feeling these will not be the last shot cottons to enter my stash.
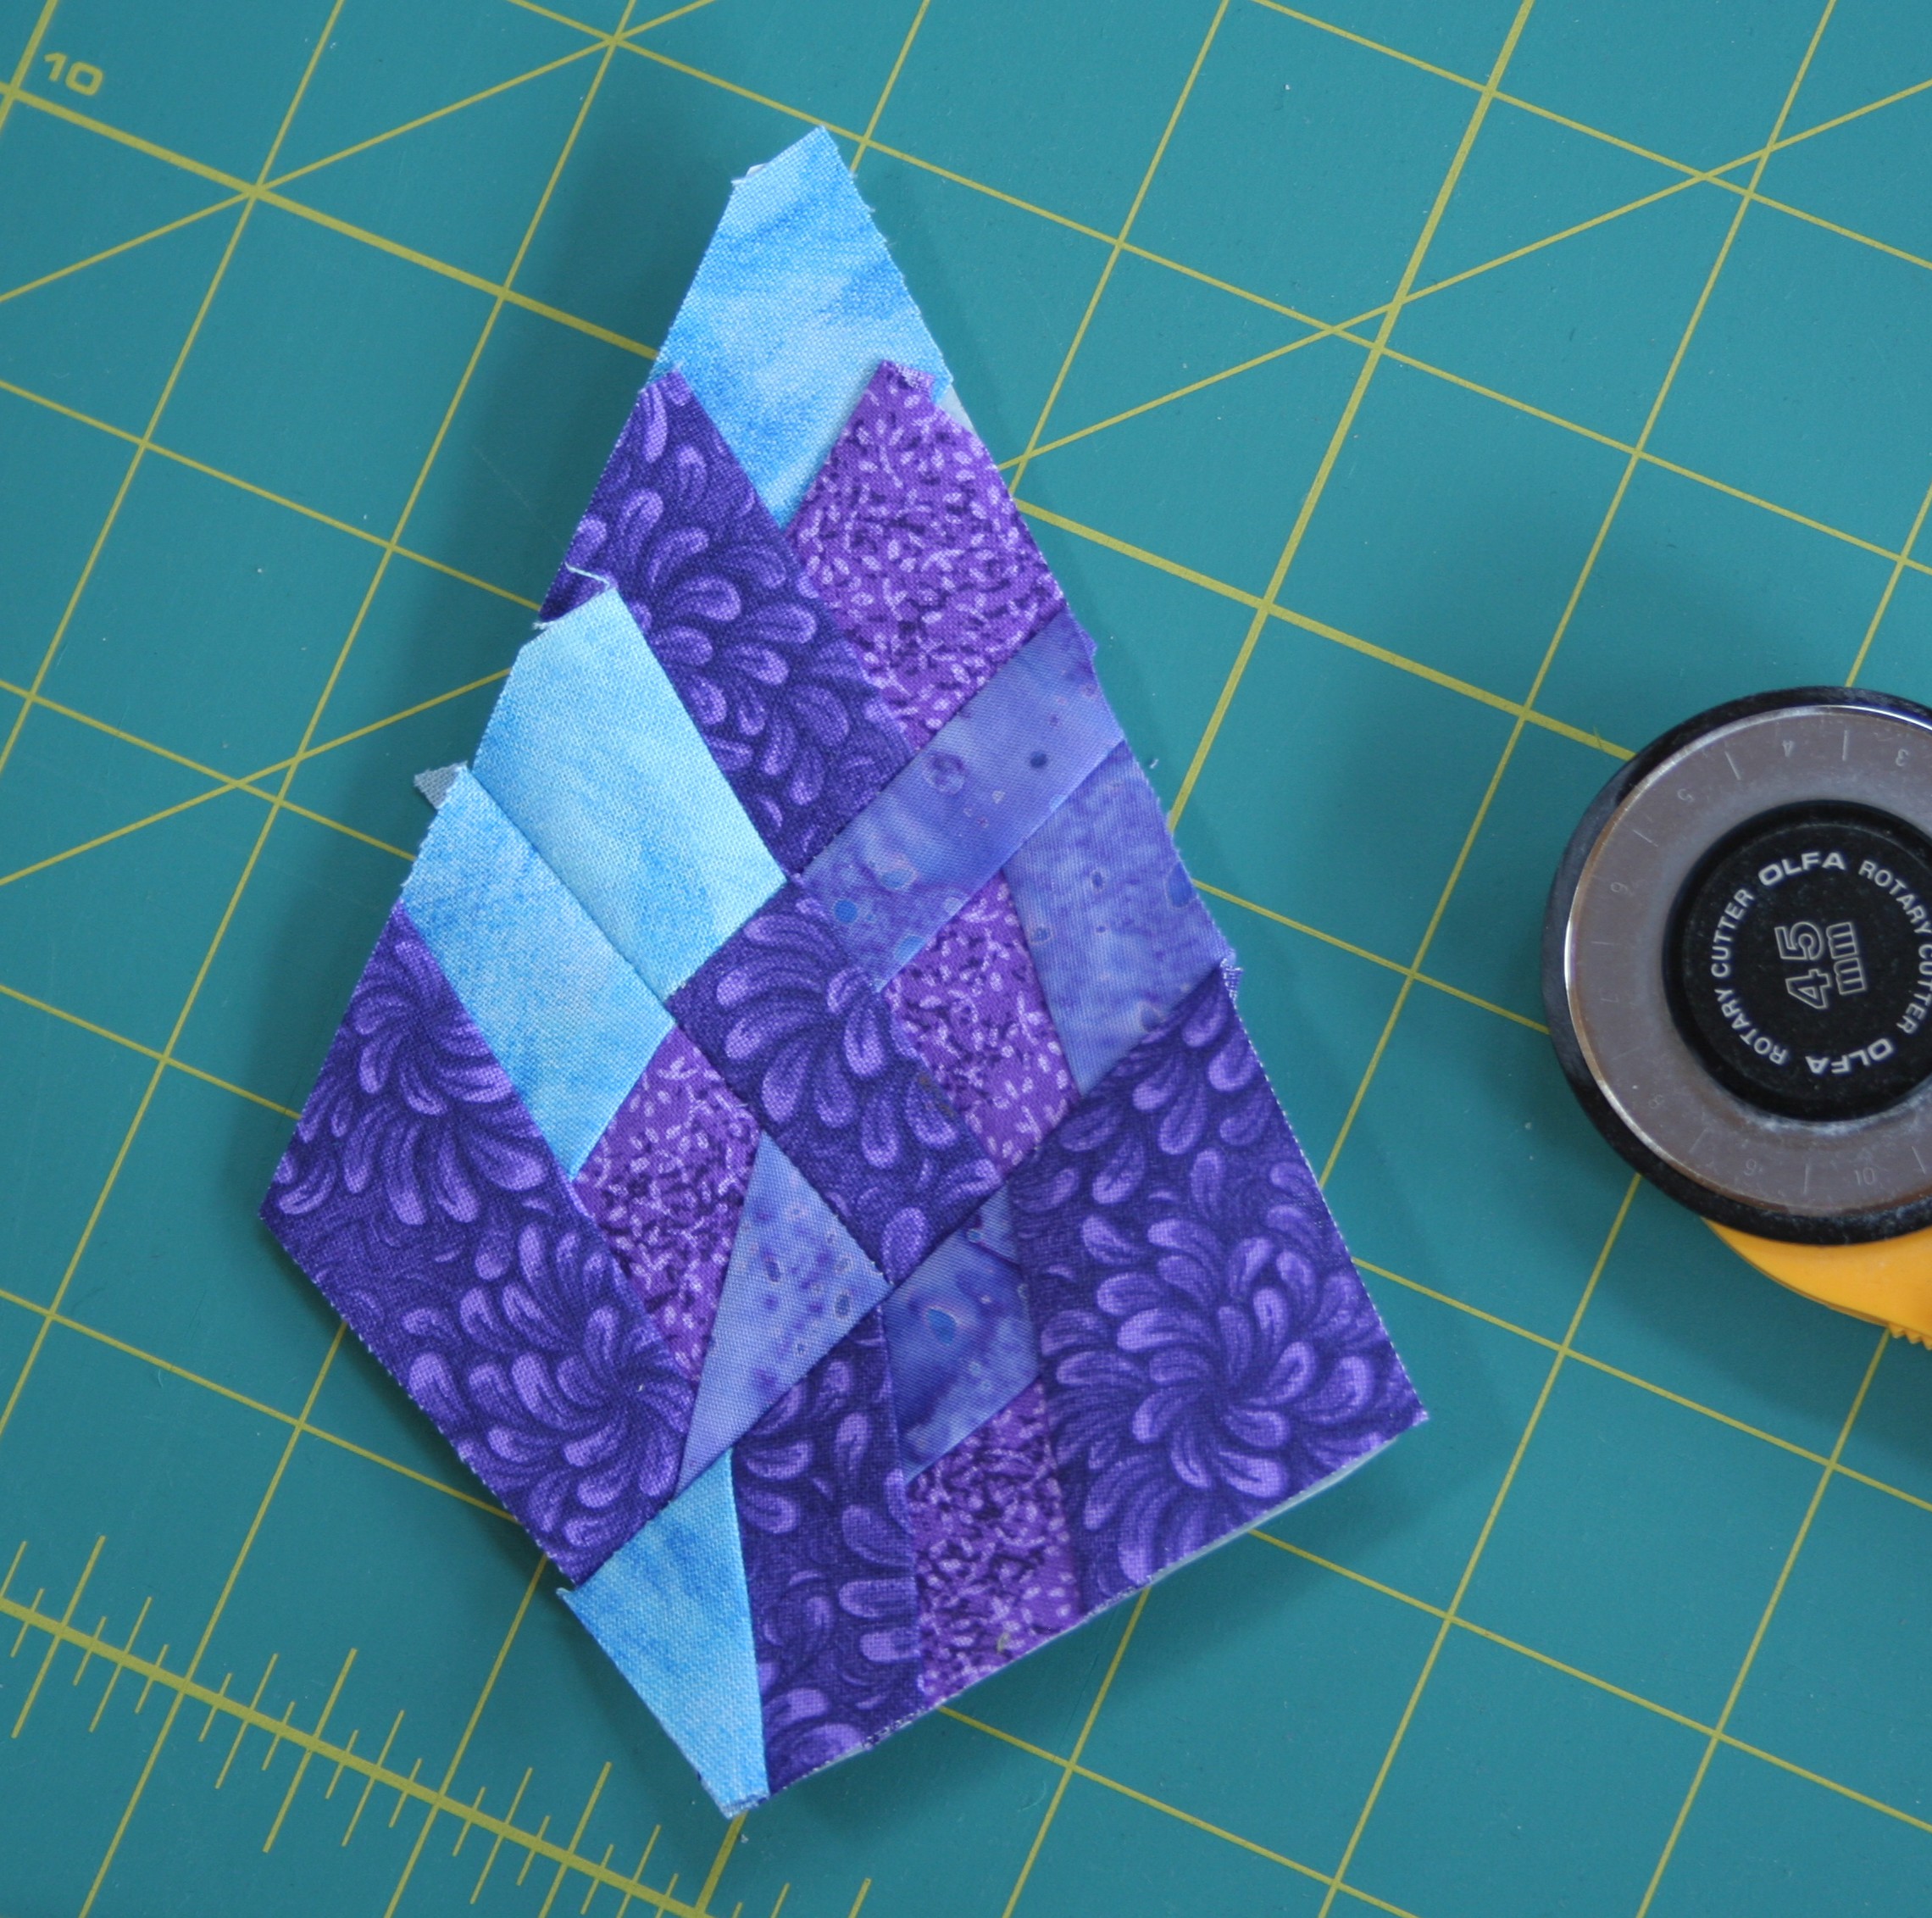
I had never seen lupine before traveling to Maine, but now that I live here they are among my favorite flowers. There is a depth and richness to their color that force me to get really close and admire their intricacy. They are very advantageous growers, almost invasive, and the sheer numbers of lupine seen along roadsides, in fields, and in happy gardens make the color incredibly apparent.
Photo by Steffen Ramsaier, found on Flickr
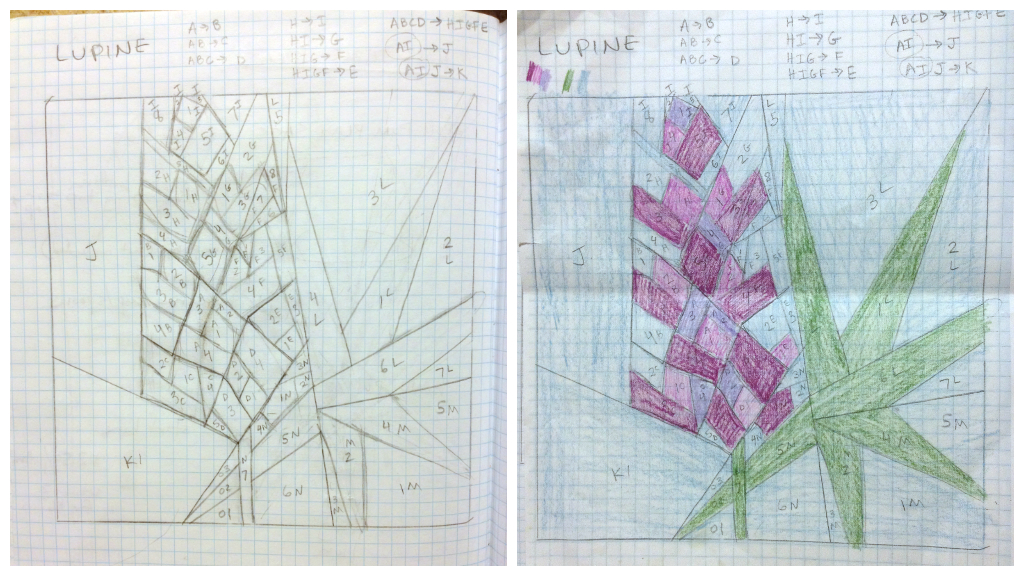
Early in my sewing days, I was trying to think of a gift to make for my mother-in-law. I immediately thought of lupine, since they are her favorite flower. (If you have children, do you know the book Miss Rumphius? aka the Lupine Lady? Well that’s my mother-in-law–okay, it’s not really, but it certainly could be!) I had recently found paper piecing and wanted to make her a paper pieced lupine pillow. The only problem was that all of my searches for paper pieced lupine patterns came up empty.
Flash forward a month or so, when I discovered that I could design paper piecing patterns. A lupine flower was one of the first sketches I did. Talk about complex! I really wanted to get the heart-shaped petals into the pattern, but I knew it had to be fairly simple to be able to be pieced. I drew out a few sketches, chose my favorite, and began to try to break it down into logical pieces. My brain instantly scrambled. I had to put the pattern aside, and work on a few different projects for a week or two.
It all starts with the graph paper and sketch.
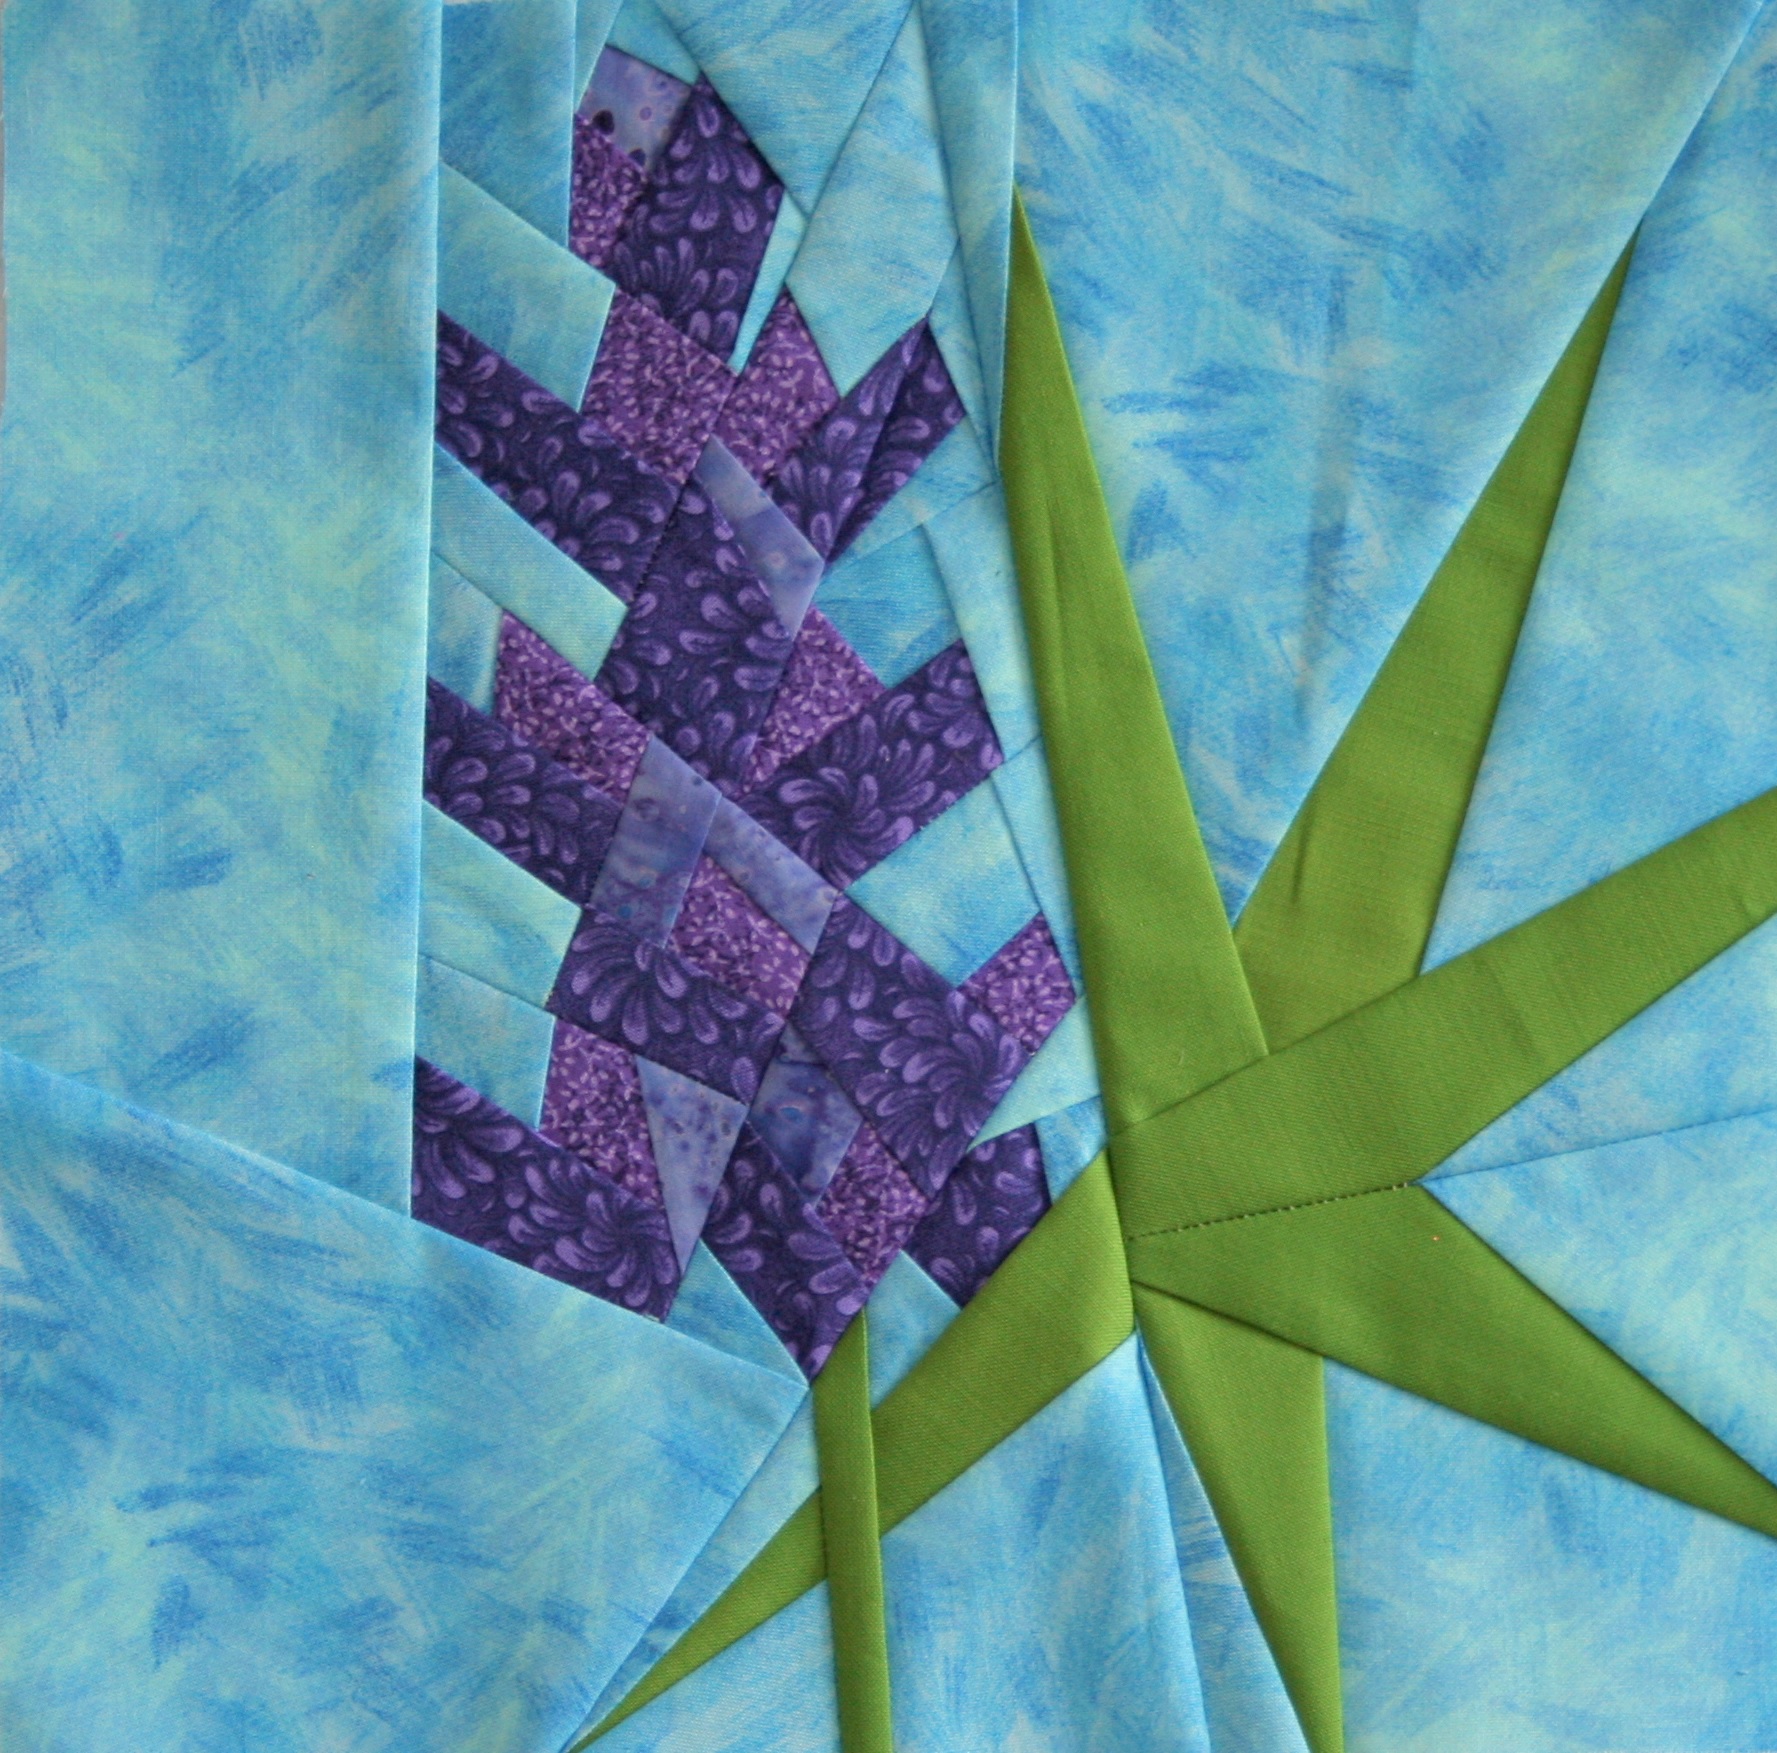
After that much needed breather, I picked up the lupine again one evening and smoothly worked it into numbered paper piecing sections. After a month or so of fine tuning and testing, the pattern is ready!
Don’t you love it!? I wasn’t sure about my fabric choices at first, but now that the block is done, I think they were perfect! They blend together just enough to give the flower depth without detracting from the congruence of the bloom.
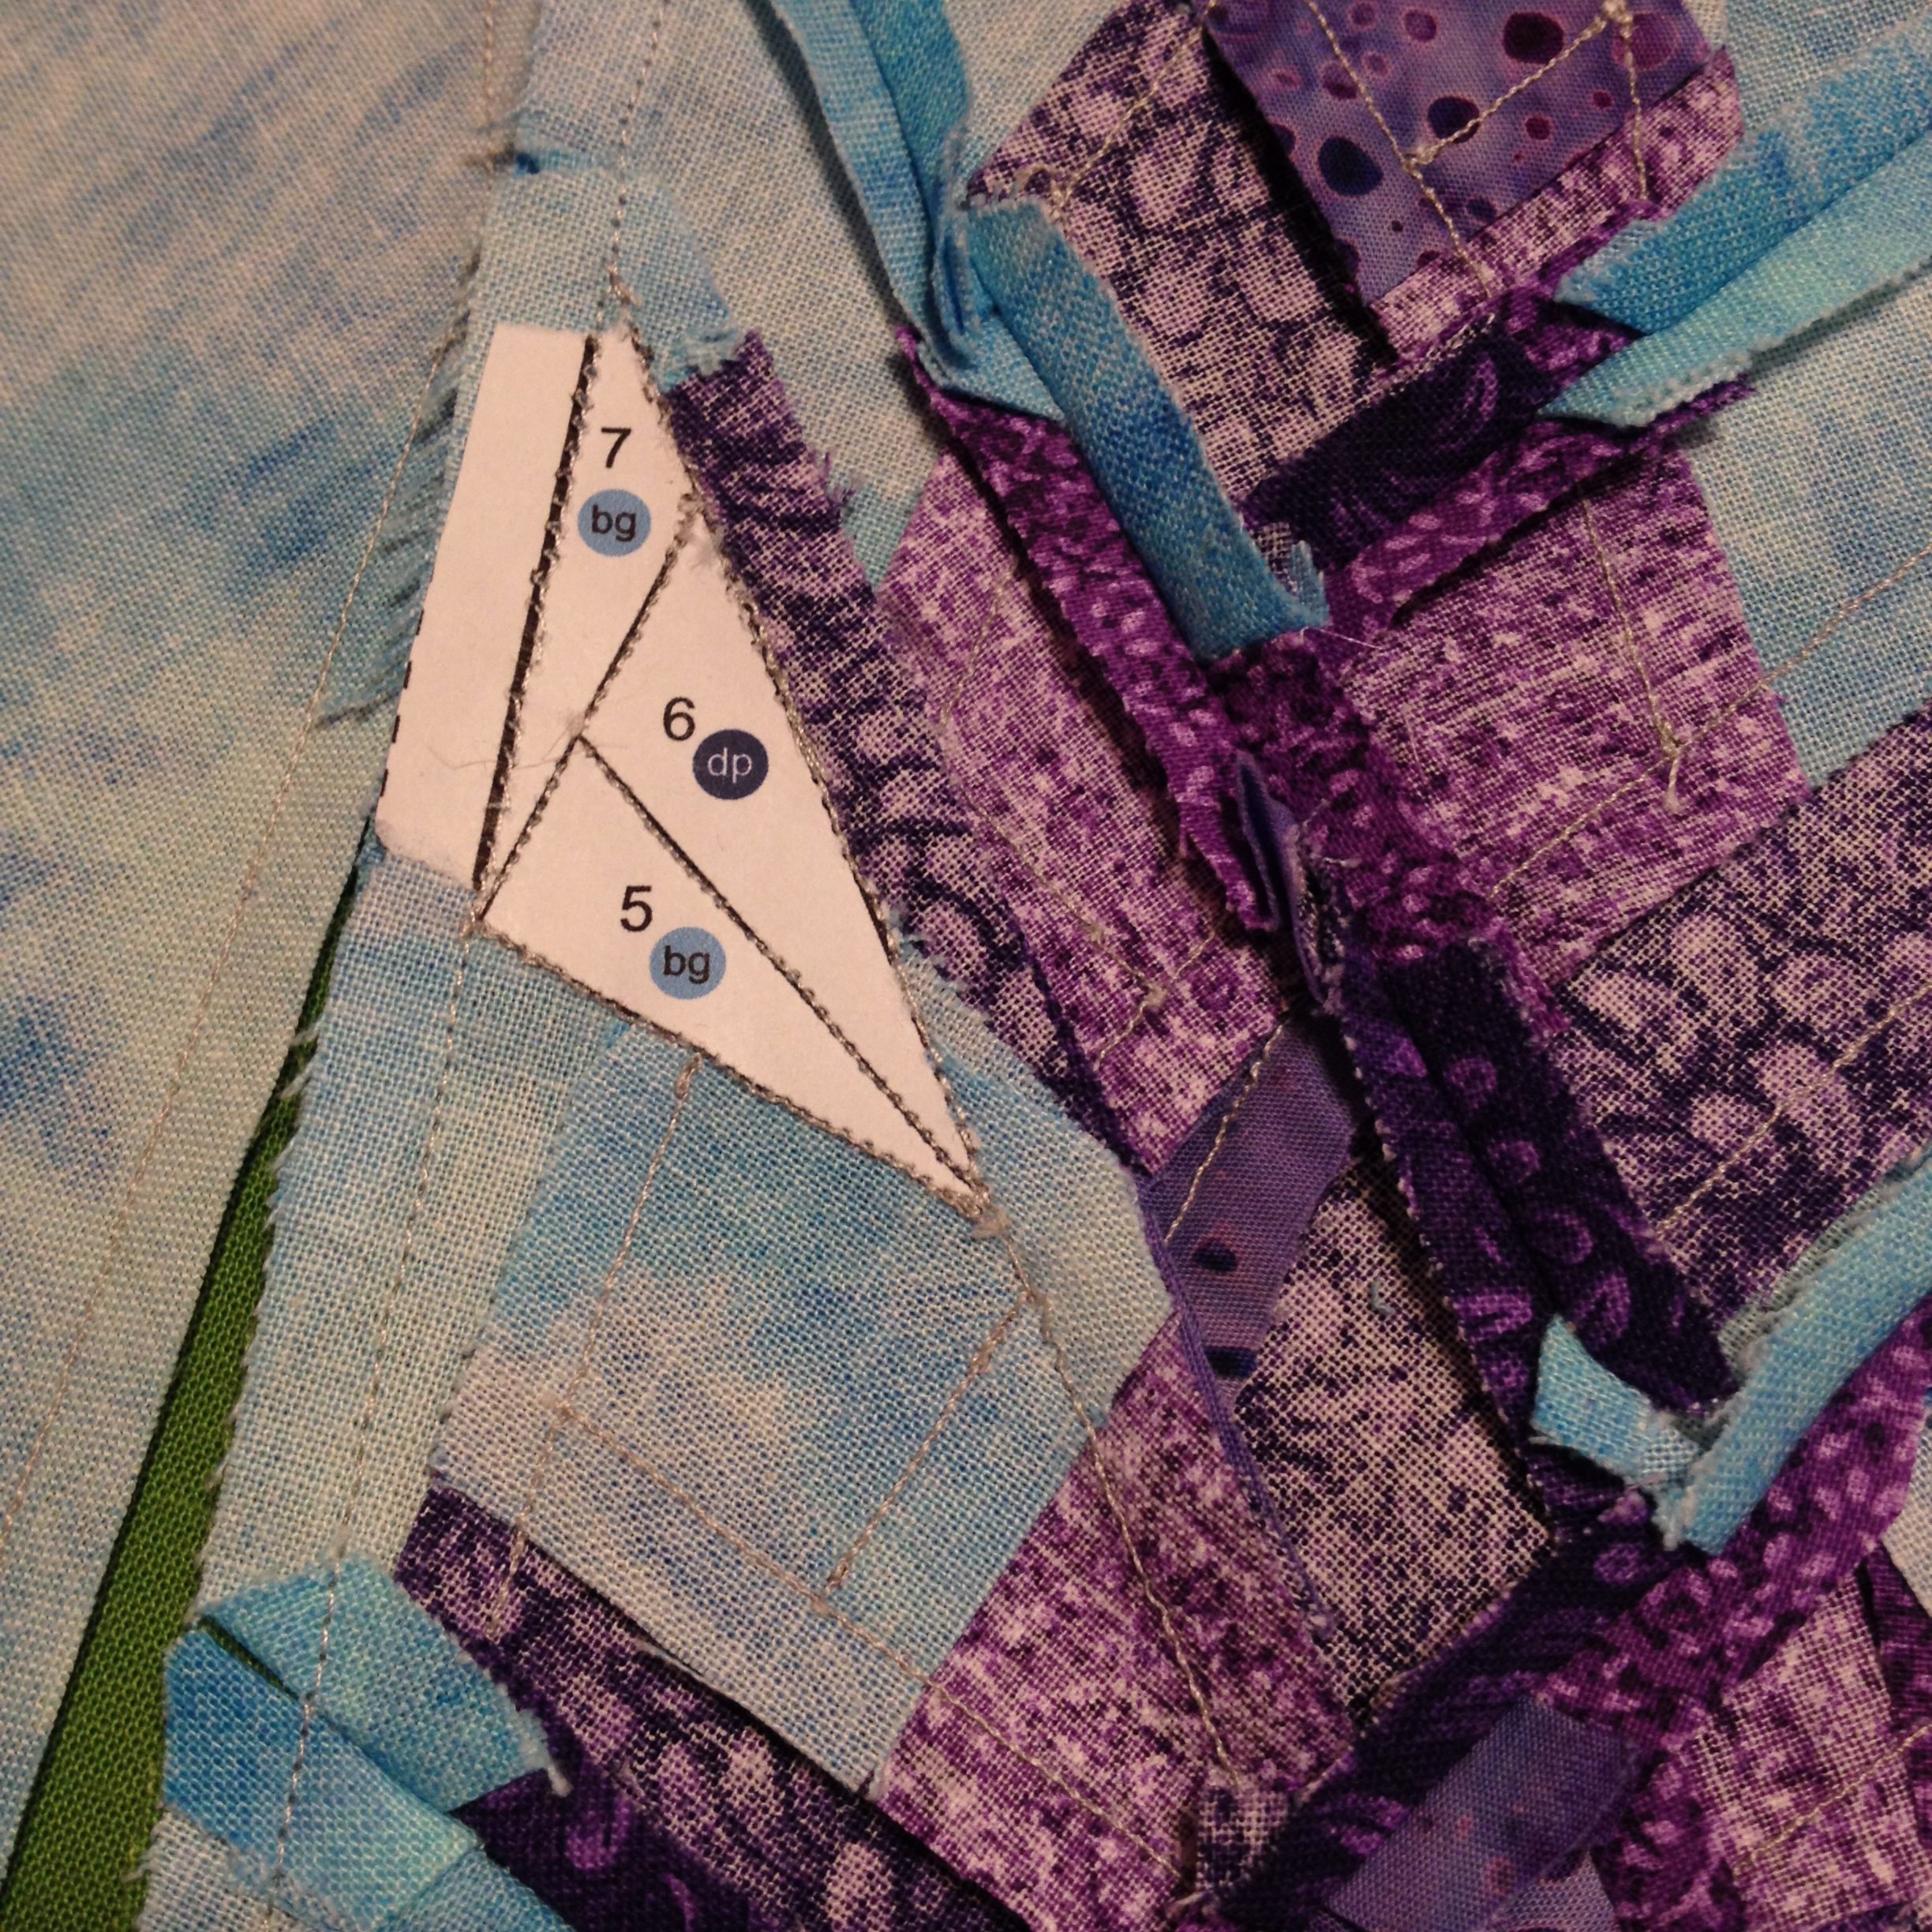
This is not a beginner paper piecing pattern in that there are many pieces and a few sharp angles. There are only simple joining seams, though; no y-seams! If you have a good sense of paper piecing, this block shouldn’t be too tricky. It took me about 4 hours to complete and measures 10″ square (10.5″ with seam allowance).
If you follow me on Instagram, you’ve watched this lupine block’s progression. For those of you who don’t follow me yet, here’s a peek at the process from my Instagram feed (@nightquilter). Of course these are taken with my iPhone during my late night quilting foray, so pardon the blur!
Little by little, it comes together.
The back is my favorite! Stragglers hanging on after I’ve removed most of the paper.
The pattern will be available in my Payhip Pattern Store by the end of today, so now if you need to make your mother-in-law (or mom, sister, brother, cousin, friend, or yourself!) a lupine pillow, wall hanging, table runner, bag, etc. you can get right to it!
This particular block will soon become a long-awaited Lupine Pillow for my mother-in-law. I’d say it was worth the wait.
This is my exciting Friday Finish, so I’m linking up!
After a long, especially cold and lingering winter, spring is finally fully here in midcoast Maine. Those first days of warm sun, cool (not frigid and biting) breeze, and sprouting green are precious days. I didn’t know it my first year here, but I know it now. The blackflies won’t be long.
The past few days have been supurb: sunny, warm-even borderline hot, and too early for blackflies. Needless to say, I have been spending every daylight moment out in the garden, playing in the yard, or admiring the flowers with my kids. I know that once the blackflies arrive, we we hide indoors or only go out with long pants and a full head & arms bug net. The blackflies will subside, but for a good solid month, they are a wicked scourge. Swarming clouds of annoying and biting bitties. When my husband and I decided to move from New Jersey back to his home state of Maine, no one had told me about the blackflies. Some days I joke that if someone had told me about the blackflies, I never would have moved here… but I know I’m joking. I love it here in rural Maine.
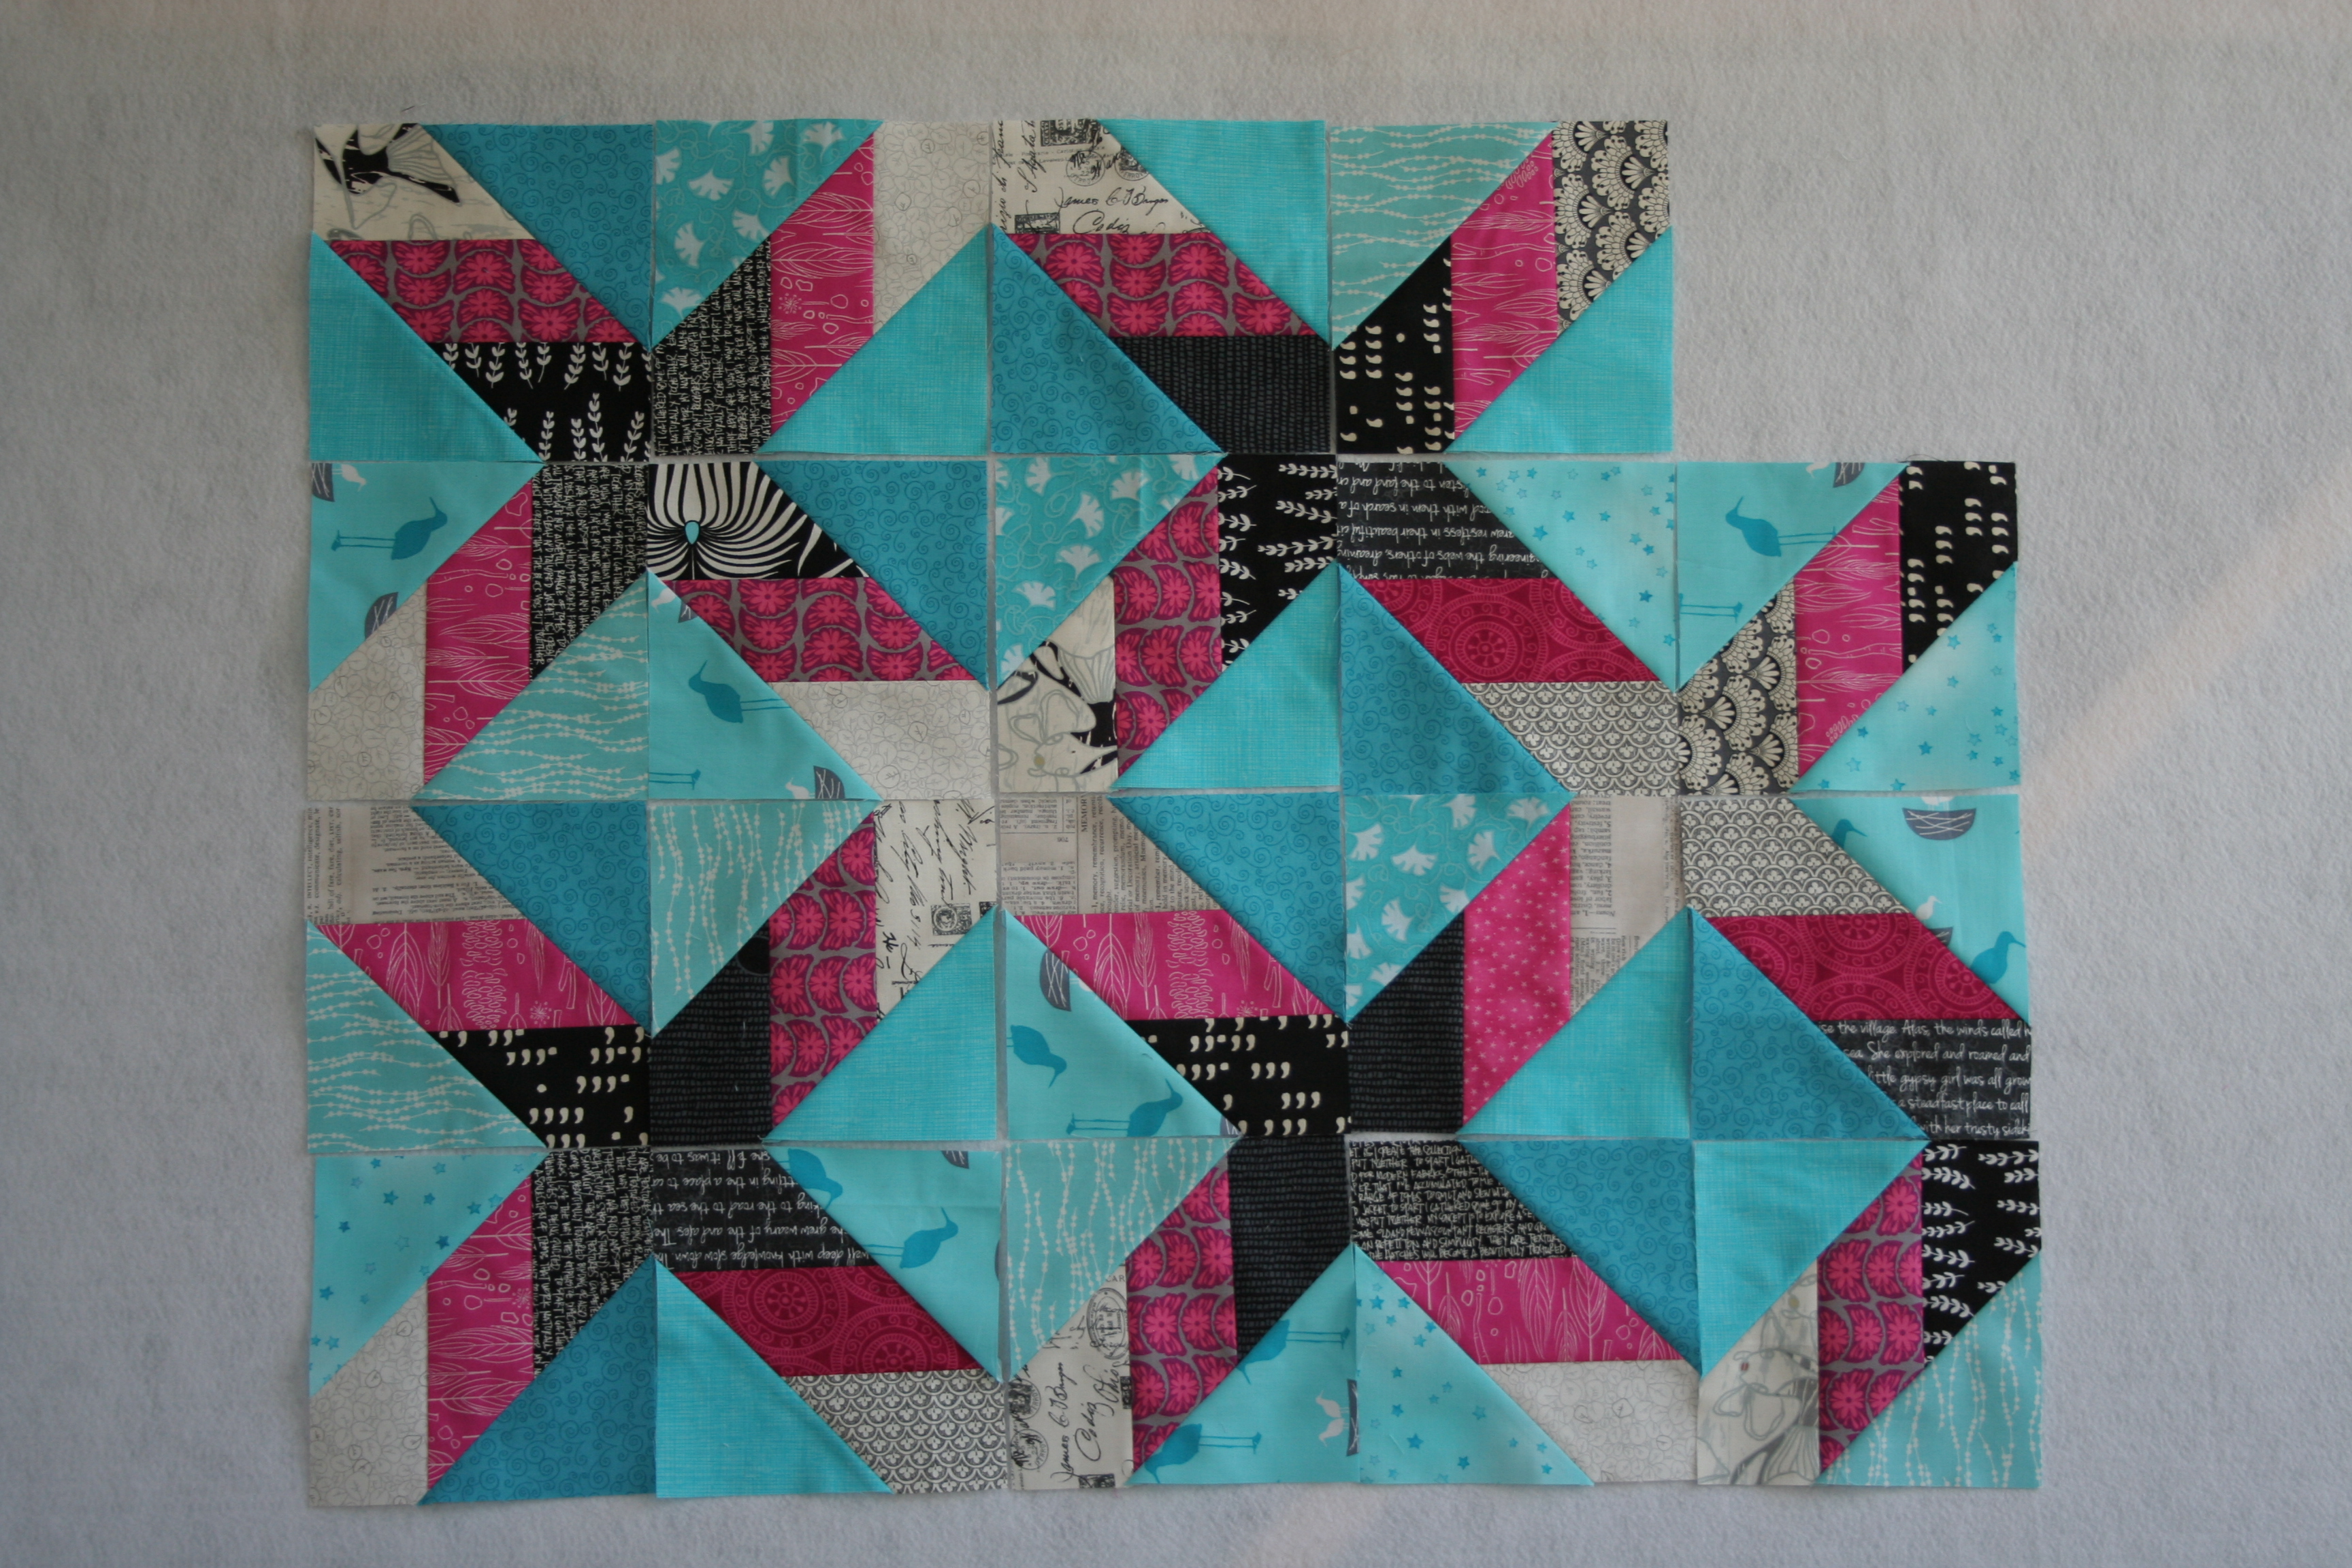
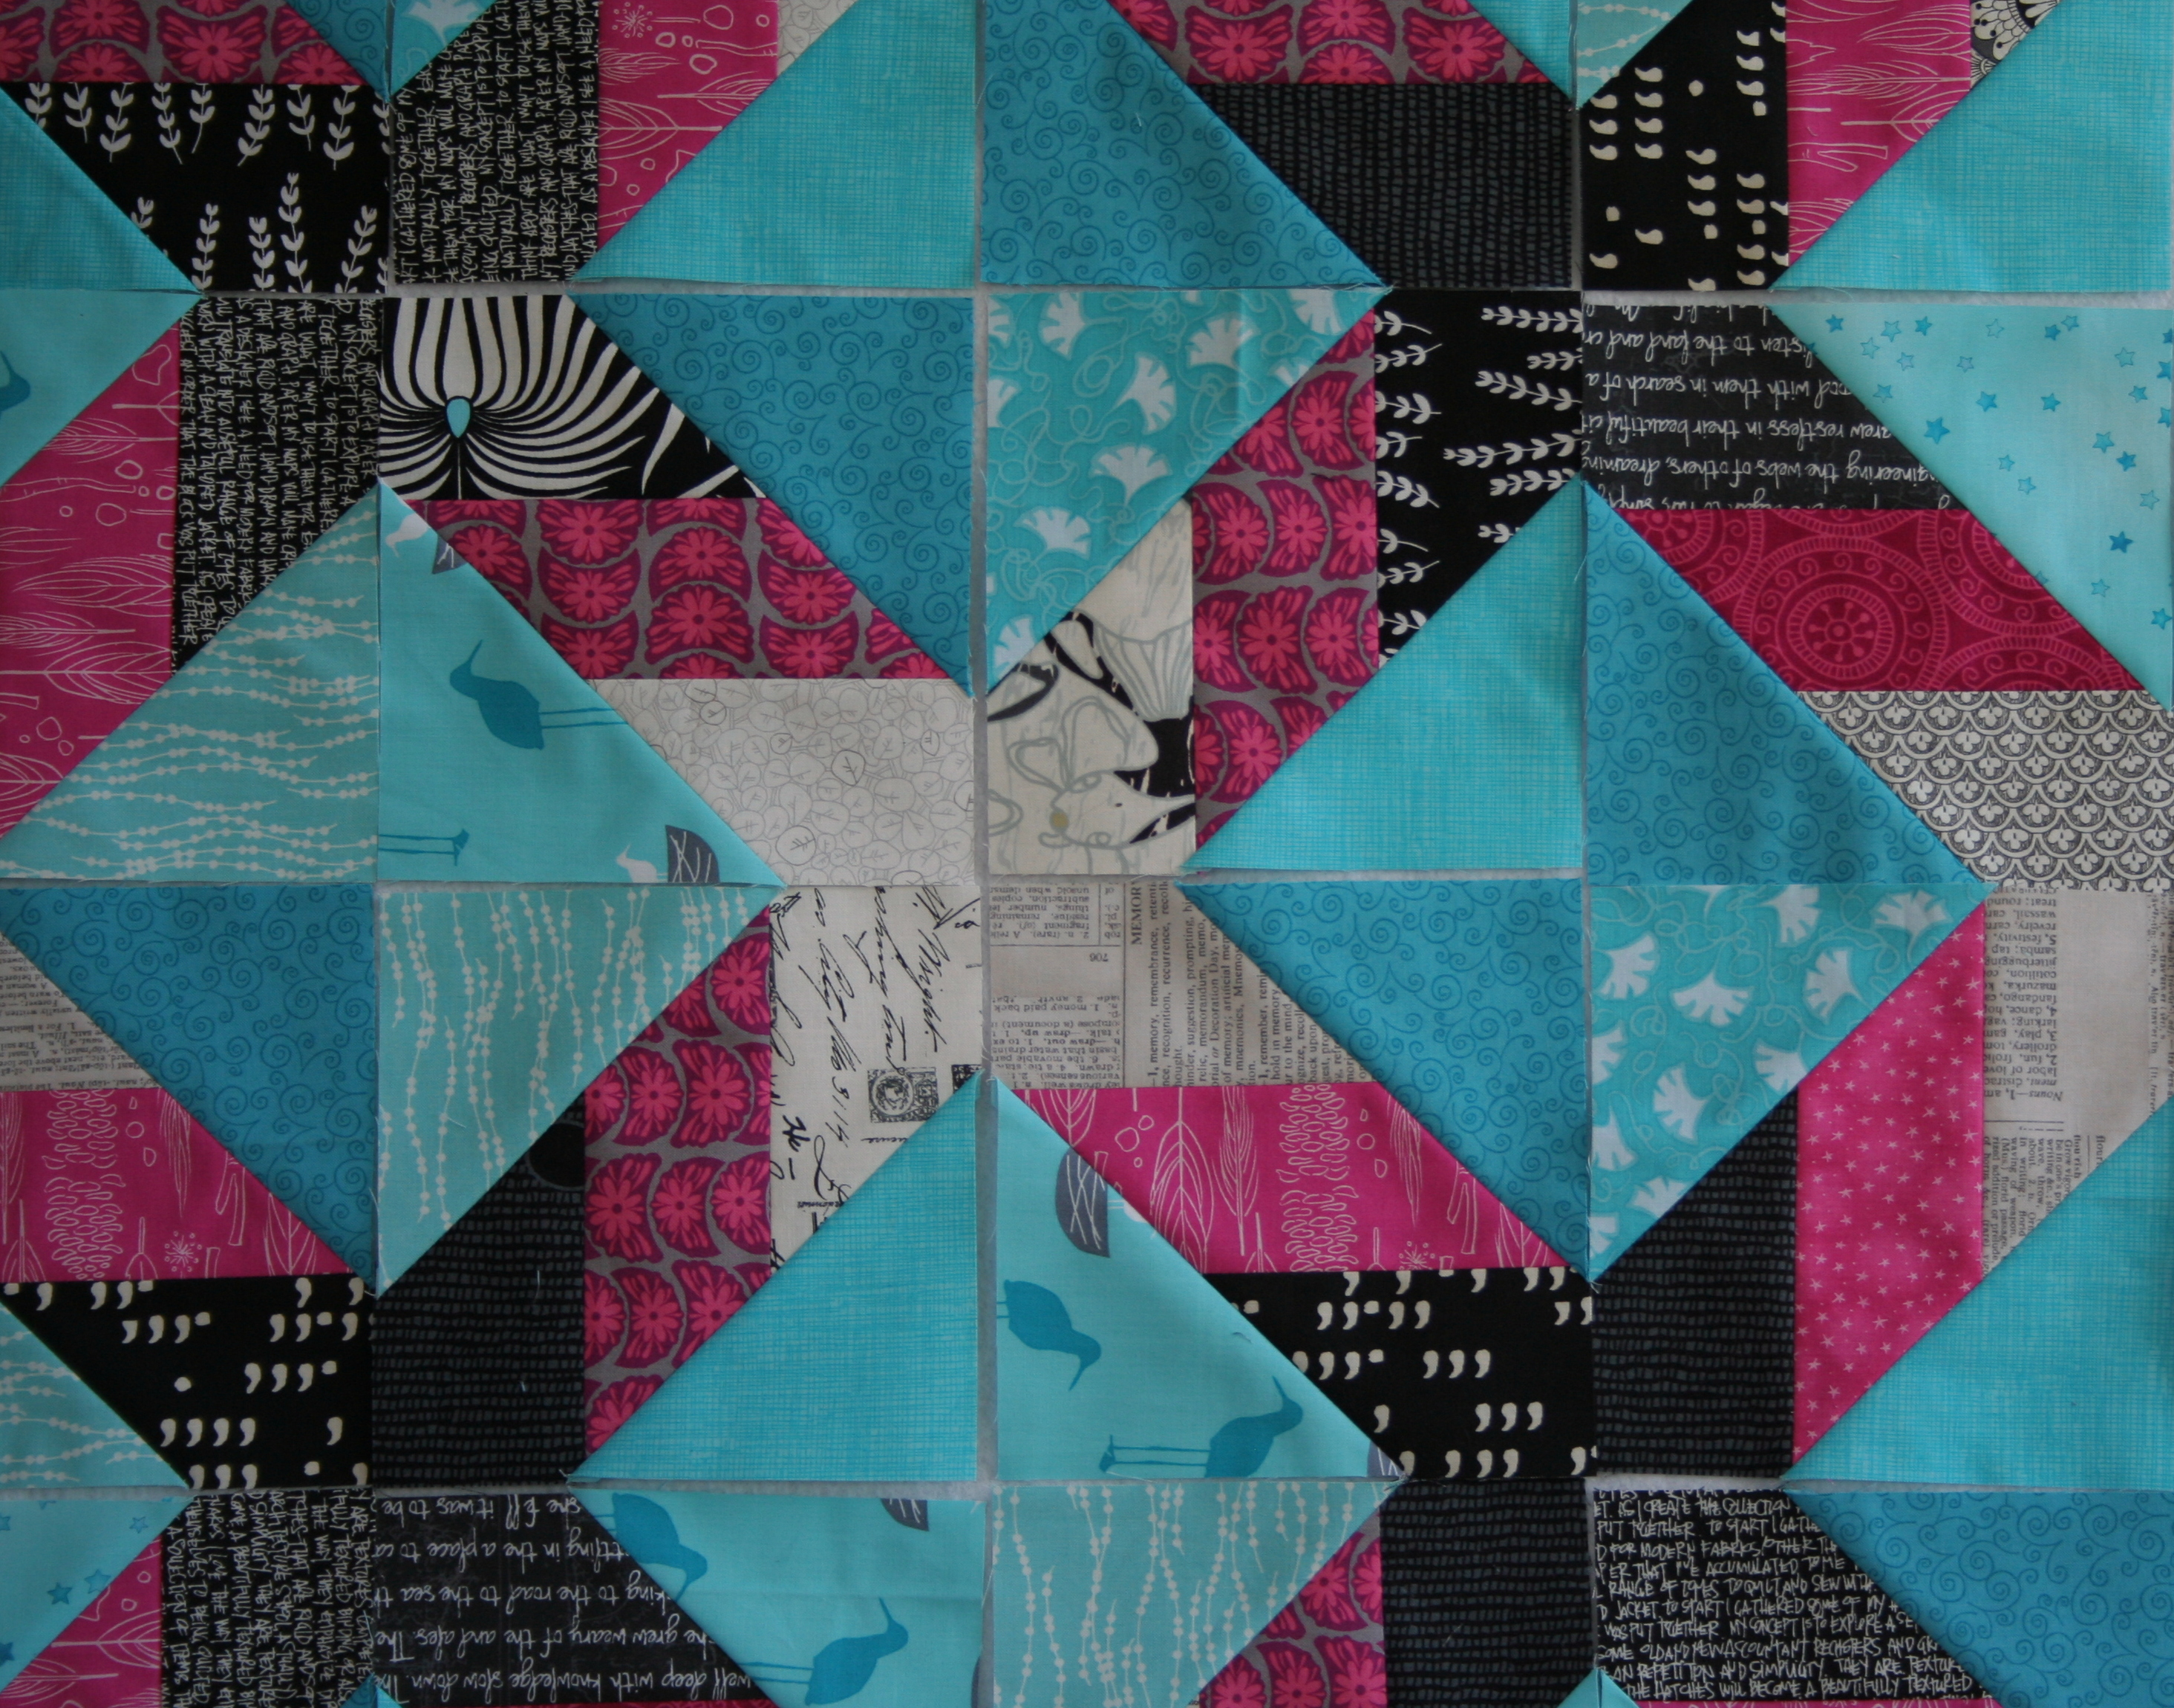
Days spent in the garden makes for a tired momma, but I can’t help but sew once the sun sets and the kids are asleep. I’m making slow progress on my Star Crazy quilt, and I like it more and more as blocks get added.
Before beginning this quilt, I was thinking of adding grays into the low volume sides, to have some of the light stars be grey instead of just low volume. I think now I’ve decided to keep grays out of it, and just stick with the black and white stars.
These blocks are a combination of my favorite colors, AND of fabrics from some of my favorite designers and fabric lines. Seeing Botanics next to Wee Wander next to Architextures, framed by Perfectly Perched and Zen Chic makes me tremendously happy!
While my sewing progress has been slowed by this gorgeous weather, I feel like I am spending my days the right way. Family, garden, and those first days of spring are SO refreshing and key to a joyous life.
Here are a few more shots of spring from around my homestead, for those of you who find inspiration as I do, from nature.
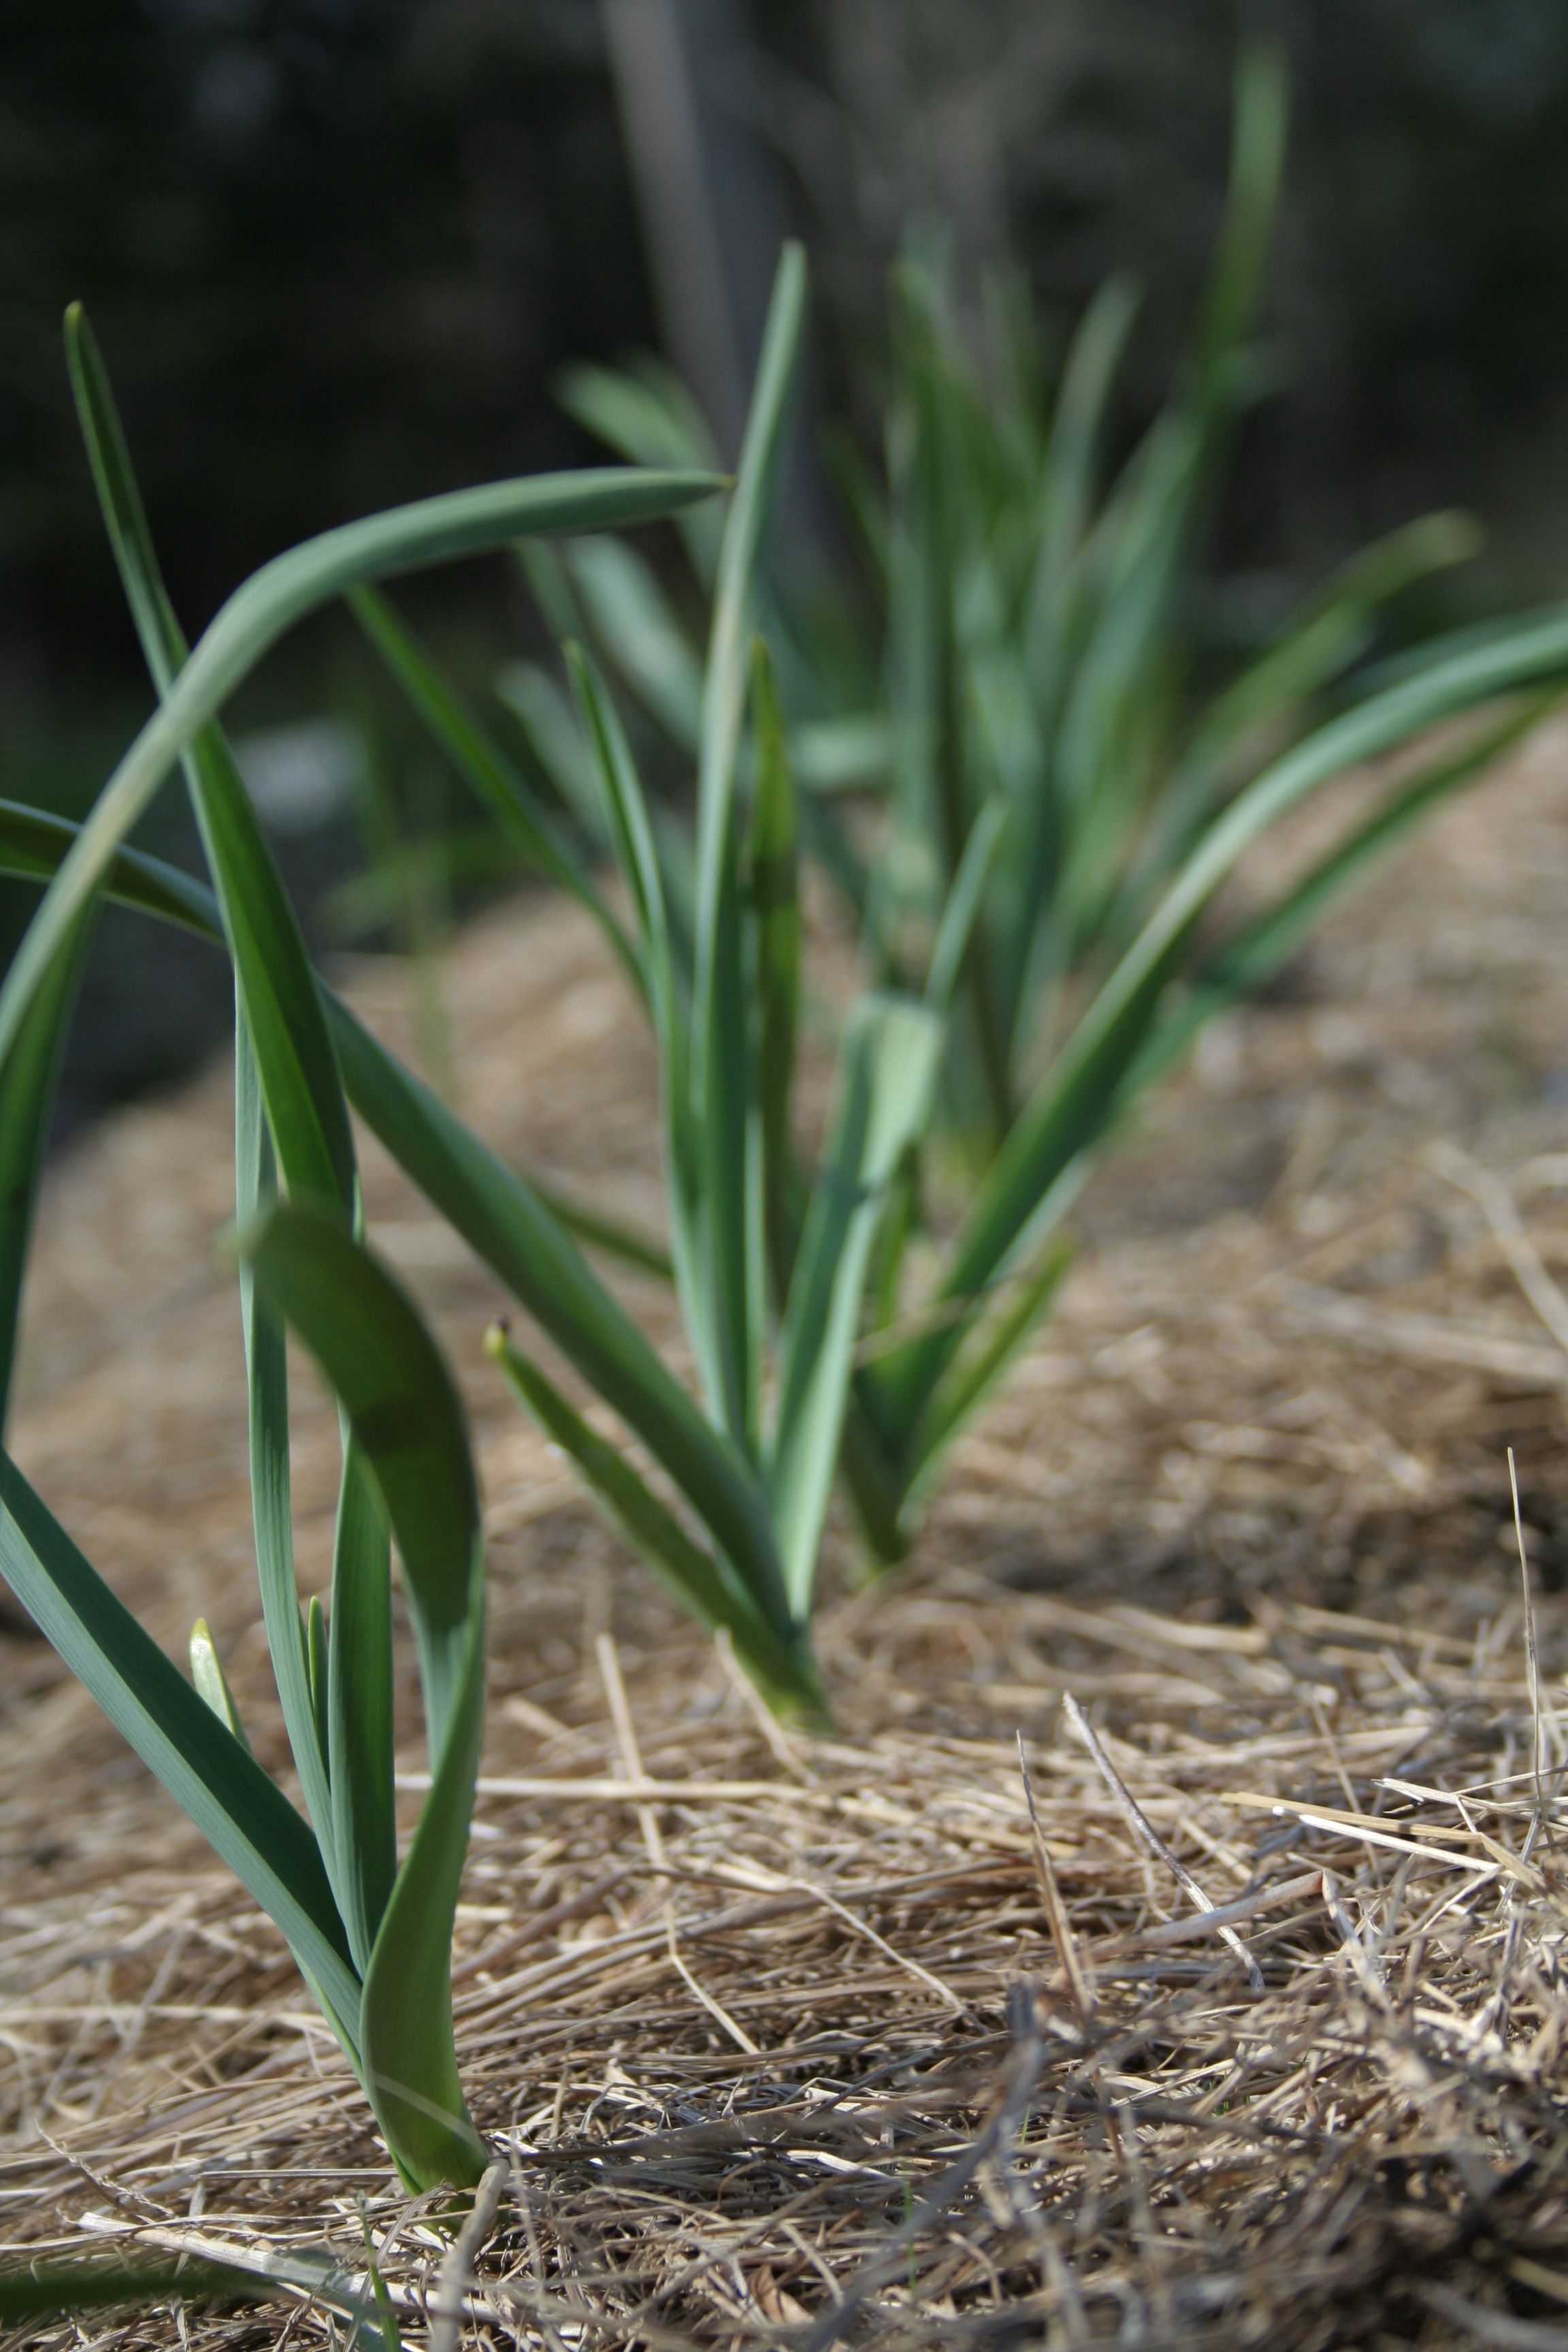
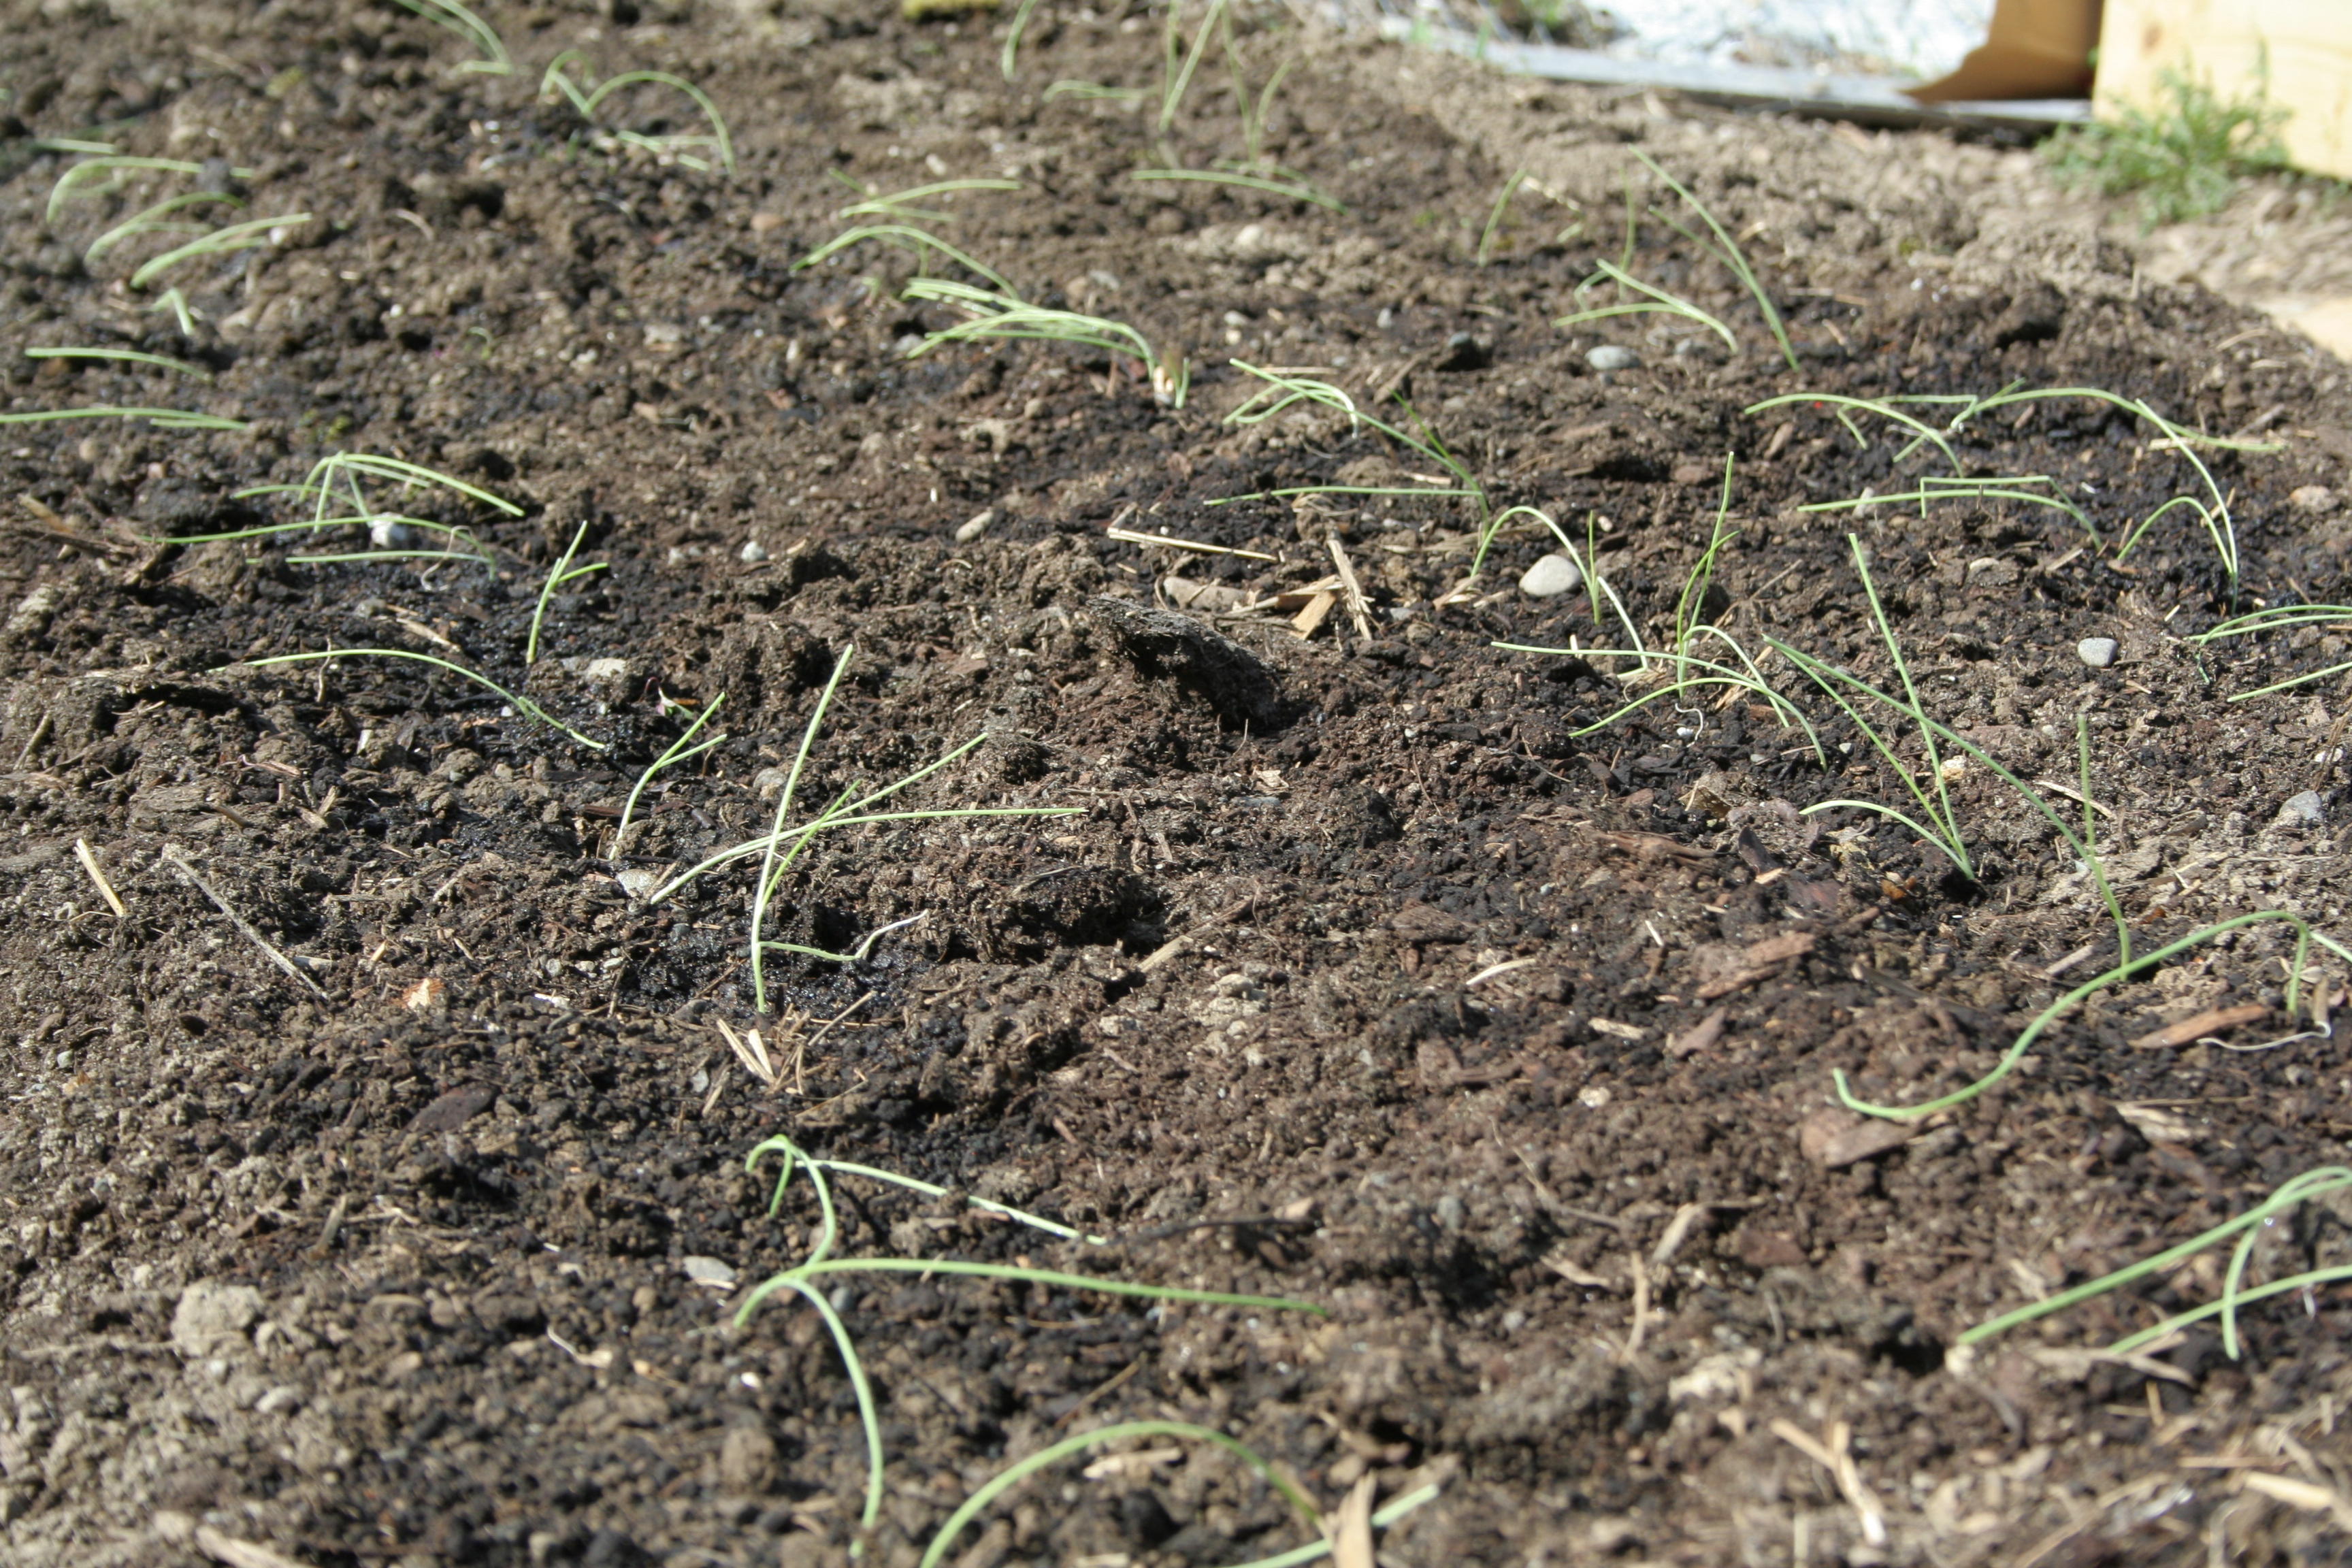
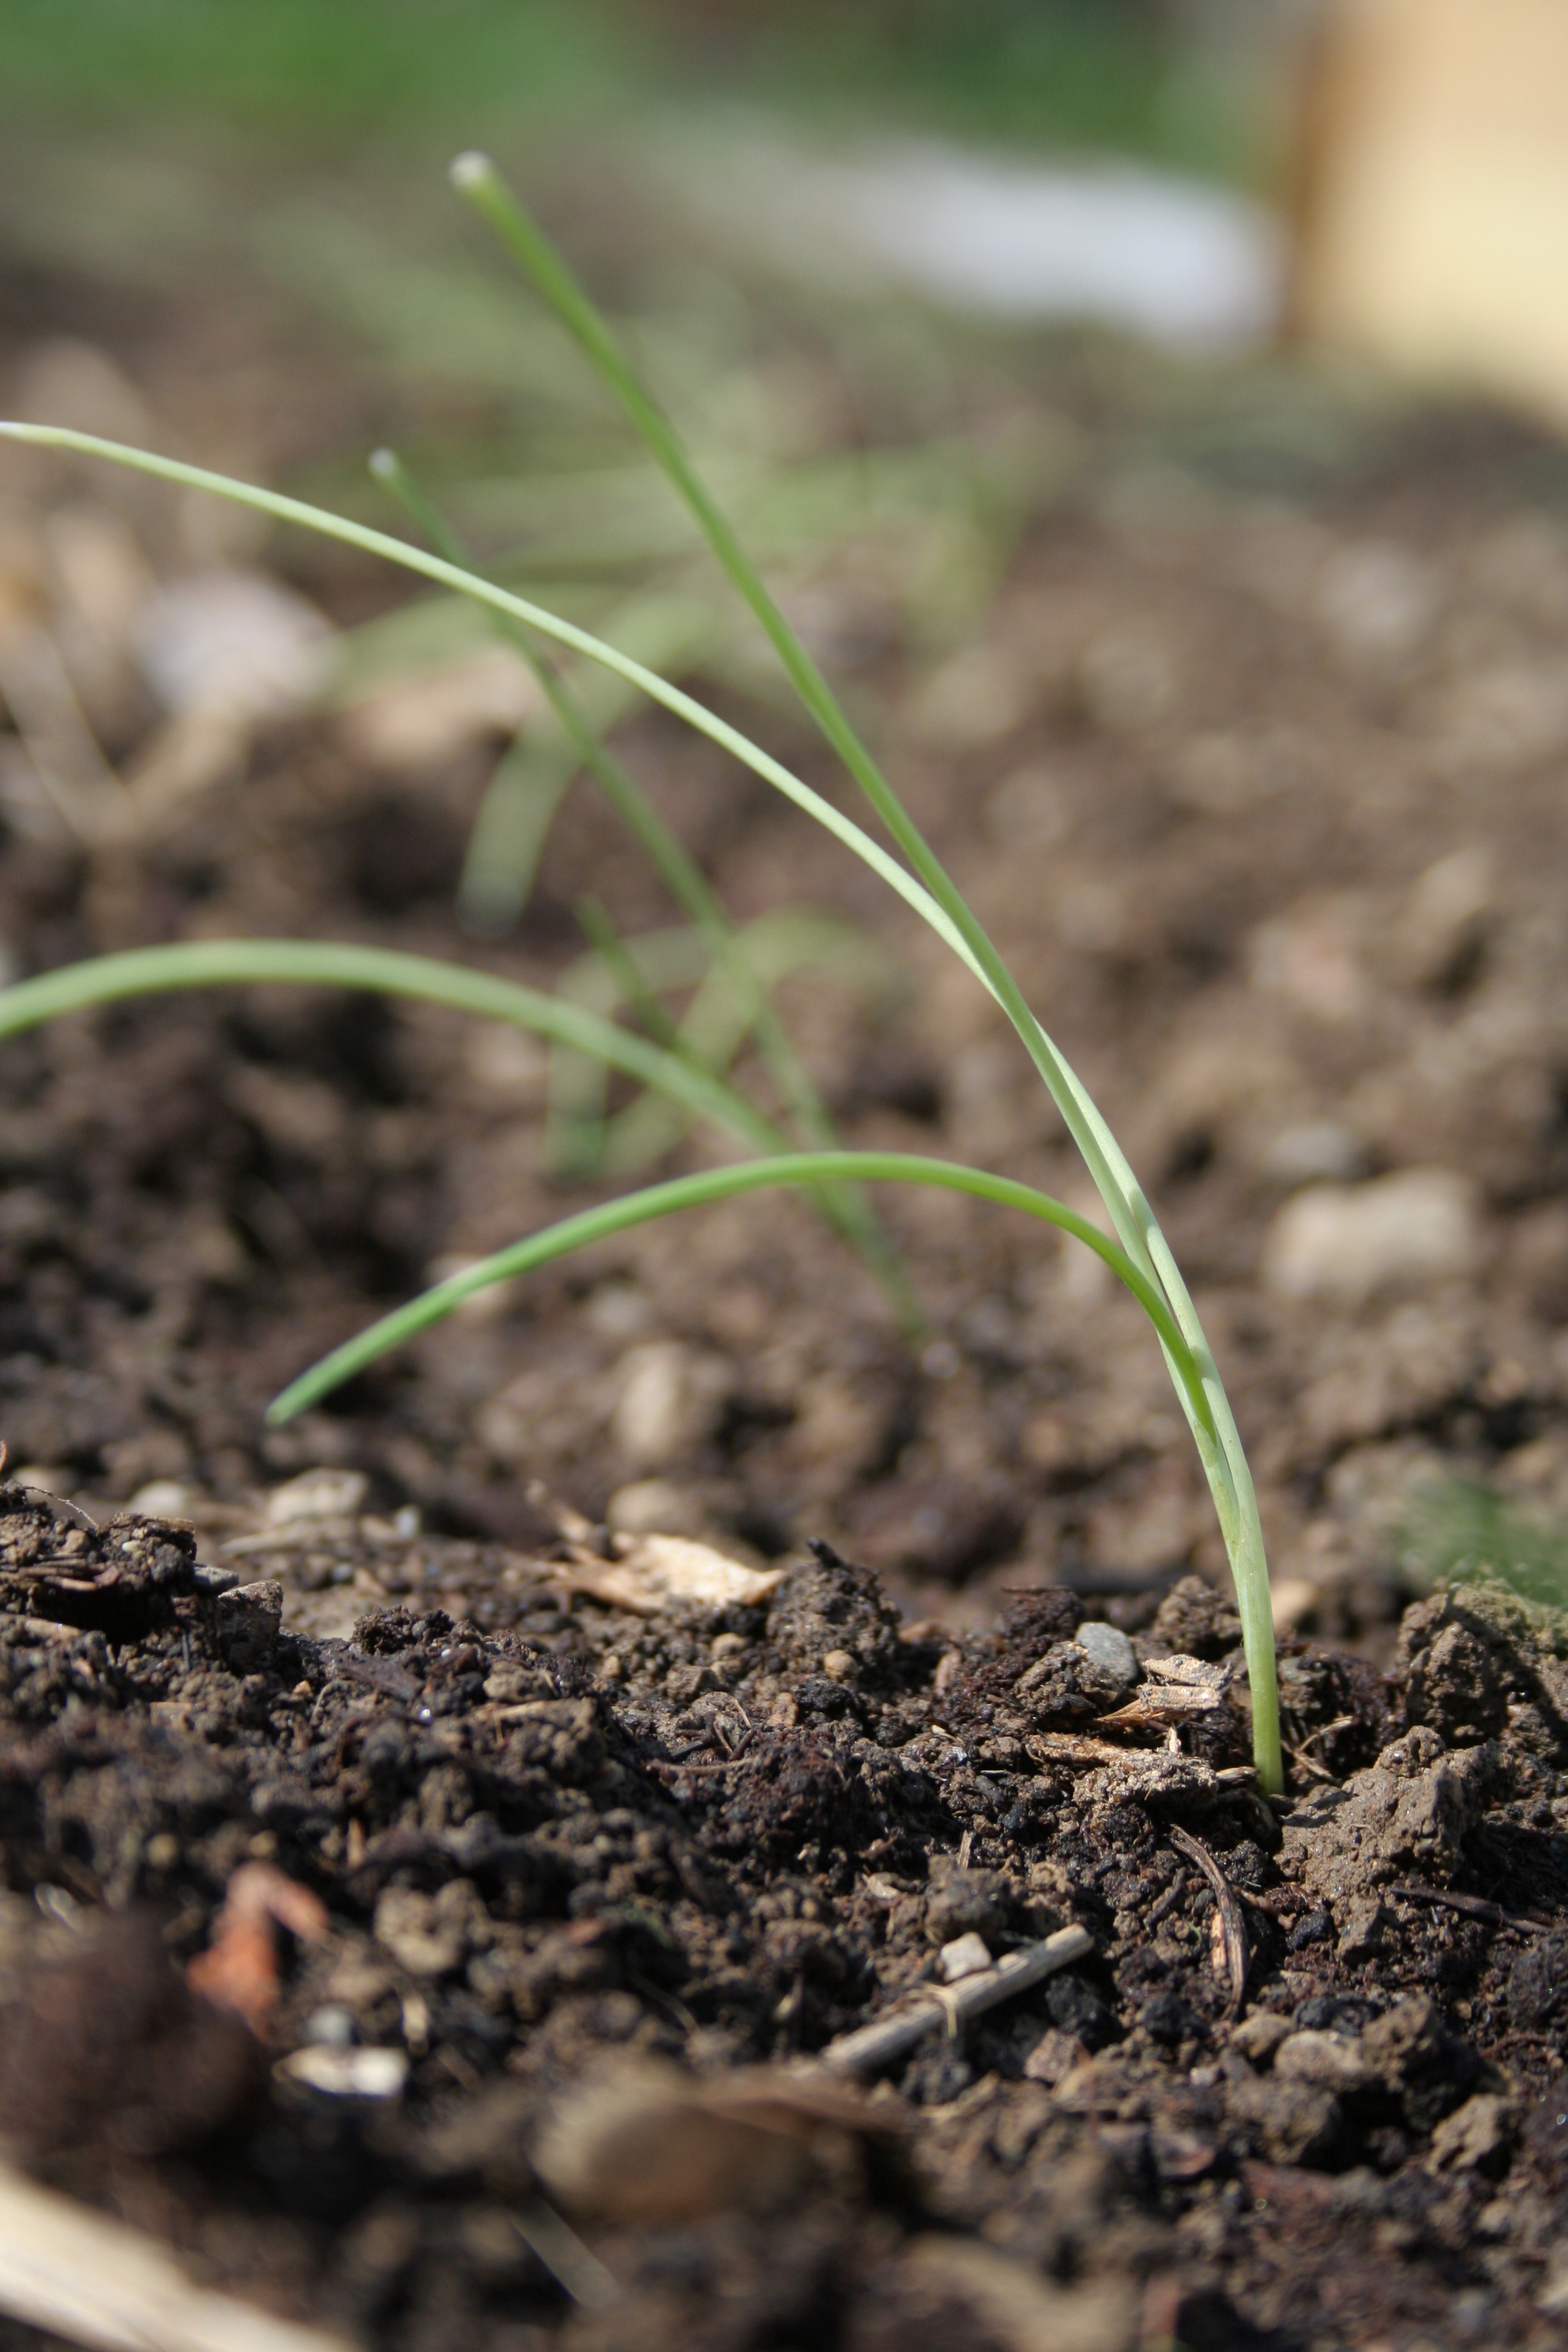
Happy rows of garlic in our garden.Yesterday I planted about 120 onion seedlings that I had started indoors in early March. I inadvertently planted them in more of a chevron pattern than straight rows! Quilting meets gardening.Hopeful that these little onion seedlings get big and strong and heavy beneath the surface.
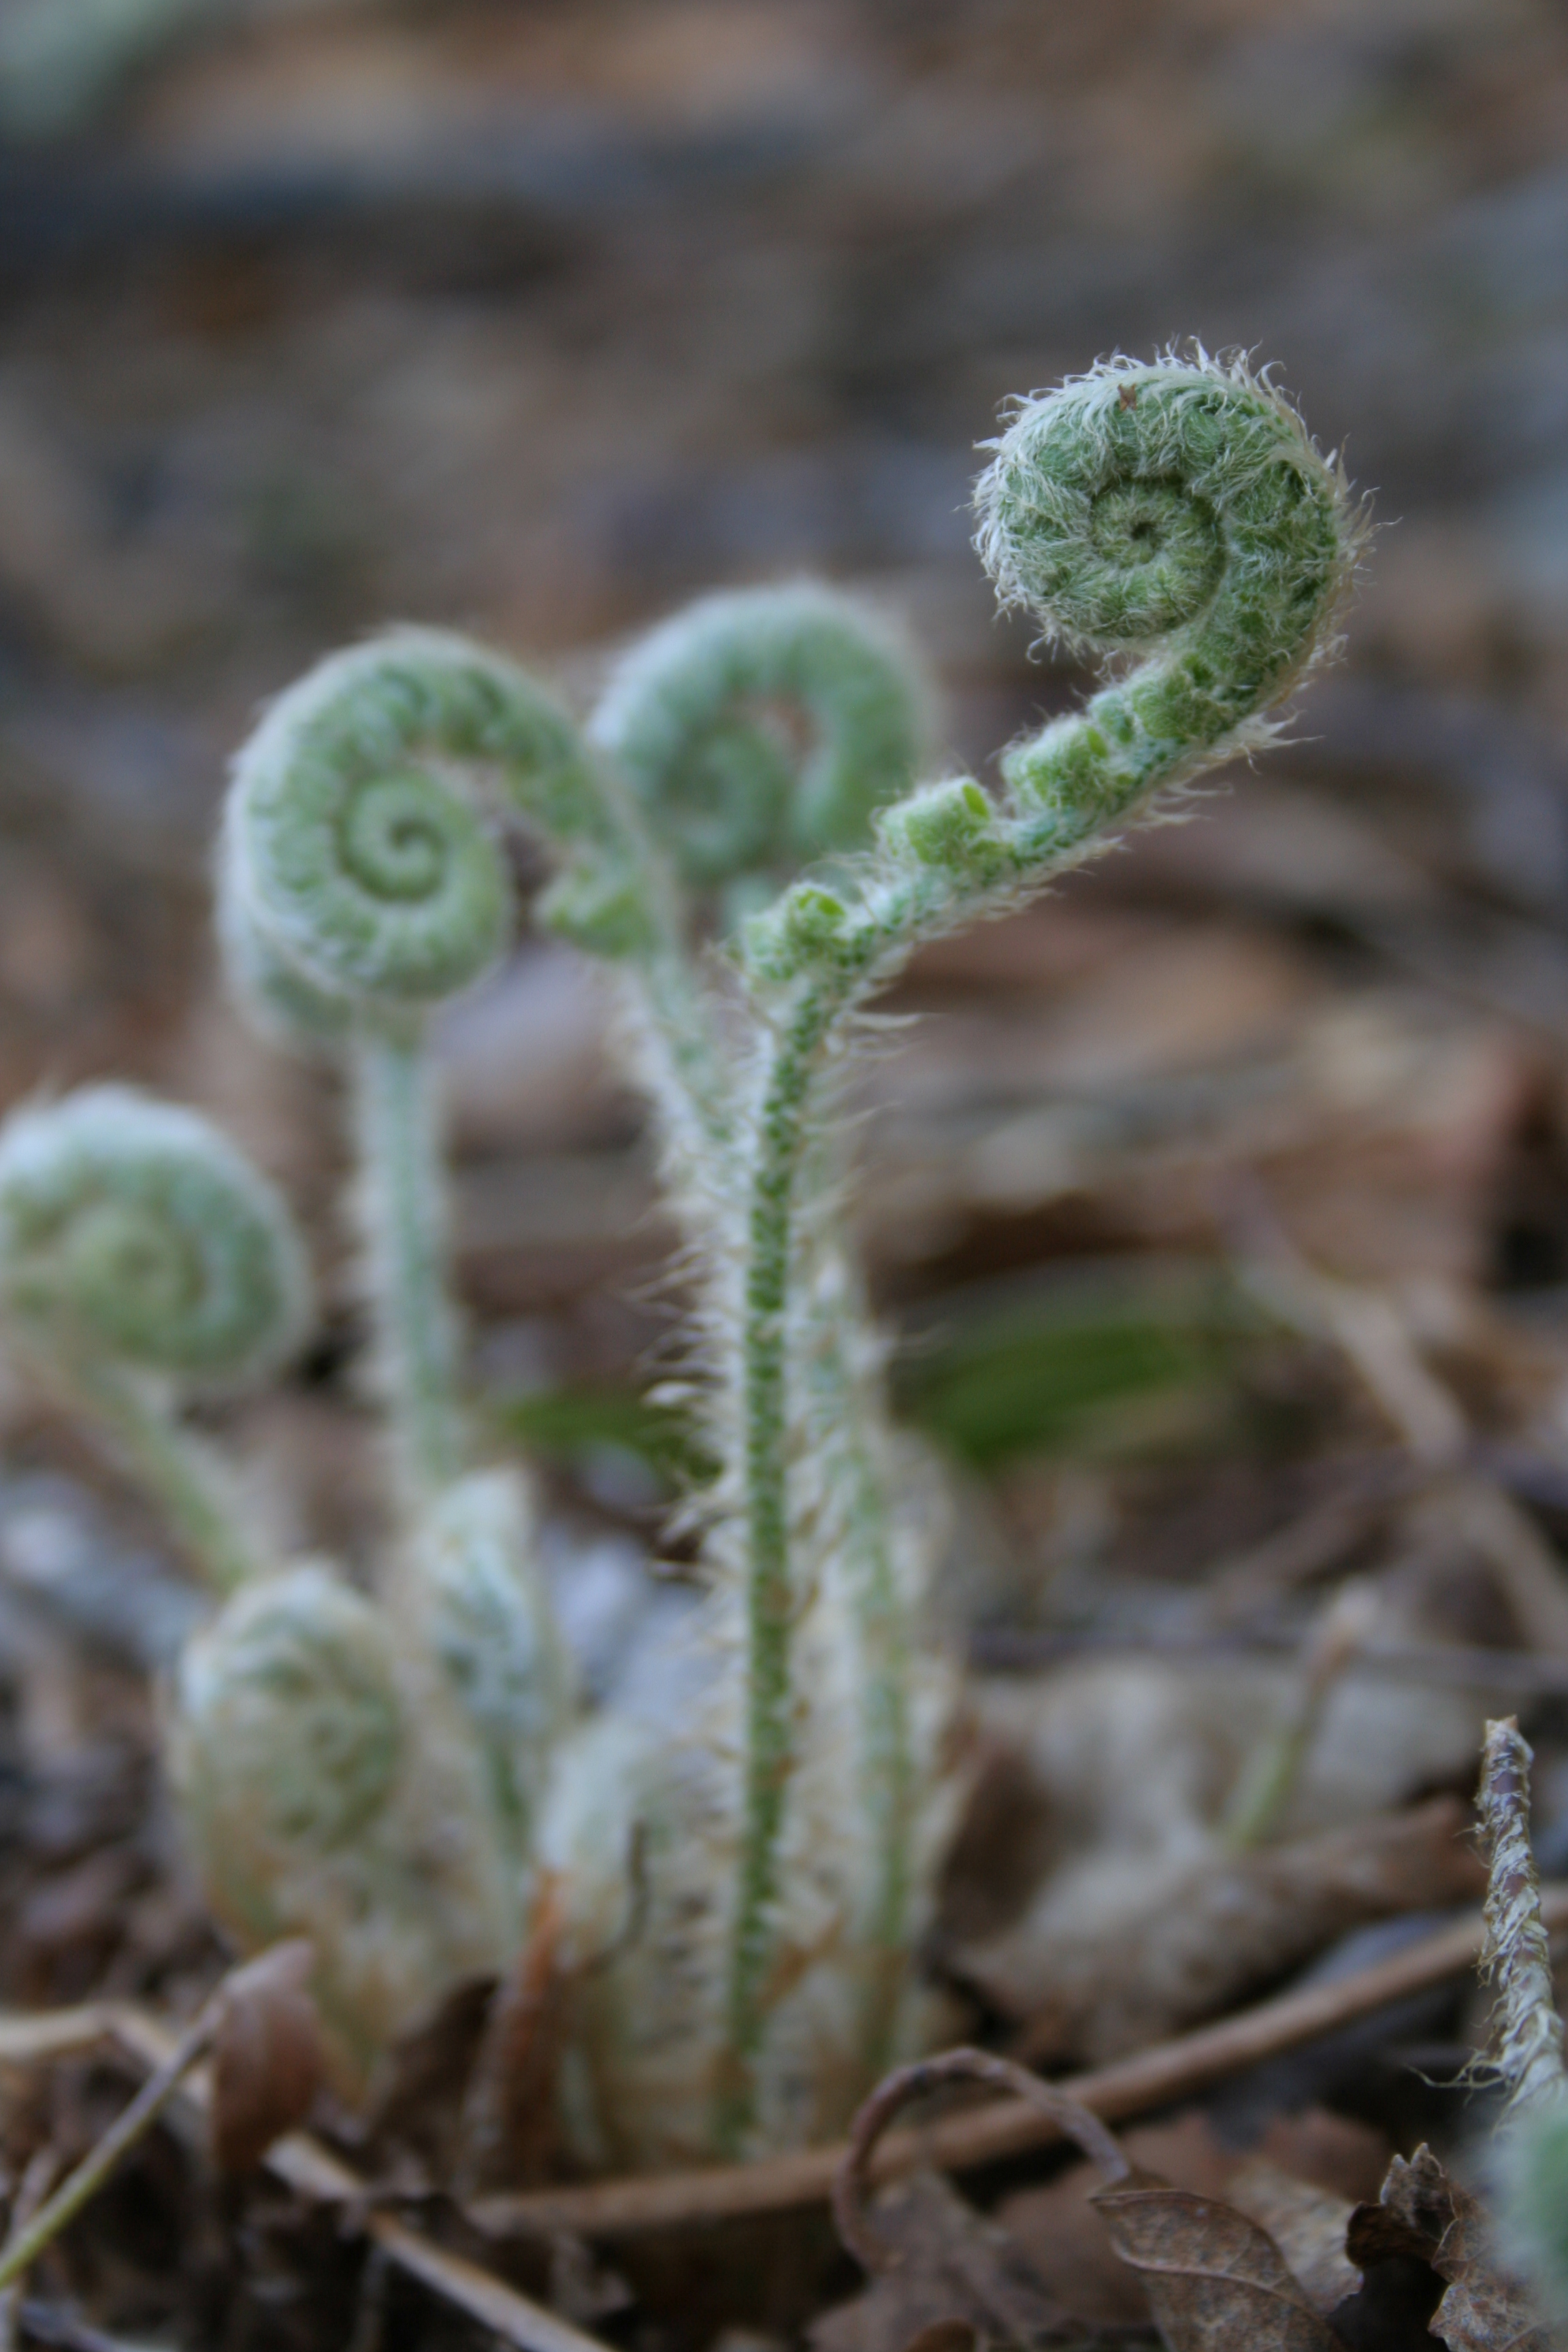
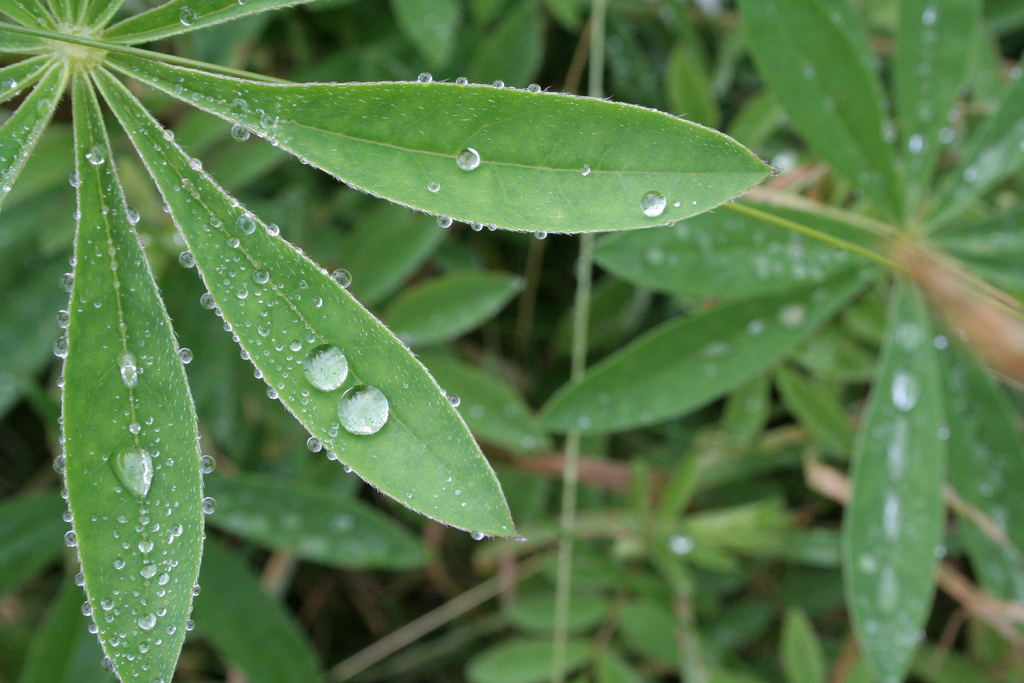
Fiddleheads coming up in the woods behind our house. Nature is so gorgeous!A large patch of our lawn is covered in these flowers every spring. Picnics galore!
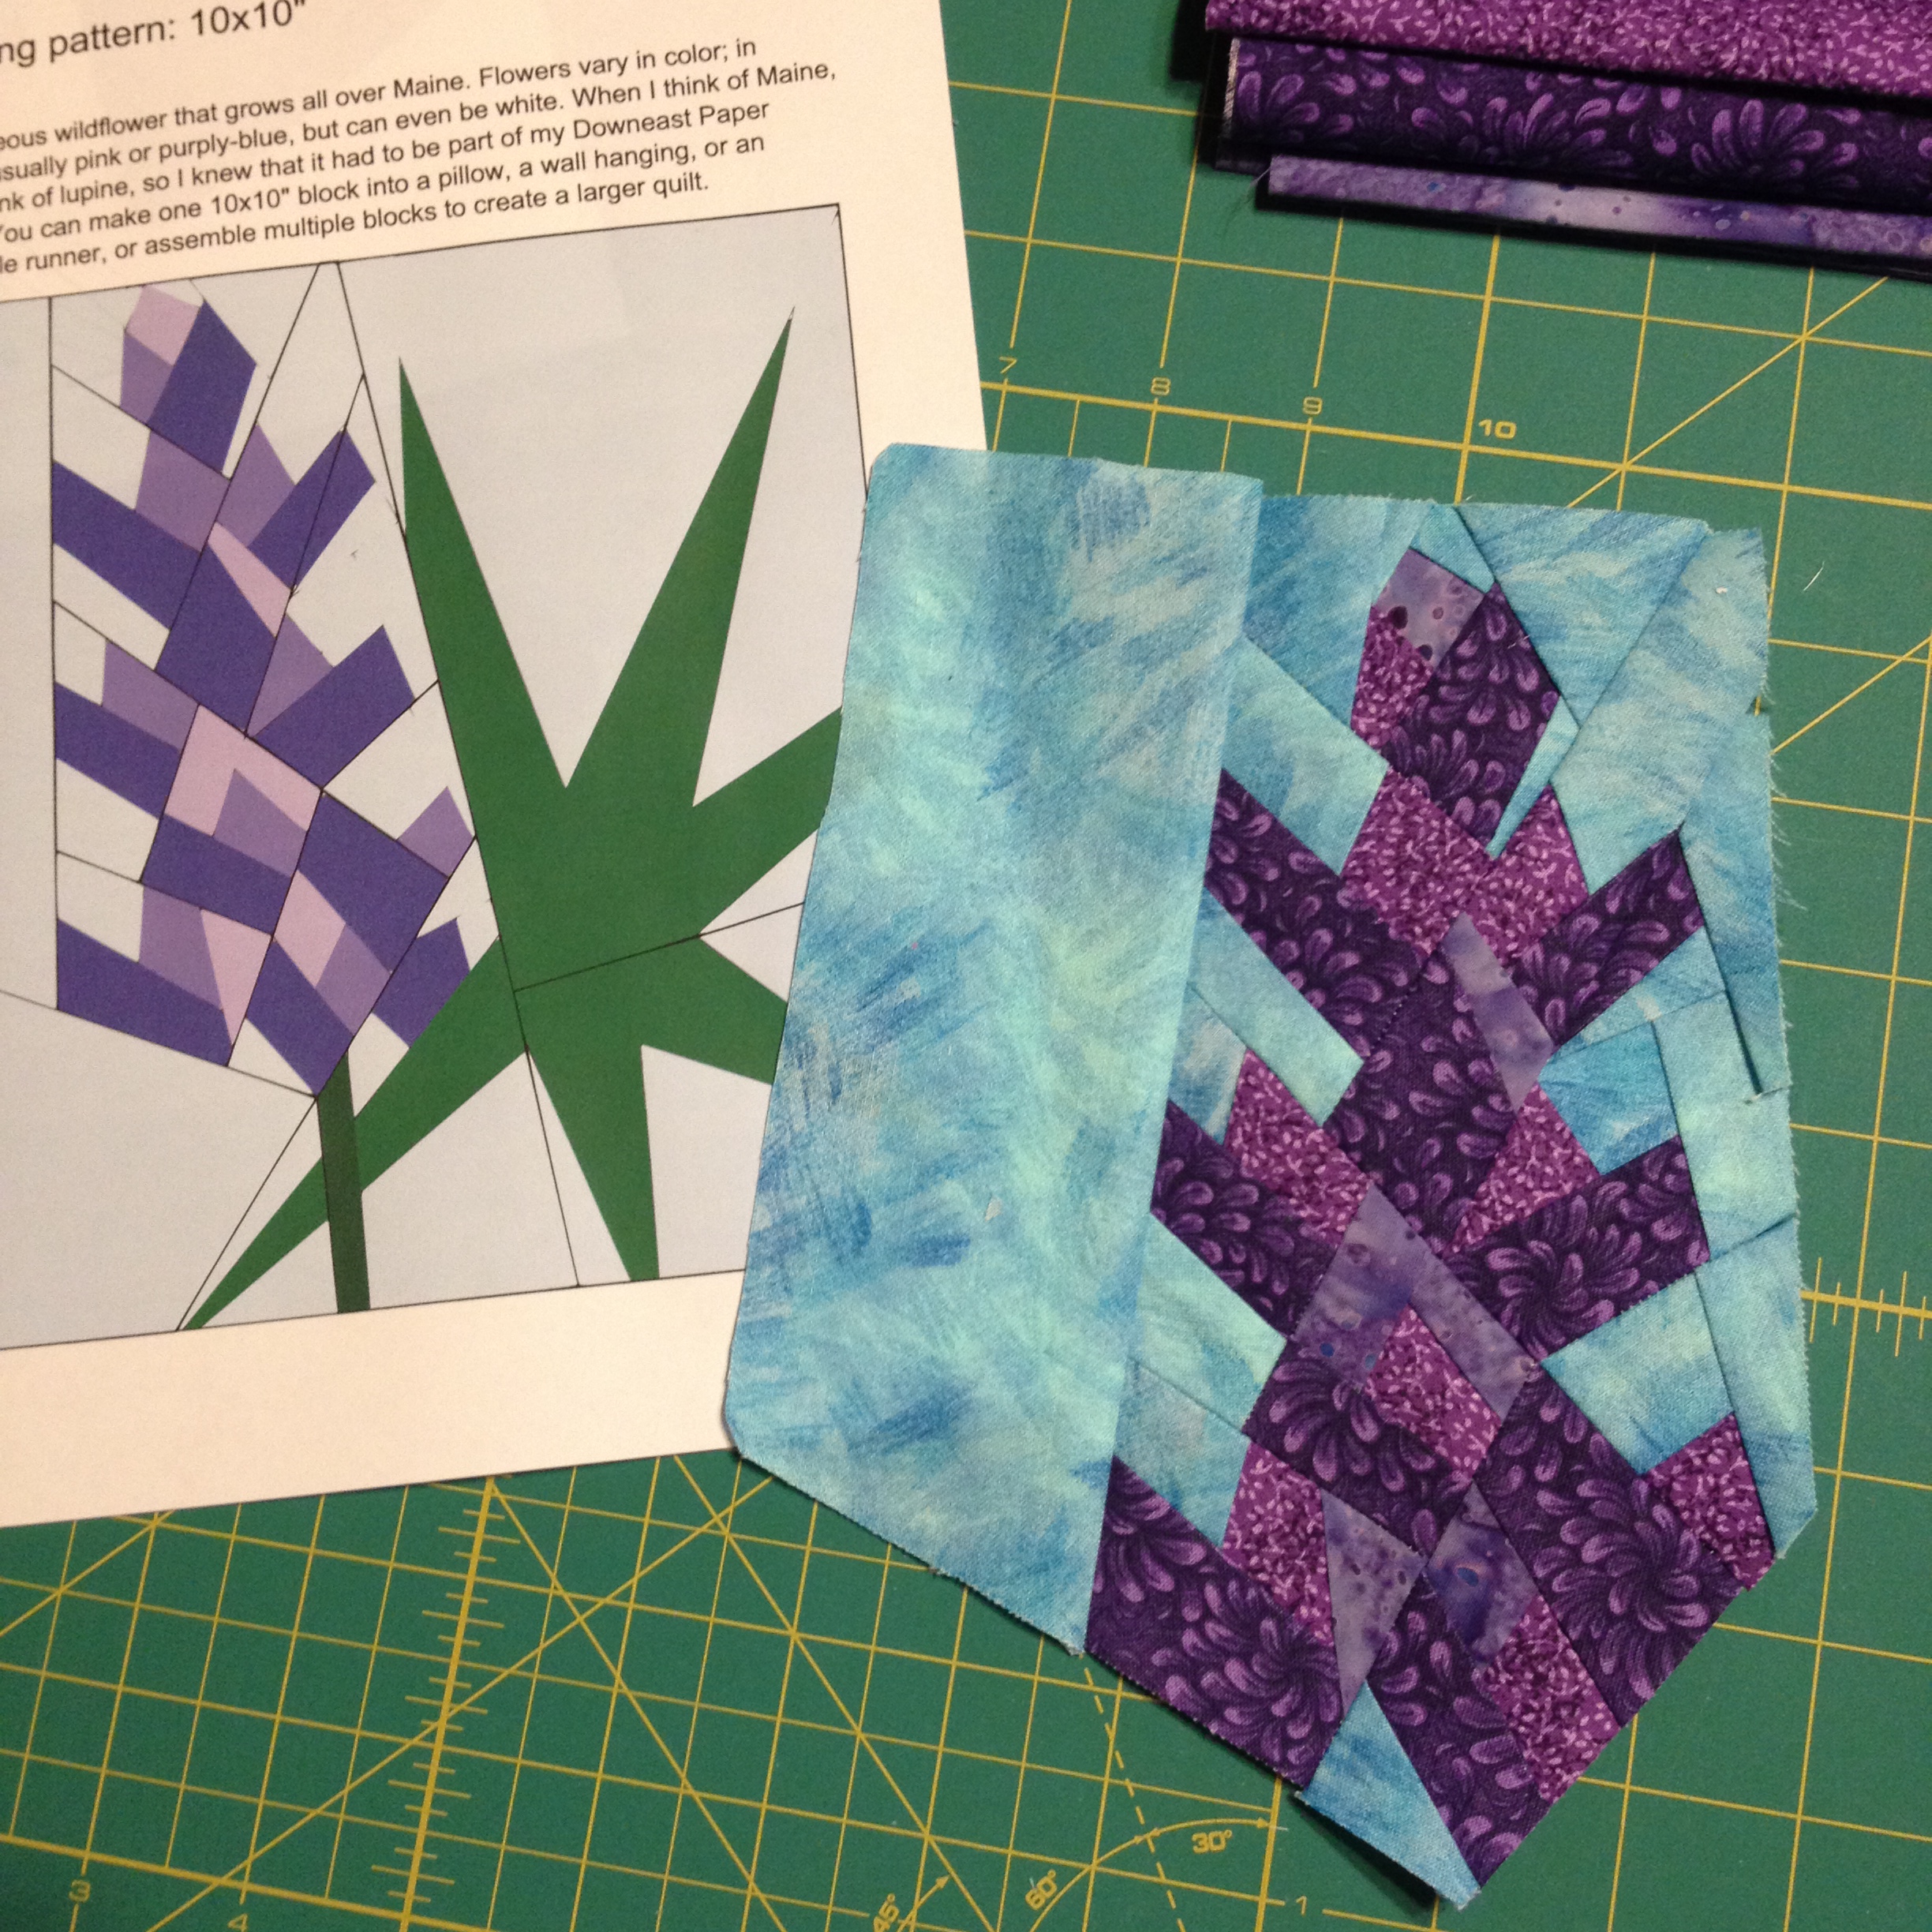
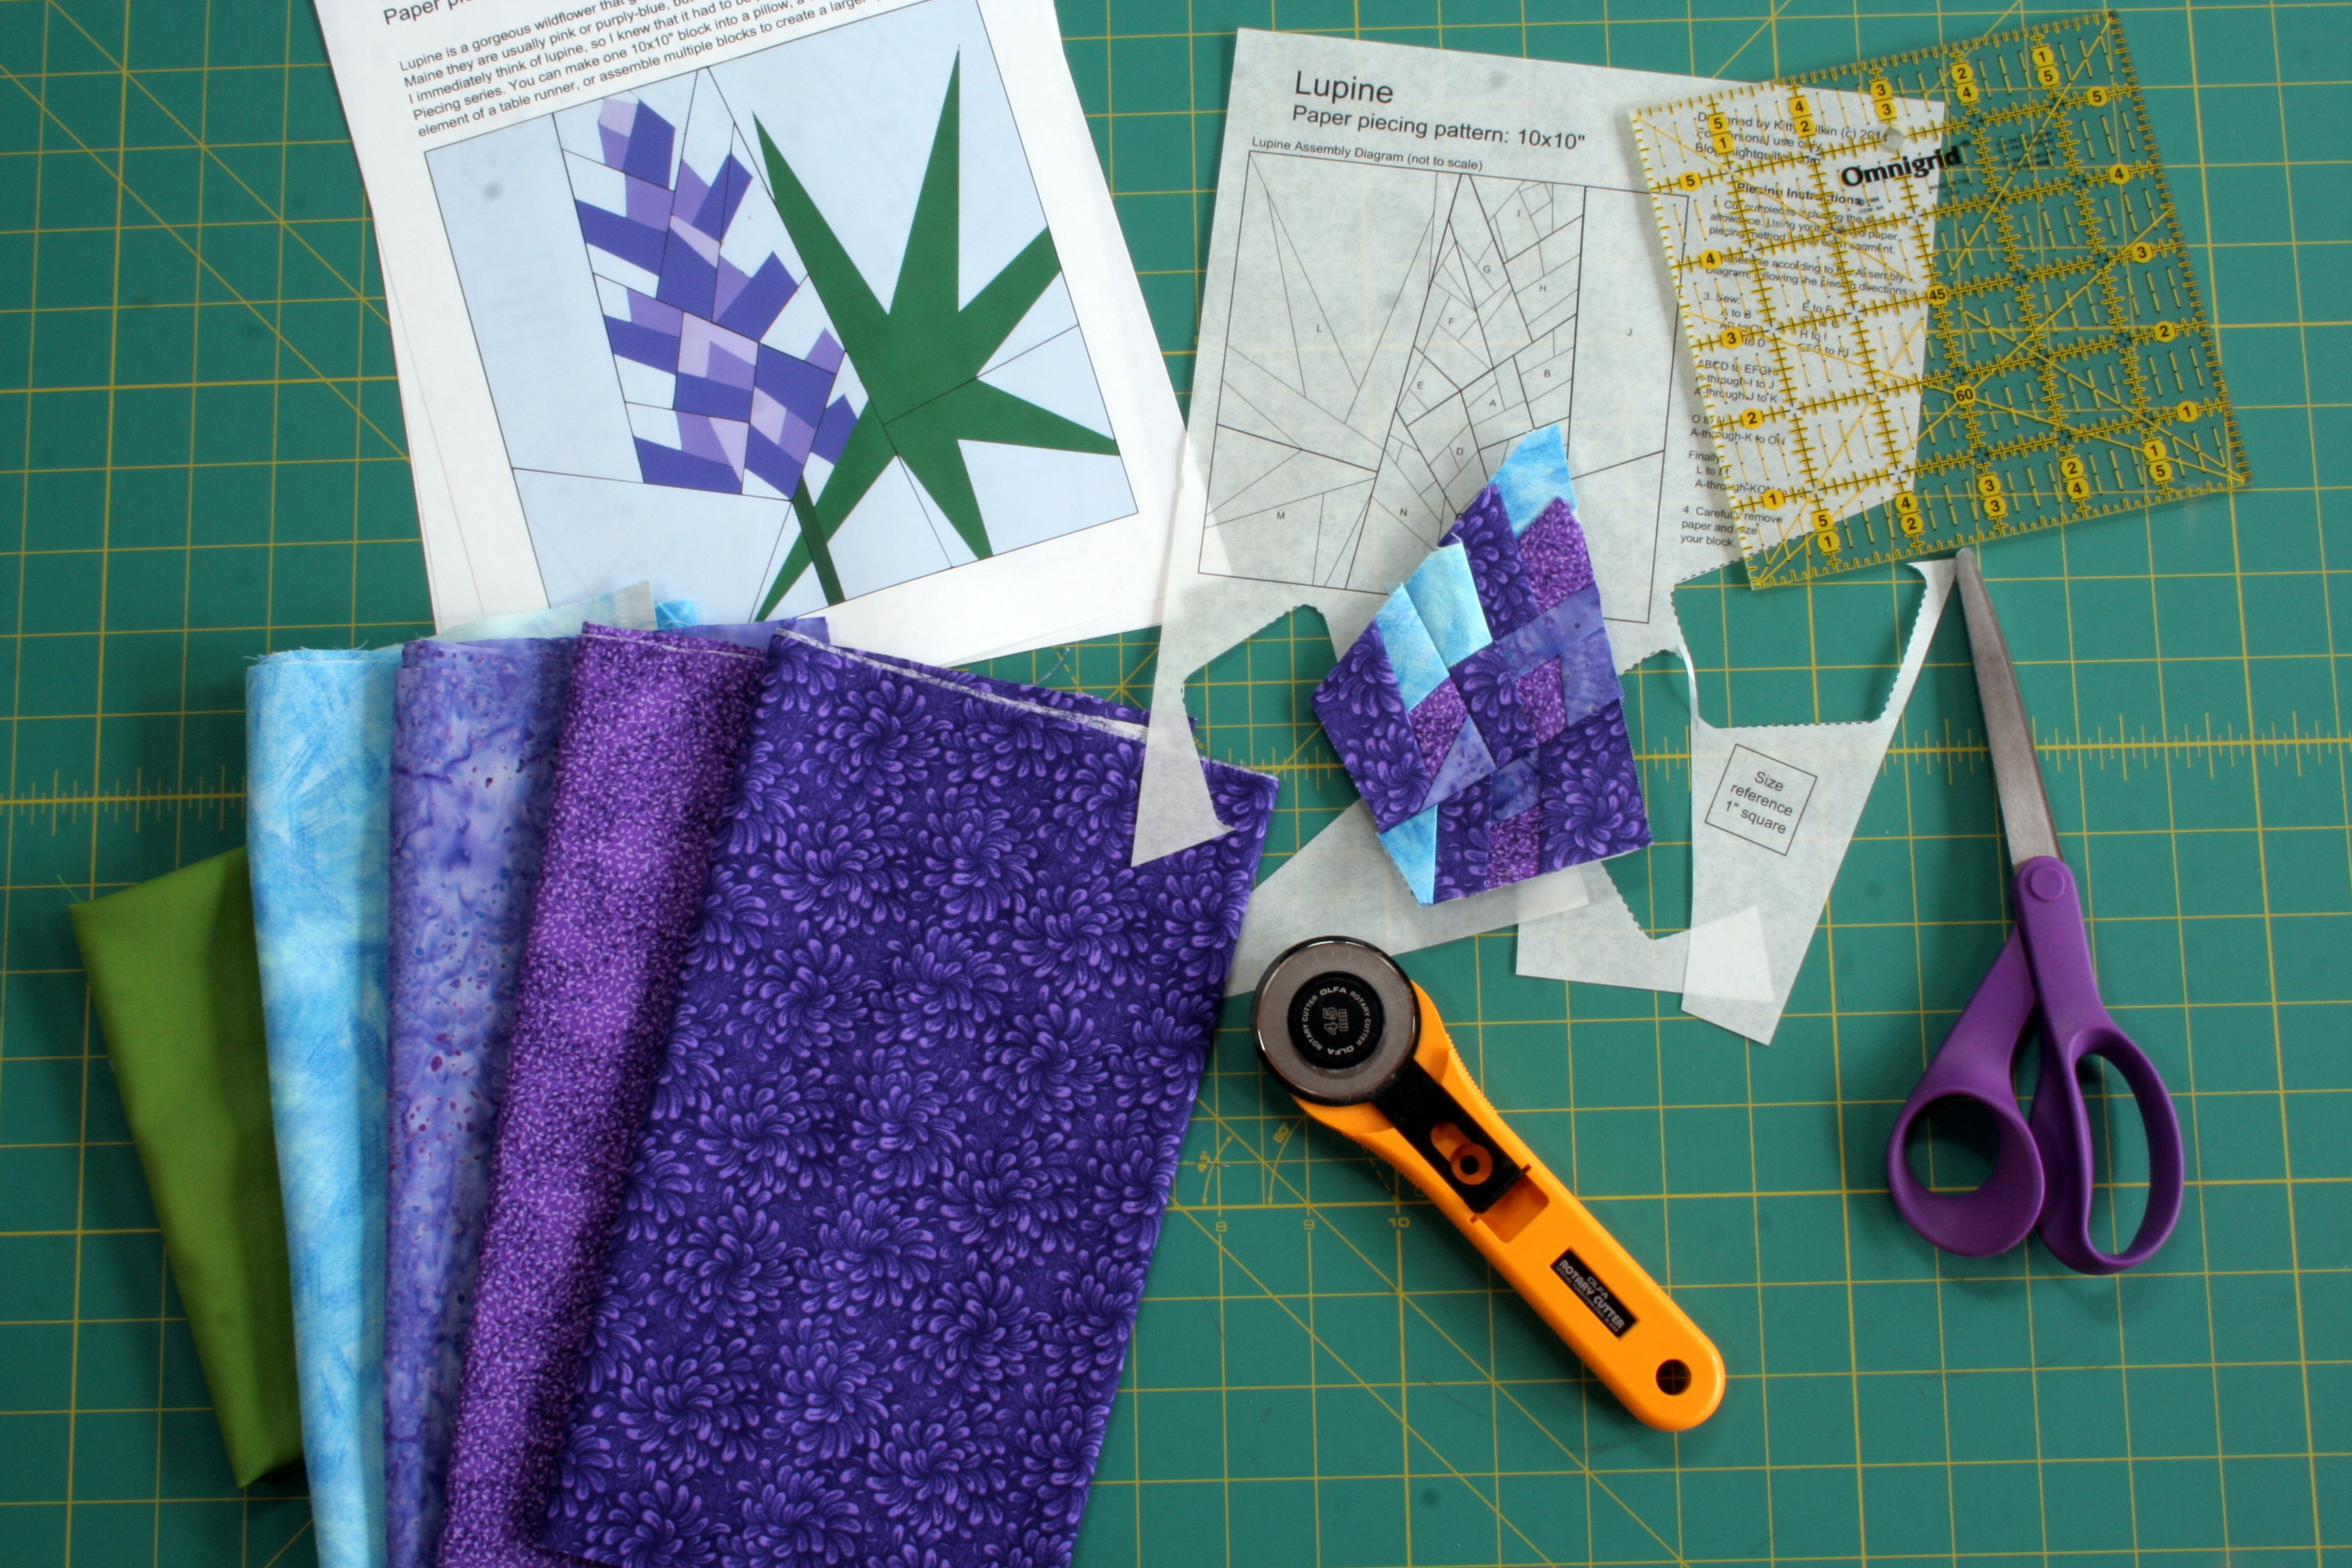
Now that I’ve got my printer figured out, I’m back to testing my new Lupine Paper Piecing Pattern. It’s a 10″ block with lots of small bits, but no complicated joining points. I’m excited to test this out and finalize the pattern, since I really think it will be a beautiful block, truly representative of lupine. Lupine grows all over Maine, and during early June you can see it sprawling gorgeously alongside highways and roads, as well as in fields and gardens. I’m working on a Downeast Paper Piecing Series, and this lupine is an essential piece!
Gorgeous lupine
When designing paper piecing patterns, I always battle with the balance of visual accuracy and simplicity. I want the finished pattern to look unmistakably like lupine, but I also want it to be simple enough that people will want to create it. With the lupine design, I knew I definitely wanted to get the heart-like flower petals into the pattern.
Hearts in the heart of a lupine flower.
The recognizable radiating leaves also had to make an appearance, albeit simplified.
I’m really happy with how my pattern turned out! I think it looks like lupine, leaves room for lots of color play in the flower, and is fairly simply pieced despite the many small bits. There are a few tricky angles, but using the printer paper foundation paper piecing method, I focus on being generous when cutting my fabric bits and haven’t had trouble yet.
I’m not overly wild about my fabric choices this time around; they seemed like they melded and contrasted well when I looked at the stacks of fabric, but once paper pieced, I’m not sure it’s enough contrast for my liking.
Mental note: when choosing fabrics for Lupine Paper Piecing Pattern, go bold!
I’ve only completed one small section of the Lupine so far, but I will be sure to post my progress as it comes along. I’m hoping to have this pattern posted in my Craftsy Pattern Store within the next couple of weeks, just in time for lupine season here in Maine.
This pattern came about when a search for a paper pieced lupine pattern turned up nothing. There are many paper pieced flower patterns, but I could not find lupine! The only solution was to design it myself.
What’s your favorite flower? Would you take the time to paper piece it into a pillow, table runner, etc.?


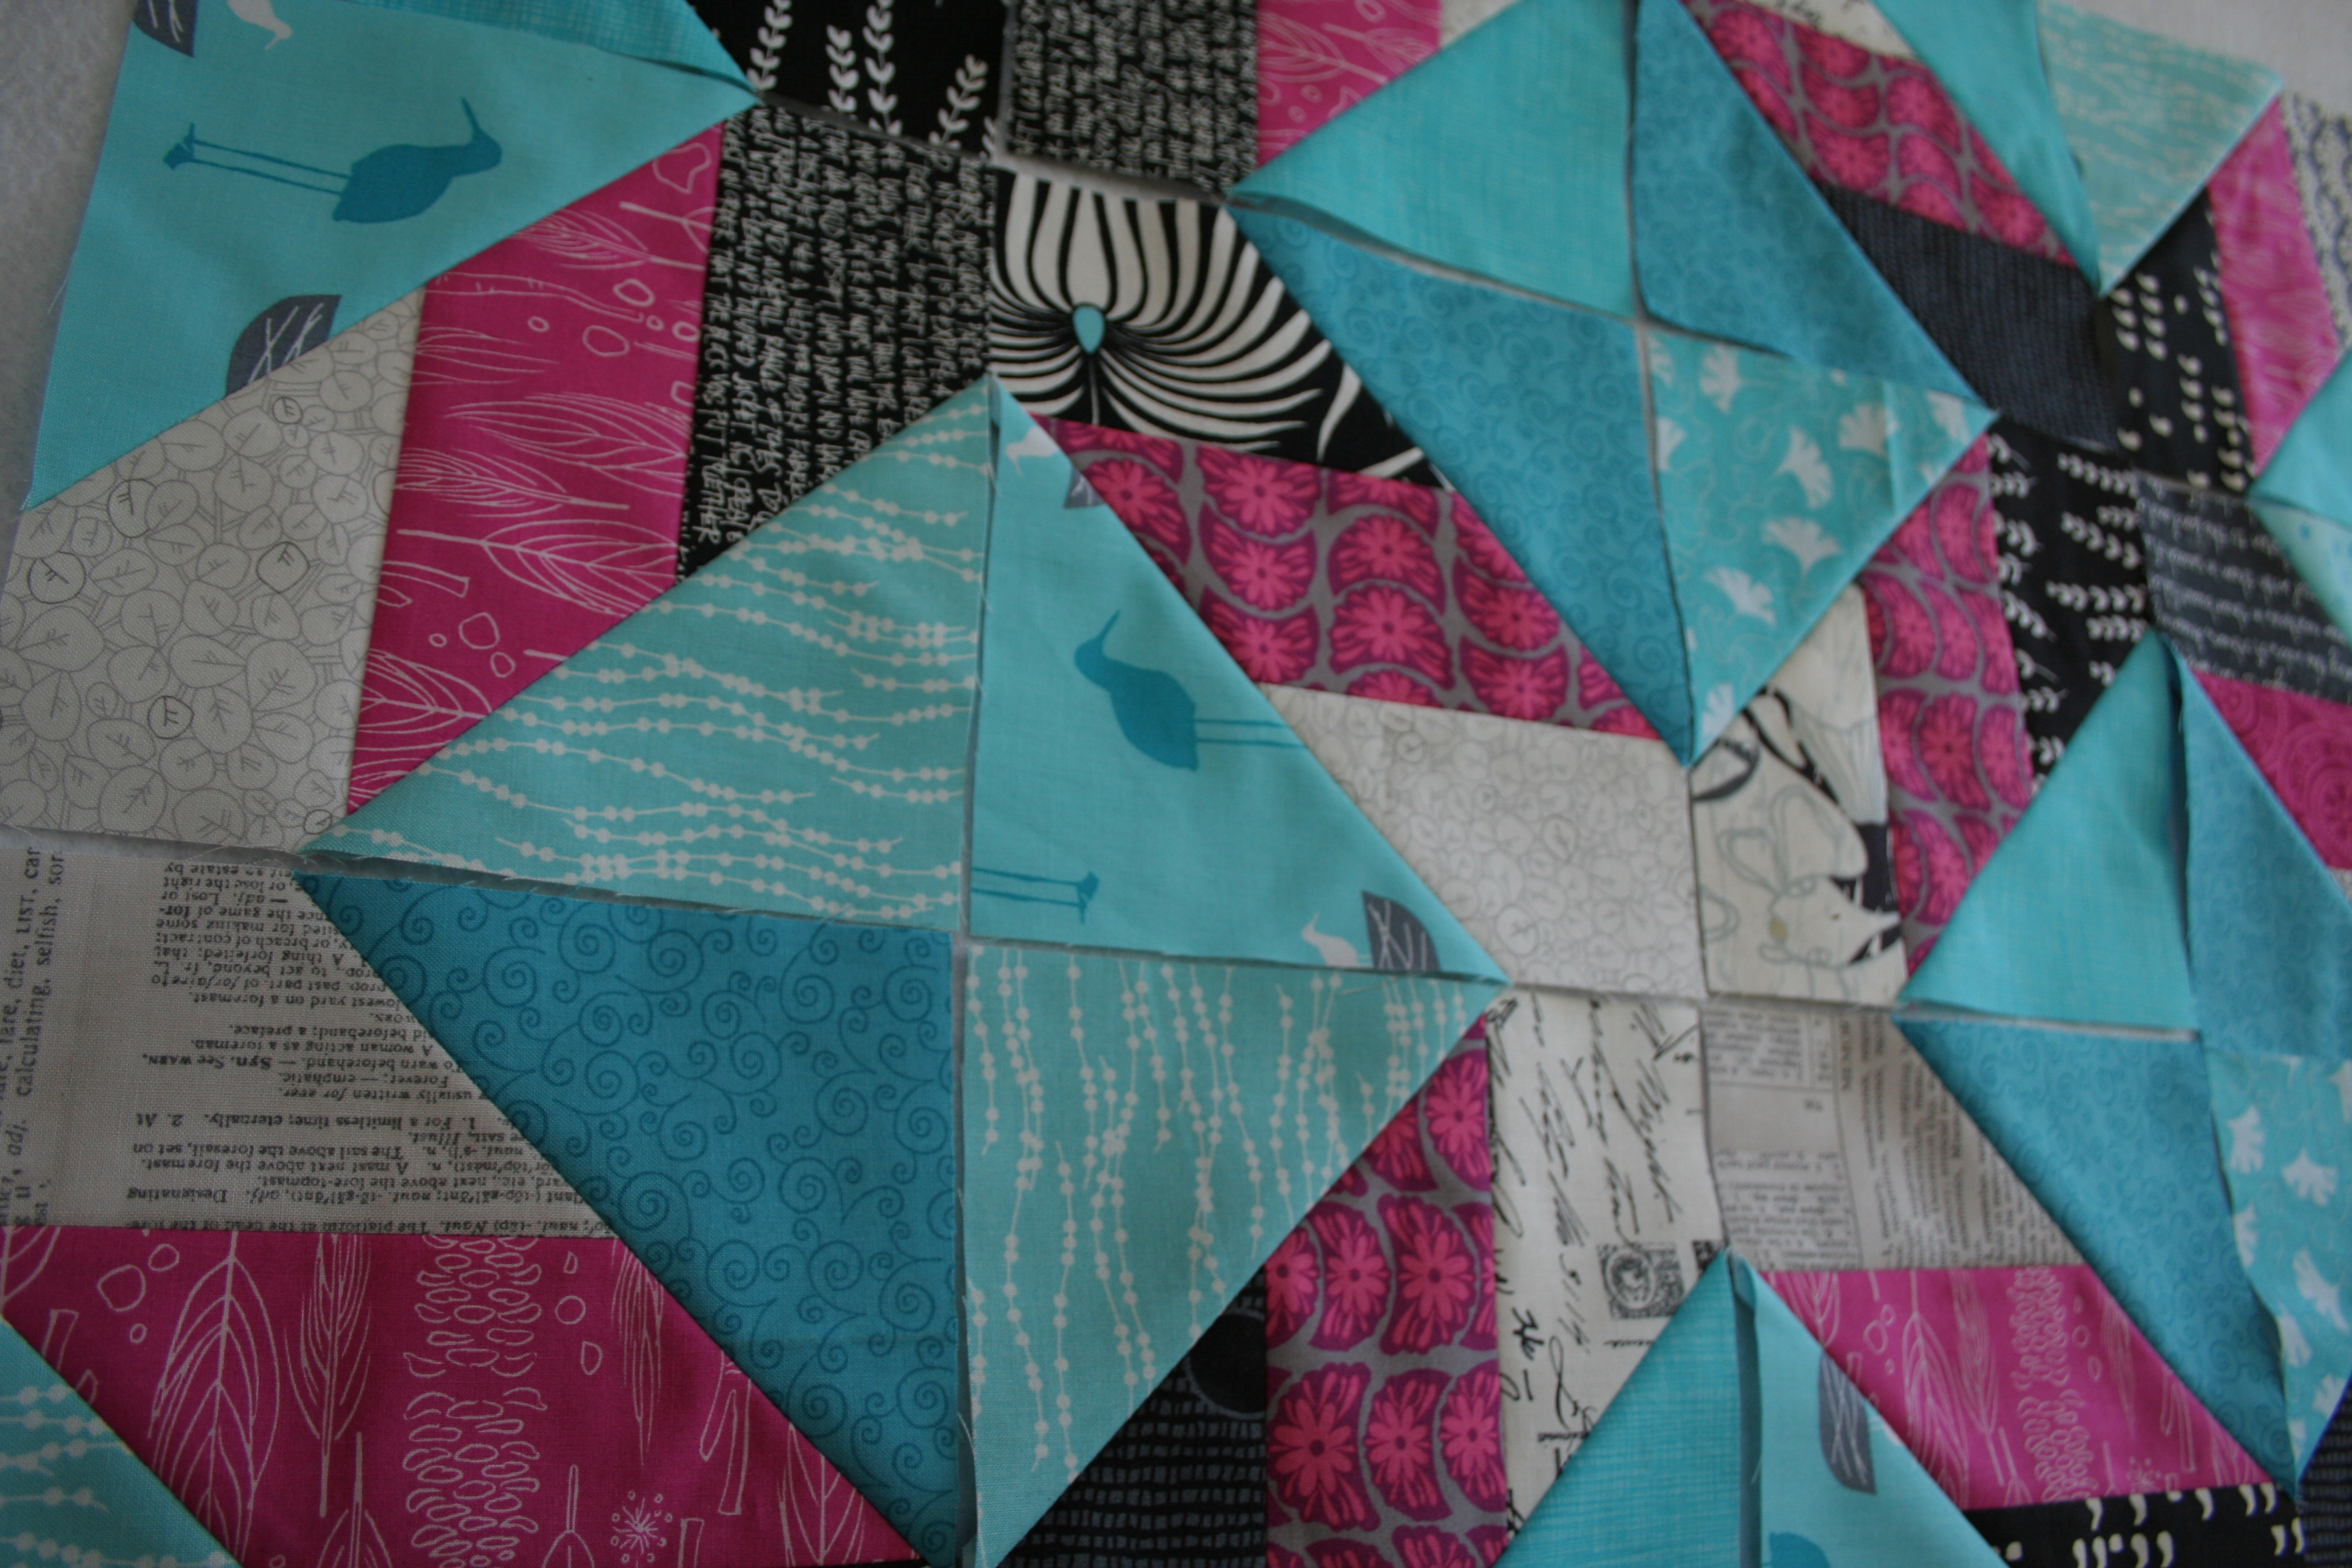
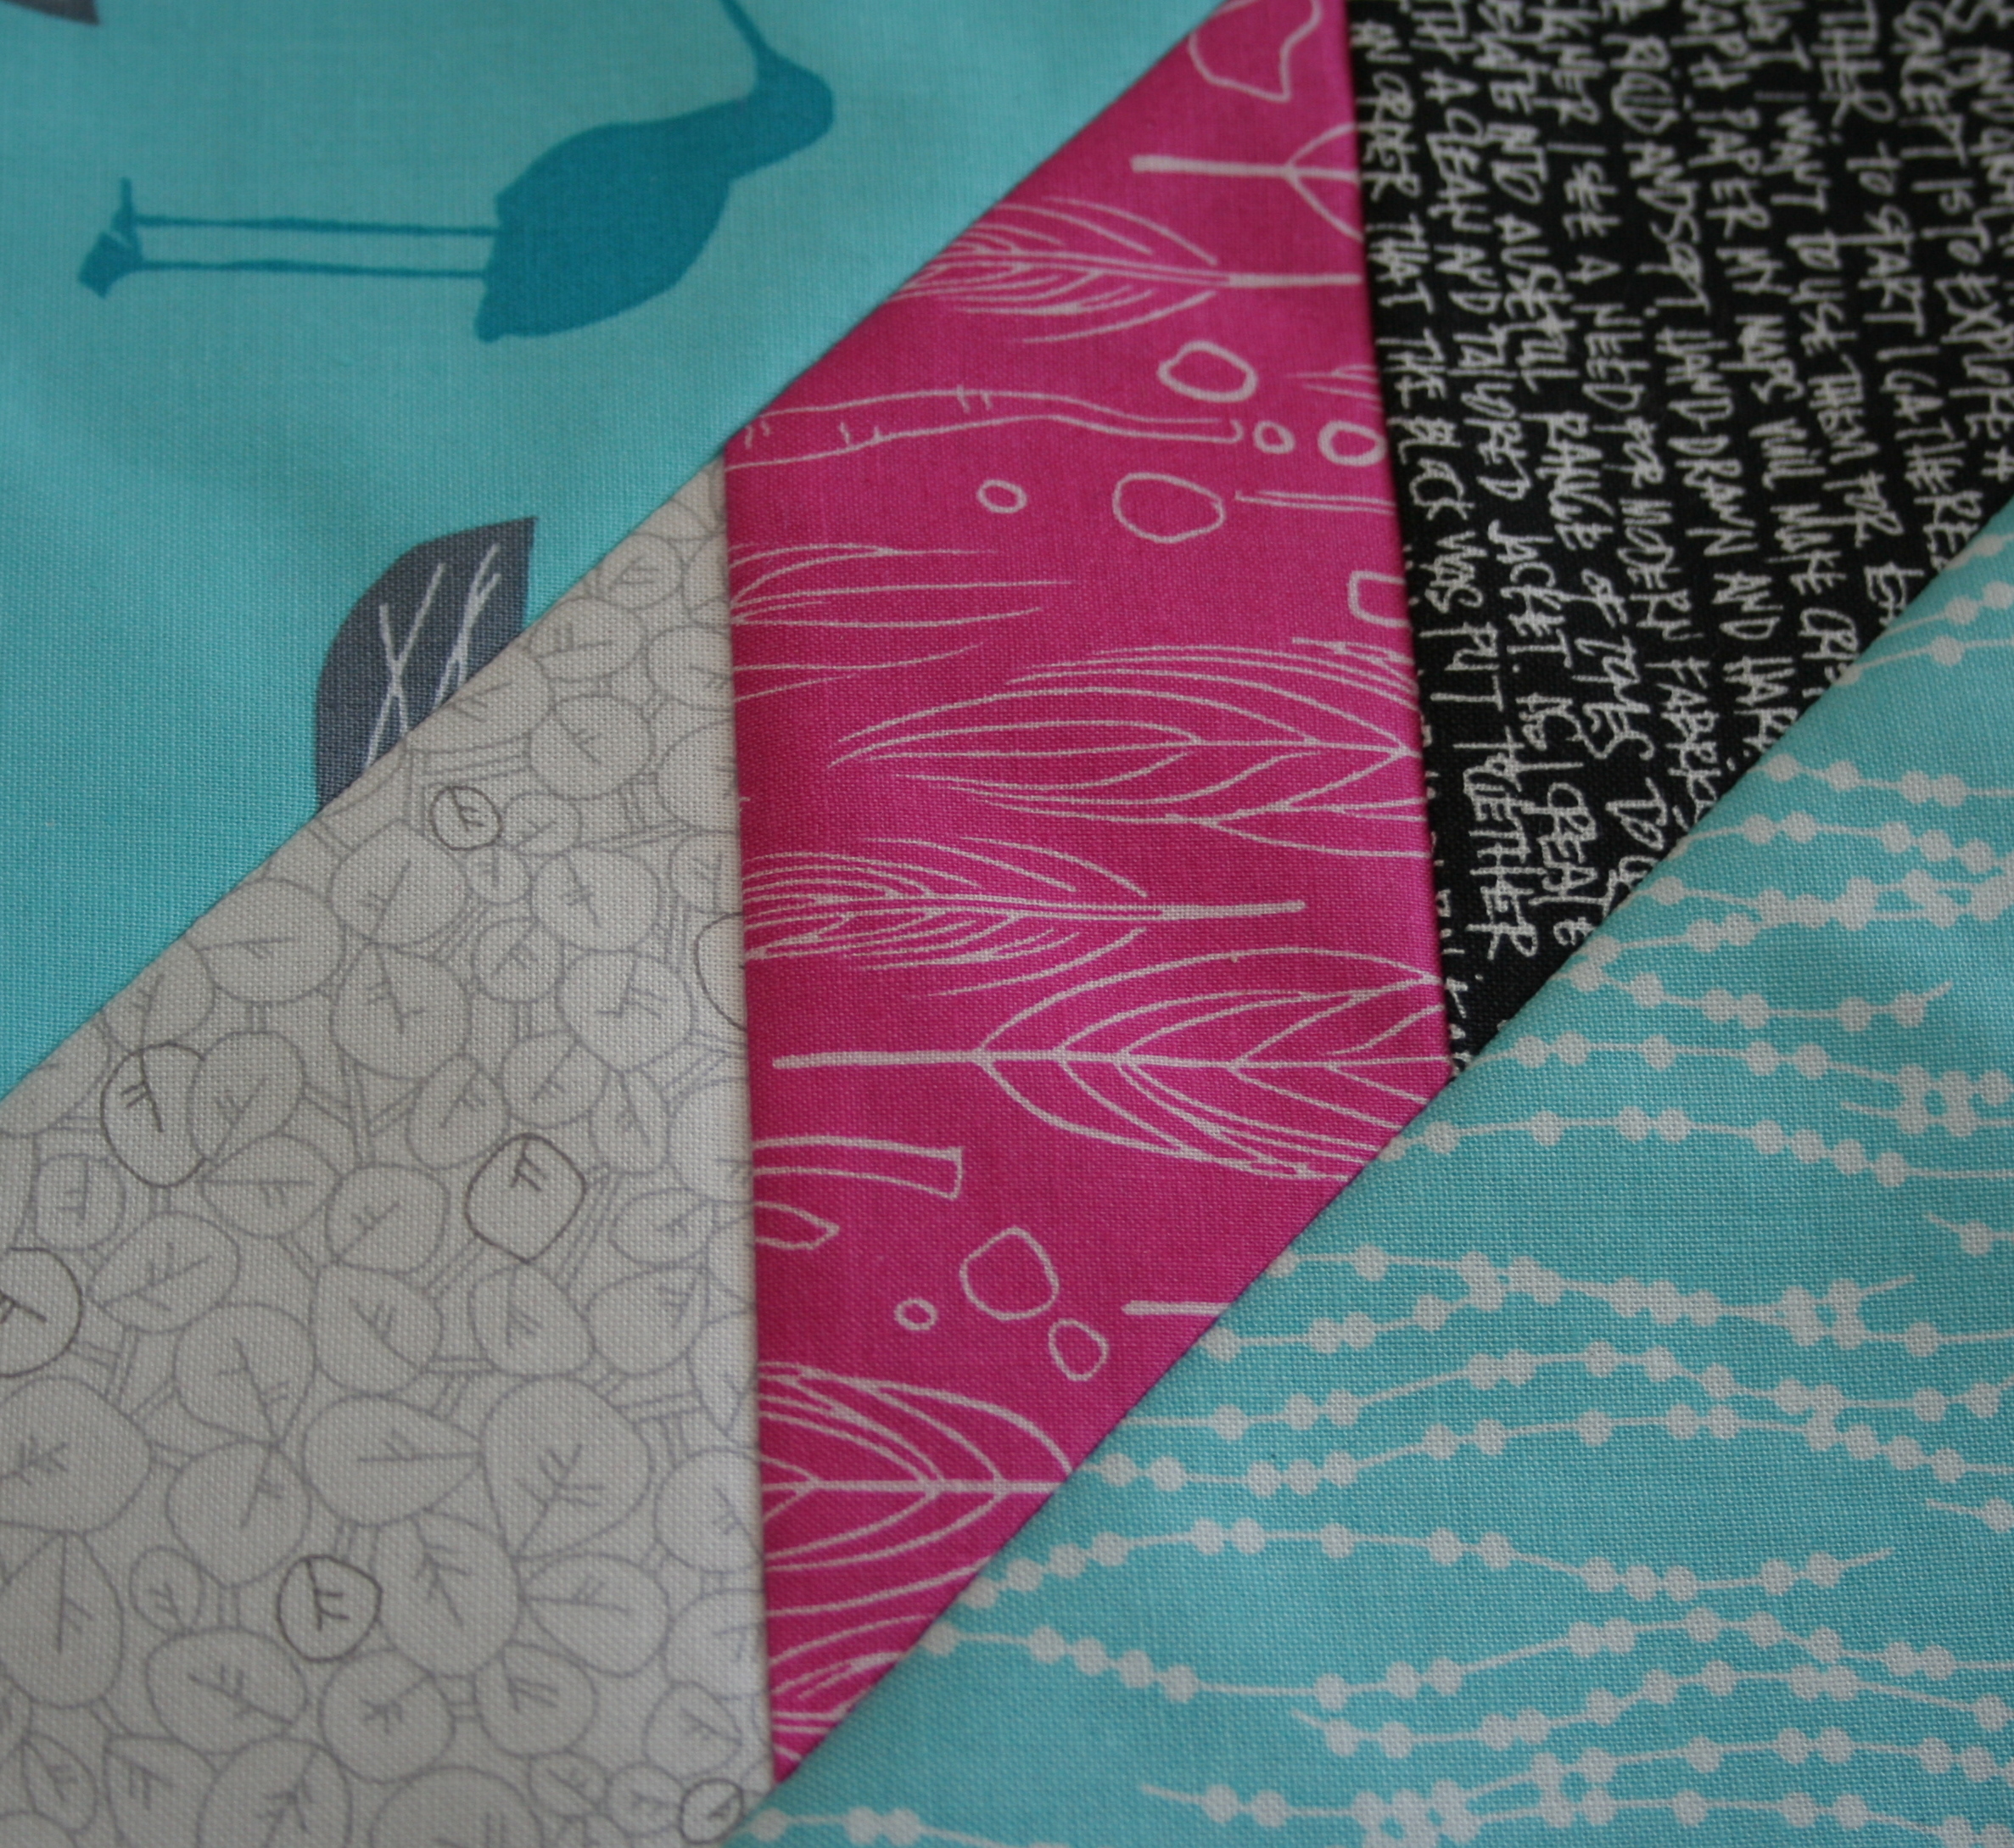
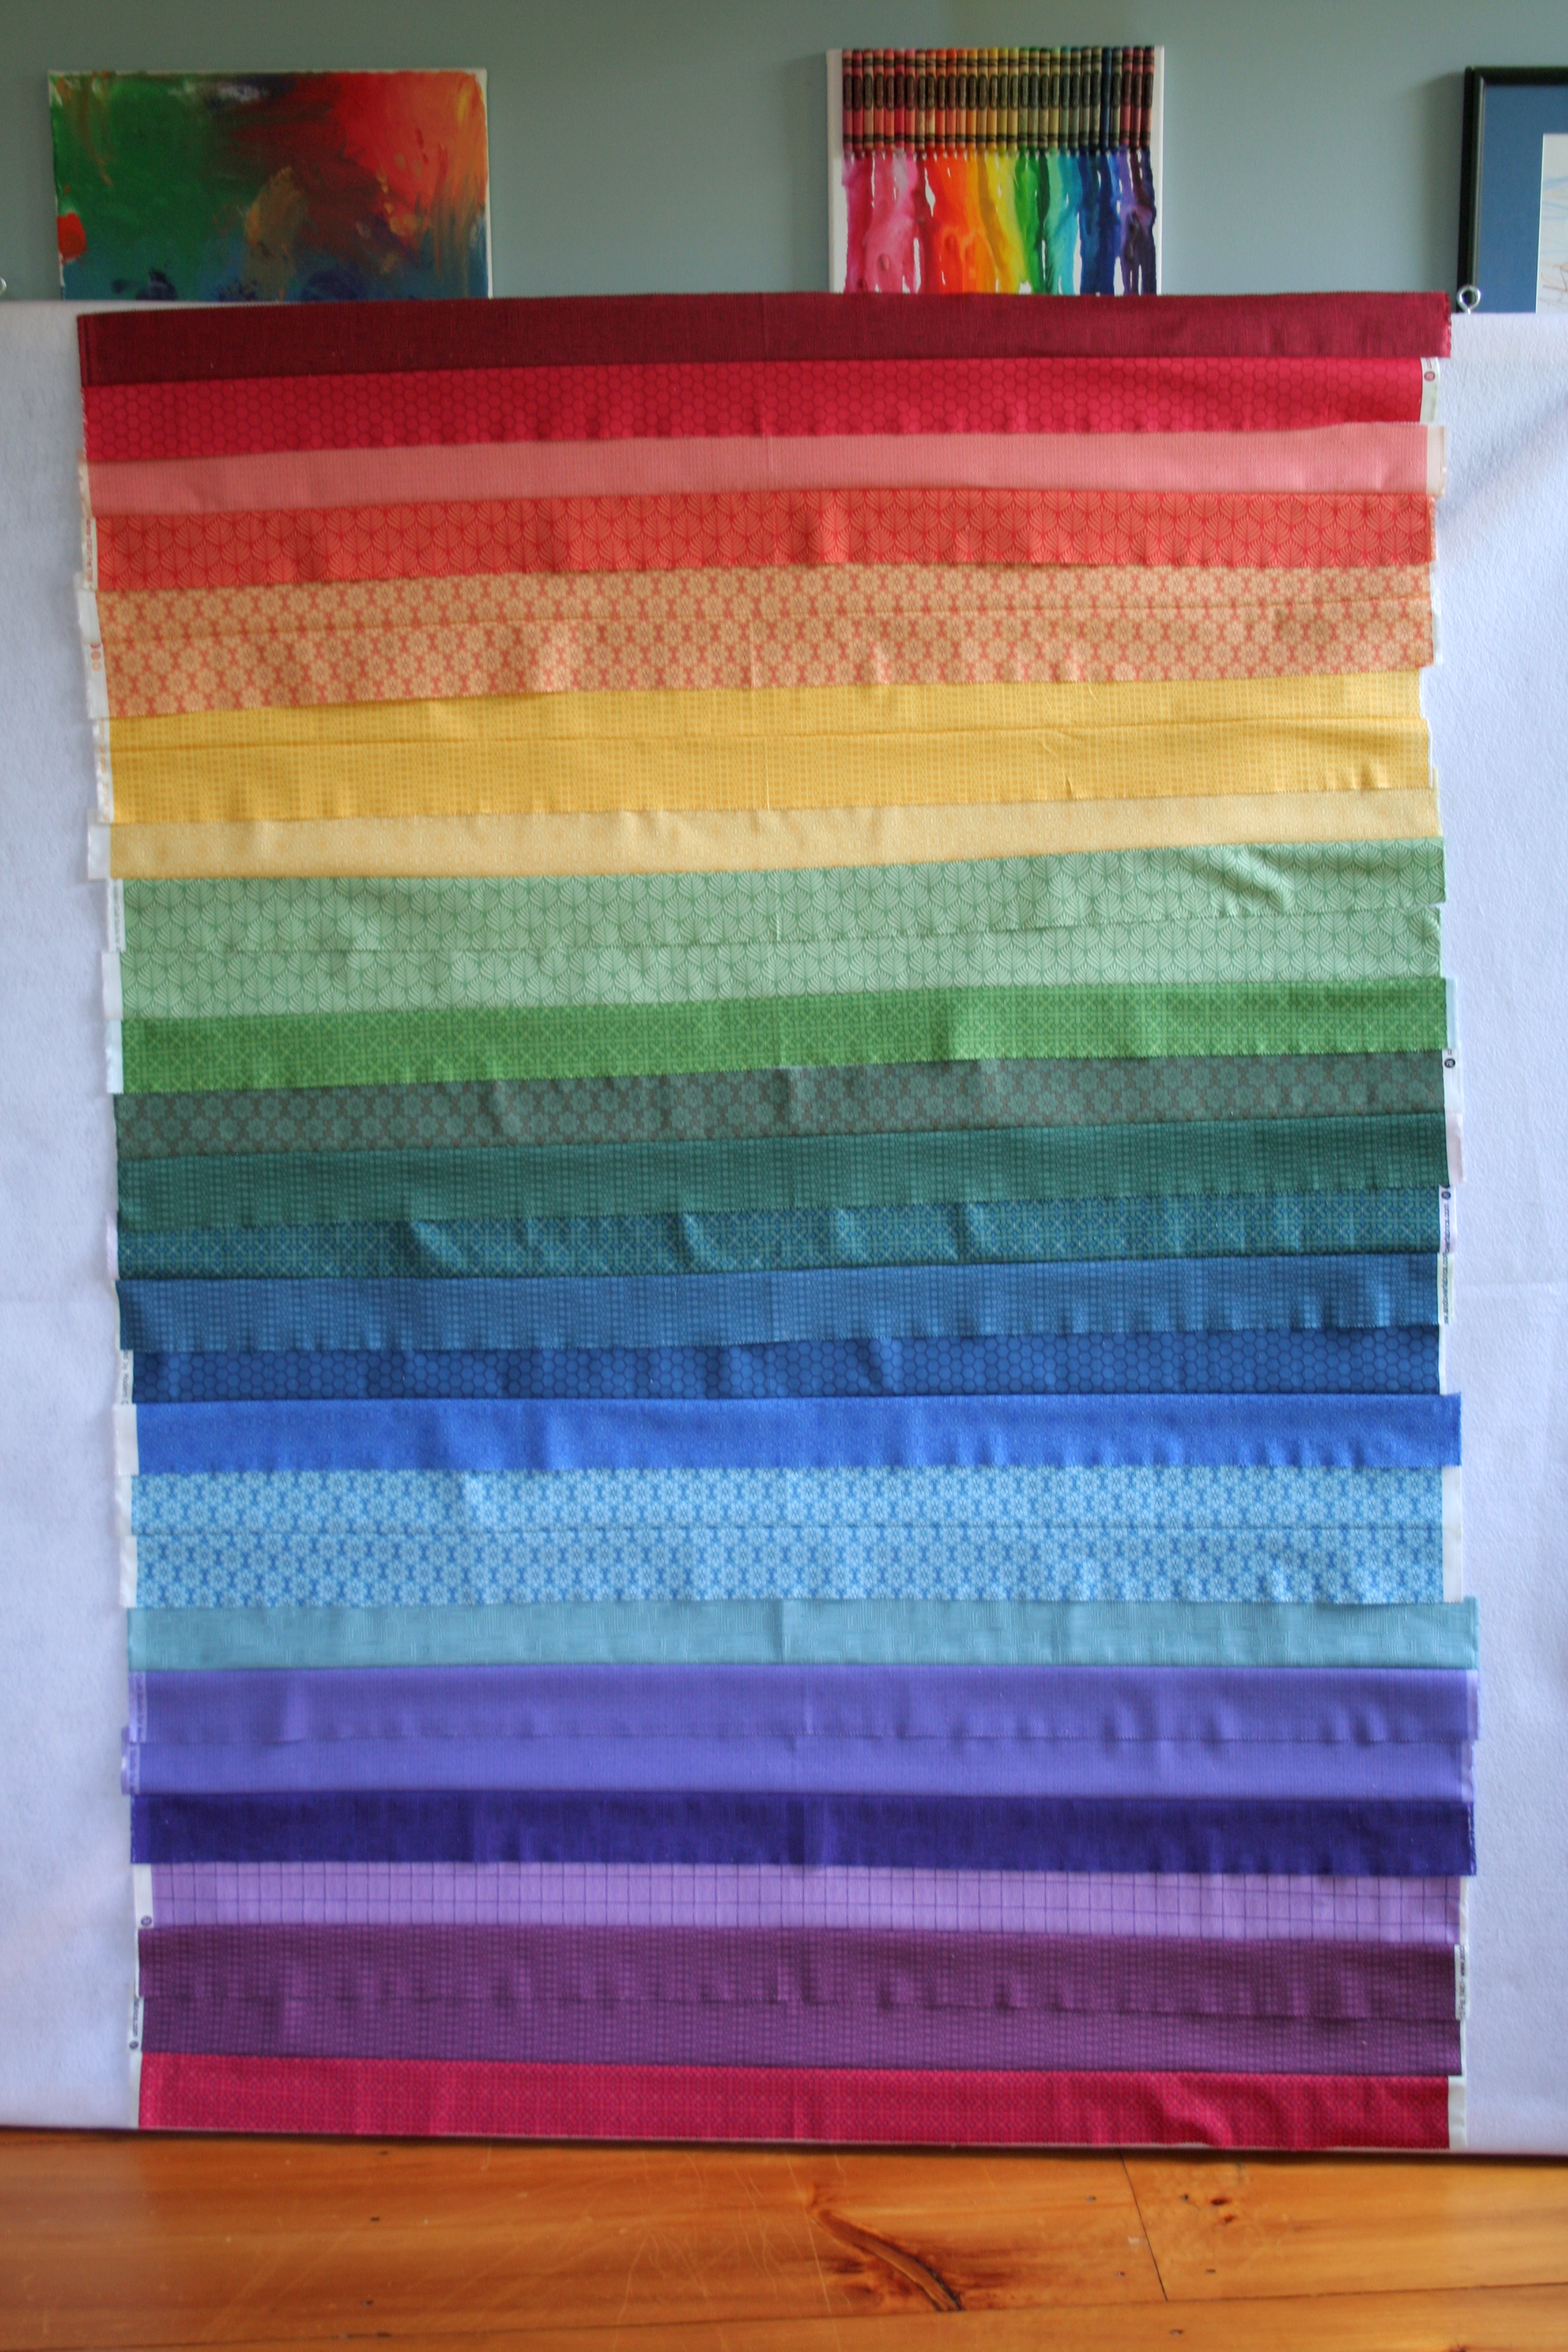 My design wall is one huge fail, so I had to lay out the strips while the “wall” was laying flat on the ground, and then slide it up to take photographs as quickly as possible before the pieces all fell to the ground. The bumps bug me, but such is life. Nothing’s perfect, especially not a partially pieced quilt top! A new design wall is creeping its way up my to-do list.
 I had never created a quilt using jellyrolls before, but only a couple of days after seeing this quilt, the deal of the day on Missouri Star Quilt Company’s site was the Andover Fabrics Color Collection Jellyroll. Sweet! Needless to say, I bought the jellyroll and added another work in progress to my list.
 Since I’m sneaking this in before midnight, I’ll link up to WIP Wednesday at Freshly Pieced.


 If you follow me on