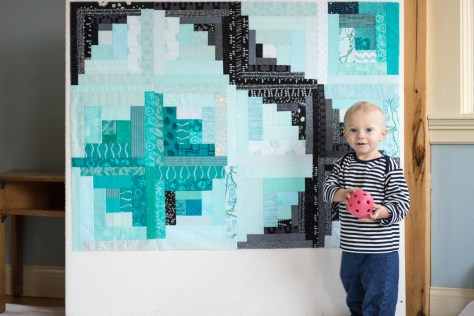
It’s about time! Six months after finishing the last block, I finally squared up and assembled Finn’s Milestone Quilt top! For those of you new to this project, I made a quilt to document my third child’s first year–one block per month for one year of his life. I finished the blocks at his first birthday, and until just this past week, they have sat quietly reflecting on what a year it had been. You can see all of the blocks taken with monthly photos of growing Finn HERE.
I finished this quilt top two days before Finn’s 18 month milestone, which was the mental deadline I gave myself, so I guess that’s what I get for giving myself such a far-off deadline! But life with kids is busy, this summer was a whirlwind of new endeavors and family adventures, and it, like so many other projects, got tucked away out of sight and out of mind. I’m glad to have it out, quilt top together, and ready for basting and quilting. I won’t count on a Christmas finish since I have two other projects I also want to finish and Finn truly won’t mind waiting a bit longer, but I can hope.
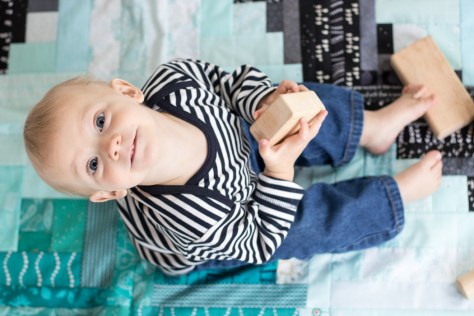
So, Finn! He is as wonderful and cheerful as ever, growing into such a bright soul of a little boy. In these photos he’s wearing a shirt gifted to him at birth by Nancy, one of my quilty friends met through conversations over blog posts–thank you, Nancy!
I really wanted to get some photos of Finn wrapped up in his quilt, but he wouldn’t have it. When I tried, he enthusiastically shook his head no and ran off. When I flopped the quilt to the ground, he at first picked it up and looked at me as if to say, “What are you doing, Mama? This doesn’t belong in a pile on the ground!” Even still, this post is full of photos. I know you wouldn’t want it any other way!
When I asked Finn to put his quilt on his head, he ran off to jump on the trampoline instead, impishly grinning at me the whole way. He loves to jump, loves to run around with his older siblings, playing chase or attempting hide and seek. He loves “shooing” the chickens and exploring the natural world. Finn is so independent, and will often focus on a project (shaking a toy around in a bowl, or putting something in and out of an empty bottle, for example) for quite a while. If you will play with him, Finn would throw and catch a ball for hours.
He’s so much fun to watch, constantly learning and exploring the world. Finn is starting to talk a bit more, but still primarily communicates with “Daaa” and pointing. His signing is just now starting to take off, which is fantastic since we’ve recently discovered that he has hearing loss, same as his older siblings (and same as me, his mommy, although mine started much later in life).
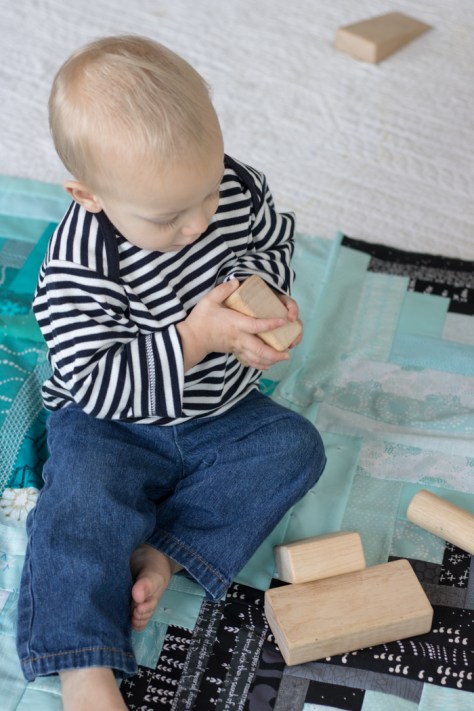
I was finally able to lure him back to his quilt with a block tower. Finn loves to stack blocks and then knock them over! I love to play the game of seeing how tall I can make a tower before he decides it’s smash time. Unlike his big brother who excels in demo, Finn likes to help build just as much as break down the towers.
Once I spread the quilt out on the floor, Finn was all about it. I was able to get some fun photos of him playing with blocks on his quilt with fun little upward grins when he discovered that I was standing on a chair photographing from above.Such a sweet boy!
Then of course, as soon as I was off the chair, he wanted to carry it around and climb up on it, too.
He loves flexing those muscles of his, and boy does he learn fast!
A little more about the quilt. I ended up switching around some blocks to get a better aesthetic balance. Since the quilt design developed as I went, I didn’t necessarily make the blocks in any order, so this rearrangement was pretty easy to accept. Sure, the final layout is different than the ones that appear in the progress posts, but that’s okay with me.
After I sewed all of the milestone quilt blocks together, I did a “victory lap” of stitches around the entire perimeter of the quilt, about 1/8″ from the edge. I saw Christa Watson of Christa Quilts encourage people to do this after finishing a quilt top, and figured it’s a great idea for holding everything together, especially when a photo shoot with a toddler is imminent.
Although Finn didn’t drag the quilt around as much as I thought he might, the victory lap was definitely worth the extra time it took to stitch!
Now all I need to do is get this layered, basted, quilted, and bound. No biggie, right? I think I’m going to use an all over boxy meander free motion quilting motif with my favorite neutral, Aurifil 2600-Dove in an attempt to keep it simple. I’m looking forward to getting this quilt into the circulation of family use, but am also savoring the journey.
Thank you for following along, and hopefully your final update on this quilt will be before Finn turns 2!
A while back, Kerry from Kid Giddy asked if I wanted to sew along with her Ugly Christmas Sweater Sew Along, and of course I said yes. I have been wanting to make her “Ugly Sweater” block since it came out last year, so this was the perfect excuse to get it (and a deadline) on my to-do list. Plus, quick little finishes are really nice this time of year. I don’t think my sweater is very ugly, but that’s ok!
The block finishes at 6″ square, so my initial thought was to shrink it down to a 3″ square and make an ornament. I love making functional items, and you know how I love to sew teeny tiny ridiculously small things! But then when I sorted through my stash and decided upon the Tula Pink Prince Charming print as the sweater body, I decided the scale would look better with the 6″ size. Now we are going to have a festive mug rug/coaster, which I plan to have out for all of sweater season, which is nice and long here in Maine!
I love the subtle Cotton + Steel Mustang twinkle trim on the sweater, and the Kona Wasabi arms round it out nicely.
Hindsight, I should have made the shoulder bits with the greeny-yellow part of the Tula print instead of the blue, since they kind of disappear into the background, but c’est la vie. My husband says he likes it this way, so all is well.
I plan to do some simple diagonal crosshatch quilting with the walking foot on my Bernina 560, but haven’t yet decided whether to use Aurifil 50wt Medium Delft Blue-2783 or Lemon-2115. I’m leaning toward the lemony yellow, I think. Which would you use?
I’ll be sure to share this block in action once I quilt it up and plop some delicious treats or a warm mug of something sweet on top! I borrowed some of the tiny glittery ornaments from the tiny tree my son cut for our kitchen island for my block photo shoot and now there’s glitter EVERYwhere! I hope your holiday season has been glittery and bright so far, too!
I recently made my first fabric purchase in a loooong time, in the hopes that it will jump start progress on sewing some gifts for family and friends. There are two big projects I’m hoping to finish soon (I’ll be real–most definitely not by Christmas)–a table runner for our home, with my favorite designer’s fabric on one side (Alison Glass) and my husband’s favorite designer’s fabric on the other side (Libs Elliott). The Alison Glass side of the table runner is about half finished and uses her new Seventy Six and Insignia fabric lines, and I’ll share more about that soon.
I ordered quarter yards of much of Libs’ True Love fabric line, with half yards of my favorites, since my husband has also requested Libs Elliott pillows. It’s honestly pretty fun that my computer programmer husband has a favorite fabric designer, and it seems fitting that Libs is his favorite since Libs’ tag line is “Making digital code into physical quilts”. Perfect match.
I had my usual helper, who was quite eager to jump on the fabric. That’s true love for ya! Such a helper!
I also ordered an ocean gradient of Kona cotton solids by Robert Kaufman Fabrics for a baby quilt I plan to make for my dear friend’s new(ish) baby boy (here’s the quilt I made for their daughter, years ago). They requested an underwater ocean themed quilt, so the Kona solids will be the perfect base. I ordered these fabrics from Fabric Depot since their extensive stock of Kona colors and ability to order 1/4 yards made it an easy choice. Neither of my local quilt shops stocked what I needed, but of course I checked them first.
I plan to use the Range Quilt by Nicole at Modern Handcraft as the base, and then applique some free-drawn sea creatures on top in bright orange. Nicole includes the specific Kona colors for a number of different color gradient options for Range, which is so super helpful! I used her palette as a base, and switched up a few of the lighter colors to keep the blue throughout, ending up with (from dark to light): Kona Storm, Prussian, Royal, Malibu, Water, Niagara, Bahama Blue, and Baby Blue, with the orange pop of Persimmon. I very well may add a darker orange for more detail once I get to the applique part, but first up is piecing the top!
Here’s a peek at my helper, since he’s just so adorable. I promise I am going to work on piecing his quilt top soon, too!
I’m linking up with Molli’s Sunday Stash (shhh I know it’s Monday), and hope to jump on his train a bit more in the coming weeks. I don’t have a whole lot of stash additions, but I do have a few fun tools and fabric bits that have been partying in my stash and have yet to be shared here.
It’s official. I completely understand the draw and very well may be hooked to meticulously cut scrap quilts! I have been having so much fun putting together my Scrappy Picnic Plaid quilt for the Quilter’s Planner 2016 Sew Along on Instagram. The pattern is by Lee Heinrich of Freshly Pieced, and is one of the fabulous quilt patterns included in the 2016 Quilter’s Planner. It’s technically my first scrappy quilt, and to add to the fun, I decided to make it an Eye Spy quilt for my 4-year old son Max.
It is such a great feeling to be creating for one of my children again (Finn’s quilt blocks are still sitting in a stack, untouched since that 12 month milestone–yes, that’s next on my list!). Every time Max sees the progress, he says, “This is fantastic!” with the enthusiasm only a four-year-old can exhibit. There’s nothing like an exuberant cheering squad to keep the motivation burning brightly.
We are in the second week of sewing for the sew along, so hopefully I will have the quilt top completely sewn together by Monday. Time will tell if I actually meet that goal with all of the kids home and lots of family Thanksgiving time on the docket, but I’m hoping to at least be close!
Yes, I accidentally created one extra block, but the funny thing is, I was thinking about one particular quilty friend the entire time I was making that block, so I’m taking it as a sign that the extra blue block has different plans. More on that later *wink*
I’ve completely finished all of the rainbow center portions, and am diving into piecing the white-grey-black border portions of each block. I love how the rainbow gradient ended up, and it is so much fun to see little peeks at previous quilts through the scraps used here.
I put a few contingencies in place to ensure that I love this quilt even though scrappy quilts are not typically my style, and I think they are proving to be quite successful. First, I used a very large ratio of Alison Glass fabric in the rainbow portions of each block. I love just about all of Alison’s fabric, so letting her color palette and fabrics play a strong hand is a surefire way to ensure I will enjoy looking at the quilt when it’s finished.
The next two will be a lot easier to see once the neutral outer portions of the blocks are complete, but I’ll mention them anyway. Second, I am using all one solid (Kona medium grey) for all of the “light grey” pieces in the pattern, instead of an assortment of scraps. This will provide a consistent and solid resting place for my eyes, just in case I get overwhelmed (although at this point, I have a feeling I’m going to LOVE looking at this quilt, so it might not have been needed). Third, I am using all of the same silver stars on black fabric for the centers of the lighter rings in the pattern, and light Lizzy House Twinkle Twinkle from her Whisper palette (Andover Fabrics) for the centers of the dark rings. Again, a little detail that will be consistent throughout, amidst the scrappy remainder of the quilt.
I love seeing my favorite designers’ fabrics together, too. The top right block in the photo above combines my favorite Carolyn Friedlander fabric from her first line Architextures (Robert Kaufman Fabrics) and the fabulous Alison Glass Grove in Grass from her Sun Prints (Andover Fabrics). They are the perfect compliments to that sweet little mushroom in the middle! Love.
If you want to spend the next week sewing to catch up, you still can join in the sew along (there are some fabulous prizes still to be won, too!); get all the details here. Also, now is a perfect time to order the 2017 Quilter’s Planner–for yourself so that you can join in on the *Spoiler Alert!* 2017 Sew Along during an inspired and productive year, and as gifts for all of your creative friends and family!
Okay, back to sewing and baking!
Many wishes for a peaceful, healthy, happy Thanksgiving spent with family and friends. I’m grateful for you and your continued support and inspiration in this wonderful quilting community.
I’m linking up with Let’s Bee Social since I haven’t linked up on here in far tooooo long!
I’ve finally decided that the day isn’t going to arrive when I have a window of “free” time where I’m just sitting around wondering what I could do. The past few months have been really busy and exciting with a lot of new opportunities and projects, and while a lot of big projects are finally wrapped up–the photography for the Quilter’s Planner is complete and the amazing planner is now available for sale, Quilt Theory has been announced and our premier line of pattern cards have been released, I just finished and mailed a quilt sample for a pattern that will appear in the February 2017 issue of Love, Patchwork & Quilting magazine, I’m manning the Quilter’s Planner Instagram feed and leading its (and my) very first Sew Along–there seems to always be one more thing. I’ve finally decided that I’m going to make time to work on little side projects, AND I’m going to make time to blog regularly again so that I can share my projects, process, and inspiration with you. You can hold me accountable for taking time to sew for me, okay?
To kick off this new resolution of making time for my own sewing on top of my more business-directed projects, I made three more blocks as part of the #100days100blocks challenge hosted by Angie from Gnome Angel. I think I left off around block 22 and the challenge is now heading into the 80s, but as I do with most projects, I set my goal low and I’m happy with just picking up again and making whatever blocks I can. As you may or may not remember, I am making my blocks entirely out of old and worn or thrifted garments, including a black leather skirt, some wool slacks, some cotton-poly blend men’s shirts, and an old pair of corduroy maternity pants. It has been *really* fun sewing with different materials, and with a mostly grey-scale color palette, I’m really focusing on textures within the blocks.
The environmental impact of our actions and the philosophy promoted through Sherri Lynn Wood’s #makedoquilt project are a large part of what spurred me to use only thrifted materials in these blocks, and so I’m presenting each block on Instagram photographed with some plant or natural phenomenon. In each description, I am sharing some information about the species or some interesting fact about its relationship with the rest of the environment. My hope is that by learning more about the world around you, you will feel more invested in preserving and improving it, or at the very least, minimizing damage done to it. This is truly a fun project that combines three of my passions: quilting, the environment, and photography. Since it has been far too long since I’ve shared my creative process with you, I thought I’d share my three latest blocks and descriptions here, too. All blocks are from Tula Pink’s City Sampler, 100 Modern Quilt Blocks book, and so I’m calling my quilt the Thrifted City Sampler (#thriftedcitysampler).
Block 73: old wool trousers, thrifted cotton-poly men’s shirt
Remember the milkweed from Block 15? Well here it is in all its seed dispersing glory! After a fun chat with Sharon from Sharon Holland Designs the other day about the amazing seed dispersal technique of jewelweed, I decided to make these next posts all about seed dispersal. As with any organism, the continuation of the species is an extremely important aspect–almost THE main purpose–of life. Since plants can’t move, they’ve developed some really clever ways to ensure their potential offspring (aka seeds) get spread far and wide and/or have a good chance of success.
Milkweed seeds are attached to a thick, light weight fluff tuft that, once matured, emerges from the dried, cracked open seed pod and is carried by the wind. Wind dispersal!! This helps spread the species into new areas, giving the species as a whole a greater chance to survive and thrive. Can you name another common plant that uses wind seed dispersal??
Block 72: thrifted black leather skirt, pink cotton women’s capris, my husband’s worn-through 100% cotton slacks.
We are fully in the most drab time of year in Maine. The gorgeous leaves are mostly brown and dropped, the flowers are in their winter form or gone, everything is finding dormancy. But plant identification is still not only possible, but fun! I hope you enjoy finding the beauty in winter weeds with me.
These asters have a small tuft that allows for wind dispersal, but they also use power in numbers to their advantage. A super hardy weed, asters produce many flowers, approximately 300 individual flowers per flower head, with many seeds resulting. The sheer number of seeds helps promote the success of their species. Paired with the wind, it’s no wonder there are asters everywhere!
Block 77: thrifted cotton-poly men’s shirt, old cotton slacks, worn men’s shirt, black leather skirt.
Another fun installment in the “amazing seed dispersal” adventure is burdock. Burdock (Arctium) is equipped with hooks and spines that latch onto any creature passing by too closely (just like Velcro). The creature continues walking until the spikey, itchy seed pod irritates him enough, spurring him to remove it and toss it aside, hopefully (for the burdock) on fertile ground. This allows the seeds to spread far, far further than a stationary plant could reach. While this is a super cool seed dispersal trait, anyone who has “fixed” her children’s coat, hair, and wool mittens after the child has discovered a burdock plant fully understands the annoyance the poor deer, bear, foxes, coyotes, and other creatures must feel toward this and similar plants! (Note that I was VERY careful not to let my block touch the seeds when taking this photo. Those barbs are sharp and definitely would result in pulls in the fabric.)
I hope you’ve enjoyed seeing these blocks and their accompanying environmental tidbits. I’m looking forward to updating you on the other small side projects I’ve been working on between deadline projects, AND hope to even finish some of the many (oh, embarrassingly many) works in progress that are stuck in the “soooo close to finished but temporarily abandoned pile”. I have so much fun to share with you! Hope you’ve been well, and I’m looking forward to being more present in this space again.
I did it again. I said yes. I couldn’t help it; it was for a friend! Over the past few weeks, I’ve been helping my good friend Stephanie (the mastermind behind the Quilter’s Planner and the one and only Late Night Quilter) with the Instagram feed for the Quilter’s Planner. She’s up to her eyeballs in getting the amazing 2017 Quilter’s Planner printed, proofed, boxed, and shipped to your doorsteps, and so I offered to help her spread the word via my favorite social media application–Instagram. Extra points to you if you’ve recognized my style over at @thequiltersplanner Instagram feed!
Isn’t it gorgeous? The 2017 planner incorporates so many new features, like laminated cover and tabs, even more patterns, and beautiful quilt photography by yours truly. Order yours now!
Not only that, but today we are kicking off the inaugural Quilter’s Planner Sew-Along over on Instagram, with the Scrappy Picnic Plaid quilt pattern by Lee Heinrich of Freshly Pieced, one of the fabulous patterns included in the 2016 Planner. Apologies to those of you who are not on Instagram, since this Sew-Along is happening only on IG (you can still watch the progress by checking the #QP2016SewAlong hashtag and feel free to sew along, but you cannot enter to win the prizes along the way without a public Instagram account. Hopefully next time!)
Here’s the information and schedule!
Quilter’s Planner 2016 Sew-Along!
We are so excited to announce the kick-off of the very first Quilter’s Planner Instagram Sew-Along, taking place over on the Quilter’s Planner Instagram feed! While we all eagerly await the arrival of our 2017 Planners, let’s sew up a pattern from the 2016 Quilter’s Planner! Sew along with us as we make the Scrappy Picnic Plaid quilt by Lee Heinrich of Freshly Pieced, one of the fabulous patterns included right in your 2016 Quilter’s Planner. Don’t have the 2016 planner? Don’t worry—you can purchase the pattern right from Lee’s shop HERE and still sew along with us.
There will be great prizes along the way, generously sponsored by Handiquilter, Aurifil Thread, Threadcutterz, The Quilter’s Planner, and Stephanie herself at Late Night Quilter! There will be a BIG grand prize at the end (pst… new sewing machine plus more!), eligible for all of you who share a photo of your completely finished Scrappy Picnic Plaid quilt! To join in this Sew-Along you do need a public Instagram account.
This pattern is super versatile and perfect for using up scraps! Make as a holiday gift, a scrap buster, or just a fun project with your quilting friends. The Sew-Along will run now through the middle of December, giving a little extra time for the piecing and quilting steps to allow for family time around the holidays.
SEW-ALONG SCHEDULE
*Note: For every photo you post on your Instagram account tagging @thequiltersplanner and #QP2016SewAlong, you will be entered into the running for the giveaways along the way!
October 24th – Quilter’s Planner 2016 Sew-Along Kick-off! (Spread the word with #QP2016SewAlong!)
WEEK 1: October 24-30th
Get the pattern! You have one week to get your hands on the Scrappy Picnic Plaid pattern so that you can sew along with us! Find it right in the Patterns section of your 2016 Quilter’s Planner, or buy the pattern HERE if you do not have a 2016 Planner (be sure to order your 2017 Planner now so you don’t miss out on next year’s fun!) Share the graphic on Instagram to show the world you’re in on the Sew-Along, using hashtag #QP2016SewAlong !! (Note that the more photos you share and tag on Instagram, the more entries you have to win prizes along the way!)
WEEK 2: October 31-Nov 6
Choose your fabrics. Dig through your scraps, visit your local quilt shop, or swap with a friend. No matter your methods, gather your fabrics and show us what you’ll be sewing with! Scrappy or solids? Holiday prints or rainbow fun? Post a photo of your fabric choices on Instagram tagging #QP2016SewAlong !
November 7th – GIVEAWAY #1
WEEK 3: Nov. 7-13
Cutting. Post photos on Instagram showing your cutting progress, tagged with #QP2016SewAlong.
November 14th – GIVEAWAY #2
WEEK 4 & 5: Nov 14-27
Sewing together the blocks and quilt top. You’ll have 2 weeks to sew your blocks and piece your quilt top! We will be sharing progress and encouragement on @thequiltersplanner Instagram feed, and look forward to sewing along with you! Again, post photos on Instagram showing your piecing progress, tagged with #QP2016SewAlong to enter the giveaways.
November 28th – GIVEAWAY #3
WEEK 6 & 7: Nov 28-Dec 11
Quilting and finishing. You’ll have 2 weeks to quilt and finish your Scrappy Picnic Plaid quilt, and we will be cheering you on!
December 12 – GIVEAWAY #4
WEEK 8: December 12-16
Final Link Up. You will have one extra week to finish up any final touches needed to complete your quilt and get the perfect photo of your completely finished and quilted Scrappy Picnic Plaid quilt on Instagram, tagging #QP2016SewAlongFINISH to be entered to win the Grand Prize!
December 17th – GRAND PRIZE
Winner chosen from finished projects tagged #QP2016SewAlongFINISH!
For now, go ahead and grab your 2016 Quilter’s Planner and flip to the pattern (or buy the pattern HERE), reserve a Project Planner Page in your Quilter’s Planner for the Scrappy Picnic Plaid Sew-Along, and repost our graphic on Instagram announcing that you’ll be joining the fun! Please be sure to tag @thequiltersplanner and #QP2016SewAlong in every photo so that you can be entered into the running for the great giveaways along the way!
We are excited to sew along with you!
QUESTIONS?
Have any questions about the sew-along? Email [email protected] and I’ll do my best to answer them promptly! Please keep in mind that we are full time mamas (with too many kids to count), so patience and kindness are appreciated! We are SO looking forward to sewing along and sharing inspiration with you!
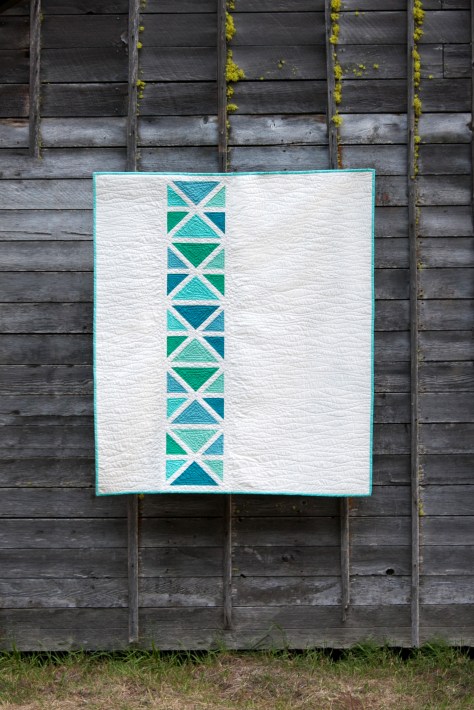
It’s finally time to share one of the big “secret sewing” projects I’ve been working on behind the scenes for the past few months! Those of you who are also on social media have most likely seen the announcement that I have teamed up with six (6) other pattern designers to launch a new company called Quilt Theory. Today is my day to introduce you to my pattern called Ocean Path, its inspiration and creation, and tell you a bit more about Quilt Theory. You also will have a chance to win a copy of my pattern, Quilt Theory coloring pages, and all of my Art Gallery Pure Elements scraps (enough to get you amply started on your very own Ocean Path Quilt) and Aurifil thread.
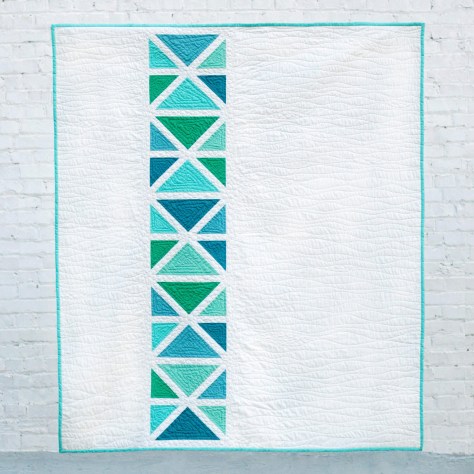
Ocean Path
First, I’d like to introduce you to Ocean Path, my contribution to the debut Quilt Theory pattern line. Our underlying theme for this first collection of patterns was “Where can your quilt take you?” since the designers that comprise Quilt Theory live all across the country.
Living in midcoast Maine, an ocean path felt like the perfect inspiration for my quilt. I wanted to embrace the simple beauty of nature while providing a pattern that could be adapted to fit any color scheme, style, or decor.
I should note here that the stunning photos included in this post were taken by Michelle Bartholomew all the way across the country in Washington state. Michelle is the mastermind behind Quilt Theory, a talented quilter and photographer, and I’m so grateful to be working with her!
Oh, how it glows!
There’s something about the simple beauty of the ocean–the clean lines, soothingly subtle color play, and oh so much space to breathe that makes my heart happy–-and I aimed to captured it all in this simple yet striking pattern. I would like to think that you can take a stroll along the coast through the making of the Ocean Path quilt.
Using simple construction from easily cut triangles and sashing, this quilt comes together in a breeze. Generous negative space provides room for intricate free motion quilting, or you could finish it with simple modern straight line quilting.
Many thanks to Art Gallery Fabrics for providing the beautifully soft Pure Elements fabric for this quilt. I used Tile Blue PE-418, Emerald PE-417, Ocean Waves PE-442, Warm Wave PE-464, and Mirage Blue PE-424 for the feature triangles. The background and sashing are Snow PE-433. The backing is Seawater NE-123 from Skopelos by Katarina Roccella, which is the absolute perfect fabric to back this design!
I quilted Ocean Path with echoing, organic triangles within each colored portion using 50wt Aurifil variegated 4654-Seamist. I quilted the bulk of the background with organic horizontal wavy lines with 50wt 2021-Natural White using the walking foot on my Bernina 560, and went a little wild and free motion quilted pebbles into all of the sashings between the triangles and drifting out into the wavy lines. It was one of those times that once I had the vision in my head, there was no turning back. I’m excited to report that it turned out pretty much the way I hoped! I did all of my piecing with 50wt Aurifil 2021-Natural White and 2600-Dove. Many thanks to Aurifil for providing the thread!
I think Ocean Path would look equally striking in many other color combinations–from fiery reds and oranges on a dark background, to the soothing calm of cool colors on a light background. I can’t wait to see your version!
All of the Quilt Theory patterns are simple enough to be printed on 4″x6″ cards or a single page downloadable pdf. At only $3 each, they are perfect for gift giving or collecting, too!
About Quilt Theory
Let me tell you a bit more about the designers behind Quilt Theory.
2016 collection of Quilt Theory patterns.
In February 2016, a group of quilters connected to cultivate relationships with others running businesses in the quilting industry. A tight-knit group was quickly woven together as we shared successes, answered questions, and supported one another. What started as a way to collect real-time insight and expertise quickly evolved into an opportunity to collaborate.
Our goal at Quilt Theory is to create simple and modern quilt patterns, and we challenged ourselves to design a line of patterns printed on small cards. As a group, we have become a strong team as we worked through pattern writing, testing, editing, and quilting.
Quilt Theory designers have been featured in 20+ major quilting publications and international quilt exhibits. Combined, we have 47 years of quilting experience, and we are excited to share our debut collection for Fall 2016.
How to buy or stock Quilt Theory patterns
You can buy either individual or a pattern collector’s package of PDF patterns through our Quilt Theory website right now!
Pattern cards will be coming soon to a local quilt shop near you! If you are a quilt shop and want to carry our patterns, set up a wholesale account here, or order through Checker Distributors.
Want to buy the cards, but don’t own a quilt shop? Let your local quilt shop know you want them to carry Quilt Theory patterns (click for a handy note to send to your favorite local quilt shop!)
Now, for the Giveaway!
To celebrate the launch of Quilt Theory, I am giving away a copy of my pattern, Ocean Path (printed or PDF, your choice!) along with a PDF of all of the Quilt Theory Coloring Pages. I’m also including all of the fabric leftover from the making of my quilt, which contains enough fabric to get you amply started on your Ocean Path quilt, plus the rest of my large spool of color coordinating 50wt variegated Aurifil thread in 4654-Seamist.
To enter the giveaway today, tell me what color way you would use to create Ocean Path. Leave a comment and make sure I’m able to get ahold of you if you win. For an additional entry, leave another comment telling me how you follow Night Quilter (email list, instagram, facebook, twitter, blog follower, etc.) Follow Quilt Theory (facebook, twitter, Instagram, etc.) and tell me how in a third comment for a third entry.
This giveaway is open to US and international participants. The giveaway will be open until Sunday, October 16th, at midnight eastern time when I’ll select the winner randomly with random.org. Giveaway is open to participants 18 years or older. *If you buy my pattern and then you win it, I’ll refund you or let you pick out another free Quilt Theory pattern! This giveaway is now closed! A winner will be announced shortly!
Be sure to visit the rest of the Quilt Theory designers this week during our blog hop.
Ahh, remember the Farmer’s Wife Sew Along!? Today is my day to share the Block 95 Sylvia tutorial for the 1930 Farmer’s Wife Sew Along, hosted by Angie at Gnome Angel and sponsored by Fat Quarter Shop and Marti Michell. Sure, I’m wildly behind on this sew along, but that’s totally ok! With my final deadlines being met within the next couple of weeks, I will have time to catch up a bit, chipping away at the missing blocks here and there. It’s all good! That’s part of what I love about Angie’s Sew Along–there’s no pressure. I’m making this quilt for me and I can take as long as I want to finish it!
Each of these Farmer’s Wife blocks manage to pack quite a punch in the little 6 1/2″ space. My method of attack when deciding how to piece each block has been consistent: how can I piece this with as little muss and fuss as possible? With Sylvia, at first I was thinking chain piecing would be the way to go, since it would help minimize the teeny tiny pieces in the inner borders I’d need to cut and sew. Looking at it more closely, I decided that with this block, even chain piecing would require piecing TINY bits, cutting, and then piecing again. Plus, sixteenths of an inch!? No thank you! Finally, I decided that foundation paper piecing was the way to go, since:
there aren’t any tricky joins,
the pieces are teeny enough that the foundation paper will be helpful in reducing wonkiness,
the block breaks into pretty manageable pieces, AND
all of the border pieces can be cut using a rotary cutter and ruler to decrease the paper removal at the end.
Those who know me know that I LOVE foundation paper piecing (FPP), and it’s true–I do! The precision one can get using FPP is unrivaled, and once the technique is mastered, it makes sewing teeny tiny pieces MUCH more manageable. I am not going to take you step by step through how to foundation paper piece, since I have written two very clear tutorials already (why reinvent the wheel, right!?), but I will share some block-specific tips and tricks to help you piece Sylvia smoothly.
For those of you who do not know how to foundation paper piece, visit my Basic Foundation Paper Piecing tutorial here, as well as the Foundation Paper Piecing tutorial guest post I wrote for the Andover Fabrics blog here. Trust me, it is a technique worth practicing and mastering, since it opens a whole new world of sewing possibility!
Reflection on the Letter – In Spite of the Mortgage
Nearly every one of the letters in this book seems to talk to me in a very specific, seemingly personal way. After the first dozen times of reading a letter I shockingly thought was *meant for me*, I realized that all of the letters have a very widely applicable message and I was simply interpreting it in a way that worked for me at that moment. That said, I can completely relate to this letter!!
Sometimes it’s necessary to just head off on an adventure despite whatever chores, obligations, or need for frugality you have waiting for you at home. We did a lot of adventuring this summer, but like Mrs. A. M. from the letter, we were able to do it on a very tight budget, not paying for much more than gas money. Day trips to beaches, mountains, playgrounds, and forested hikes abounded, and I was always sure to pack a picnic lunch, extra snacks from home, and full changes of clothes for all three kids (and myself)… just in case. It was a much needed change from the stay home and do chores days we could have had!
Tutorial
Ready to get sewing? Make sure you have a grasp on how to foundation paper piece, and let’s make Sylvia!
Choosing Fabrics
As soon as I saw this block, I knew that I wanted to meticulously cut the center square. I’m arranging my blocks on point, so be mindful of your own plans before meticulously cutting your fabric! (I call “fussy cutting” meticulous cutting, and you can read why here). In looking for a fabric with a perfect color scheme and feature design, I stumbled across my precious Heather Ross Far Far Away unicorns (Windham Fabrics). I added some solid blue from an old project, and some Lizzy House Twinkle Twinkle from her Whisper Palette (Andover Fabrics). While the colors are a bit more muted than my other blocks, I think they will all work together. Plus, this fabric combination was a match made in heaven… once it was together, there was no separating it!
Here are some general tips for foundation paper piecing:
Shorten your stitch length to 1.2 (if you are an absolute newbie at FPP, try 1.5 until you get the hang of it);
Hand crank your needle down at the beginning of each line to make sure you start off exactly where you want to;
Backstitch at the beginning and end of each line to secure your stitches (they will be much sturdier during paper removal this way); and,
Foundation paper piecing results in many trimmed thread ends. What better time to make yourself a thread catcher? Here’s a free tutorial on how to make the one I use.
To help you while you stitch up Sylvia, here are some block-specific tips for you with photos from my process.
Tip #1: How to make a fussy cutting template for FPP
Fussy cutting while foundation paper piecing can seem daunting, but with one extra step, it can be super easy! Simply create a fussy cutting planning template for the piece(s) you want to focus on. I go through making such template in detail in my FPP post for Andover here, but here are the basics: Print an extra sheet of paper containing the FPP template with the piece you want to fussy cut (printing on card stock will make the planning template sturdier).
Mark the specific piece you want to meticulously cut. I went a little overboard on marking mine for the sake of clarity here. I circled the number but also traced just outside the line of the particular piece, both with bright pink sharpie. Simply circling the number would probably suffice!
Cut out the center of the piece, creating a window that is exactly the size of the piece you want.
Draw a 3/8″ seam allowance around the window. I used a green micron pen for this example to ensure the line didn’t get confused with the printed lines on the paper.
Cut along the line you drew.
You should how have a planning template to help you cut your fabric for fussy cutting. Notice that I placed my planning template onto the fabric upside down. This is because in foundation paper piecing, we are sewing the block on the reverse side of the template. It did not matter too much for this particular piece, since it’s a square, but always be mindful of directionality of the fabric as well as wrong side-right side. If need be, mark your planning template with “right side up” or “wrong side up” so that your fabric is cut properly!
Tip # 2: Color code your foundation paper
Between sewing the fabric on the reverse side of the paper, having the block broken into sometimes odd sections before sewing, and the many pieces involved in most foundation paper piecing patterns, it is in your best interest to color code your paper template before beginning to sew. This way, you can be sure you sew each fabric in the proper place.
Tip #3: Be generous with your fabric pieces
Especially when first getting started with foundation paper piecing, one of the biggest tips I can offer is to be generous with your fabric pieces. It’s better to have to trim a bit more off than to be short and have to rip stitches! For my bright blue squares on Sylvia, I cut the fabric into 1 1/2″ squares, which as you can see includes ample overhang.
Tip #4: Use rotary cutter and ruler for rectangular shapes
This tip goes for bag-making as well: just because there is a template created for a perfectly rectangular piece, it doesn’t mean you can’t use your rotary cutter and ruler! The outer pieces of Sylvia can be easily cut using a rotary cutter and ruler, which will save time with paper removal at the end. Since these pieces are not easily measured (let’s avoid using sixteenths of an inch if we can help it!) simply cut out the foundation paper piece templates and use them as a guide when rotary cutting. Use the foundation paper piecing method to piece the center portion, then add the D, E, H, and I rectangles using traditional piecing methods. Easy peasy!
And there you have it. Sylvia, in all her glory.
Thank you so much for joining me today and I hope you found this tutorial helpful!
Hi! Remember me? I’m currently stuck down the deadline rabbit hole, but am very much looking forward to returning here. I am nearing the finish line for a couple more projects, and then I will have MUCH more time for slow, leisurely stitching and lots of sharing my projects and progress here.
The funny thing about the past few months, which have seemed filled to the brim with exciting, albiet deadlined projects, is that ALL of the projects were taken on in the span of one particularly ambitious-feeling week back in March or April. It was right when I was finishing the final touches on my first commissioned quilt, Kittens at Play, and I was feeling on top of the world, having knocked out a few big deadline projects. Within the span of a week, quite a few project opportunities presented themselves to me, and in my feeling of boundless ambition, I said yes. Then I said yes again. Then I said yes a couple more times. Do I regret it? Nah. There’s no sense in that, and the projects have been fun and exciting. But I certainly will learn from it, and by sharing my story here perhaps you can, too. The lesson? Know your limits.
Leanne from Devoted Quilter emailed me a few weeks back asking if I would be willing to participate in a blog post she was writing about staying organized. Last week, she posted her compilation post, filled with tips from some of her favorite quilters on how to stay organized with quilting.
*Spoiler alert* My tip for her was to know your limits. When every project is a priority with a quickly approaching deadline, it’s difficult to make a prioritized list and keep yourself organized. On normal weeks, the prioritized list I make in my Quilter’s Planner each week is my saving grace. You can head over to her blog to read more great tips for staying organized, and I look forward to joining you soon!
I couldn’t write a post without ANY photos, so here are a few quick photos I took along the walk to pick up my daughter from school today. Autumn is officially here in midcoast Maine!
The birch leaves are *just* beginning to turn.Queen Anne’s Lace is fully seeded and ready for winter.The maple trees are really putting on a fiery show!
How do you manage to stay within your limits even when presented with fun and exciting opportunities!? Clearly, I need some pointers!
My favorite colors! Flying geese! Curves! Precision delicately dancing with improv! Yessssss, this block has all of those things and I’m excited to share a detailed tutorial with you today. This new block was designed for the New Block Blog Hop sponsored by Cloud9 Fabrics and hosted by Yvonne at Quilting Jetgirl, Cheryl at Meadowmist Designs, and Stephanie at Late Night Quilter. Today is day three of the hop, which means that 46 new block tutorials have already been shared, and 23 more are being shared today. Amazing!
I’m calling my block Steady On, which just seemed fitting for such a classic made-by-me block. Those of you who know me know that I cannot keep anything simple, and this is a perfect case in point. This block has double improv curves, twenty (20) tiny flying geese, an hourglass block, and quite a few points that should match *just* so, all in the 12 1/2″ unfinished square block. But fear not, this tutorial has detailed photos and instructions on how to make each component of the block, and breaking it down into manageable chunks makes this block come together quite smoothly (Spoiler: we can make some of the flying geese 4 at a time!). There’s something about the determined light colored geese headed bravely into the dark and improvy unknown that urges me to encourage them… Steady on, now! That same encouragement goes for you, since I would LOVE to see you tackle this block and come out victorious (tag @nightquilter and #steadyonquilt when you do!). This is going to be fun, so let’s get started!
Gather your materials:
Fat quarter (FQ) of each of the five (5) fabrics generously provided by Cloud9: Amazon, Sky, Shadow, Lilac, and Iris. (There will be fabric left over–enough for a second block or more depending on how frugally you cut your scraps!).
Clover hera marker and/or other fabric marking tool
fabric scissors
washable school glue (I use Elmers)
Fine glue tip (optional but helpful)
rotary cutter & mat
quilting ruler with 1/4″ and 1/8″ markings (I use Omnigrid rulers)
sewing machine (I have a Bernina 560)
thread (I use Aurifil 50wt 2600-Dove for nearly all of my piecing)
Press your fabrics and use spray starch or Flatter by Soak to help stabilize them before cutting.
If you are really attune to detail, you may notice that the smallest squares and rectangles are a bit too small in this photo–you’re right, but I corrected the measurements for the tutorial! No worries. Steady on…
Then cut the following pieces from each fabric:
Iris:
– (8) 1 7/8″ squares (for geese 4 at a time)
– (4) 1 1/2″ squares (for single geese)
– (4) 5 1/2″ squares (for curved quadrants)
Lilac:
– (1) 3 1/4″ square (for geese 4 at a time)
– (6) 1 1/2″ x 2 1/2″ rectangles (for single geese)
– (1) 3 1/4″ square (for hourglass block)
Now, we will break down the block into manageable pieces, and make a component at a time. Let’s start with the curved quadrants!
Making Double-Curved Quadrants
For this step, you will need your 5 1/2″ squares of Iris, Amazon, and Sky, washable school glue and tip, a marking pen or pencil, scissors, and an iron and pressing surface. To make the double-curved quadrants for this block, follow my tutorial on easy curved piecing using a visual layering approach and glue basting HERE. Go ahead and read it now, I’ll wait for you. When you’ve read through it once and have a grasp on the general technique, grab three of your 5 1/2″ squares, one each of Iris, Amazon, and Sky. For this block, the Iris is the bottom layer, the Sky is the middle layer and the Shadow is the top layer.
Since this method begins from the bottom up, start with Iris and Amazon. Mark the Amazon square 2 1/4″ up along both sides from the bottom right corner. Make sure your mark extends 1/4″ in from the edges before beginning the curve. This will be your sew line, not your cut line, so by measuring the 2 1/4″ we are ensuring our seams will match up, even though the flying geese are exact and the curves can be improv. (Note here that if you are using fabric with a right and wrong side, you want to be marking the wrong side of the fabric. With the Cloud9 Cirrus Solids that’s not important).
Draw an improv curve from marked point to point, or trace a perfect curve using the edge of a small plate or glass. Make sure your curve begins and ends at your marked points 2 1/4″ up from the corner.
Using the drawn line as your sew line, follow the steps in my curved piecing tutorial here to sew your first curve. Beautiful, right!?
Next, grab your Shadow 5 1/2″ square and mark 3 1/4″ up both sides from the bottom right corner. Again, draw your curve as desired, connecting from marked point to marked point, and using that line as the sew line.
Make four quadrants, measuring 2 1/4″ up on the Amazon square and 3 1/4″ up on the Shadow square for two of them, and measuring 3 1/4″ up on the Amazon and 4 1/4″ up on the Shadow square for the other two. Admire your smooth curves, and set those blocks aside for later!
Making Flying Geese 4 at a Time
Next we will crank out as many flying geese as we can, using the technique of making 4 at a time found in the Reference Section of the Quilter’s Planner. I use my Quilter’s Planner daily, and it sure did save some time with this block! Here’s how:
Place two 1 7/8″ Iris squares in the top right and bottom left corners of a 3 1/4″ Sky square as shown. Using your fabric marking tool of choice, draw a diagonal line from the top right corner to the bottom left corner. I love my Hera marker since it doesn’t actually mark the fabric, but makes a clear guide line.
Sew 1/4″ from either side of the drawn line. Press with a hot iron to set the seam (notice that I didn’t do this step? tsk tsk).
Cut along the drawn line.
Press the small Iris triangles outward, with seams pressed toward the dark fabric. Then place another 1 7/8″ Iris square in the corner of each unit, and mark a diagonal line as shown above.
Again, carefully sew 1/4″ from either side of the drawn line. Cut along drawn line.
Press open, with seams toward darker fabric.
Trim to 1 1/2″ x 2 1/2″ and set aside.
Repeat instructions above using the remaining 1 7/8″ Iris squares and a 3 1/4″ Lilac square to make four Lilac geese with Iris corners.
Making Single Flying Geese
The remaining flying geese must be made one at a time since the corner colors are mixed up to flow into your improv curved quadrants.
Grab your 1 1/2″ squares and 1 1/2″ x 2 1/2″ rectangles and lay them out to help plan which corners should be positioned on each rectangle. Use the finished flying geese above to help plan before you start sewing.
To make a flying geese block (or would it be flying goose?), position a 1 1/2″ square right sides facing the right top corner of a 1 1/2″ x 2 1/2″ rectangle. Draw a diagonal line as shown above.
Sew along the line and then trim a 1/4″ seam allowance.
I like to get mine all paired and drawn so that I can chain piece each side.
Repeat with the other 1 1/2″ square on the top left side of the block. Press seams open or up toward the corner.
Time saving tip: I cut my 1/4″ seam allowances with scissors while pressing. As long as you are accurate with a pair of scissors, it takes much less time than rotary cutting, at least for me.
Square your flying geese to 1 1/2″ x 2 1/2″ rectangles, making sure that your goose point is a perfect 1/4″ (or slightly further) from the top edge. Set aside.
Making Center Hourglass Block
Finally, let’s make that center hourglass block. Grab your 3 1/4″ Lilac and Sky squares.
Place right sides together and mark a diagonal line. I like to pin my pieces together since we are working with such a small scale. If you’d prefer some wiggle room, you can begin with 3 1/2″ squares and trim to size when you’re finished!
Sew 1/4″ from either side of the drawn line. Cut along the drawn line.
Press toward darker fabric. You will have two half square triangles (HST).
Place HSTs right sides together, with the Lilac half of one facing the Sky half of the other, and nesting the seams.
Draw a diagonal line perpendicular to the existing seam line, again pinning to keep the pieces in place while you sew.
Sew 1/4″ on either side of the drawn line. Then, cut along drawn line.
Press seams open. You will have two hourglass blocks, but will only need one for this block. Save the other one for your next Steady On block!
Trim to 2 1/2″ square. Set aside.
Assembling the Block
Now that you’ve made all of the components, it’s time to sew the block together! Arrange all of your pieces as shown above, paying careful attention the positioning of the flying geese in relation to the large and small curves on your curved quadrants. There should be two Iris flying geese corners next to small curves and three Iris flying geese corners next to large curves.
Sew the top five and bottom five groupings of geese together, and sew the center horizontal strip of geese and center hourglass block together.
Perfect points tip:When sewing the flying geese together, keep the piece with the goose point on top. As you’re sewing, make sure your sewing machine needle sews exactly through the “x” that marks the point of the goose, or if anything, slightly to the right (above) the point. This way you won’t lose any points!
Next, sew the top left and top right curved quadrants to the top grouping of geese, pinning just after each seam that needs to match.
Press seams toward the less bulky side (toward the curved quadrants).
When aligned properly, the geese corners should flow into the curved piece perfectly–that’s why we so carefully marked our curve starting distances with our improv curves!
Finally, sew the top and bottom panels to the center horizontal strip, again pinning just after each important seam match. Press toward the less bulky sides (the curved quadrants), and viola! Steady on…
I am really excited about how this block turned out, and I’m eager to play around with different color placements and curve arrangements. I’d love to see if you sew up this block, too, so please tag me @nightquilter#steadyonquilt when you do!
Thank you for visiting and I hope you found this tutorial helpful! Check out all of the other new block tutorials shared today, all of which will be combined to make one big gorgeous charity quilt:


 I finished this quilt top two days before Finn’s 18 month milestone, which was the mental deadline I gave myself, so I guess that’s what I get for giving myself such a far-off deadline! But life with kids is busy, this summer was a whirlwind of new endeavors and family adventures, and it, like so many other projects, got tucked away out of sight and out of mind. I’m glad to have it out, quilt top together, and ready for basting and quilting. I won’t count on a Christmas finish since I have two other projects I also want to finish and Finn truly won’t mind waiting a bit longer, but I can hope.
 So, Finn! He is as wonderful and cheerful as ever, growing into such a bright soul of a little boy. In these photos he’s wearing a shirt gifted to him at birth by Nancy, one of my quilty friends met through conversations over blog posts–thank you, Nancy!
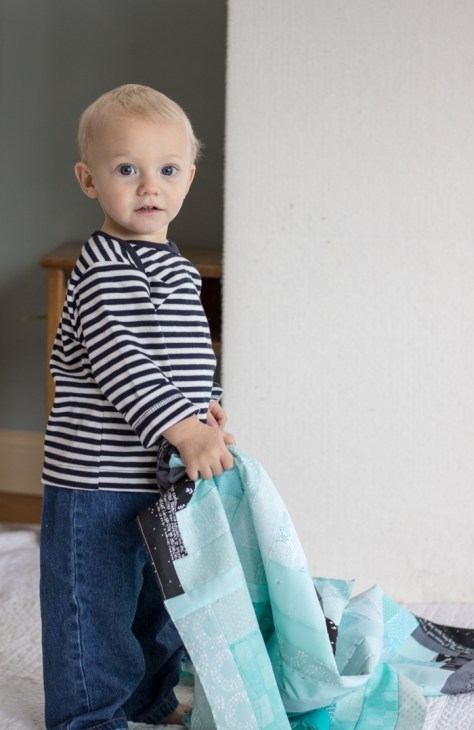 I really wanted to get some photos of Finn wrapped up in his quilt, but he wouldn’t have it. When I tried, he enthusiastically shook his head no and ran off. When I flopped the quilt to the ground, he at first picked it up and looked at me as if to say, “What are you doing, Mama? This doesn’t belong in a pile on the ground!” Even still, this post is full of photos. I know you wouldn’t want it any other way!
 When I asked Finn to put his quilt on his head, he ran off to jump on the trampoline instead, impishly grinning at me the whole way. He loves to jump, loves to run around with his older siblings, playing chase or attempting hide and seek. He loves “shooing” the chickens and exploring the natural world. Finn is so independent, and will often focus on a project (shaking a toy around in a bowl, or putting something in and out of an empty bottle, for example) for quite a while. If you will play with him, Finn would throw and catch a ball for hours.
 He’s so much fun to watch, constantly learning and exploring the world. Finn is starting to talk a bit more, but still primarily communicates with “Daaa” and pointing. His signing is just now starting to take off, which is fantastic since we’ve recently discovered that he has hearing loss, same as his older siblings (and same as me, his mommy, although mine started much later in life).
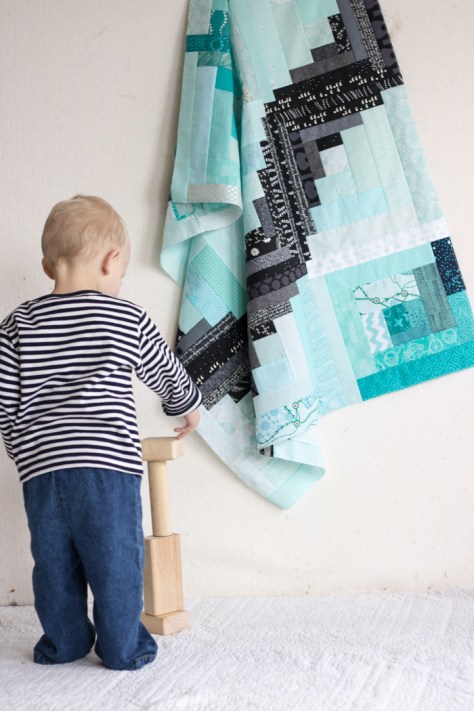 I was finally able to lure him back to his quilt with a block tower. Finn loves to stack blocks and then knock them over! I love to play the game of seeing how tall I can make a tower before he decides it’s smash time. Unlike his big brother who excels in demo, Finn likes to help build just as much as break down the towers.
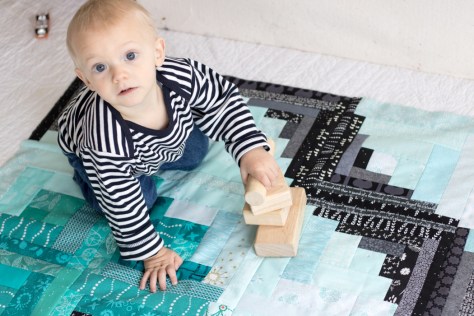
 Once I spread the quilt out on the floor, Finn was all about it. I was able to get some fun photos of him playing with blocks on his quilt with fun little upward grins when he discovered that I was standing on a chair photographing from above.
 Such a sweet boy!
 Then of course, as soon as I was off the chair, he wanted to carry it around and climb up on it, too.
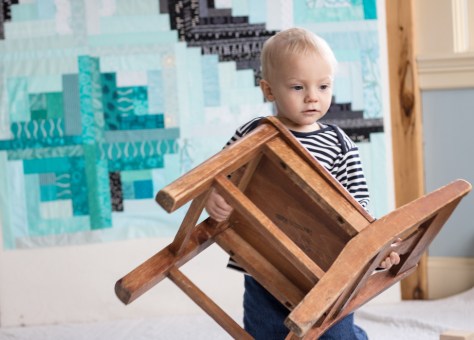
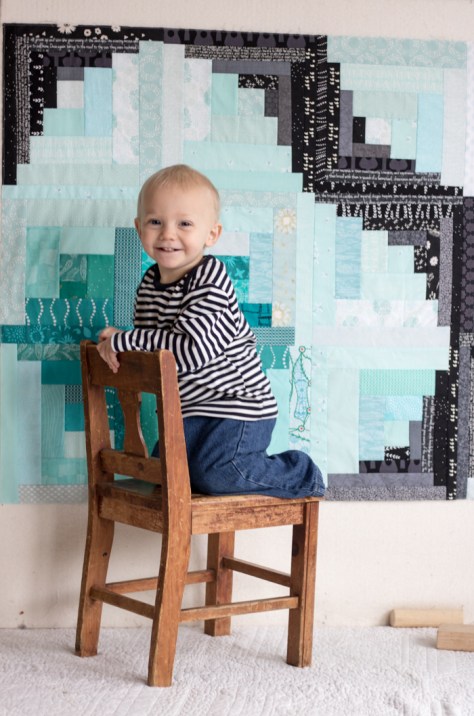 He loves flexing those muscles of his, and boy does he learn fast!
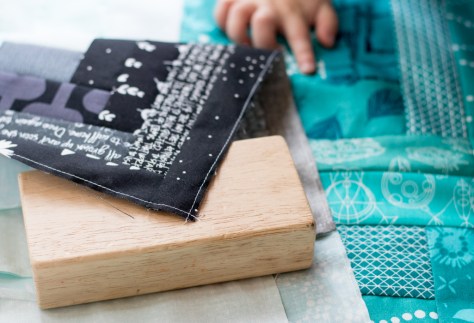 After I sewed all of the milestone quilt blocks together, I did a “victory lap” of stitches around the entire perimeter of the quilt, about 1/8″ from the edge. I saw Christa Watson of Christa Quilts encourage people to do this after finishing a quilt top, and figured it’s a great idea for holding everything together, especially when a photo shoot with a toddler is imminent.
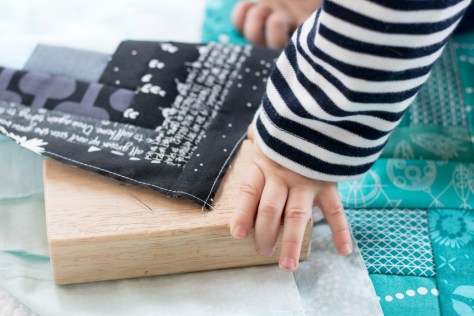 Although Finn didn’t drag the quilt around as much as I thought he might, the victory lap was definitely worth the extra time it took to stitch!
 Now all I need to do is get this layered, basted, quilted, and bound. No biggie, right? I think I’m going to use an all over boxy meander free motion quilting motif with my favorite neutral, Aurifil 2600-Dove in an attempt to keep it simple. I’m looking forward to getting this quilt into the circulation of family use, but am also savoring the journey.
 The block finishes at 6″ square, so my initial thought was to shrink it down to a 3″ square and make an ornament. I love making functional items, and you know how I love to sew teeny tiny ridiculously small things! But then when I sorted through my stash and decided upon the Tula Pink Prince Charming print as the sweater body, I decided the scale would look better with the 6″ size. Now we are going to have a festive mug rug/coaster, which I plan to have out for all of sweater season, which is nice and long here in Maine!
 I love the subtle Cotton + Steel Mustang twinkle trim on the sweater, and the Kona Wasabi arms round it out nicely.
 Hindsight, I should have made the shoulder bits with the greeny-yellow part of the Tula print instead of the blue, since they kind of disappear into the background, but c’est la vie. My husband says he likes it this way, so all is well.
 I plan to do some simple diagonal crosshatch quilting with the walking foot on my Bernina 560, but haven’t yet decided whether to use
  I’ll be sure to share this block in action once I quilt it up and plop some delicious treats or a warm mug of something sweet on top! I borrowed some of the tiny glittery ornaments from the tiny tree my son cut for our kitchen island for my block photo shoot and now there’s glitter EVERYwhere! I hope your holiday season has been glittery and bright so far, too!
 I ordered quarter yards of much of Libs’ True Love fabric line, with half yards of my favorites, since my husband has also requested Libs Elliott pillows. It’s honestly pretty fun that my computer programmer husband has a favorite fabric designer, and it seems fitting that Libs is his favorite since Libs’ tag line is “Making digital code into physical quilts”. Perfect match.
 I had my usual helper, who was quite eager to jump on the fabric. That’s true love for ya! Such a helper!
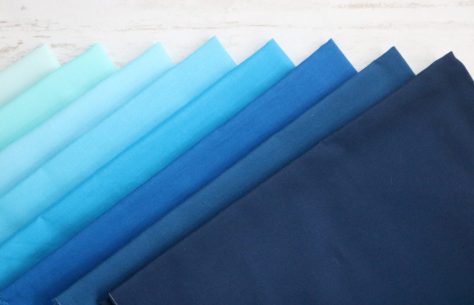 I also ordered an ocean gradient of Kona cotton solids by
  I plan to use the
  Here’s a peek at my helper, since he’s just so adorable. I promise I am going to work on piecing his quilt top soon, too!
 It is such a great feeling to be creating for one of my children again (
 We are in the second week of sewing for the sew along, so hopefully I will have the quilt top completely sewn together by Monday. Time will tell if I actually meet that goal with all of the kids home and lots of family Thanksgiving time on the docket, but I’m hoping to at least be close!
 I put a few contingencies in place to ensure that I love this quilt even though scrappy quilts are not typically my style, and I think they are proving to be quite successful. First, I used a very large ratio of
  I love seeing my favorite designers’ fabrics together, too. The top right block in the photo above combines my favorite Carolyn Friedlander fabric from her first line Architextures (
 To kick off this new resolution of making time for my own sewing on top of my more business-directed projects, I made three more blocks as part of the
  Block 73: old wool trousers, thrifted cotton-poly men’s shirt
 Block 72: thrifted black leather skirt, pink cotton women’s capris, my husband’s worn-through 100% cotton slacks.
 Block 77: thrifted cotton-poly men’s shirt, old cotton slacks, worn men’s shirt, black leather skirt.

 We are so excited to announce the kick-off of the very first Quilter’s Planner Instagram Sew-Along, taking place over on the
  This pattern is super versatile and perfect for using up scraps! Make as a holiday gift, a scrap buster, or just a fun project with your quilting friends. The Sew-Along will run now through the middle of December, giving a little extra time for the piecing and quilting steps to allow for family time around the holidays.
 First, I’d like to introduce you to
 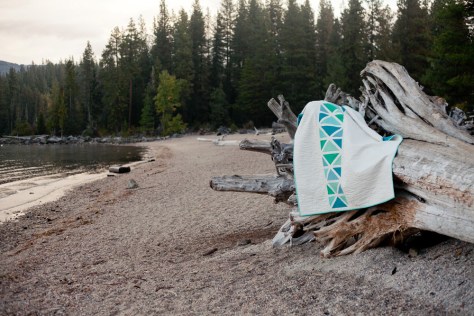 Living in midcoast Maine, an ocean path felt like the perfect inspiration for my quilt. I wanted to embrace the simple beauty of nature while providing a pattern that could be adapted to fit any color scheme, style, or decor.
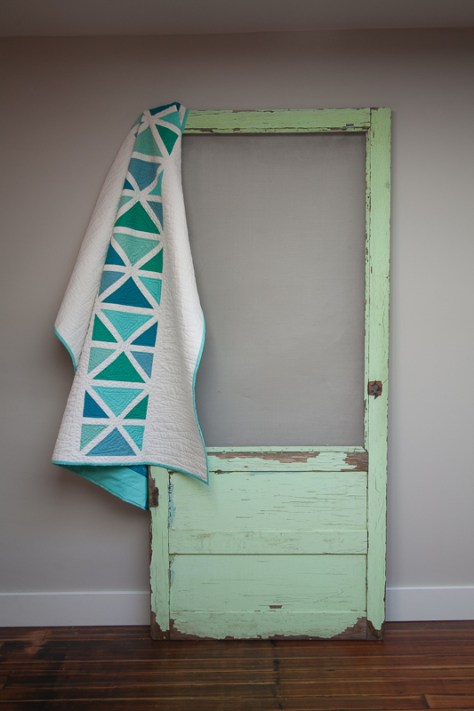 I should note here that the stunning photos included in this post were taken by
 Using simple construction from easily cut triangles and sashing, this quilt comes together in a breeze. Generous negative space provides room for intricate free motion quilting, or you could finish it with simple modern straight line quilting.
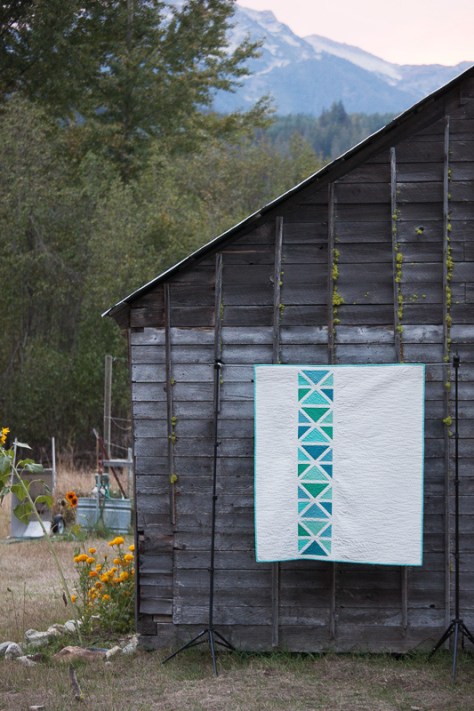 Many thanks to
  I quilted Ocean Path with echoing, organic triangles within each colored portion using 50wt
  All of the Quilt Theory patterns are simple enough to be printed on 4″x6″ cards or a single page downloadable pdf. At only $3 each, they are perfect for gift giving or collecting, too!

 To celebrate the launch of Quilt Theory, I am giving away a copy of my pattern, Ocean Path (printed or PDF, your choice!) along with a PDF of all of the Quilt Theory Coloring Pages. I’m also including
 Each of these Farmer’s Wife blocks manage to pack quite a punch in the little 6 1/2″ space. My method of attack when deciding how to piece each block has been consistent: how can I piece this with as little muss and fuss as possible? With Sylvia, at first I was thinking chain piecing would be the way to go, since it would help minimize the teeny tiny pieces in the inner borders I’d need to cut and sew. Looking at it more closely, I decided that with this block, even chain piecing would require piecing TINY bits, cutting, and then piecing again. Plus, sixteenths of an inch!? No thank you! Finally, I decided that foundation paper piecing was the way to go, since:
 Ready to get sewing? Make sure you have a grasp on how to foundation paper piece, and let’s make Sylvia!
 As soon as I saw this block, I knew that I wanted to meticulously cut the center square. I’m arranging my blocks on point, so be mindful of your own plans before meticulously cutting your fabric! (I call “fussy cutting” meticulous cutting, and you can read why
  Mark the specific piece you want to meticulously cut. I went a little overboard on marking mine for the sake of clarity here. I circled the number but also traced just outside the line of the particular piece, both with bright pink sharpie. Simply circling the number would probably suffice!
 Cut out the center of the piece, creating a window that is exactly the size of the piece you want.
 Draw a 3/8″ seam allowance around the window. I used a green micron pen for this example to ensure the line didn’t get confused with the printed lines on the paper.
 Cut along the line you drew.
 You should how have a planning template to help you cut your fabric for fussy cutting. Notice that I placed my planning template onto the fabric upside down. This is because in foundation paper piecing, we are sewing the block on the reverse side of the template. It did not matter too much for this particular piece, since it’s a square, but always be mindful of directionality of the fabric as well as wrong side-right side. If need be, mark your planning template with “right side up” or “wrong side up” so that your fabric is cut properly!
 Between sewing the fabric on the reverse side of the paper, having the block broken into sometimes odd sections before sewing, and the many pieces involved in most foundation paper piecing patterns, it is in your best interest to color code your paper template before beginning to sew. This way, you can be sure you sew each fabric in the proper place.
 Especially when first getting started with foundation paper piecing, one of the biggest tips I can offer is to be generous with your fabric pieces. It’s better to have to trim a bit more off than to be short and have to rip stitches! For my bright blue squares on Sylvia, I cut the fabric into 1 1/2″ squares, which as you can see includes ample overhang.
 This tip goes for bag-making as well: just because there is a template created for a perfectly rectangular piece, it doesn’t mean you can’t use your rotary cutter and ruler! The outer pieces of Sylvia can be easily cut using a rotary cutter and ruler, which will save time with paper removal at the end. Since these pieces are not easily measured (let’s avoid using sixteenths of an inch if we can help it!) simply cut out the foundation paper piece templates and use them as a guide when rotary cutting. Use the foundation paper piecing method to piece the center portion, then add the D, E, H, and I rectangles using traditional piecing methods. Easy peasy!
 And there you have it. Sylvia, in all her glory.

 *Spoiler alert* My tip for her was to know your limits. When every project is a priority with a quickly approaching deadline, it’s difficult to make a prioritized list and keep yourself organized. On normal weeks, the prioritized list I make in my


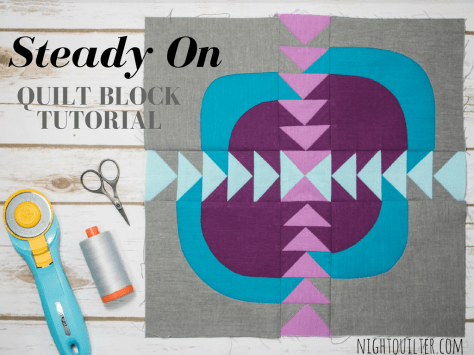 I’m calling my block Steady On, which just seemed fitting for such a classic made-by-me block. Those of you who know me know that I cannot keep anything simple, and this is a perfect case in point. This block has double improv curves, twenty (20) tiny flying geese, an hourglass block, and quite a few points that should match *just* so, all in the 12 1/2″ unfinished square block. But fear not, this tutorial has detailed photos and instructions on how to make each component of the block, and breaking it down into manageable chunks makes this block come together quite smoothly (Spoiler: we can make some of the flying geese 4 at a time!). There’s something about the determined light colored geese headed bravely into the dark and improvy unknown that urges me to encourage them… Steady on, now! That same encouragement goes for you, since I would LOVE to see you tackle this block and come out victorious (tag
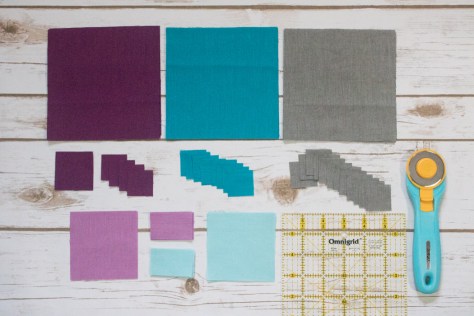
 For this step, you will need your 5 1/2″ squares of Iris, Amazon, and Sky, washable school glue and tip, a marking pen or pencil, scissors, and an iron and pressing surface. To make the double-curved quadrants for this block, follow my tutorial on easy curved piecing using a visual layering approach and glue basting
  Since this method begins from the bottom up, start with Iris and Amazon. Mark the Amazon square 2 1/4″ up along both sides from the bottom right corner. Make sure your mark extends 1/4″ in from the edges before beginning the curve. This will be your sew line, not your cut line, so by measuring the 2 1/4″ we are ensuring our seams will match up, even though the flying geese are exact and the curves can be improv. (Note here that if you are using fabric with a right and wrong side, you want to be marking the wrong side of the fabric. With the Cloud9 Cirrus Solids that’s not important).
 Draw an improv curve from marked point to point, or trace a perfect curve using the edge of a small plate or glass. Make sure your curve begins and ends at your marked points 2 1/4″ up from the corner.
 Next, grab your Shadow 5 1/2″ square and mark 3 1/4″ up both sides from the bottom right corner. Again, draw your curve as desired, connecting from marked point to marked point, and using that line as the sew line.
 Make four quadrants, measuring 2 1/4″ up on the Amazon square and 3 1/4″ up on the Shadow square for two of them, and measuring 3 1/4″ up on the Amazon and 4 1/4″ up on the Shadow square for the other two. Admire your smooth curves, and set those blocks aside for later!
 Place two 1 7/8″ Iris squares in the top right and bottom left corners of a 3 1/4″ Sky square as shown. Using your fabric marking tool of choice, draw a diagonal line from the top right corner to the bottom left corner. I love my Hera marker since it doesn’t actually mark the fabric, but makes a clear guide line.
 Sew 1/4″ from either side of the drawn line. Press with a hot iron to set the seam (notice that I didn’t do this step? tsk tsk).
 Cut along the drawn line.
 Press the small Iris triangles outward, with seams pressed toward the dark fabric. Then place another 1 7/8″ Iris square in the corner of each unit, and mark a diagonal line as shown above.
 Again, carefully sew 1/4″ from either side of the drawn line. Cut along drawn line.
 Press open, with seams toward darker fabric.
 Trim to 1 1/2″ x 2 1/2″ and set aside.
 Grab your 1 1/2″ squares and 1 1/2″ x 2 1/2″ rectangles and lay them out to help plan which corners should be positioned on each rectangle. Use the finished flying geese above to help plan before you start sewing.
 To make a flying geese block (or would it be flying goose?), position a 1 1/2″ square right sides facing the right top corner of a 1 1/2″ x 2 1/2″ rectangle. Draw a diagonal line as shown above.
 Sew along the line and then trim a 1/4″ seam allowance.
 I like to get mine all paired and drawn so that I can chain piece each side.
 Repeat with the other 1 1/2″ square on the top left side of the block. Press seams open or up toward the corner.
 Time saving tip: I cut my 1/4″ seam allowances with scissors while pressing. As long as you are accurate with a pair of scissors, it takes much less time than rotary cutting, at least for me.
 Finally, let’s make that center hourglass block. Grab your 3 1/4″ Lilac and Sky squares.
 Place right sides together and mark a diagonal line. I like to pin my pieces together since we are working with such a small scale. If you’d prefer some wiggle room, you can begin with 3 1/2″ squares and trim to size when you’re finished!
 Sew 1/4″ from either side of the drawn line. Cut along the drawn line.
 Press toward darker fabric. You will have two half square triangles (HST).
 Place HSTs right sides together, with the Lilac half of one facing the Sky half of the other, and nesting the seams.
 Draw a diagonal line perpendicular to the existing seam line, again pinning to keep the pieces in place while you sew.
 Sew 1/4″ on either side of the drawn line. Then, cut along drawn line.
 Press seams open. You will have two hourglass blocks, but will only need one for this block. Save the other one for your next Steady On block!
 Trim to 2 1/2″ square. Set aside.
 Now that you’ve made all of the components, it’s time to sew the block together! Arrange all of your pieces as shown above, paying careful attention the positioning of the flying geese in relation to the large and small curves on your curved quadrants. There should be two Iris flying geese corners next to small curves and three Iris flying geese corners next to large curves.
 Sew the top five and bottom five groupings of geese together, and sew the center horizontal strip of geese and center hourglass block together.
 Perfect points tip: When sewing the flying geese together, keep the piece with the goose point on top. As you’re sewing, make sure your sewing machine needle sews exactly through the “x” that marks the point of the goose, or if anything, slightly to the right (above) the point. This way you won’t lose any points!
 Next, sew the top left and top right curved quadrants to the top grouping of geese, pinning just after each seam that needs to match.
 When aligned properly, the geese corners should flow into the curved piece perfectly–that’s why we so carefully marked our curve starting distances with our improv curves!
 Finally, sew the top and bottom panels to the center horizontal strip, again pinning just after each important seam match. Press toward the less bulky sides (the curved quadrants), and viola! Steady on…