

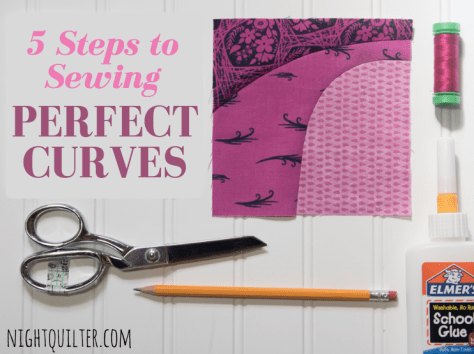
I am so excited to finally share this technique with you, since it makes sewing curves SO simple. I especially love that it can be used on both improv and exact curves, even circles. Mastering curves was on the top of my list this year in terms of quilting goals, and I’ve been working hard at it! While my traditional curve sewing still needs about 900 hours to hit the 10,000 hours that will result in mastery, I’ve found that this method results in perfect curves in five (that’s right–5!) easy steps.
 I first saw this method being used by Hillary from Entropy Always Wins, Stephanie from Spontaneous Threads, and the other #beesewcial-ites, and was intrigued by the way they created such flat-laying, wildly curving improv pieces again and again and again. With some extra guidance from Stephanie, I was able to figure out the technique and have been using it on most of my sewn curves since. You can see where I’ve used it here, here, and here. This technique is derived from the six-minute circle method, but can be applied to any curve. I love using the technique, and so I thought I would share it with you.
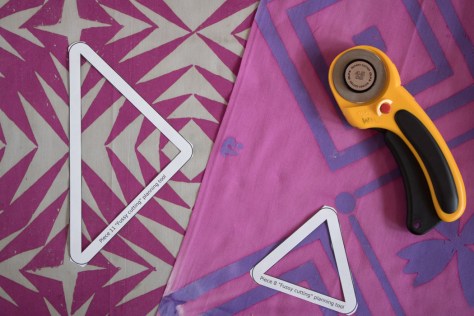
 So let’s get started! First, gather your supplies. You will need:
- your fabric pieces (I used three approx 5″ square pieces of fabric to help demonstrate the stacking of the layers, but you can use any scrap that fits the shape you’re trying to sew!)
- fabric scissors
- washable school glue – Elmer’s works great
- fine glue tip (optional but helpful!)
- zipper foot for your sewing machine (optional but makes sewing the curve much easier)
- iron and pressing surface
- pencil or other fabric marking tool for drawing your line
- paper on which to draw your desired curves (only needed if you are sewing an exact curve–you can free draw or cut improv curves, too)
 Before you begin, decide generally how you want your curves to look. I like to sketch mine out on paper more for a visual than for an exact plan. Think of your fabrics in terms of layers: the bottom is the inside of the curve, moving upward and outward. Keep in mind that if you want to have a convex curve next to a concave curve, simply switch the way you view your “top” and “bottom” layers. The inside of the curve is always the bottom, and work from the bottom up.
Once you have an idea of generally (or exactly) how you want your curves to look, it’s time to get started. Five easy steps, I promise! Ready?!
Step 1:
Draw desired curve on the wrong side of top fabric piece.
 Draw your curve on the wrong side of your top (or in this case, middle) fabric with a pencil or other light fabric marking pen. If you want your curve to be exact, you can trace the line from your paper sketch by holding the fabric and paper up to a window or other light source. Be sure that the right sides of both the paper and fabric are facing away from you, since you want the line drawn on the wrong side of your fabric, but also want the curve to go in the proper direction.
Step 2:
Cut 1/4″ away from the inside edge of your drawn line.
 Next, cut between 1/4″ and 3/8″ away from the inside edge of your drawn line. This is your seam allowance.
 Clip your curves to help make your curve smooth. Be sure to cut only halfway to the drawn line, not all the way to the drawn line.
Step 3:
Press seam allowance.
 Next, carefully press the seam allowance along your drawn line. Take your time here to make sure your curve is pressed smoothly and exactly along your drawn curve.
Step 4:
Glue baste to bottom layer.
 Now it’s time to glue baste this curve onto your bottom layer. Using a fine glue tip and washable school glue, create a small beaded line of glue along the seam allowance. Carefully lining up the outer corners of your squares, layer the middle fabric (with right side facing up and your cut, pressed, and glued seam allowance tucked under) on top of the bottom piece of fabric. This step is why I like to begin with three squares that are the same size. It makes positioning my curves as easy as pie!
 Press with your fingers, making sure the seam allowance is in the right spot and fully folded under. Press with a hot iron to set the glue. Admire your perfect curve… but it’s not sewn yet! Just one more step.
Step 5:
Sew along drawn line.
 Once the glue has been set and fabric cooled off, carefully lift up the top layer of fabric to expose the seam allowance. I use my zipper foot with my needle moved all the way to the left, since the narrow foot helps ease around tight turns. Carefully and slowly sew along your drawn line.
 As you sew around the curves, carefully move the top fabric out of the way, being sure not to allow folds or puckers to form under the needle. Backstitch a bit at the beginning and end of your sewn line to secure the stitches.
 Viola! Press again and you have a perfectly sewn curve!
 Trim away the bottom fabric that extends beyond the seam allowance, and save for your next scrappy project.
 Repeat those five easy steps for your other layers: Draw, Cut, Press, Glue Baste, Sew.
 There you have it. Smooth curves, either traced and perfect, or free cut and improv.
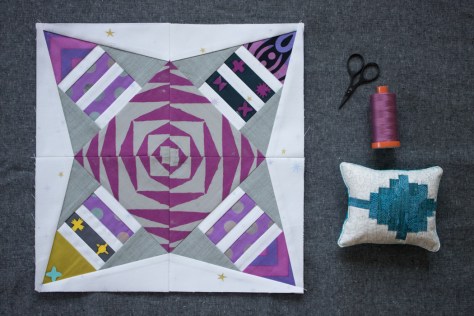
I hope you find this tutorial helpful! I know I can’t stop sewing crazy curves now that I know I can sew them like this. Next week I’ll be sharing a block tutorial for the Cloud9 New Block Hop, and *hint hint* part of it will use this method! Get your practice in now!
I’m linking up with Let’s Bee Social, and will link up with Tips & Tutorials Tuesday when Stephanie & Yvonne get it started again in a couple weeks!

 So fun! Still, I resisted. Then I noticed that
  I pulled some old worn out clothes from our toss/donation piles (a workshirt of my husband’s with elbows worn nearly through, a pair of maternity corduroys that were a hand-me-down given to me by a friend who had received them as a hand-me-down from another friend and worn bare in too many spots to mend, and a thrifted leather skirt I had bought for a project that fizzled before it really began), and hit up a local thrift shop to fill in the gaps a bit. I decided to focus on a monochromatic grey color palette, but asked my kids to choose a pop of color from the sale racks. A large pair of coral women’s capri pants fit the bill, and I’m excited at the resulting palette.
 Even if you don’t have Instagram, you can follow along with my posts and environmental tidbits by clicking
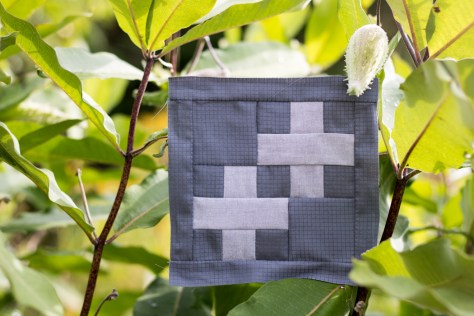

 I’m excited to be a part of the
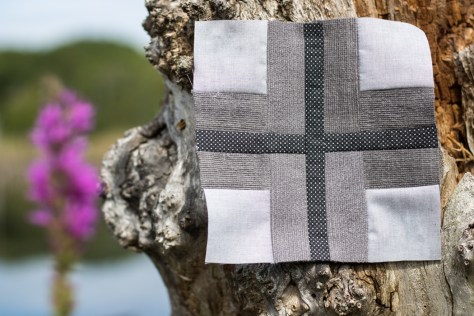
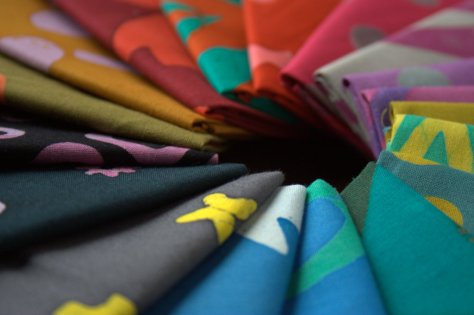
  There are almost 70 participants in this hop and each one will be presenting a free tutorial for a new 12″ (finished) block using 5 fat quarters of Organic Cirrus Solids generously donated by Cloud9. All blocks will be collected by the hosts and made into quilts for charity.
 After petting this gorgeous bundle of organic fabric and sketching out a few block ideas, I think I’ve decided on a winner, and I can’t wait to share it with you. I will be posting my tutorial with the Wednesday crowd on September 14th, so mark your calendars!
 While I had every intention of taking lots of photos, I also made a conscious effort to distance myself from social media and technology as much as I could, so that I could aim to slow down body, mind, and spirit. Lo, I took hardly any photos at all. But I can tell you this: the retreat was everything I imagined and more and I would jump back there in a heartbeat. I’ve already begun saving pennies for next year. There was a whole lot of relaxing, chatting, stitching, laughing, learning, making new friends, swimming, yoga, relaxing some more, stitching some more, eating, drinking, and so much more.
 And of course color. Lots and lots of color. This is just a tiny peek at the
 If you haven’t yet added Constant Flux to your pattern library, it’s still on sale for a few more days in my
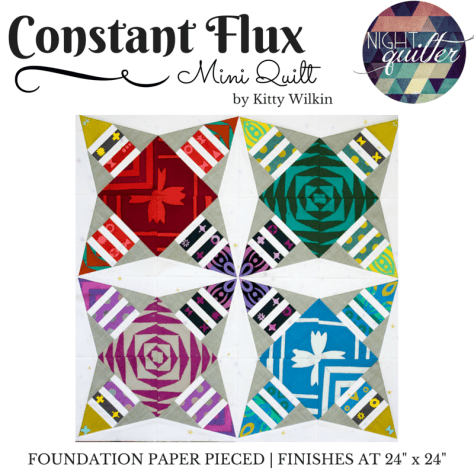
 I created my version of Constant Flux inspired by
 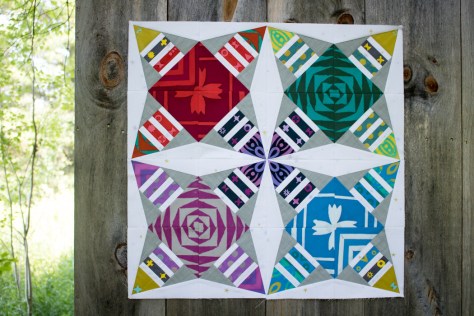 Constant Flux is available in my
 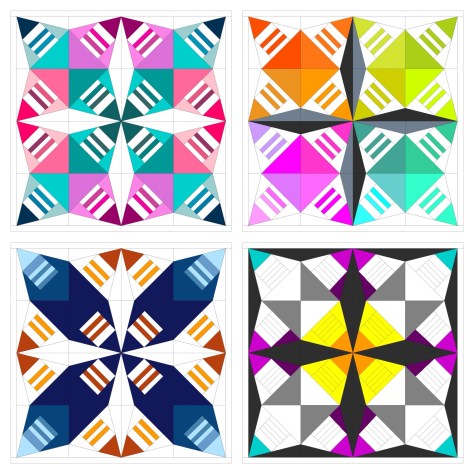 For now, I haven’t quilted my first one and I already want to make Constant Flux in a different colorway. Look at all of the options I came up with in just a short moment of color arrangement play! The pattern comes with a full page coloring sheet so that you can explore your options before diving in. That bottom right version is calling to me–which one would you make first?!
 First up is my ongoing epic
  Another project I’m plugging away on is a fun one for Andover Fabrics. They were awesome enough to send some Alison Glass Handcrafted Patchwork to me, as well as some yardage of Constellation by Lizzy House from her Whisper Palette collection. I picked up some Andover textured solid from my LQS
  I’ve also been out on three different quilt photography adventures with my amazingly gifted quilt holding assistant, aka my husband. We have been having a blast photographing the quilts for this year’s
 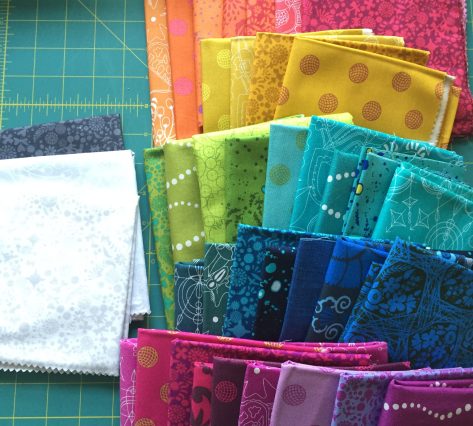 There are many other fun projects waiting patiently on the decks, including a Terrazzo Quilt (pattern by
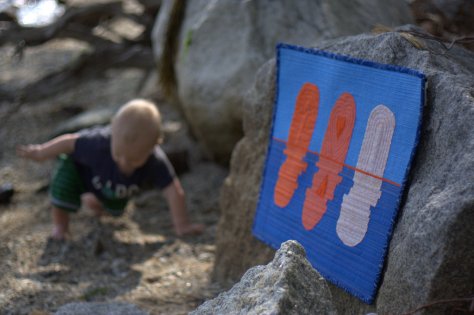
 I recently finished and gifted this mini quilt to a fellow quilting friend as part of a small private swap, and now that it has been received, I can tell you all about it! I entitled it, “Let Your Heart Shine True”, and it’s meant to be a visual representation of the fact that the goodness in your heart shines through, despite any missteps, mistakes, wrong words, or other things we personally may feel will tarnish or cloud our good intentions. It was made for Yvonne of
  This is my first attempt at a “statement quilt”, per se. My thought was that the quilt would show the large pieces on top as representing “people”, and the rippled reflection below being the public perception of the person. When mistakes are made, things are said in a not so clear way, or even just general awkward social interactions happen, those are the ripples that cause the reflection to be jarred and shaken. Yet despite the ripples and the jolted reflection, the heart remains intact and unbroken. If you lead with the heart, your good intentions ultimately must become known, no matter how many times you need to back pedal or rephrase things to clarify your meaning. I thought creating a statement quilt for Yvonne was fitting, since she has created a number of quilts as part of her
  The construction of this mini quilt was a fun multi-step process. I began by needle-turn appliquéing the rounded pieces onto panels of background fabric. I cut the bottom pieces with an identical free-style rounded top, but with much longer length since I planned to cut and resew it many times. Once they were appliquéd onto the background fabric, I cut random, varied width strips from the bottom ones, off-set it enough to wobble but not extend beyond the width of the finished panel, and resewed it. Each one was cut and re-sewn six or seven times to create the rippled effect. Let me tell you–that first cut into the needle-turned mound was a bit nerve-wracking! It was another one of those times I just had to trust that the vision in my head would translate well to reality.
 After rippling all three reflections, I squared each panel and sewed them together creating a horizon with a very narrow, approximately 1/8″ strip of solid orange fabric (Kona Persimmon, I think!). Yvonne’s favorite colors are blue and orange, which clearly influenced my fabric selection. I used some of our mutual favorite oranges from Carolyn Friedlander, and added some sketch by Timeless Treasures and an unknown solid from my early quilting days stash. I bound it in blue Mercury by Alison Glass, including a bit of framing while adding a bit from another mutually adored fabric designer.
 After that, the quilt begged for some more quilting, so I added random rows in yellow, gold, and orange for interest (40 wt 1135-Pale Yellow, 50 wt 5022-Mustard, and 50 wt 1154-Dusty Orange respectively). Both the top and bottom ended up pretty thoroughly matchstick quilted, but I really like the addition of the yellow, gold, and orange thread in the bottom, as well as the added interest of using a slightly heavier weight thread as the yellow. It reminds me of light reflecting off the ripples in a pond, which is perfect given the intention of the quilt.


 As an extra special incentive, if you buy the bundle from me, you will also be entered to win a Quilter’s Planner 2017 Starter Kit, which includes a 2017 Quilter’s Planner as well as pens, stickers, and highlighters to help you stay organized, productive, and inspired! (Note: The winner will receive the starter kit as soon as it’s available, expected to be shipping in October). Congratulations to Sharon, the winner of the Quilter’s Planner Starter Kit!
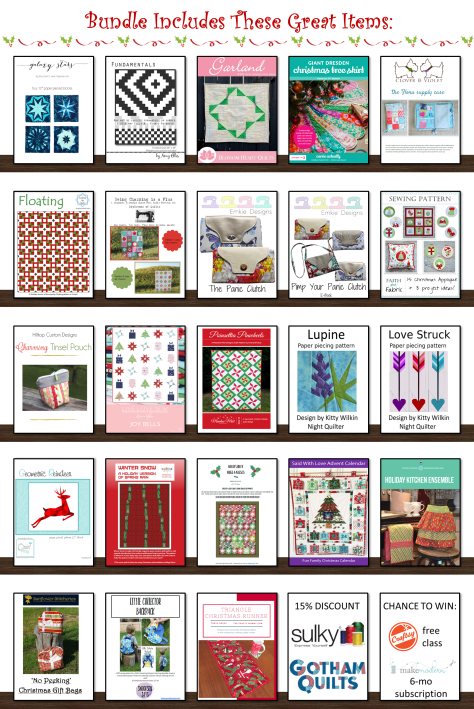
 You will get immediate digital download of all of the patterns shown above, plus:

 This mini quilt finishes at 24″ square, and its creation coincided with the fabulous bloom of peonies in our garden. It features a new die called
 The colors of the peonies and the colors in the quilt meld so beautifully together! I really could not help but take a million photos of this quilt with the gorgeous color gradient of peonies from my garden, but since it’s Thursday, I figured a combination of Color Inspiration Thursday and a heads-up about my Sizzix tutorial would be perfectly acceptable.
 Ahhh peonies! Such an inspiration!
 Corresponding solids from left to right:
 I love the natural ombres and vibrant colors found in nature and thoroughly enjoy combining natural inspiration with quilty projects. It is so fun to try to stitch the beauty around me into the quilts in my hands!