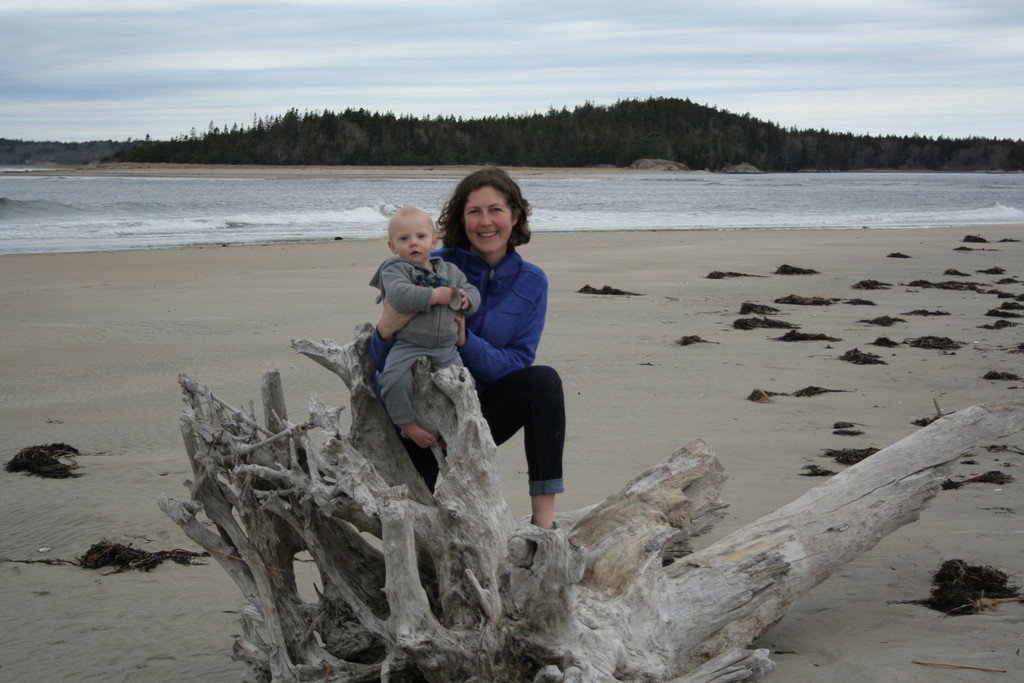
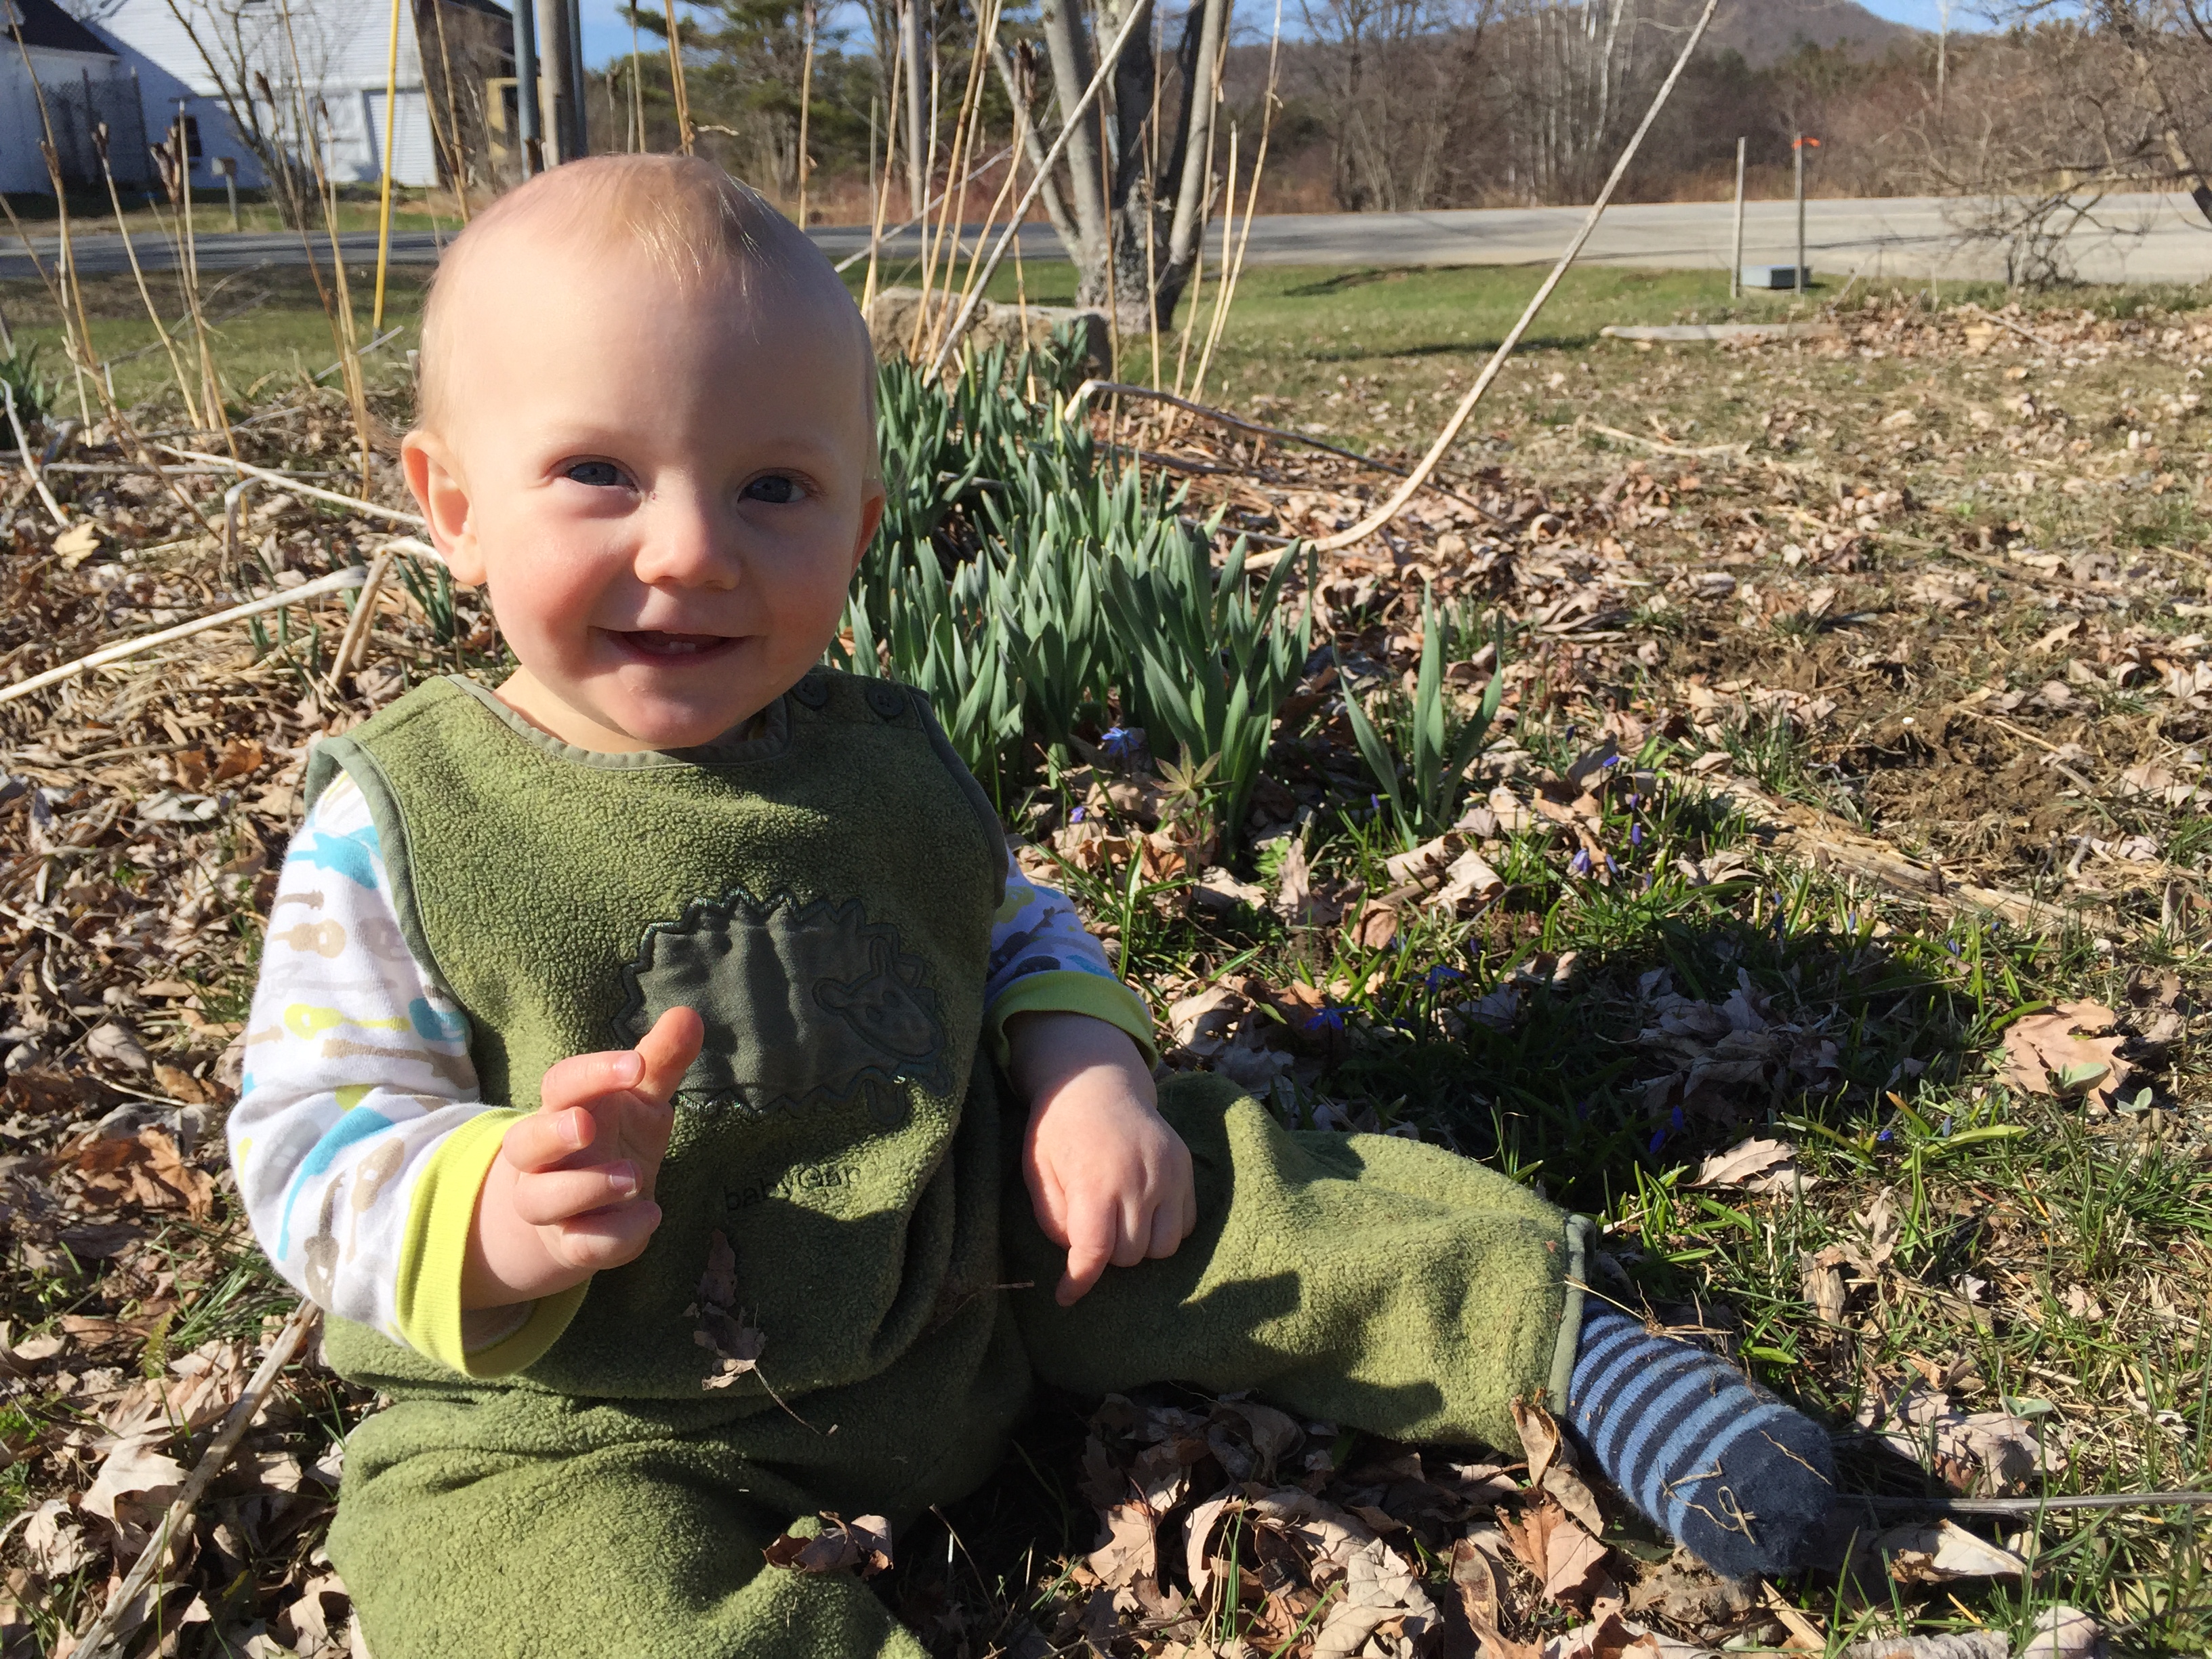
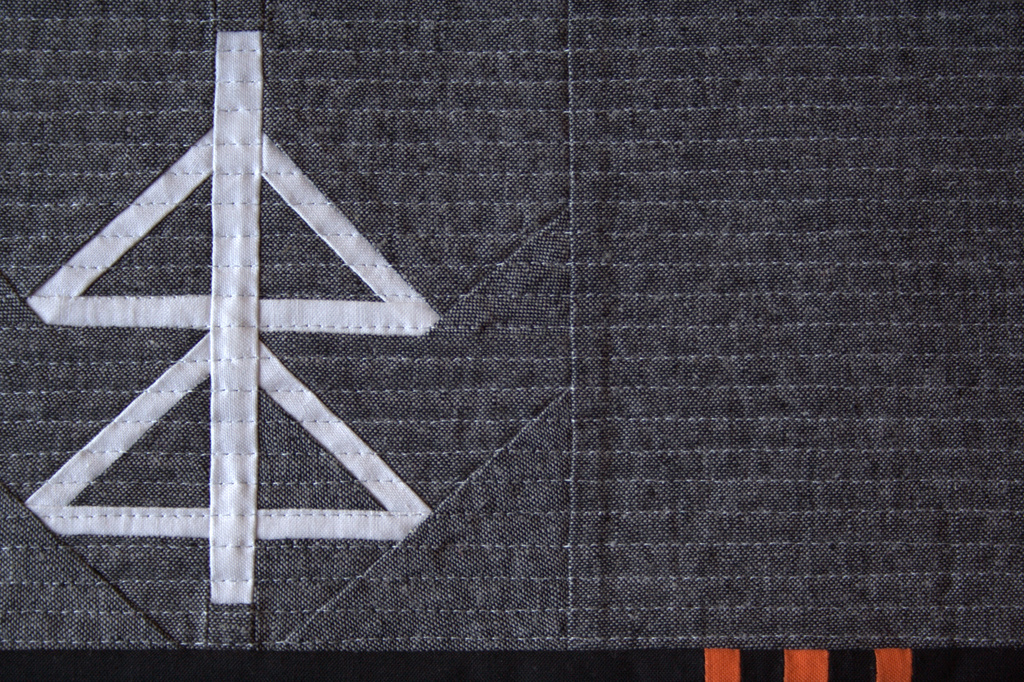
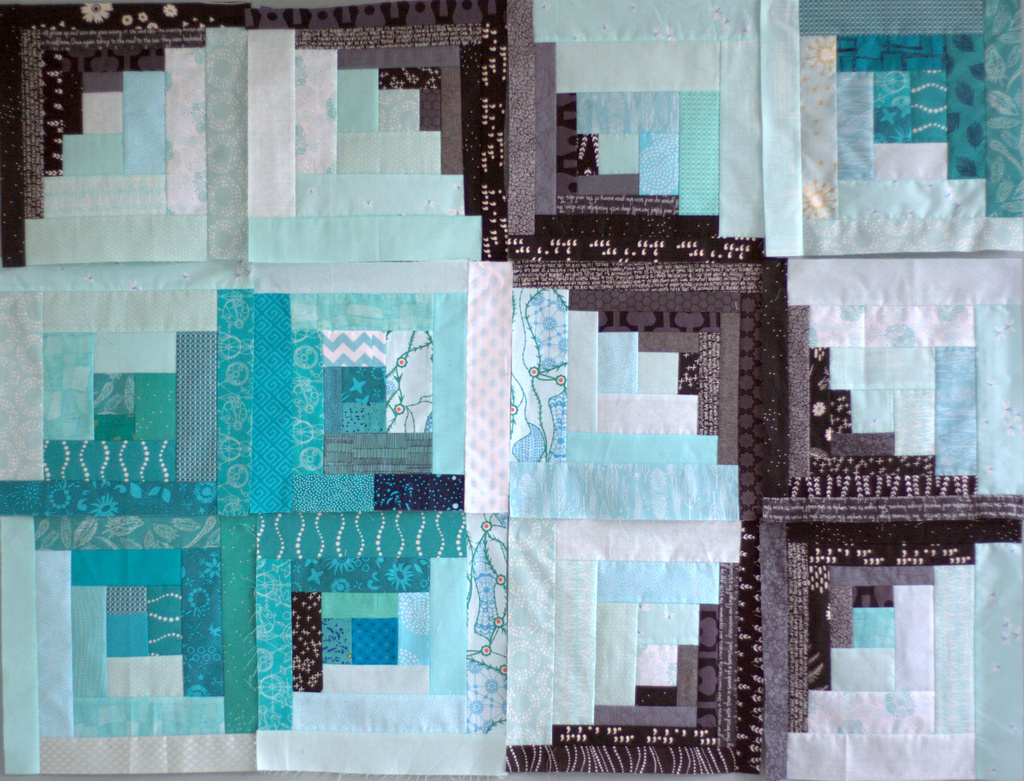
And just like that, all of the blocks for Finn’s milestone quilt are finished and my baby is officially one year old. They say “babies don’t keep” but somehow it feels like the past year flew by especially quickly. I won’t even try to pretend I won’t miss this project dearly now that it’s mostly finished. I do still need to piece the top and quilt it, so no worries–you haven’t seen the last of Finn and his quilt!
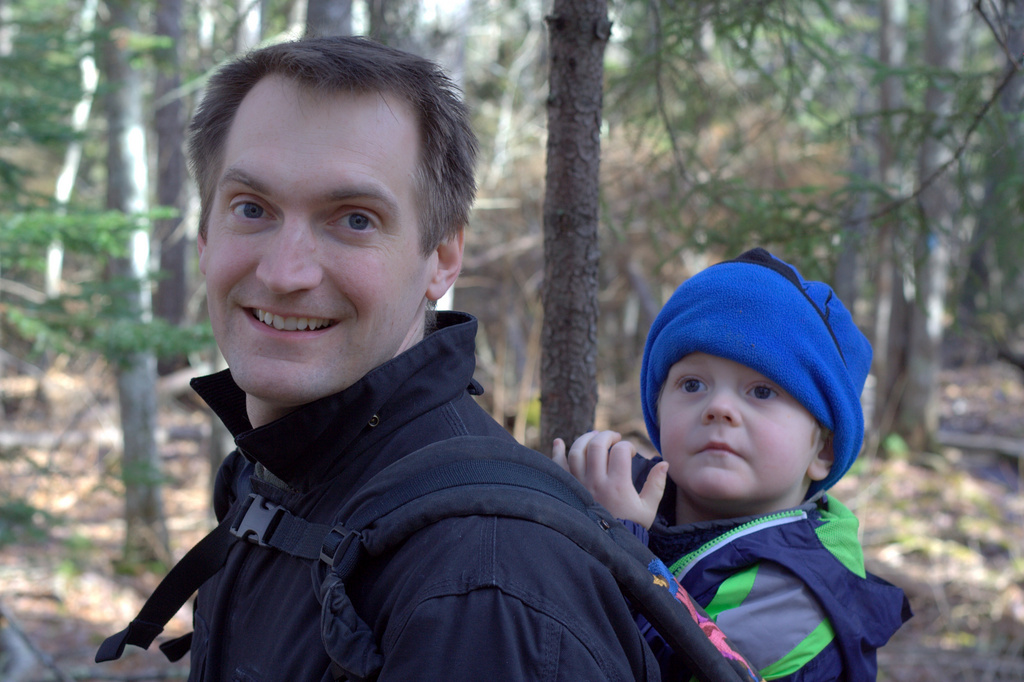
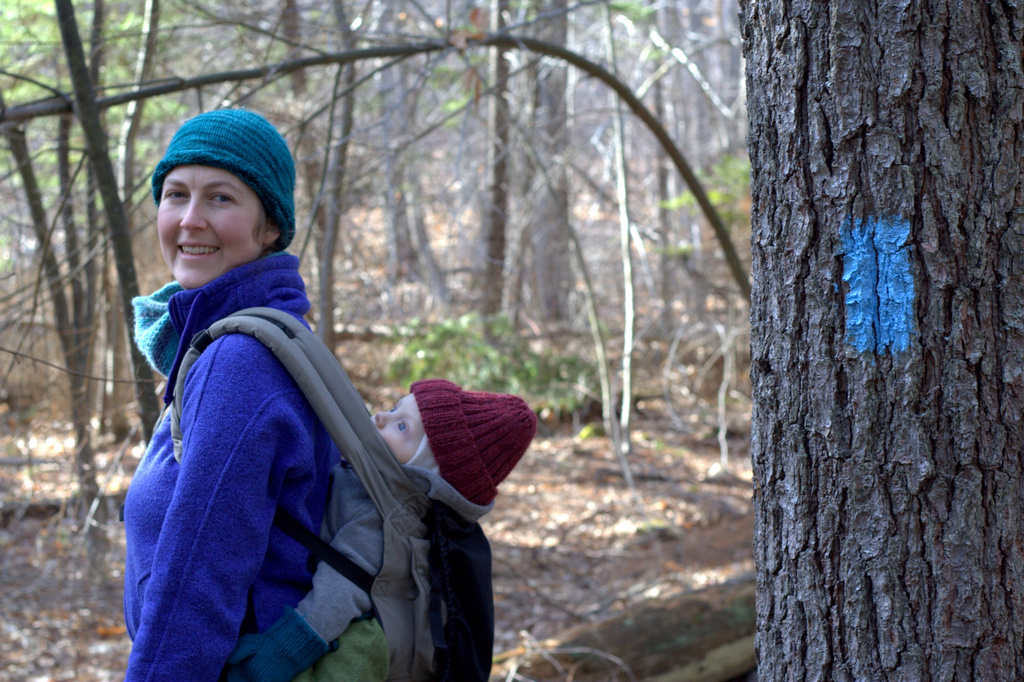
Within the past week, Finn has fully mastered walking and now prefers it over crawling. He joyfully walks circles around the house, his wobbly steps getting stronger and smoother by the day. This joy of walking certainly made this photo shoot the most difficult yet! I got one, only one, photograph of Finn relatively near his final quilt block, and while it’s not as clear as I’d like, it’s staying.
Twelve months is 12 months, and not even mommy’s most sincere and pleading attempts will keep a newfound walker from walk, walk, walking! Just as a reminder, here is Finn with his very first milestone quilt block, 11 long months ago:
Isn’t it absolutely mind-blowing how much babies grow and learn in such a short time!? Life is an amazing thing.
My big kids brought home a couple of balloons from their cousin’s first birthday this weekend (we had a full family birthday weekend with both Finn and cousin Reagan born 26 hours apart), and they have become the favorite toy for all three kids. (Safety note: Yes, I know that balloons are not technically safe for babies, so I will reassure you here that I only allow Finn to play with the balloon when I am directly supervising him!) I figured giving Finn something fun to hold was my best bet at having him stand still for even a moment.
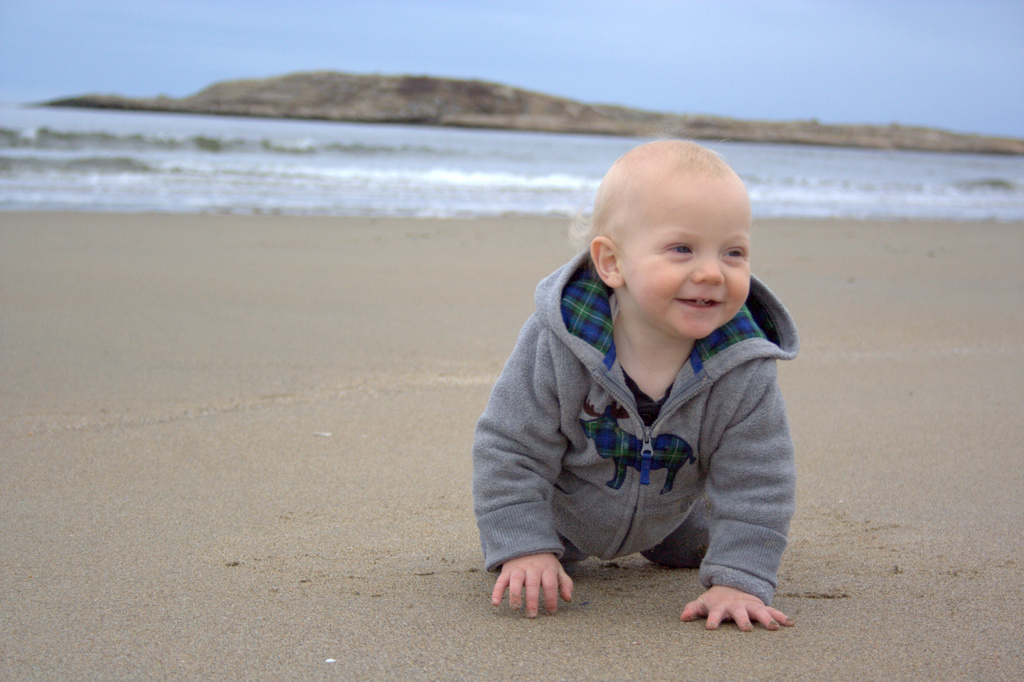
Even still, Finn would rather walk around than stand still, despite my best efforts. C’est al vie. Such is life with a brand new walker!
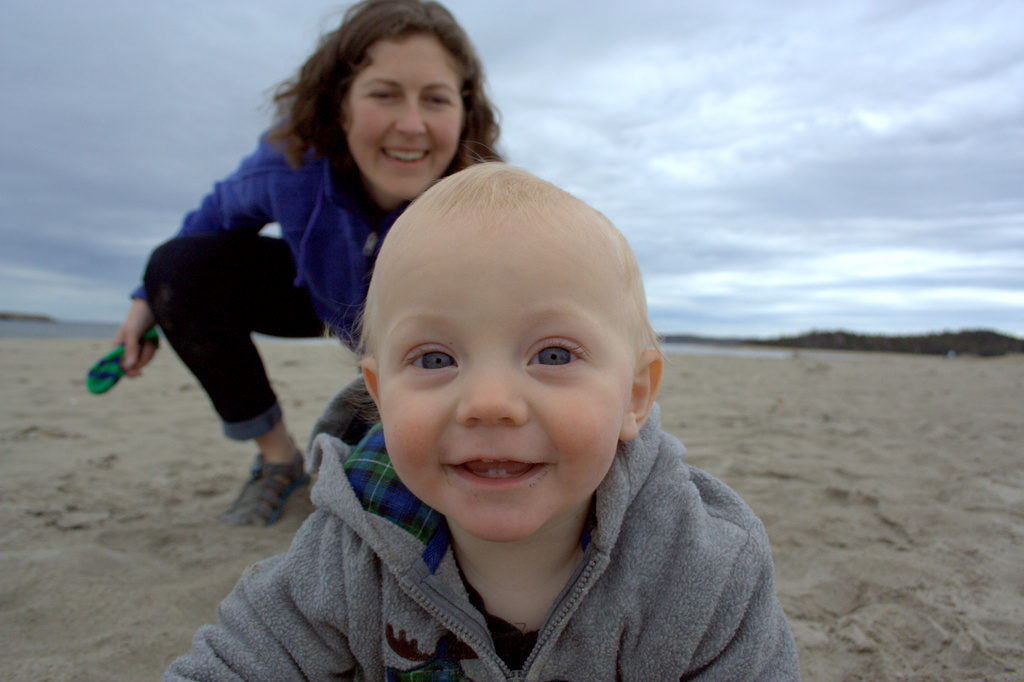
Add an eager almost-four-year old big brother helper, and the majority of my photos looked like this:
or, more accurately, like this:
This is part of what I have loved about this project, though. It has given me an opportunity to sit down, reflect, and write about life in the current moment. By documenting each month of my baby’s life, I’m also documenting our life as a family. With our busy lives, how often do we take a moment to write about our day? I have loved that this project has given me the motivation to write, reflect, and document the joyful milestones in Finn’s first year.
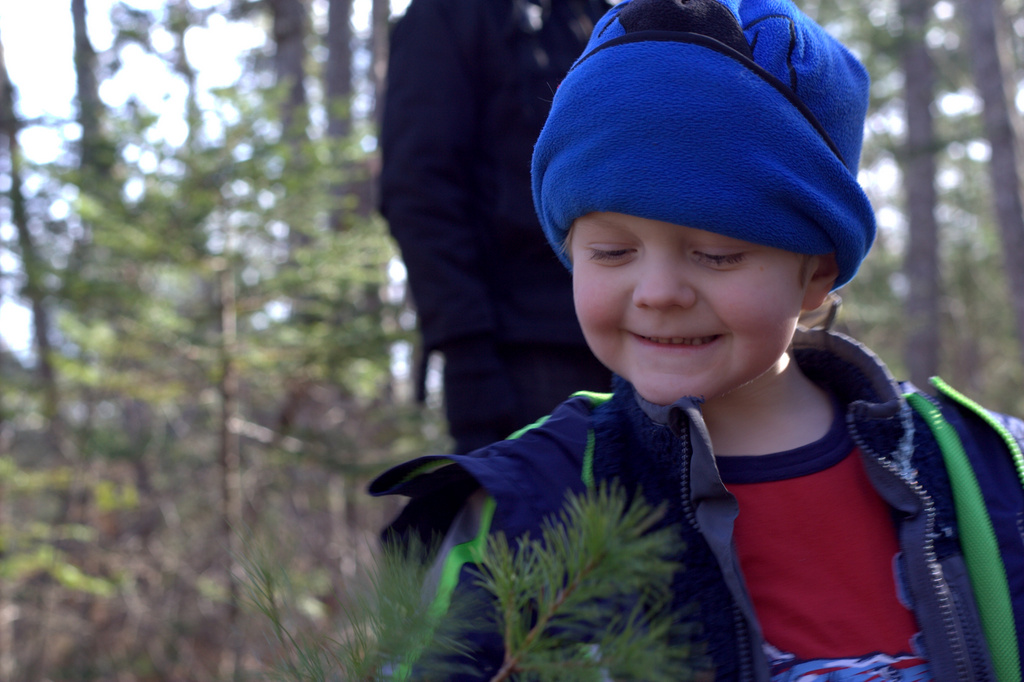
Finn continues to have a sweet and joyful disposition, complete with his newfound ability to express frustration and flop himself face down, crying, on the floor. Overall, though, he is a happy boy and a super helper. He loves to help me unload the dishwasher, taking out each utensil and holding it up for me (as long as I’m quick enough to take it within a second or two). When he does that, I always say “Thank you!” and now it sounds like he says, “Thank you!” right back. This morning while I was getting dressed, he joyfully opened my dresser drawer and started taking out folded clothes, tossing them on the floor one at a time and saying “thank you” after each one! Oh, the innocence of babes!
Finn has helped take these blocks off the wall for the very last time. Next up is squaring up the blocks and sewing the quilt top together. I’m going to give myself a month in which to do it, since it feels like an attainable goal. Setting realistic goals is still something I’m continuously working on, and something this project has helped with greatly. As much as I may have itched at times to make extra blocks, or up the ante to two blocks per month, I’m SO glad that I stuck with my original plan of one block per month, since deadlines have a funny way of sneaking up on me. Sure, it took an entire year, but all of the blocks for Finn’s quilt have been made! A finished quilt is just around the corner.
For those of you new to this project, you can see the full quilt layout plan, HERE in the 3 month post. The blocks are all completely finished now, and just as planned! You can see the full progression of Finn and his quilt’s growth HERE or by clicking the “Milestone Quilt” tab at the top of my blog. Thank you for joining me on this journey! I’m not considering the journey over just yet, since I will check in with quilt finishing progress, too, with Finn’s help of course!
I’ll end this post with a few peeks from Finn’s first birthday party. He had such a great time!
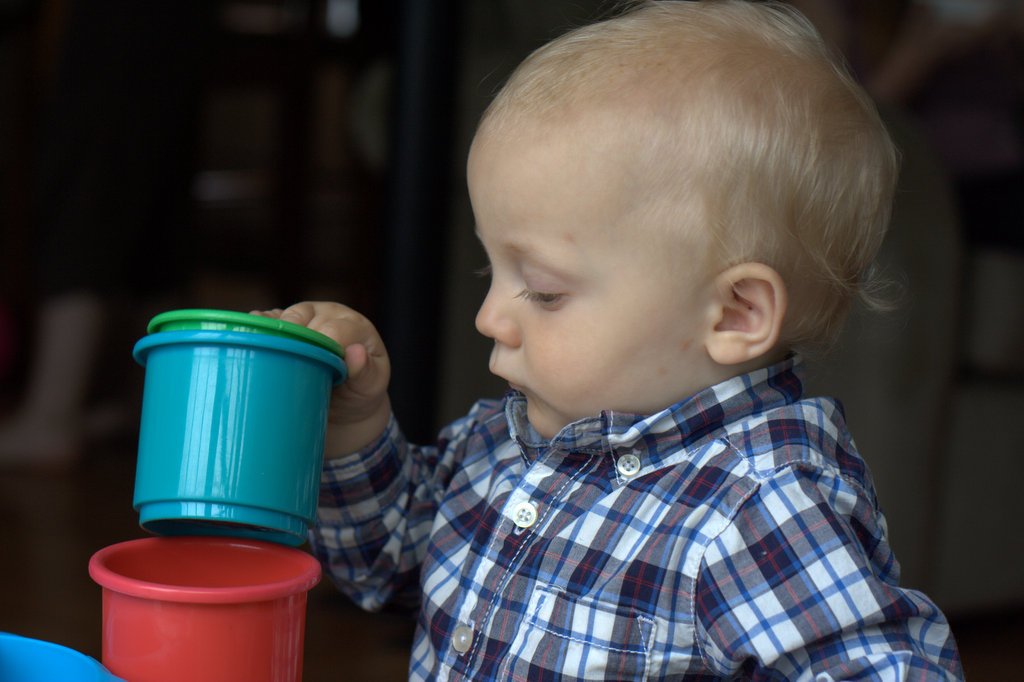
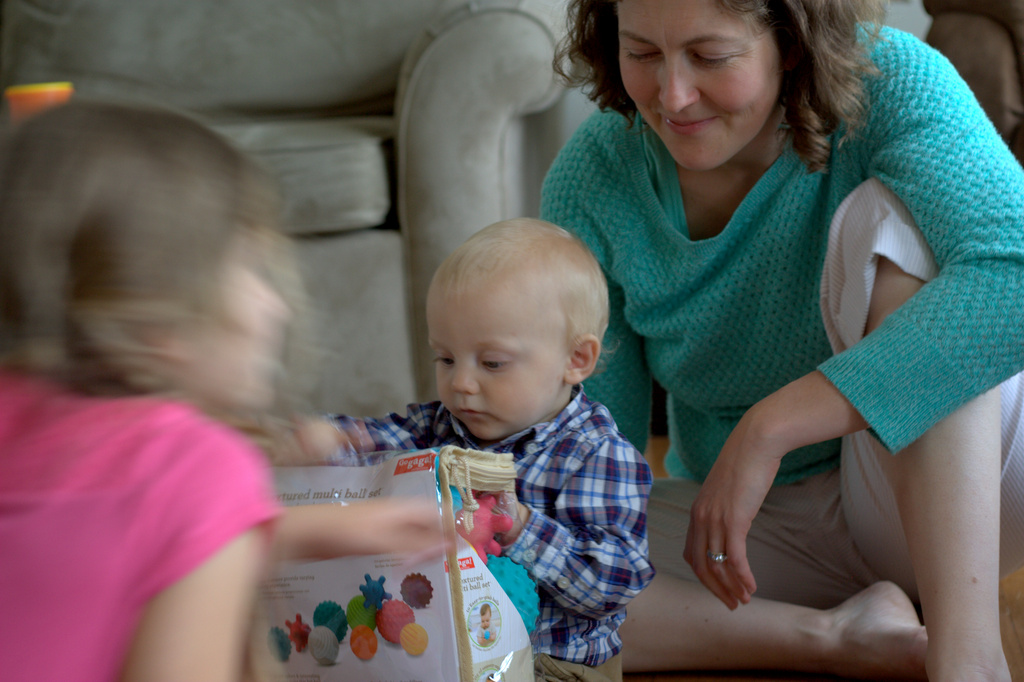
Cheerful boy + good light = sweet shot!Figuring out those stacking cups!Those eyes!The big sibling blur during gift opening. Big siblings are great gift helpers!Birthday cake!“Oh yes, I am eating it all!”
Here’s to many more years of growth, joy, and family fun!
Today I’m excited to be a part of the Oakshott Lipari blog hop, your final stop for those of you who have been following along. So many fabulous projects have been made with the fat eighths bundle of the new Lipari line, so I encourage you to also check out the others along the hop, linked at the bottom of this post. Many thanks to Lynne and Michael at Oakshott for including me in the hop!
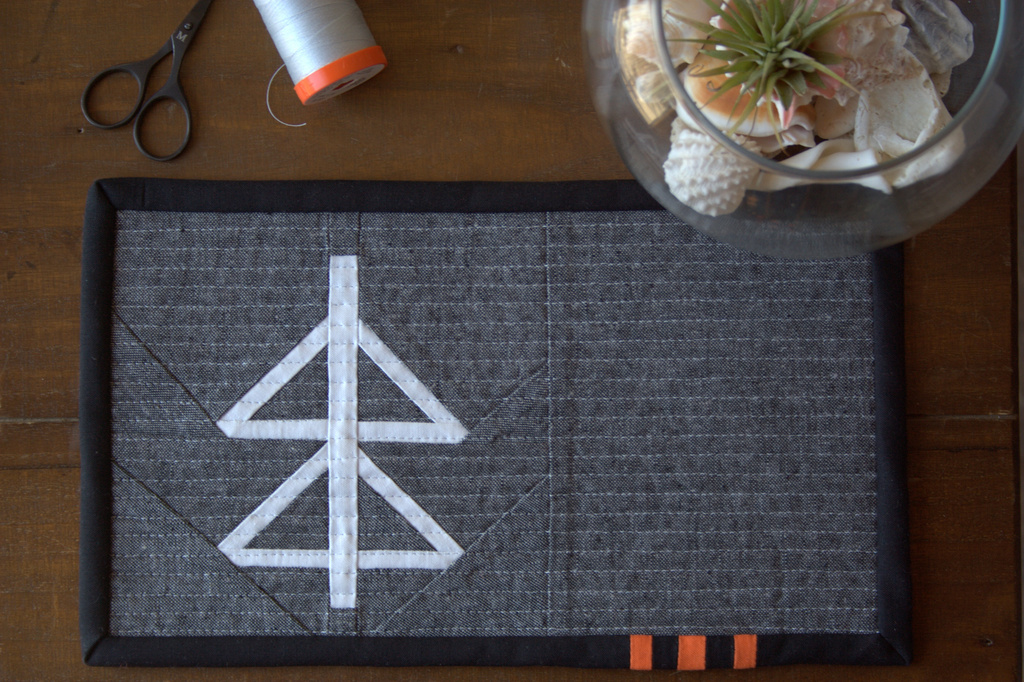
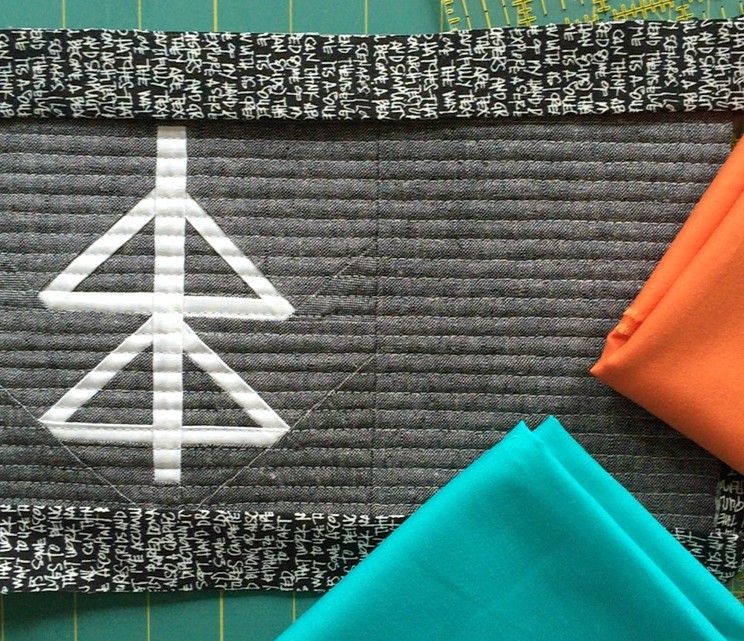
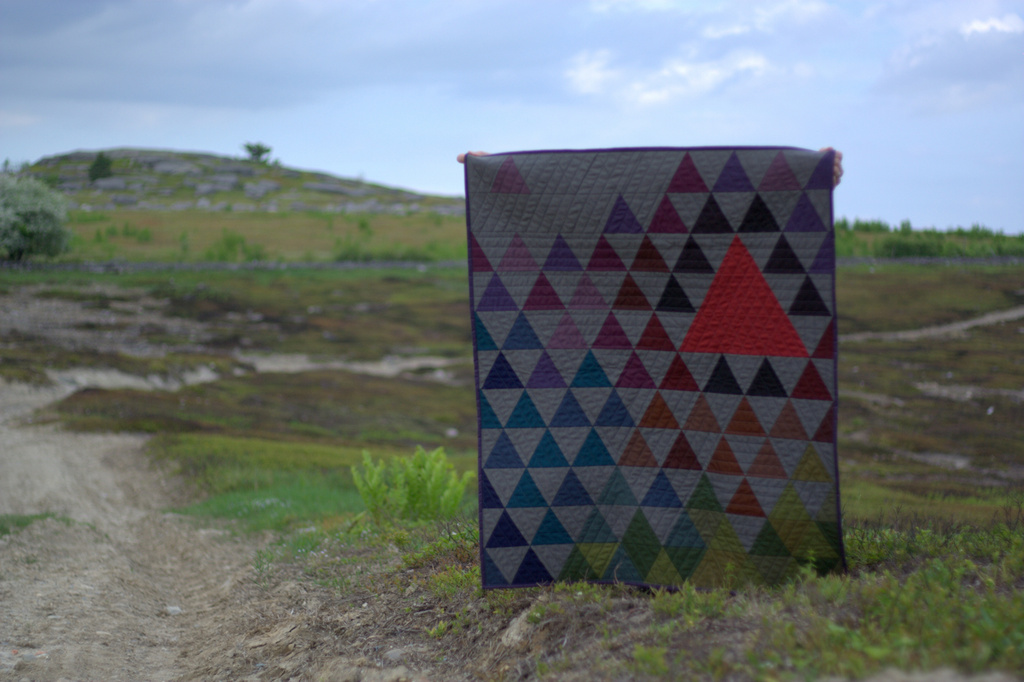
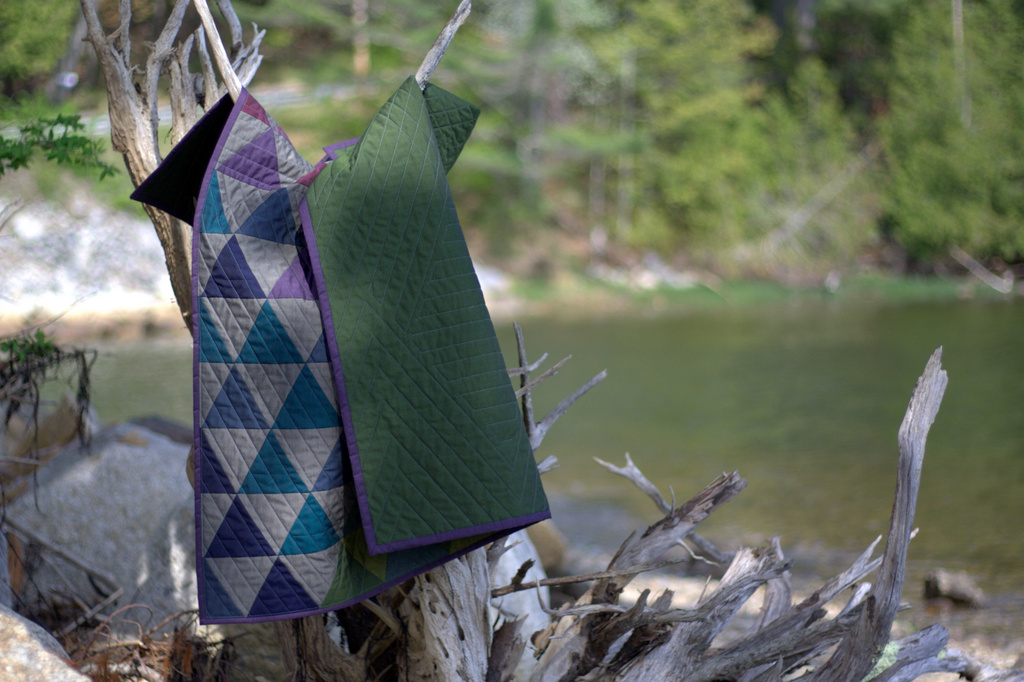
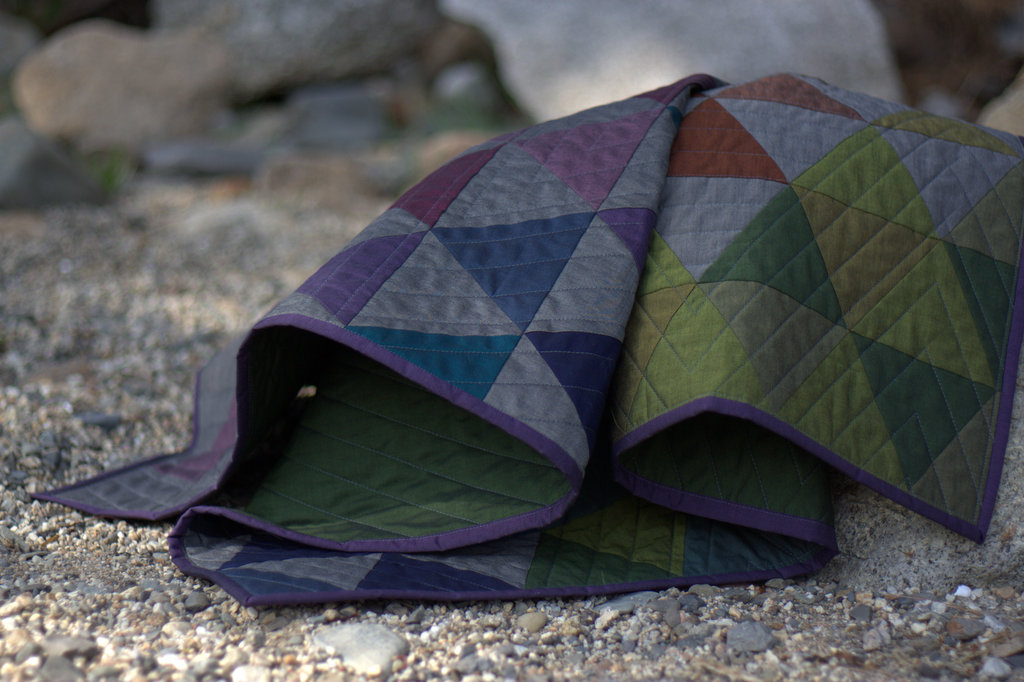
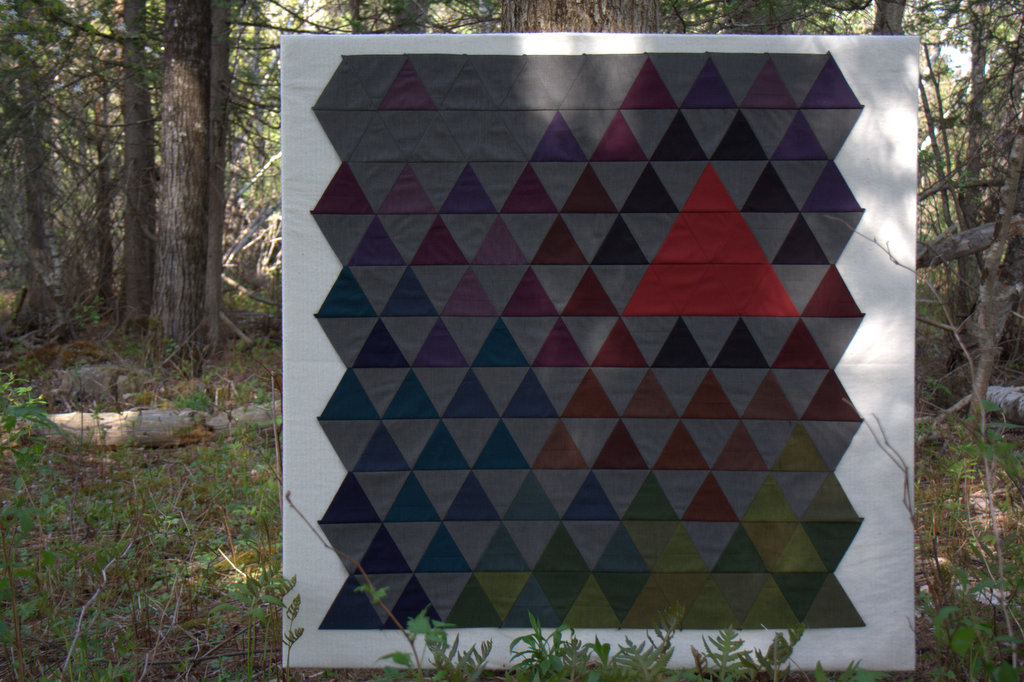
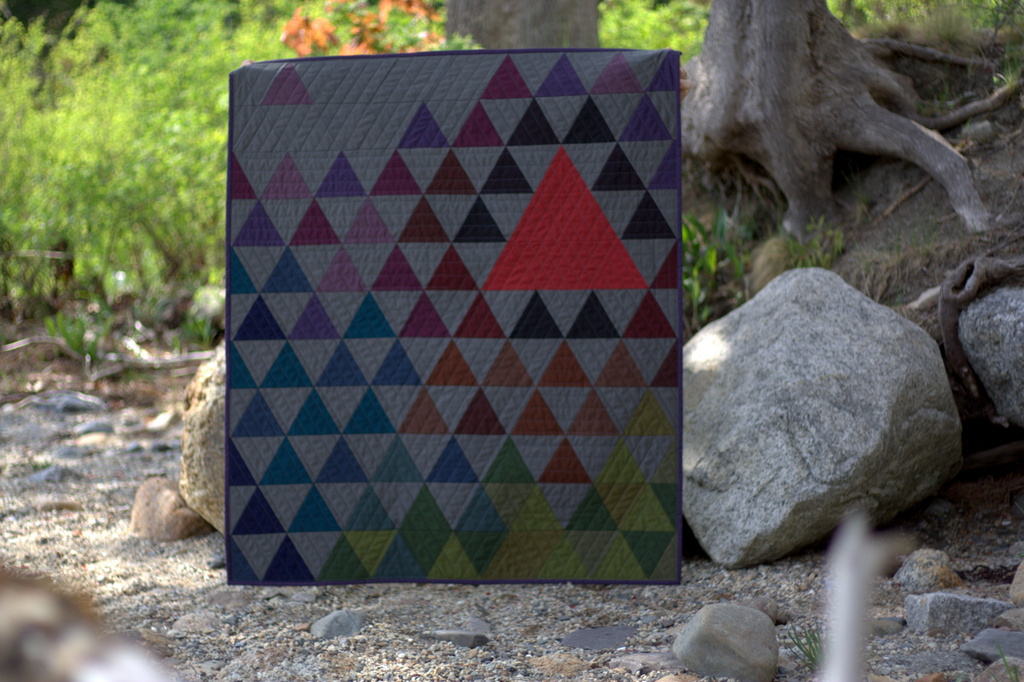
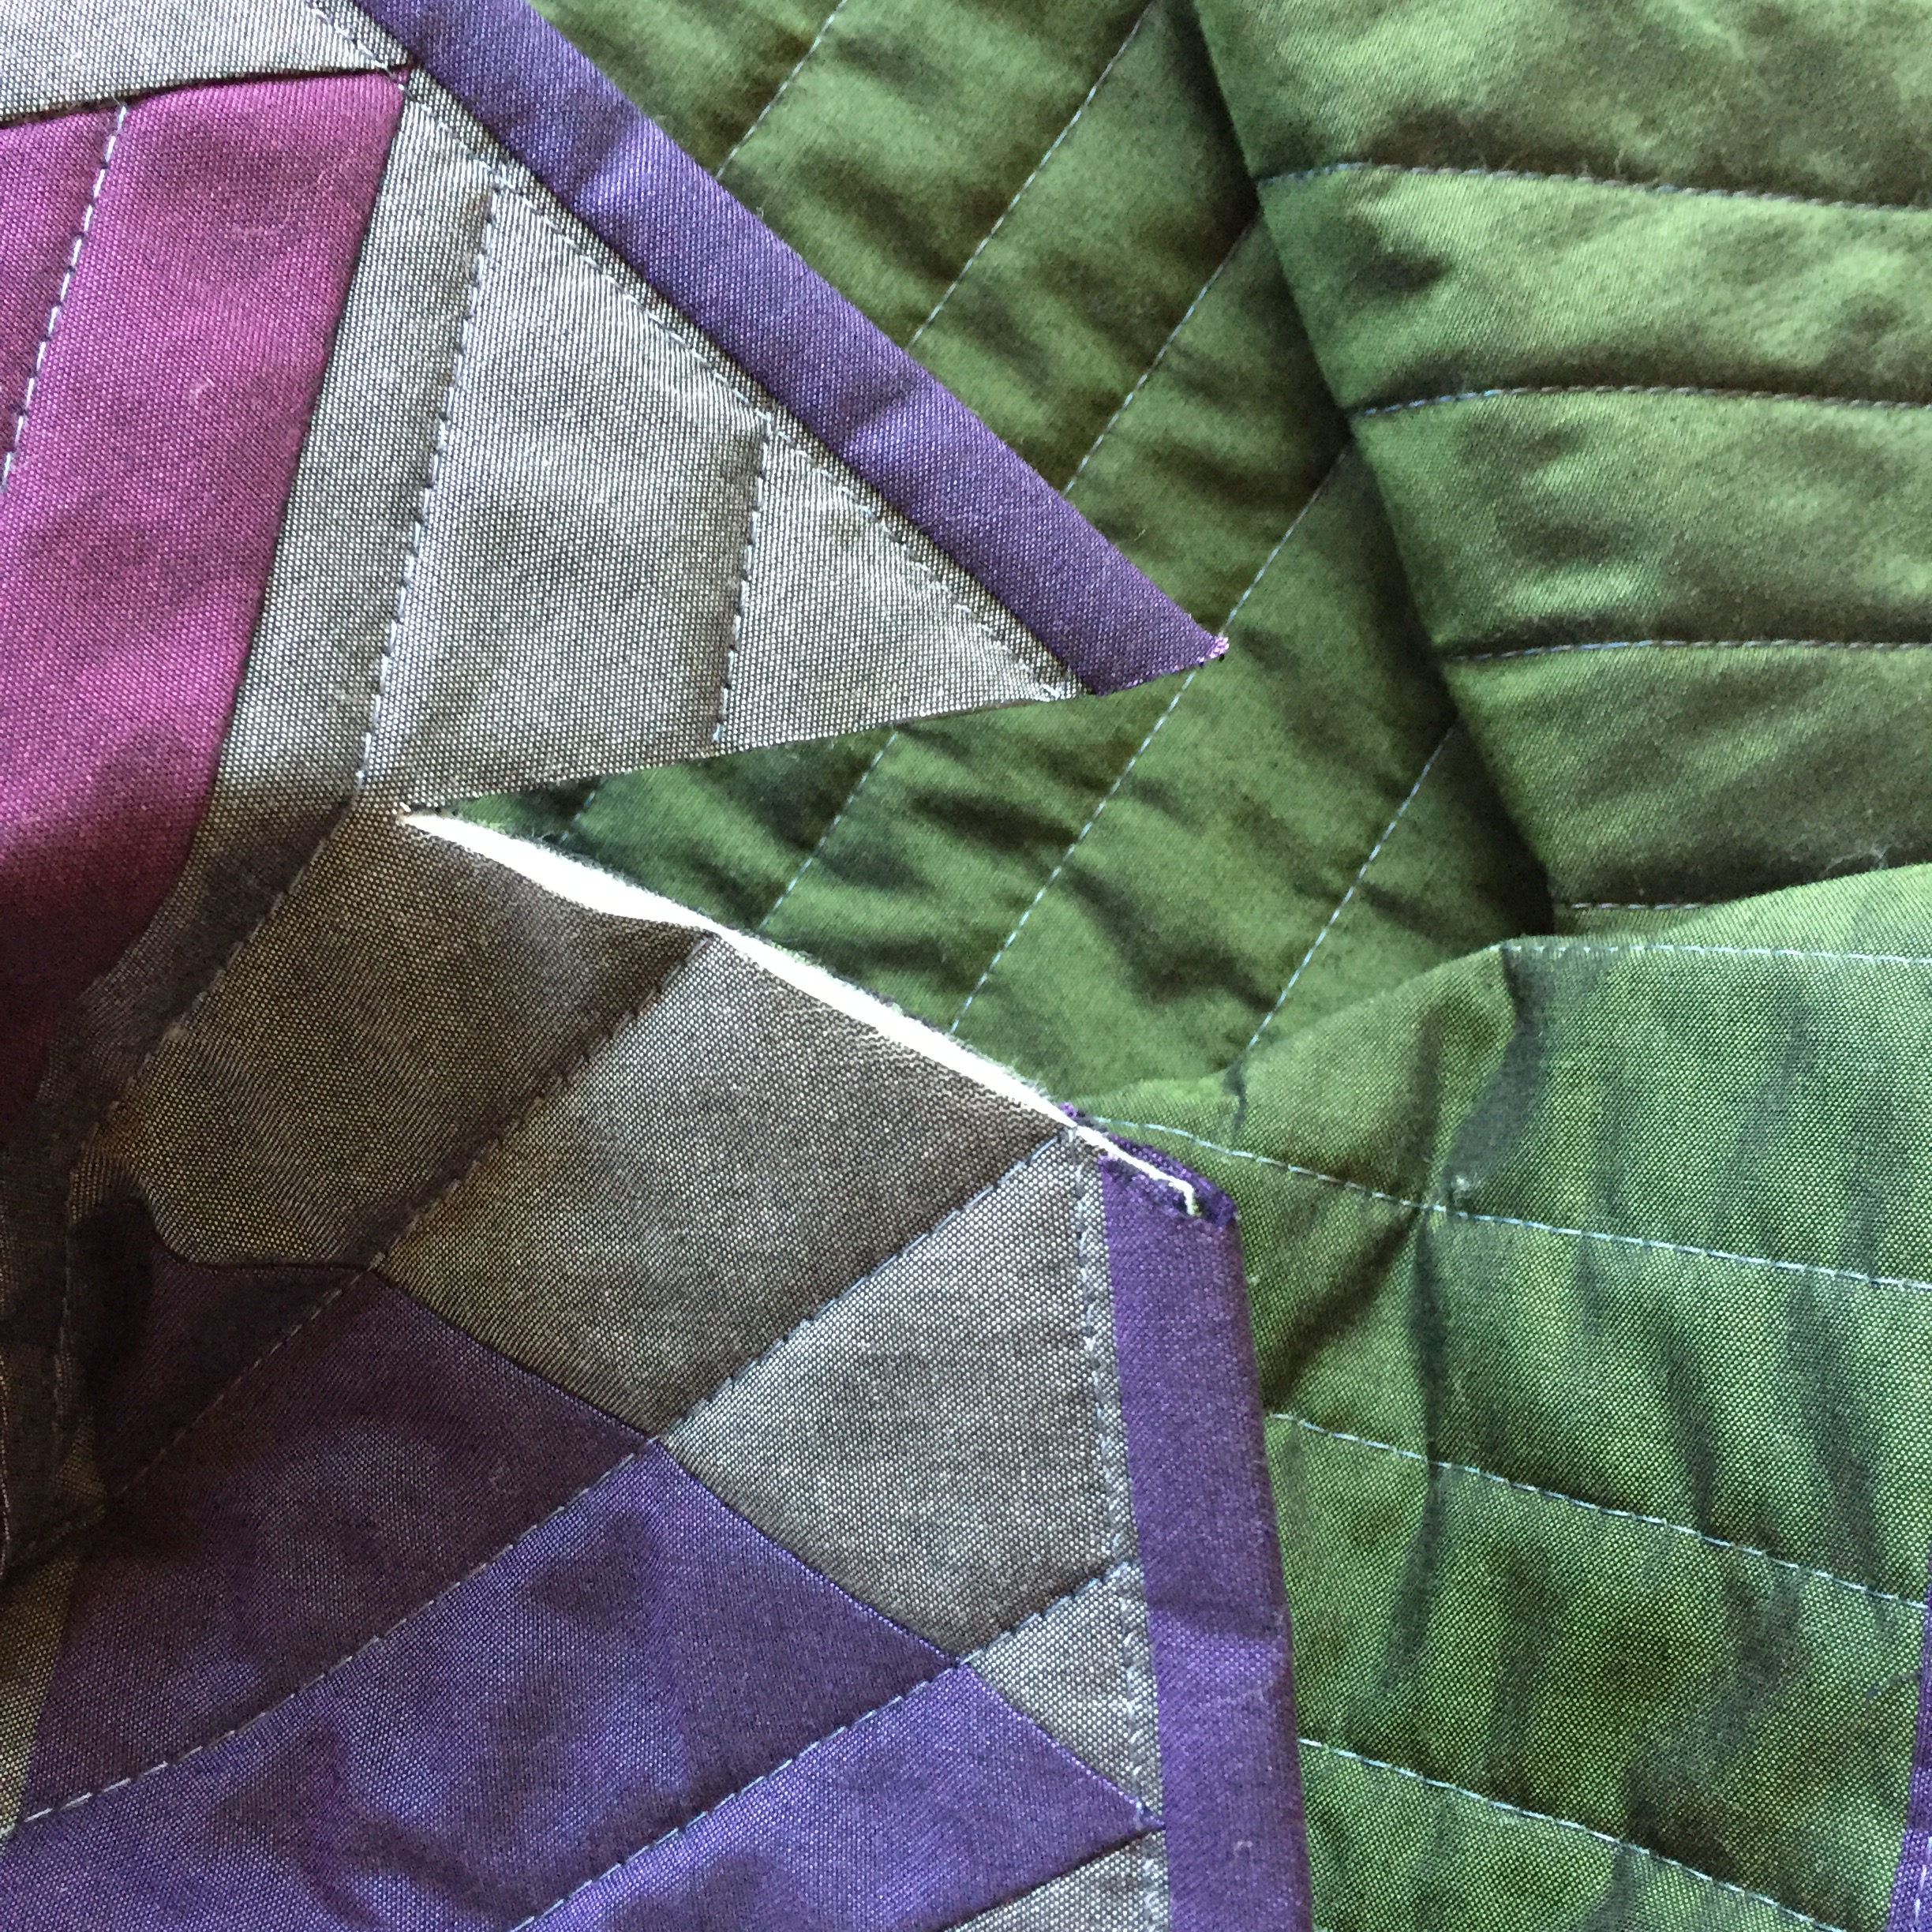
This was my first time working with Oakshott fabrics, and they are so luxurious! They are a woven fabric and feel almost silky to the touch. They feel more substantial than other shot cottons I’ve used, and the Lipari line looks iridescent since the warp is black and the weft is a bright jewel tone. These fabrics come to life when you see them in person–photos truly don’t do them justice. The Lipari line was inspired by volcanoes and the description from Oakshott says it best: “Lipari perfectly captures the primordial beauty of the Aeolian islands. Its luminous colours mirror cobalt seas, lush greenery, pink bougainvillea and shimmering sun; a beauty shot through with dark, fine-grained volcanic rock and black sand.” As soon as I read this description, I knew my quilt had to be a reflection of this volcanic inspiration. Thus, my Vesuvius quilt was born.
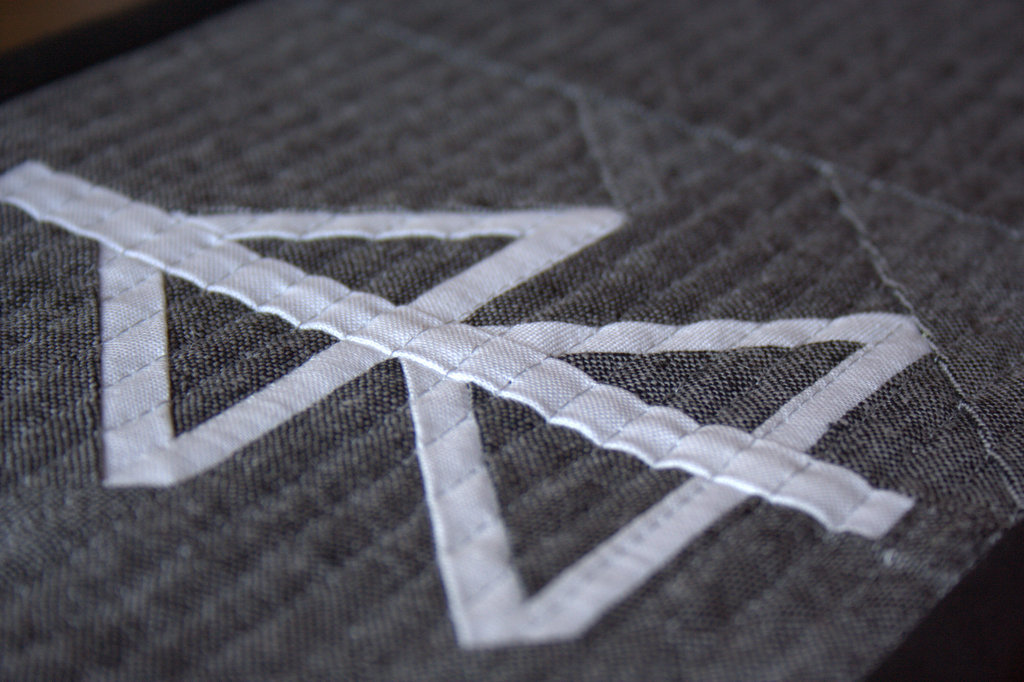
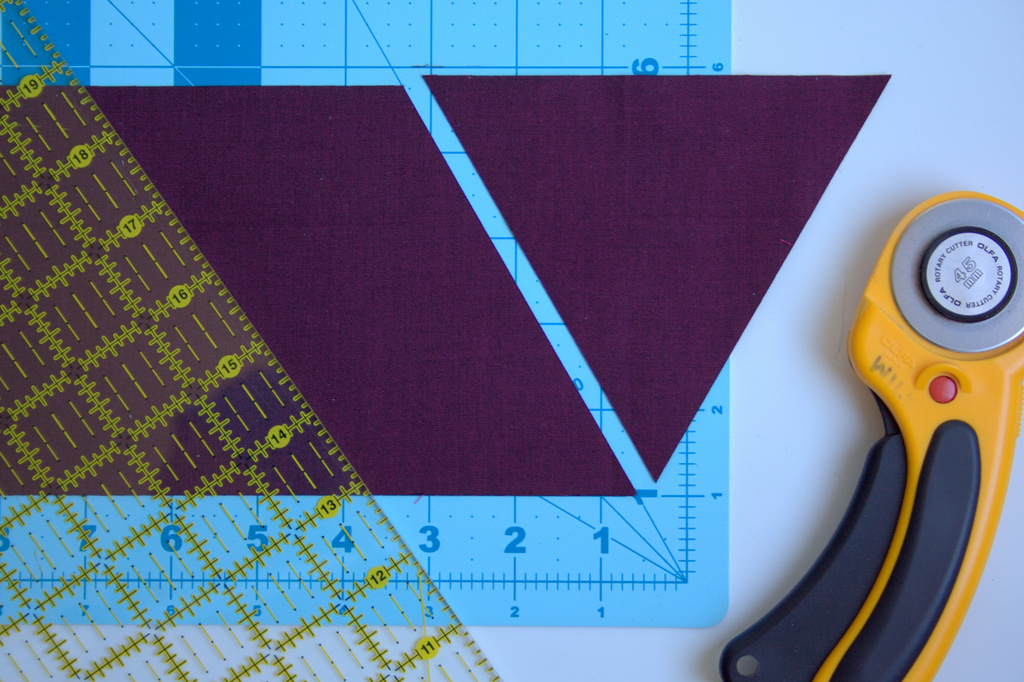
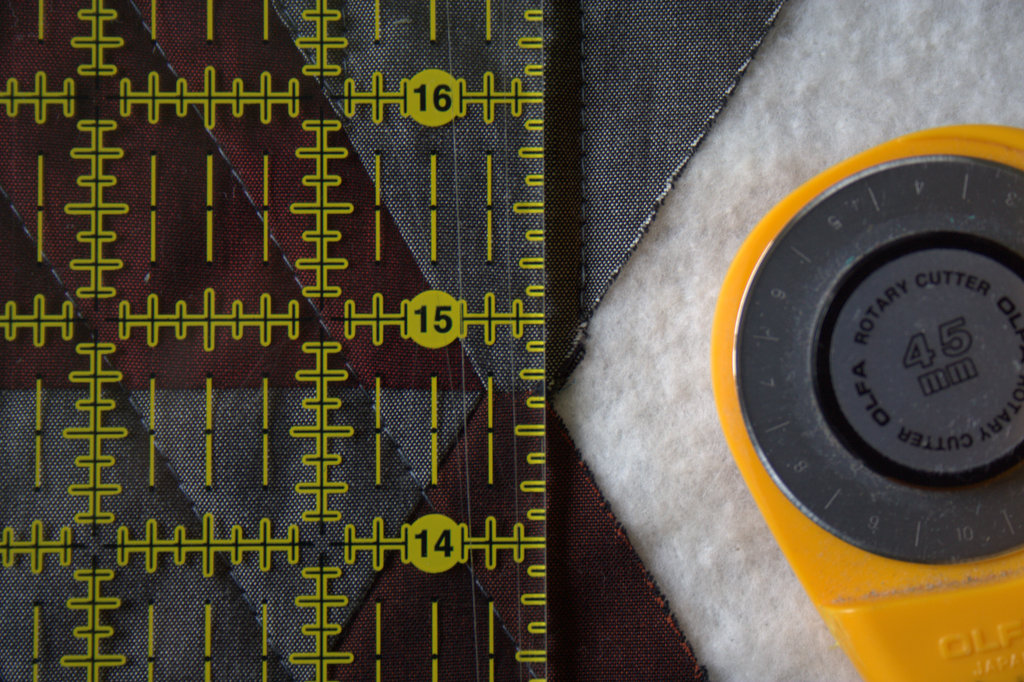
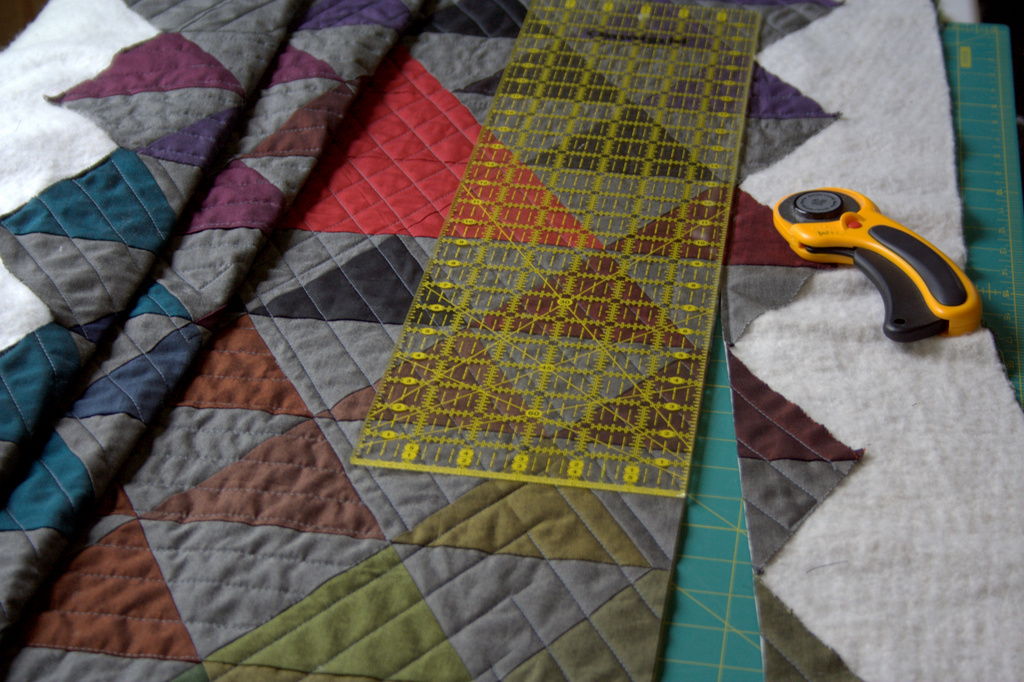
I made my Vesuvius quilt with 60 degree triangles, to elicit the sharp peaks of the mountainous volcanoes. I pulled in some Ruby Red – Toledo for the molten focal triangle, and let the Lipari steal the show. I used my Sizzix die cutting machine to speed up the cutting process. I really wanted to photograph this quilt next to a volcano, but I had to settle for some blueberry barrens and a Maine coast beach.
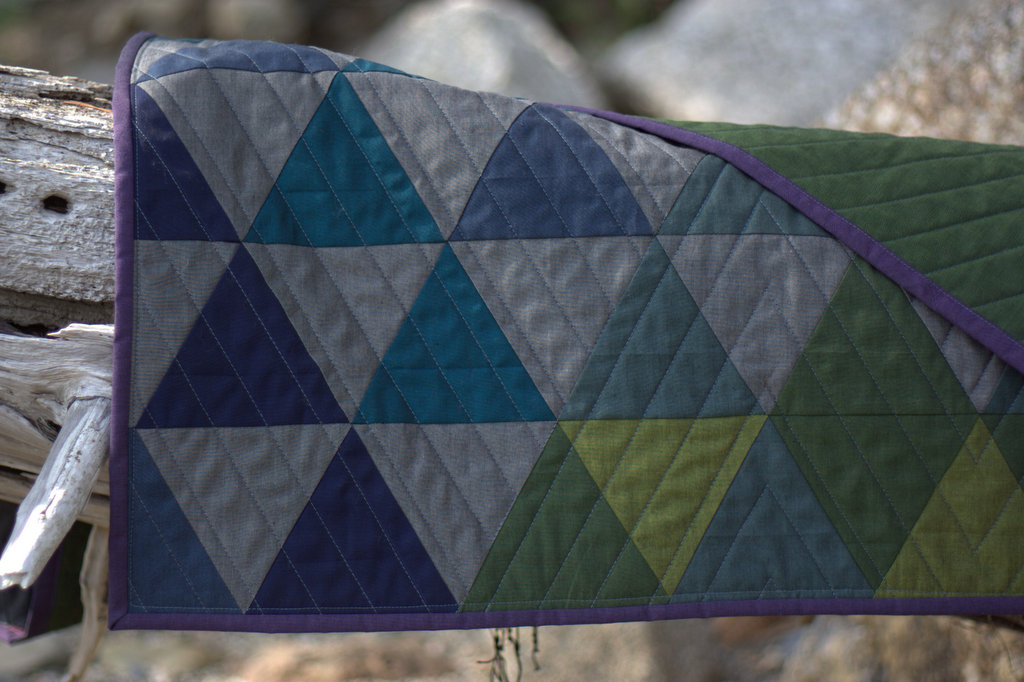
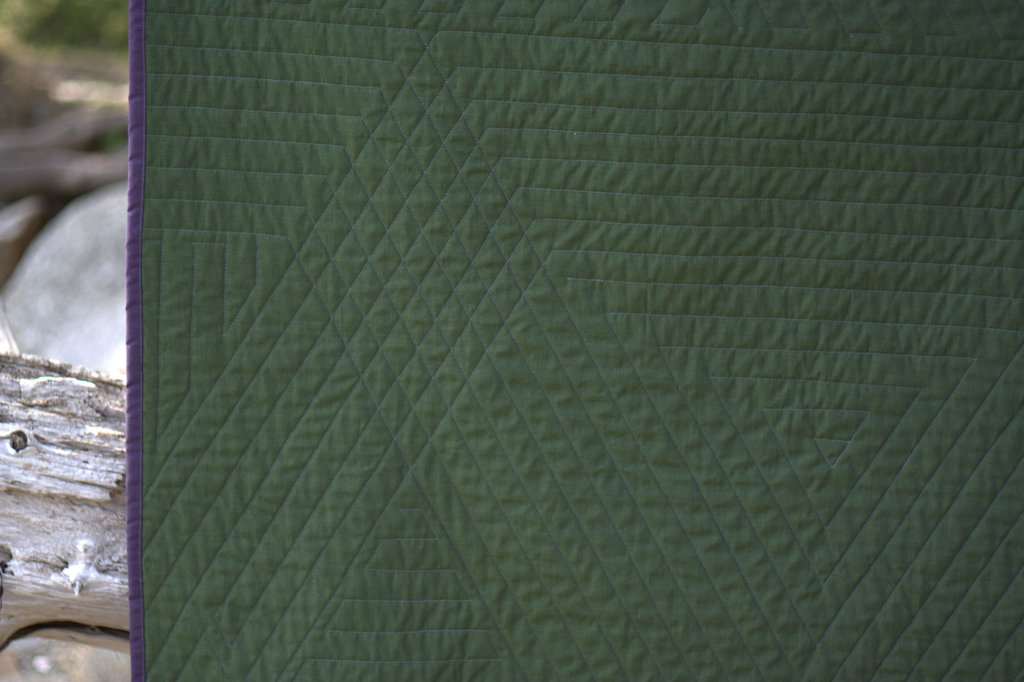
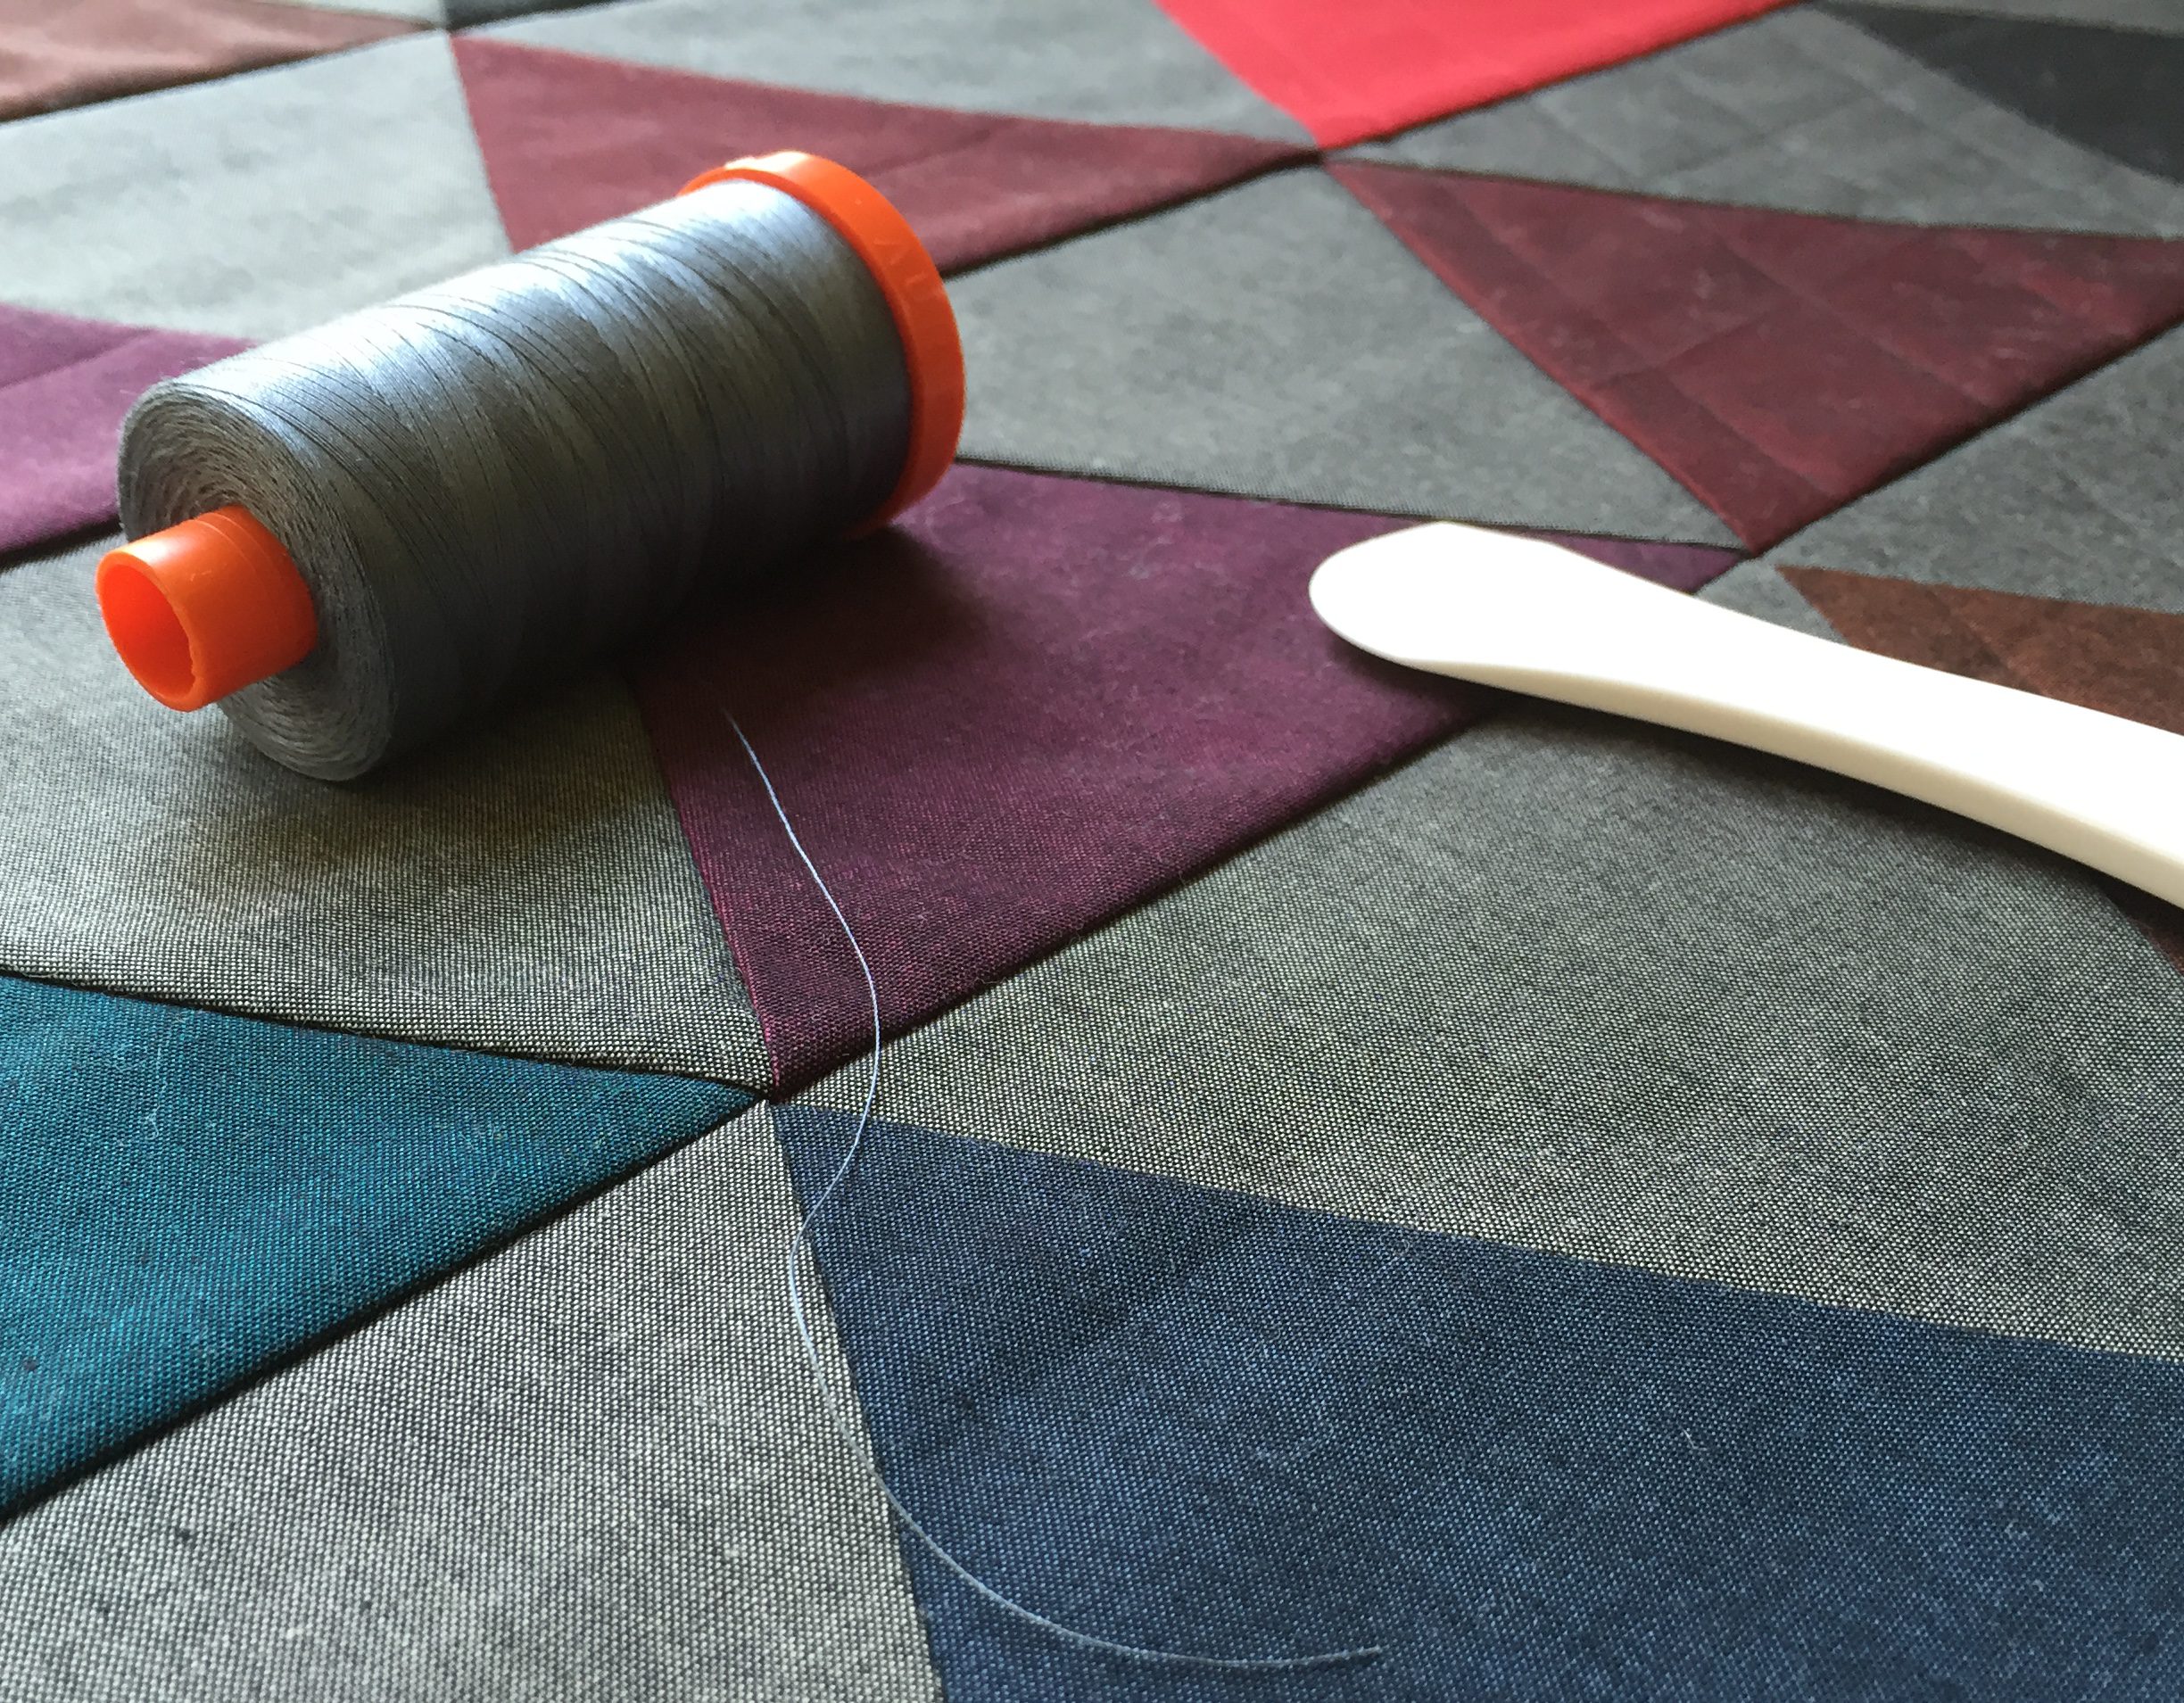
I quilted Vesuvius with 50 wt Aurifil thread 1246-Grey, which blended wonderfully with the Lipari Pollara (grey) I used as a background color. I used the walking foot on my domestic Bernina 560 to quilt straight lines 1″ apart, switching up directions in various sections of the quilt to provide movement and added interest. I LOVE how it turned out!
The Lipari Porticello (dark green) backing shows the quilting wonderfully, although it’s tough to get the full effect through photos!
I was torn on what color to use as the binding, but decided that Lipari Gallina (purple) frames it nicely.
This quilt finishes at 36″x43″ so would make a wonderful wall hanging or sophisticated baby quilt. You could also add borders to make it larger.
Tutorial
Here’s how to make your very own Vesuvius quilt! (Note that Oakshott Lipari fabric is 54″ wide. Typical quilting cotton is approximately 42″ wide, so plan accordingly)
Materials
A fat eighths bundle of Oakshott Lipari
1/8 yard of Oakshott Ruby Red Toledo
3/4 yard additional Lipari Pollara (grey)-negative space
1 1/4 yards Lipari Porticello (dark green)-backing
1/3 yard Lipari Gallina (purple)-binding
42″ x 50″ piece of batting
Sizzix die cutting machine
Sizzix XL Triangle, Equilateral 4 3/4″ x 5 1/2″ unfinished die
–OR–
Rotary cutter, cutting mat with 60 degree lines, and ruler
Thread (I used Aurifil 50wt 1246-Grey for both piecing and quilting)
Sewing machine with a walking foot (I use a Bernina 560)
Rotary cutter
Hera marker
Pins
Small thread snip scissors
Cutting
Using your method of choice (see below for instructions for each method), cut the following number of triangles from each fabric:
88 grey (Lipari Pollaro)
9 red (Ruby Red Toledo)
From fat eighth Lipari bundle:
20 purples
27 greens/yellows
12 browns
19 blues
4 black-red
8 black
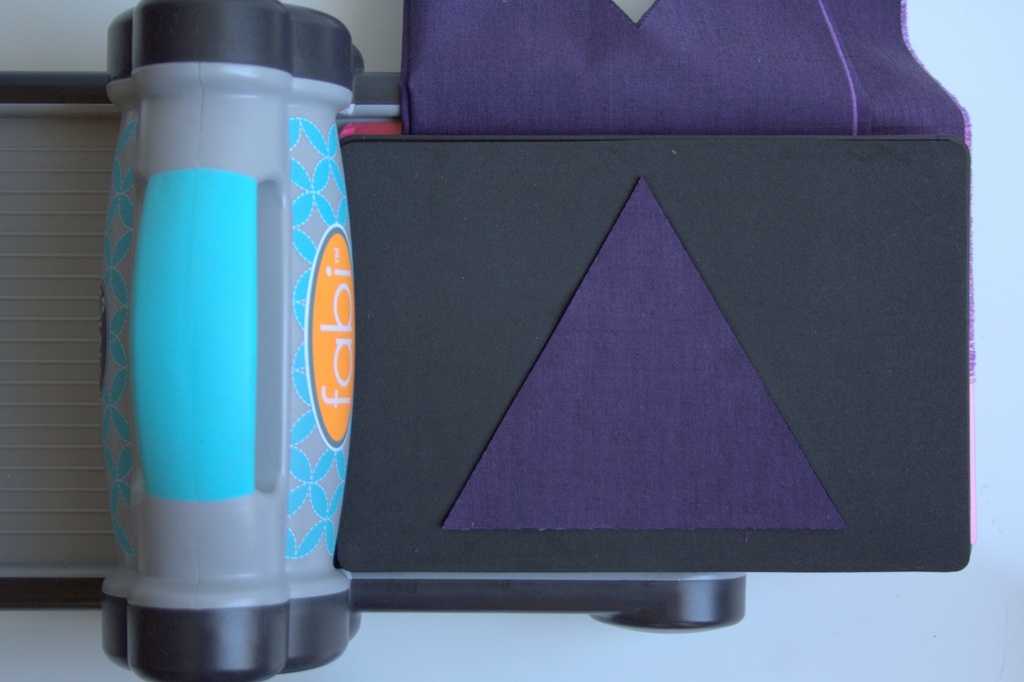
Using a Sizzix die cutting machine
I used my Sizzix Fabi and BigZ Triangle, Equilateral 4 3/4″ x 5 1/2″ unfinished die to speed up the cutting process.
When using your sizzix, cut 5″ x width of fat eighth strips of fabric of each color, fold them over the die blade in the Sizzix cutting sandwich (bottom cutting pad, die with the blade face up, fabric, top cutting pad), and cut 9 triangles at a time. Note that the Oakshott fat eighths are 10″ x 27″, which are larger than a typical quilting cotton 9″ x 21″ fat eighth.
After passing each strip of fabric through the Fabi die cutting machine, you can reposition the remaining fabric and cut triangles from the “scraps”.
If you don’t have a Sizzix, read on to find out how to cut 60 degree triangles with your rotary cutter, using the lines on your cutting mat.
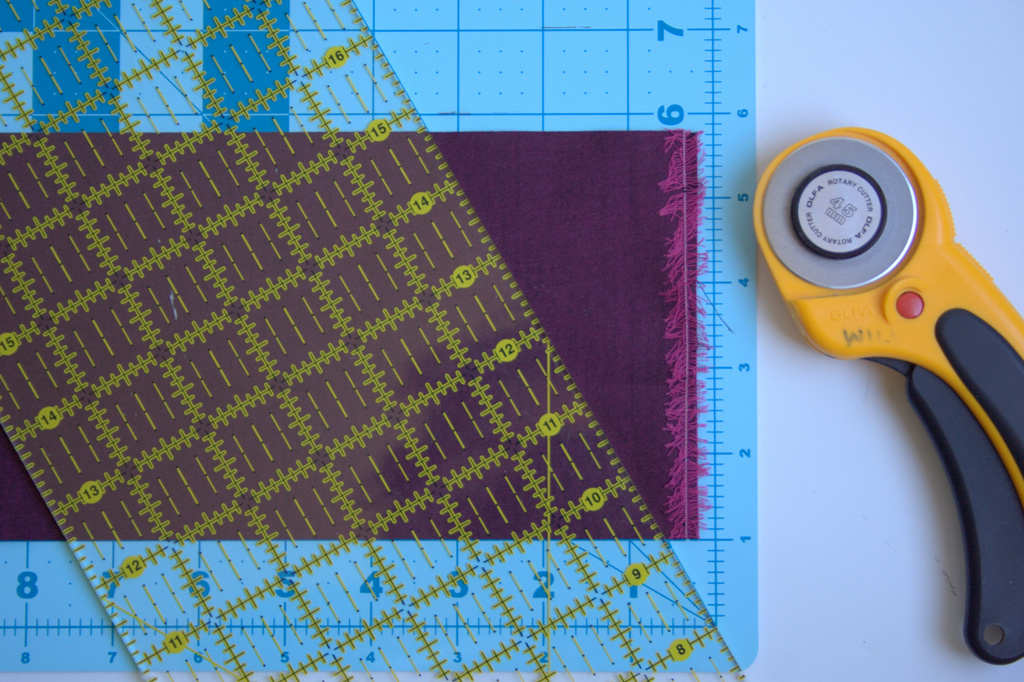
Using a rotary cutter and the lines on your cutting mat
First, cut strips 4 3/4″ by width of fabric. *Note: You can leave the fabric strip folded in half or doubled up if you’re using the width of fat eighth strips, allowing you to cut two triangles at a time!
Find the 30 degree line on your cutting mat. Yes, we are making 60 degree triangles by cutting along the 30 degree line (You have a 90 degree square to begin, trim off 30 degrees, then you’re left with 60 degrees!)
Align the bottom of your fabric strip along the 1-inch line. I use the 1-inch line so that you can see where the 30 degree line extends above and below the fabric. Place the edge of your ruler along the 30 degree line.
Using your rotary cutter, cut your fabric on the ruler angle.
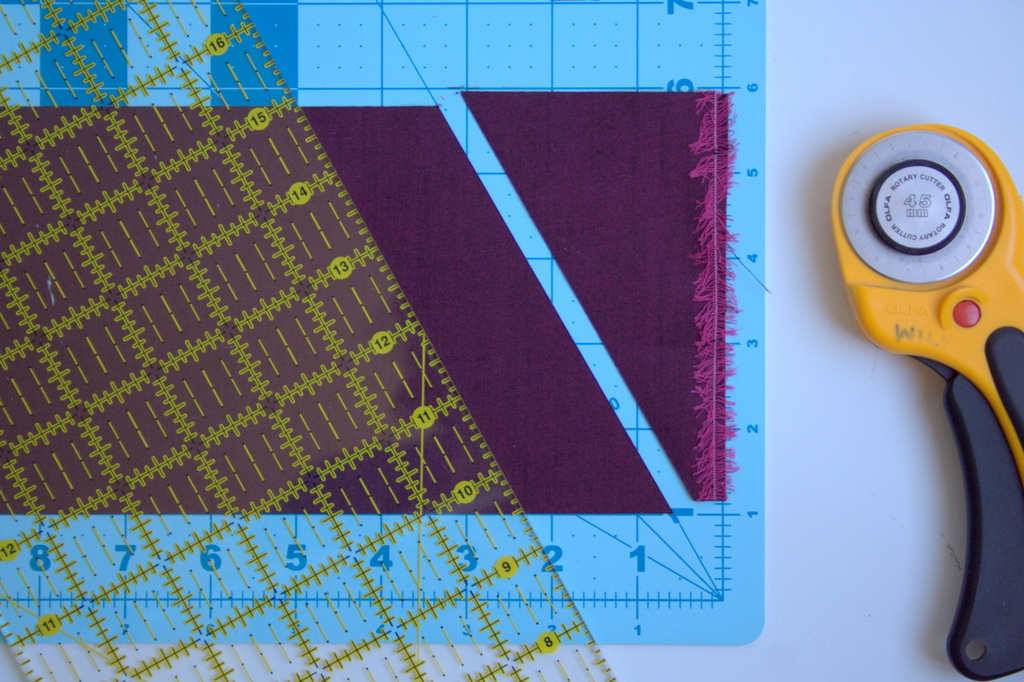
Flip your fabric strip over, then align the bottom edge with the 1-inch line on your mat, so that the bottom point of your cut is on the 30 degree line.
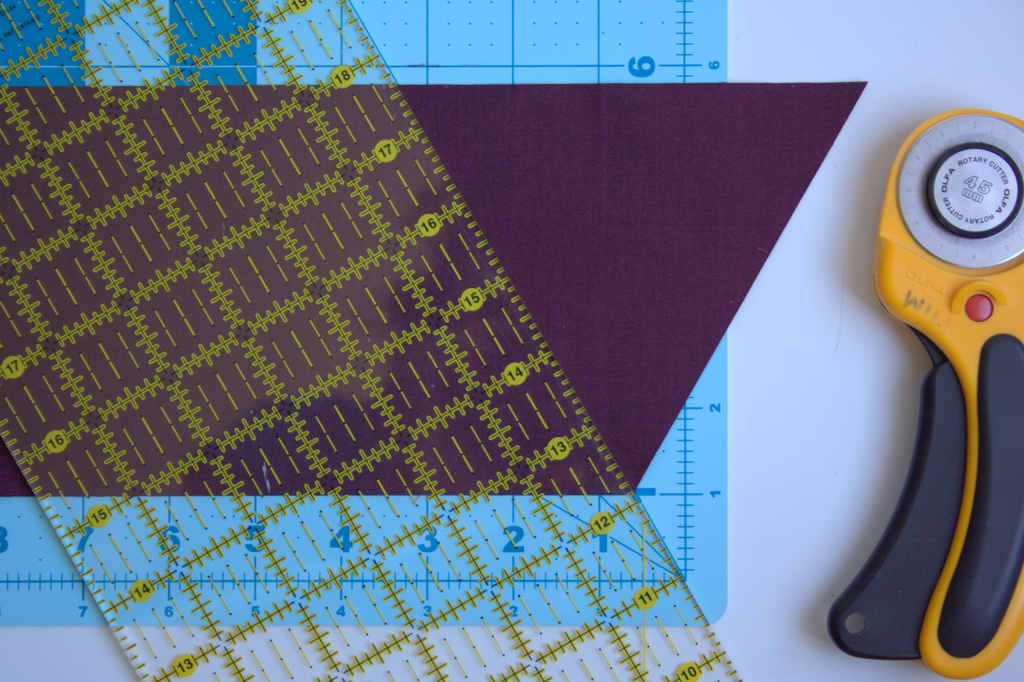
Again, place the edge of your ruler along the 30 degree line. Using your rotary cutter, cut your fabric on the ruler angle. You now have your 60 degree triangle, or two (2) if you kept your fabric strip folded in half. Cut as many as you need.
Piecing the Quilt Top
Once your pieces are cut, lay them out as shown. A piece of batting wrapped around a large wall board works well, but I have been often known to use my design floor to help with layout, too! (SizingNote: if you want a larger quilt, you could add a row of grey (Lipari Pollara) triangles to the right and left sides before sewing the rows together to maintain the outer triangle points when adding borders. Then, trim square and add rectangular borders to the desired size.)
Be sure to keep the grain of fabric running top to bottom (the woven texture of the Oakshott Lipari makes this easy to do since the grain is clearly visible when the fabric is held up to the light). Once your pieces are laid out as desired, it’s time to sew them together! Chain piecing helps the process go quickly and smoothly. Here’s how to set it up.
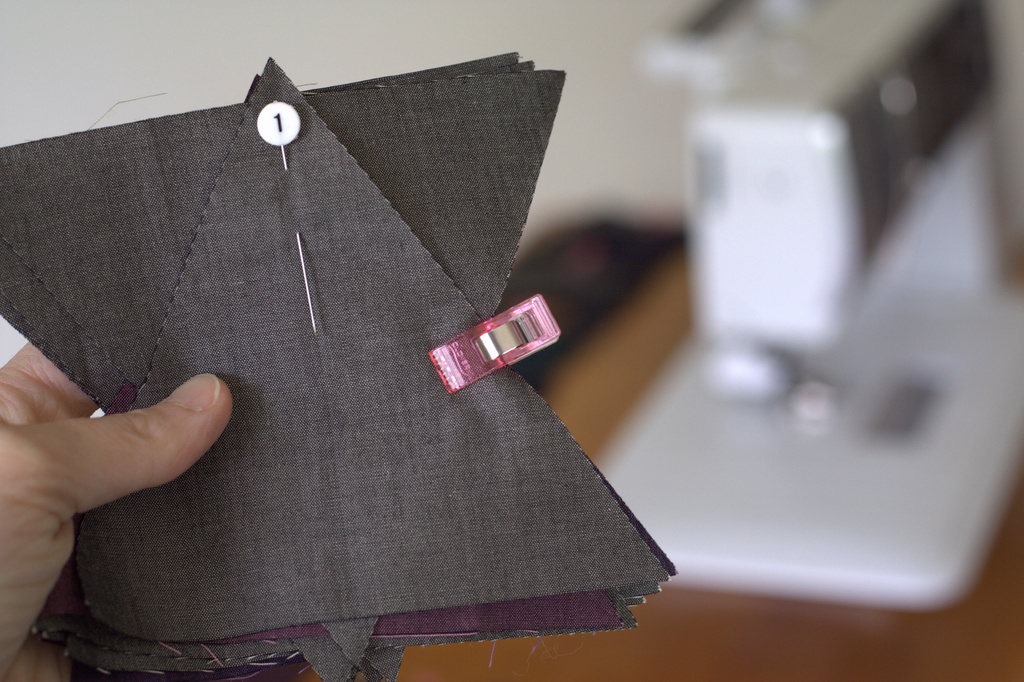
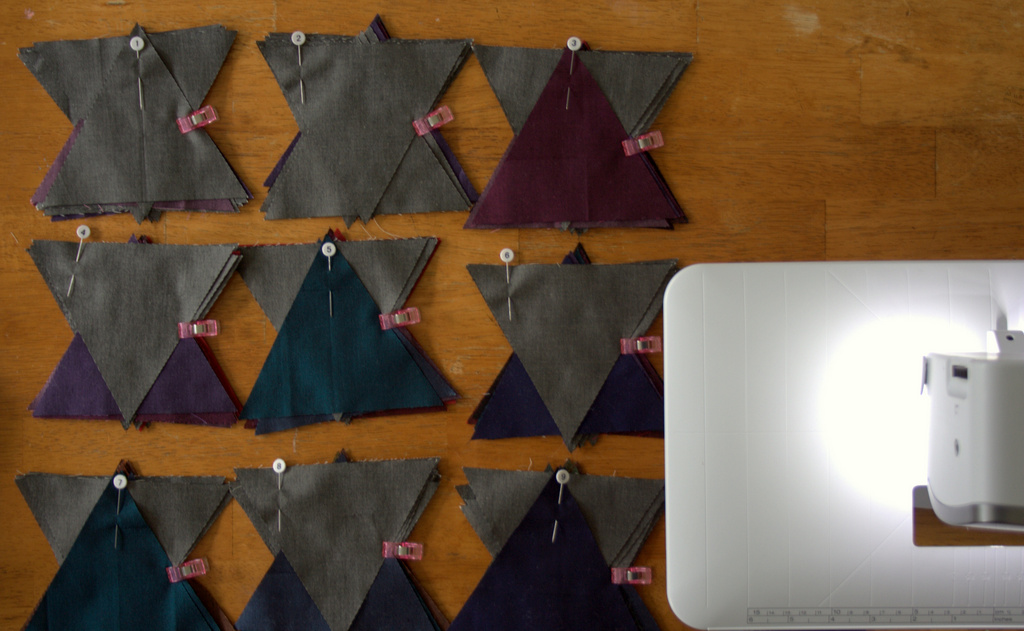
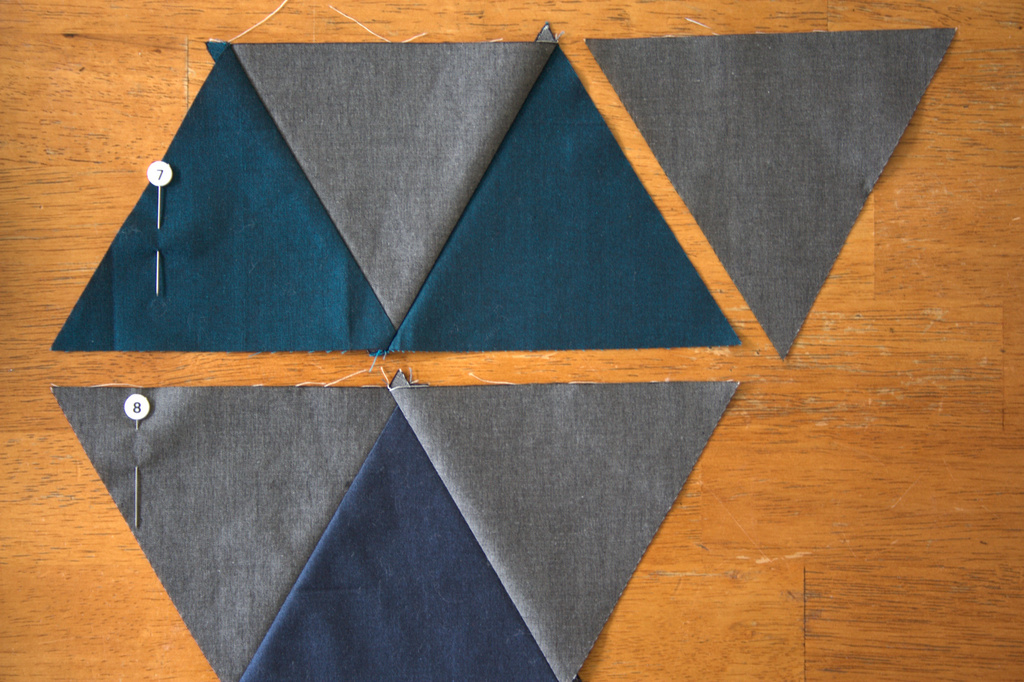
Label each horizontal row. I began with 1 on the top and ended with 11 on the bottom and used pins to label the first piece in each row (Note that I labeled each row after stacking, so the pins aren’t visible in these photos).
Carefully stack the triangles from each row, with the far left piece on top, and keeping the triangles facing the proper direction (this will help you keep them straight while piecing). For example, for row one, you will have the labeled first triangle piece from the far left on top, and carefully pick up each triangle across the row, adding it to the bottom of the stack.
Once you have your row stacked, use a clover clip or similar device to hold the stack together.
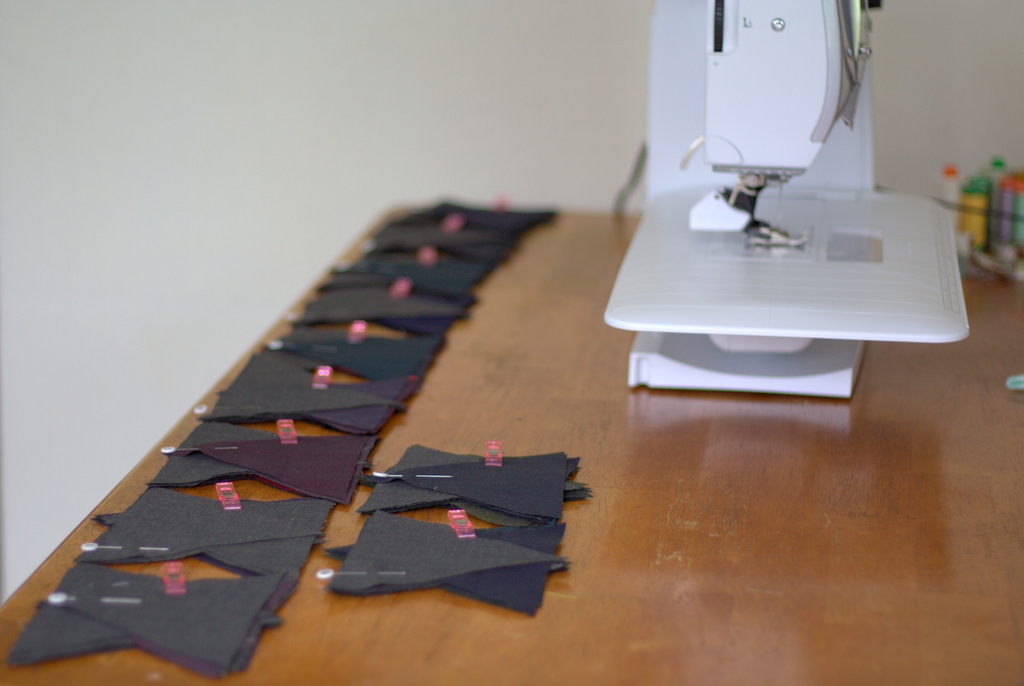
Gather all of your rows in this manner.
Lay them out in order, making a clear mental note of what row is located where. You could label a sticker on the table next to each stack to help, although simply keeping them in chronological order works well for me. Let’s sew! (Note that a table next to you works better than having the stacks this close to the sewing machine. As you add pieces, your strips will drag your stacks around if you keep them here as shown!)
To speed up the process, we will be chain piecing (sewing without stopping) the first piece to the second piece from every row. Note: Be sure to keep the pin labeling each row in the first block at all times!!
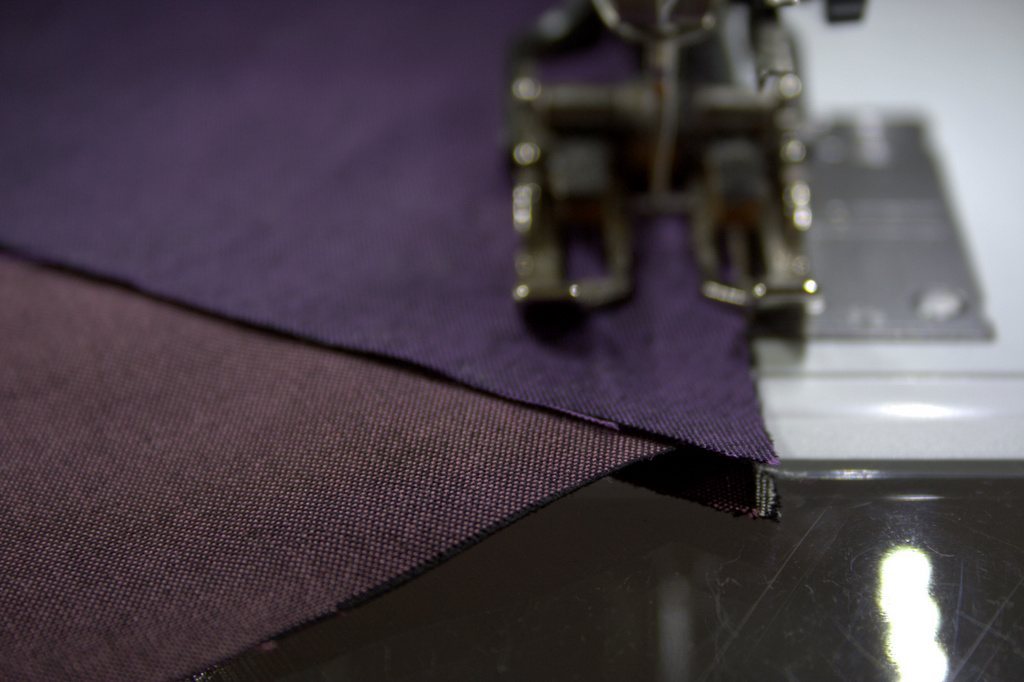
Once you have all of your first pieces sewn to your second pieces, trim the threads to separate, and press. All these bias edges means this is a great time to practice pressing, and NOT ironing. Press: up, down, up. Great!
Alternate which side you press your seam for each row. I pressed odd rows (1, 3, 5, etc.) to the left and even rows (2, 4, 6, etc.) to the right. Pressing open also works well!
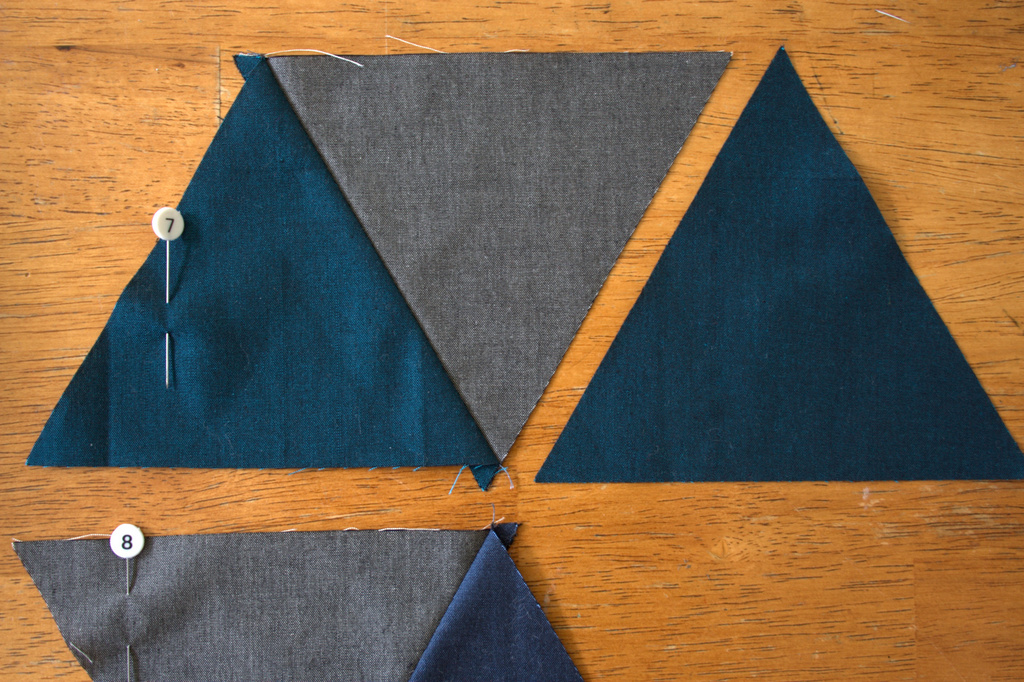
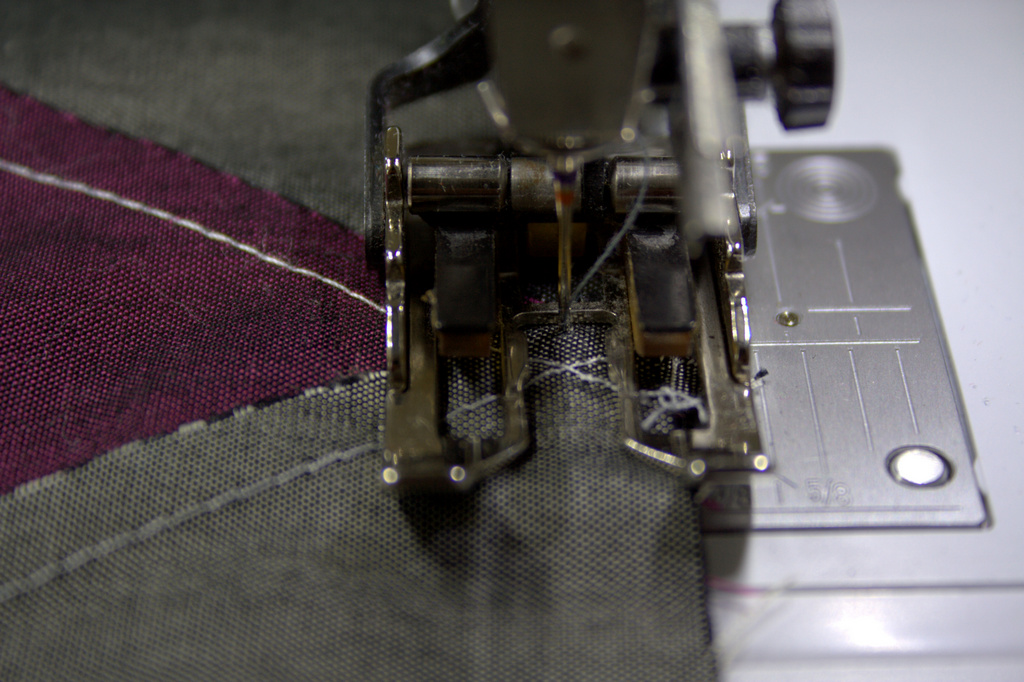
Next, add the next triangle to each row, chain sewing again. You’ll be sewing the third triangle (which is now on top of each stack) to each row. Double check the number pin on the sewn row before adding the next triangle, since you want to be sure to keep your gorgeous layout intact.
Continue chain piecing, trimming, pressing, and chain piecing again until all of your rows are assembled. As you add each triangle, stack those corners and everything will be right in line!
Sew all of the rows together, pressing seams up toward the grey triangles. I like to pin about 1/8″ after each point where the triangle points will be matching up, and aim to sew *right* through the center of the seam-cross to make sure you don’t cut off any points when sewing the rows together.
Quilting & Finishing
Once your quilt top is pieced, baste as desired. I decided to quilt my quilt before squaring it up because of all of the bias edges. I used 505 basting spray and spray basted for the first time! I used Christa Watson’s design wall spray basting tutorial and can see why people love it.
I decided to quilt my quilt with straight lines 1″ apart using the walking foot on my Bernina 560. I used a hera marker and a long quilting ruler to mark lines 1/2″ from some seams, and then 1″ apart from there. I sectioned the quilting in a few different sections, using straight lines 1″ apart but changing directions in each section. Lines intersect in the Ruby Red triangle, “exploding” out to the sides (like a volcanic eruption!?). The quilting lines don’t intersect anywhere else in the quilt. I really love the finished effect.
After quilting, it’s time to square up the quilt. Using a long, straight edge, trim 1/4″ away from the outer points so that you don’t lose any points when you sew on the binding. Use at least two sets of points to make sure your ruler is straight before cutting.
Square up your quilt, trimming off the excess, then bind!
Viola! Enjoy your Vesuvius Quilt, and please use #vesuviusquilt and tag me @nightquilter if you decide to make one.
Many thanks, again, to Oakshott for providing the fabrics for this project, and for including me in the hop. Make sure to check out the rest of the amazing Lipari projects:
*BREAKING NEWS* Volcanic action alert
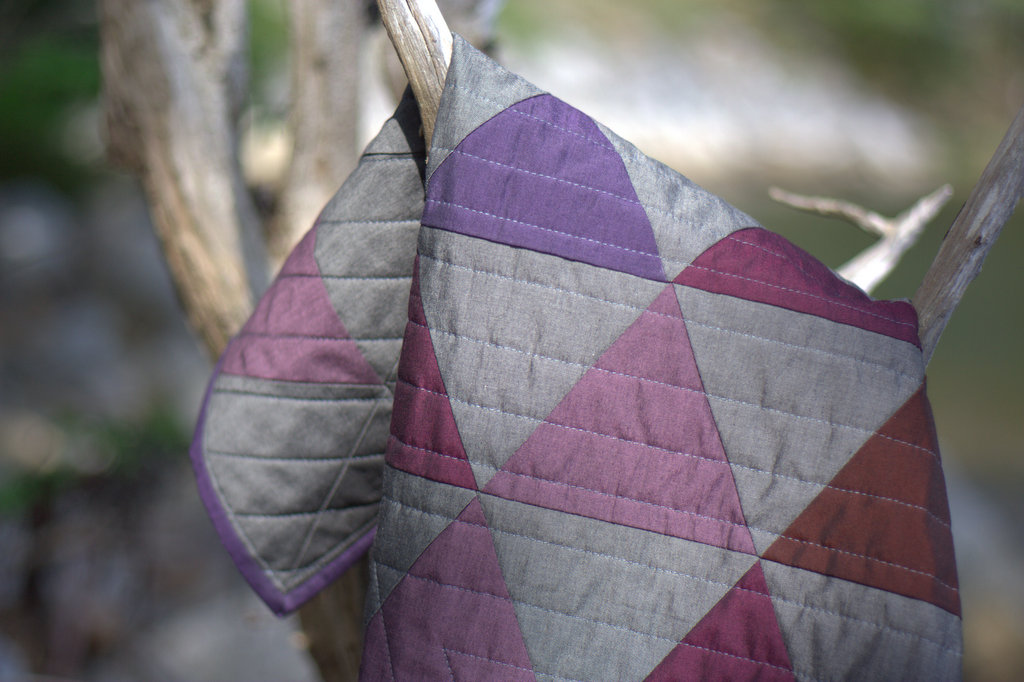
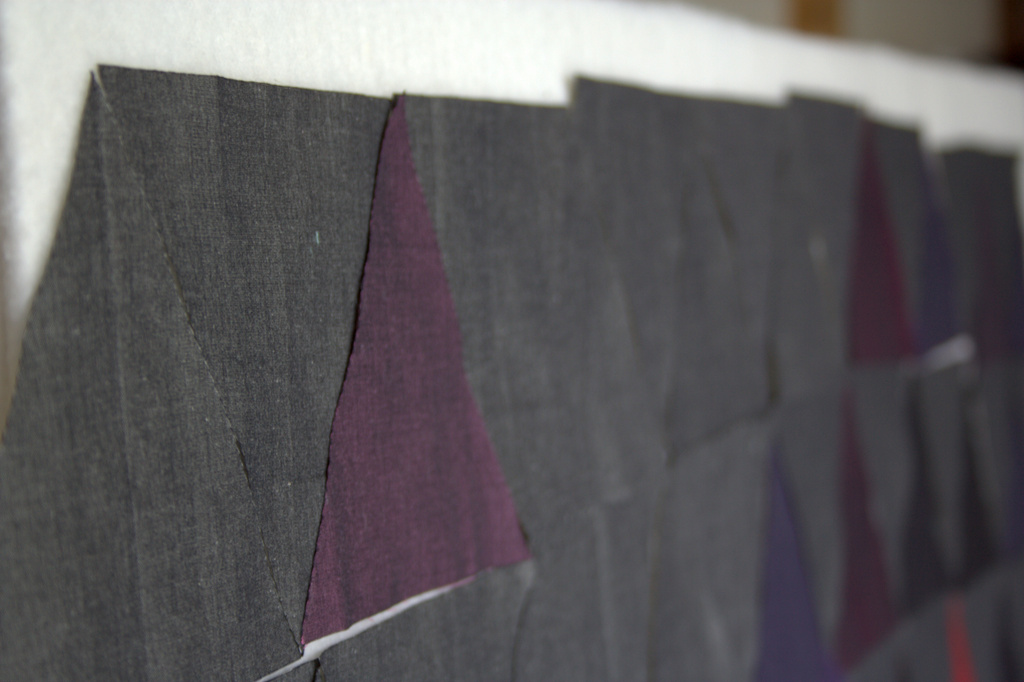
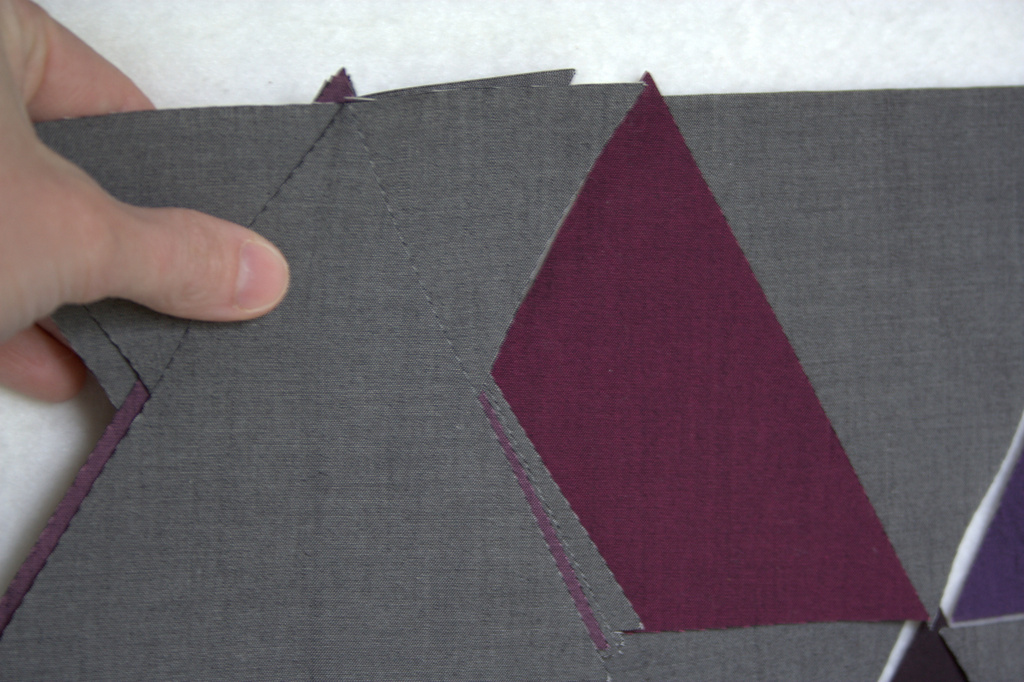
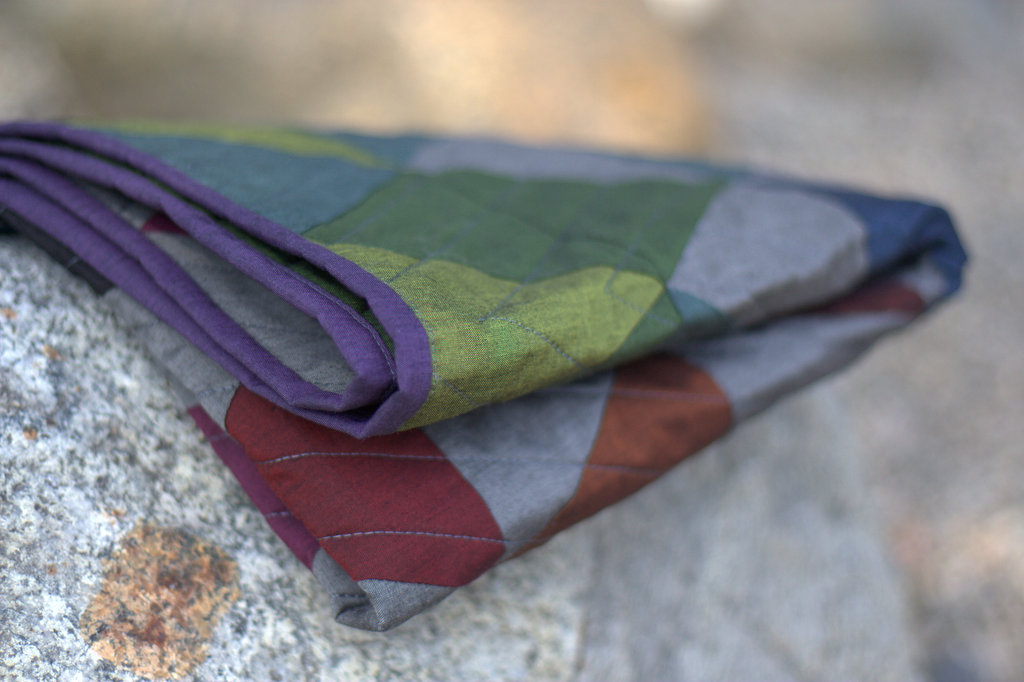
For those of you who follow me on Instagram, you may have seen the heart-wrenching fate of this quilt, that I so unknowingly aptly named “Vesuvius”: my nearly-four year old son cut into it in three places (along with a trail of destruction that included my Machinger quilting gloves cut into pieces and cuts into a big chunk of fusible fleece). With the great outpouring of support, commiseration, and suggestions offered by the fantastic community on IG, I’ve decided to make the cuts an added design element, another chapter in the story of the quilt, and sew either black or red patches over the cuts, making them into “fault lines”.
One of three cuts, now called “fault lines”, made into the edge of this quilt by my nearly-four year old son.
For now, though, I will put the quilt aside until I can dive into the repair with chuckles and reminiscence instead of lingering tears and frustration. I know that my son did not cut into my quilt maliciously, but it still is a difficult experience. I have made it known that if he ever wants to cut fabric again, he can tell me and I will help him make a quilt. We’ll see where it goes. For now, my Vesuvius Quilt (aka Max’s Fault Lines) is smoking and being buried by ash for a bit. It will rise again some day in the future.
**Note: I wrote this post four (4) weeks ago and between other scheduled tutorials and family sickness, it has yet to be posted. I’m finally scheduling it to post so that it goes up no matter what goes down on the homestead. Spring is in full swing here in Maine, now, so just pretend it is a month ago while reading this!**
Warm, sunny, peeks-at-summer days are popping up here and there, intermingled with some below freezing nights and a bout of snow a couple of days ago. Ahh, spring in Maine! We were able to escape on one last grand adventure as a family of three before my big kids returned from their vacation two weeks ago, and today’s color inspiration comes from our adventures at Popham Beach in Phippsburg, Maine. It’s a bit of a drive away at just over 2 hours, but somehow the stars aligned and Finn slept the entire drive down, making our day joyful and smooth. And such, “beaching it” is the theme of the week; color palettes were created using Play Crafts’ Palette Builder 2.1.
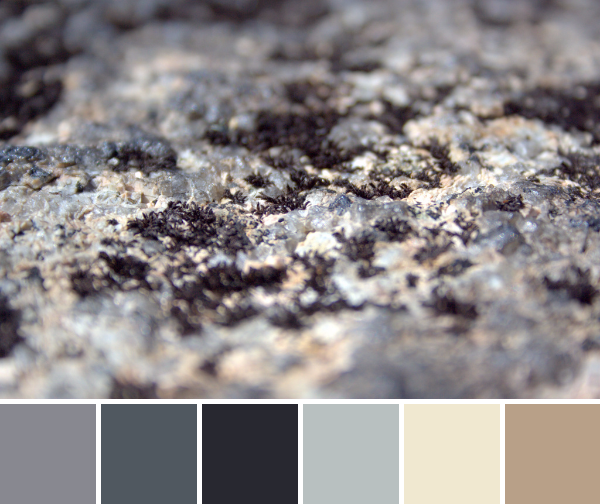
Corresponding solids from left to right: Kona Pewter, Bella Bunny Hill Blue, Bella Prairie Green, Bella Pistachio, Kona Parchment, Bella Etchings Charcoal
Corresponding Aurifil thread from left to right: 2606 – Mist
2560 – Iris 5010 – Beige 5016 – Olive Green 2326 – Sand 1140 – Bark
As soon as we began along the path to the beach, I was drawn to the sea grasses that grew along the dunes. Such perfect little spikes of green popping up through the fine sand, it’s amazing to think that they alone hold the shifting sands in place during the strongest storms. Yet another reminder of Mother Nature’s simple complexity. The soft greens of the grasses and beige tones of the sand give a quiet feel to this palette.
This grass-covered dune was gorgeous as a whole, too, and I was happy to see a nice solid fence and signage clearly explaining the importance of looking without touching (or walking).
Corresponding solids from left to right: Bella Peacoat, Kona Pewter, Kona Medium Grey, Bella Nautical Blue, Kona Spice, Kona Latte
Corresponding Aurifil thread from left to right: 2785 – V Dk Navy
2605 – Grey 1126 – Blue Grey 1310 – Med Blue Grey 4012 – Copper Brown 5010 – Beige
Great color combinations can be found in the most unexpected of places, like this old, rusty lobster trap that was washed up on the beach and almost entirely covered by sand. I am wishing I took a photo of this from further away, since you might not notice the intricacies of texture and color unless you take a closer look. Lovely rust! I actually have a quilt in the wayyyy beginning phases of planning using a rusty color palette like this. It might become a reality in a year or two!
Here are a couple more photos from our expedition, just for fun:
Check out that amazing driftwood!!
Here’s to another color inspiration post next week, featuring some of the gorgeous spring flowers that are finally filling our gardens! Enjoy your week!
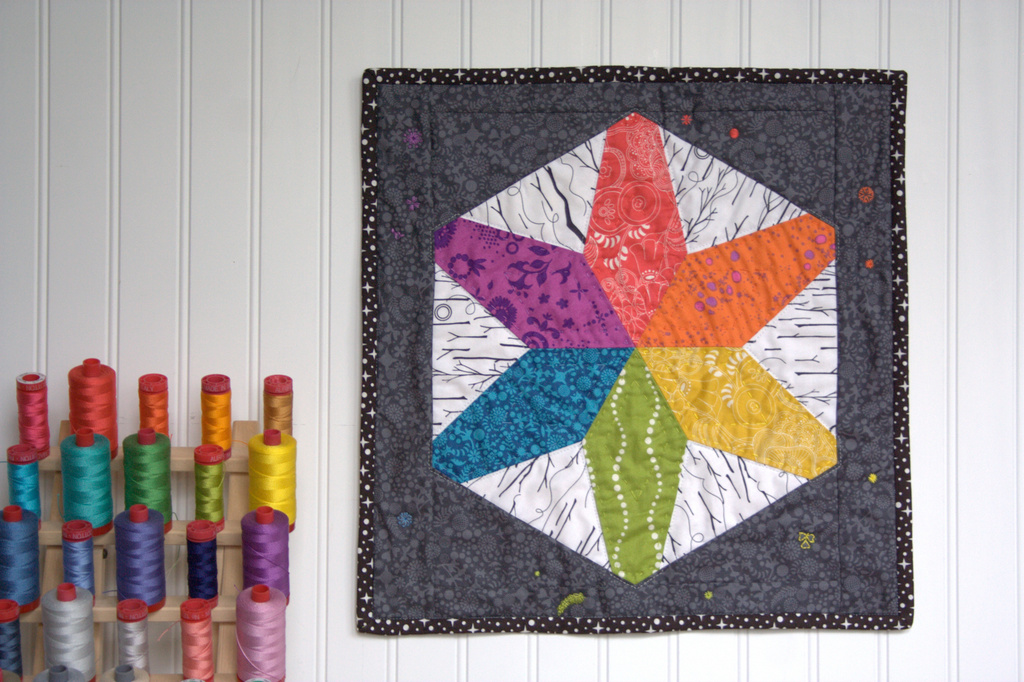
Last night kicked off the International Quilt Market, spring edition, which is in Salt Lake City this year. Much of my Instagram feed is flowing with pictures of sample spree booty, gorgeous booths, and peeks at new fabric lines and products. One product that is being introduced at Quilt Market as we speak is a new Sizzix die called Hex Star designed by Victoria Findlay Wolfe.
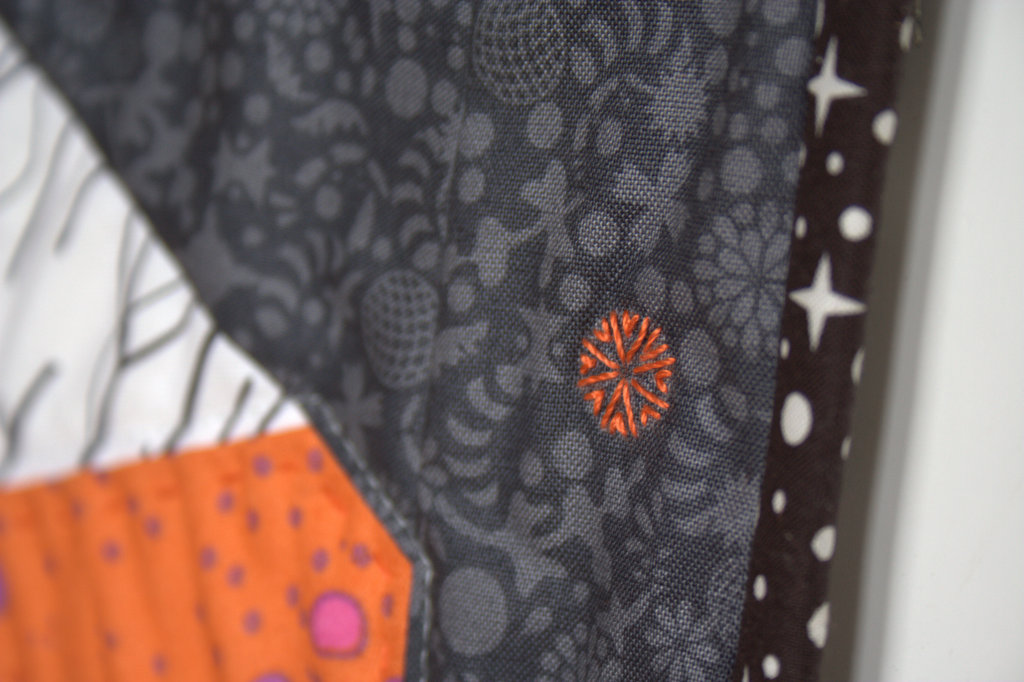
I got to play with this die in advance and I’m sharing the project I made with it over on the Sizzix blog today! It included my very first y-seams, rainbow hand quilting with 12 wt Aurifil thread, and a fun go at embroidery quilting (I may have invented that term myself–is it such a thing!?) I share a close look at my hand quilting, a tip for even stitches, and many more photos of the full project here.
Although the mini quilt is bound and finished, I am 99.9% sure I am going to do more embroidery-quilting on the Alison Glass Endpaper outer border. I was debating whether to stick with the colors extending from each arm of the star or to mix it up in the outer border, but I think I’m going to stick with the same colors as the center. I shared more detail photos of the quilting and embroidery in my Sizzix post, so head over to see more!
Here are the 12 wt Aurifil colors I used, just in case you want to try some rainbow hand quilting, too:
5002 – Medium Red
1154 – Orange
2120 – Canary
1147 – Light Leaf Green
4140 – Wedgewood
2540 – Medium Lavender
I’ll be sure to show you when I finally decide it’s really finished. For now, I’m linking up with Crazy Mom Quilts since this mini is technically finished (although is anything ever really fully finished when you have thread in your hand?)
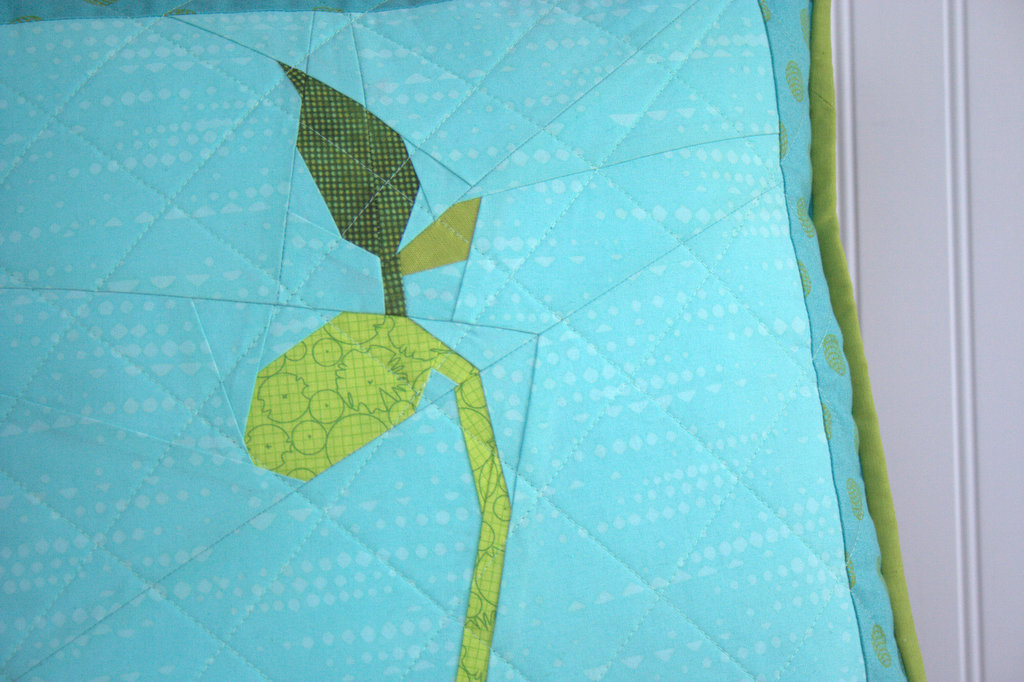
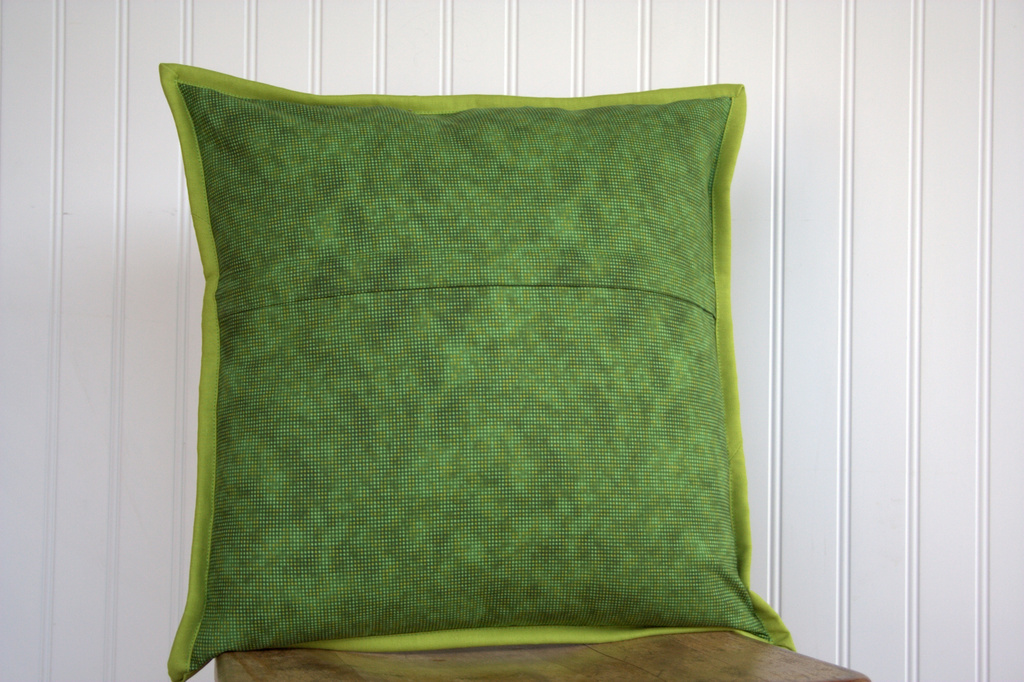
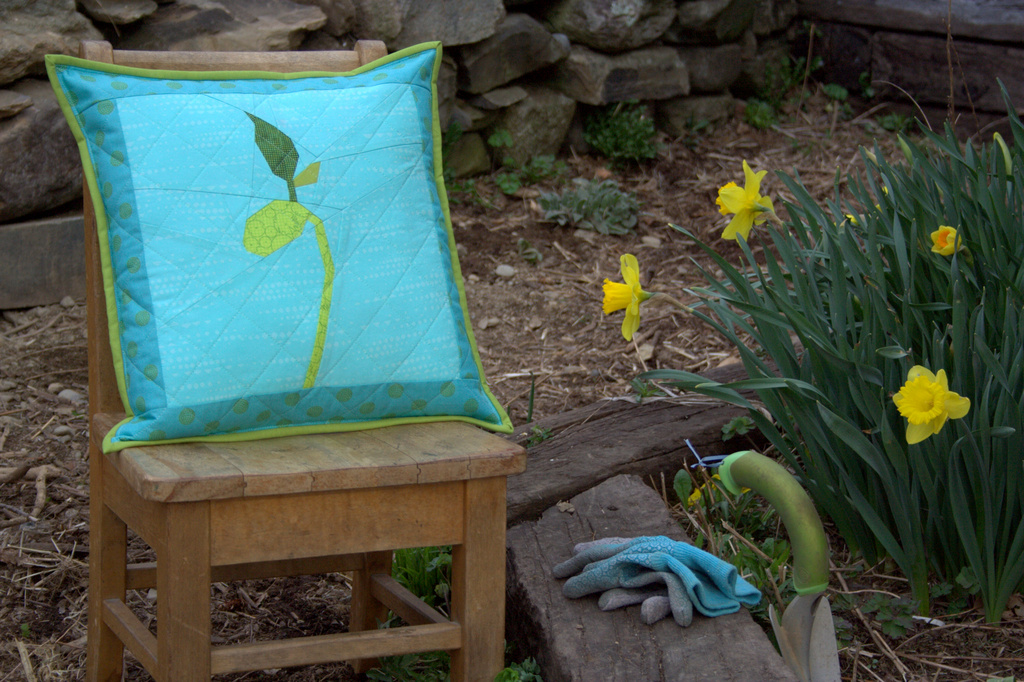
Earth Day has always been one of my favorites days. I strive to fully embody the “Earth Day is Every Day” ideal with my day to day life, from adopting a whale in third grade and frequent stream clean ups as a child, to majoring in environmental science in college, to aiming to instill a love and respect for the earth and all its creatures and functions in my children. The earth is our home, and it is our responsibility to help nurture and care for it. Today seemed like the perfect day to share my newly finished pillow featuring my bean sprout foundation paper pieced pattern.
I’m calling this pillow “Grow” and it will be donated to a fundraiser auction/raffle at our local school. The theme for the fundraiser is “Growth & Gardening” so it fits perfectly!
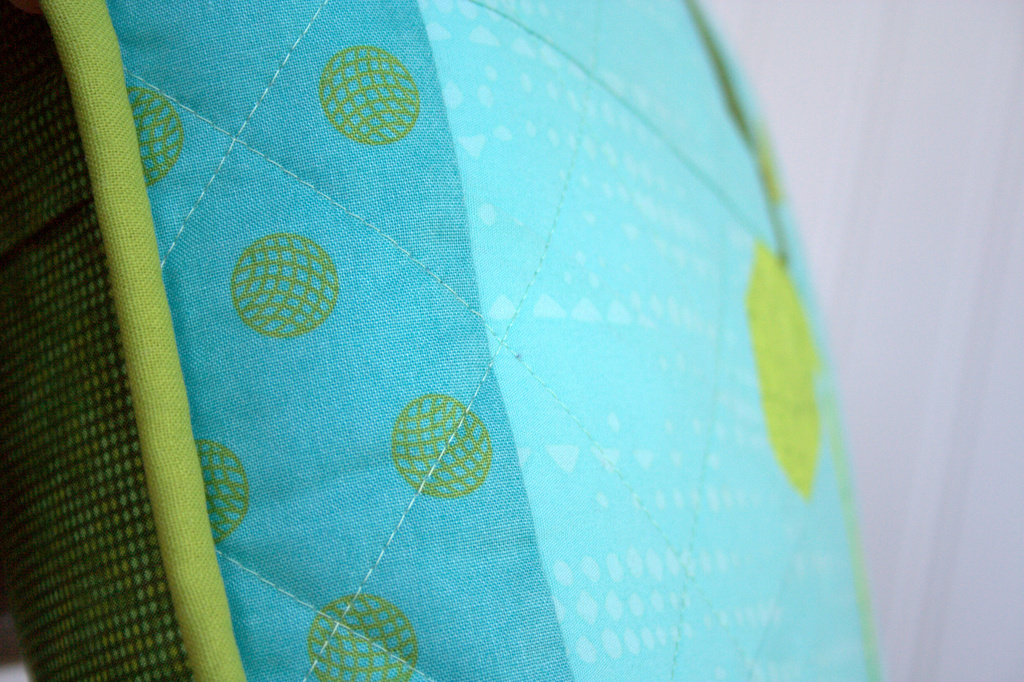
I used my coveted Carolyn Friedlander bright green Architextures fabric (Robert Kaufman) for the sprout, with little leaves of lime linen leftover from a previous project and a dotty dark green that was in my stash, but has no selvedge. A light turquoise modern Indah batik by Me + You (Hoffman Fabrics) makes a perfect summer sky for the background. Alison Glass Sun Prints 2016 Sphere (Andover) as the border rounded out the pillow nicely. It’s bound in the remainder of the lime linen blend and backed in that same mystery, beautiful dark green fabric. I quilted the pillow front with coordinating 50wt Aurifil thread in 2800-Mint Ice, since it blends right in with both the background and the green bean sprout.
I was hoping to release the Bean Sprout Pattern today, too, but lo… life got in the way and it’s not quite ready yet. Soon, hopefully. The pattern finishes at 12″ square so I added 2″ borders all around to bring the pillow to 16″ square.
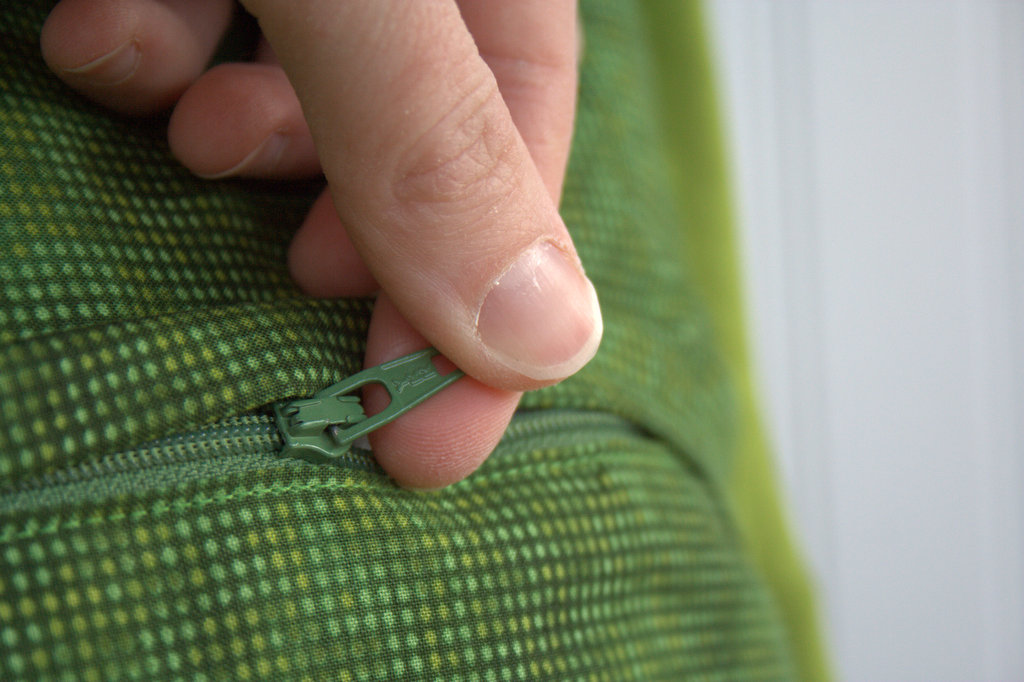
I also inserted my very first hidden zipper in the back of this pillow, which is SO exciting! I used a fabulous tutorial by S.O.T.A.K. handmade and it worked like a charm. I am definitely installing hidden zippers in the backs of all of my pillows from now on.
Now that this pillow is finished and photographed, it will be delivered to my daughter’s school for their annual fundraising auction/raffle. Last year’s donated project taught me a lot about the art of giving, and this year’s gift seems no less serendipitous. A quilted item was needed for a growth-themed fundraiser, right as I had tested my bean sprout pattern–perfect! I’m curious to see what next year brings, and I hope this pillow is able to raise some money for our local school!
I’m linking up with Crazy Mom Quilts, Needle and Thread Thursday, and TGIFF, since a finish ALWAYS warrants celebration! Now, off I go on a hike to celebrate this gorgeous Earth Day! Head on outside and love your mama!
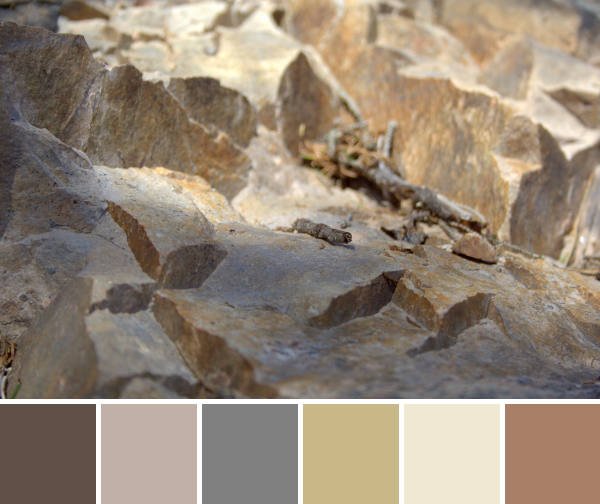
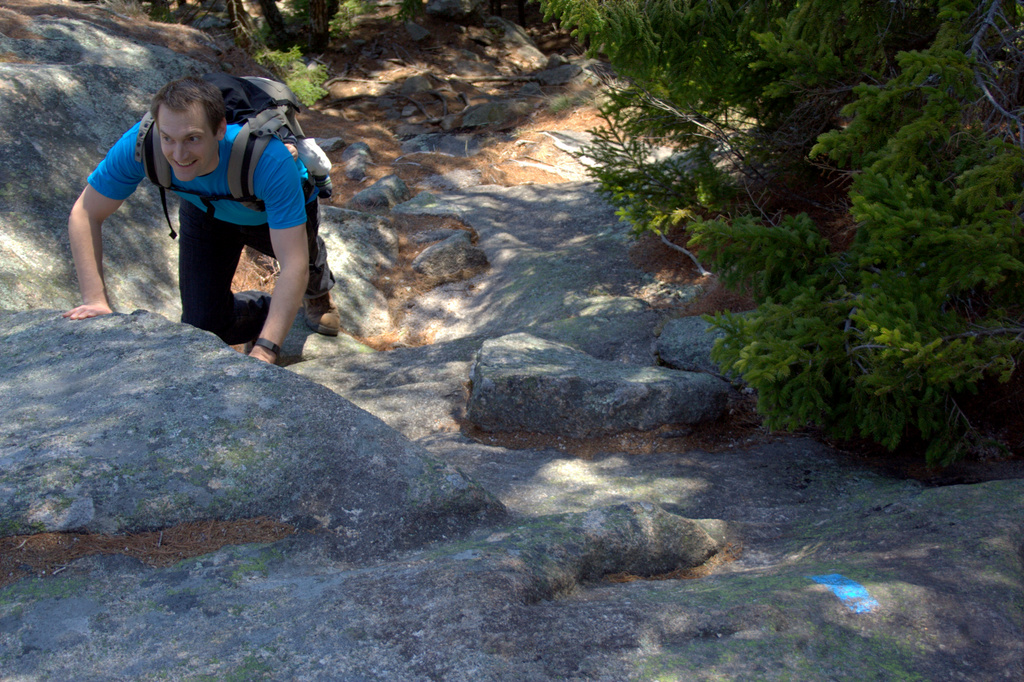
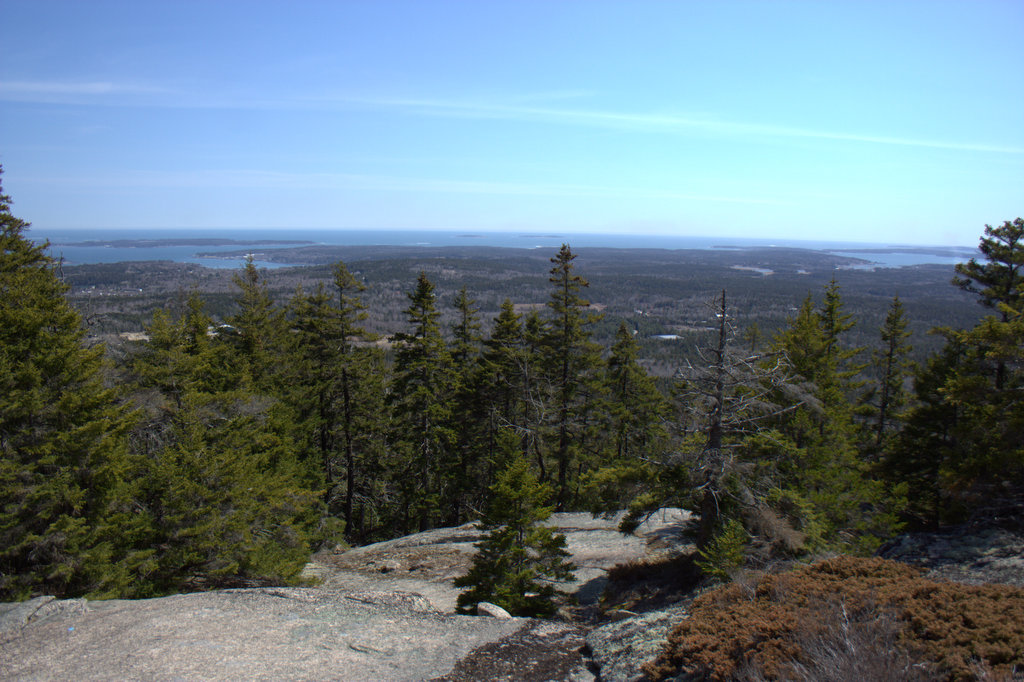
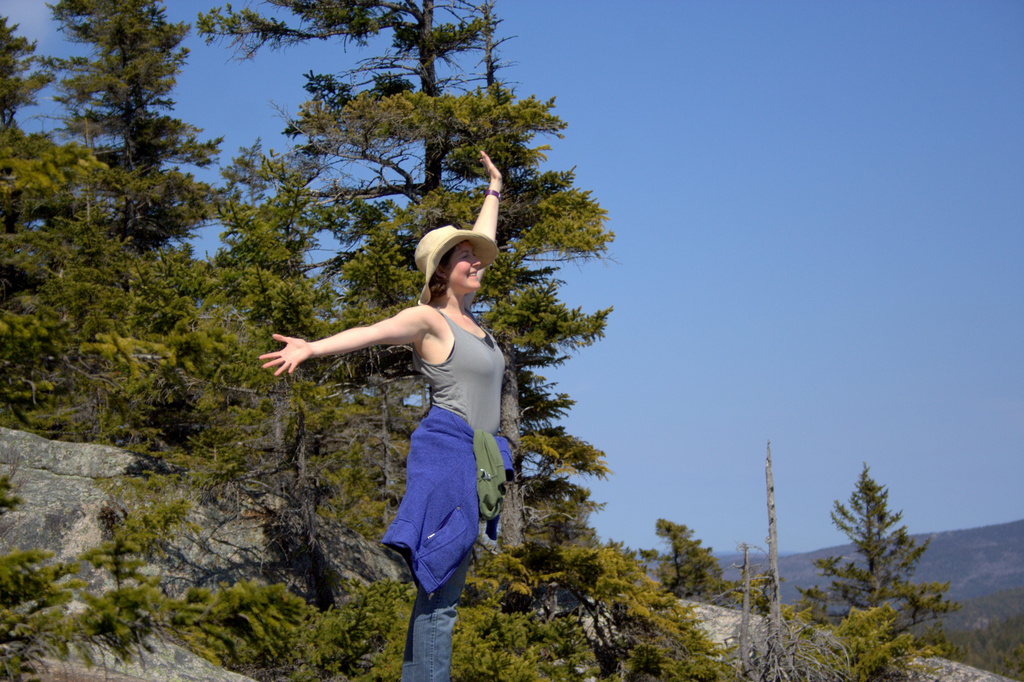
This past weekend, my husband and I sought out a new trail to hike, and aimed to find one that we would not be able to tackle with a 3 and 6 year old in tow. Our big kids had just left for a grand adventure–a week in NJ with Grandma & Pop Pop, flying solo for the first time ever. With Finn in a carrier, we were aiming to hike up a mountain and get some much desired fresh air, burning muscles, and a view. We found exactly what we were seeking in the Mansell Mountain Trail in Southwest Harbor, Maine. We found it by watching 1 Minute Hikes with Aislinn, and you can watch her video of the hike here (watching it again, I’m realizing we hiked the trail backwards). It’s a pretty neat tool for those looking for new hikes in Maine (although I don’t really know why it’s called “1 minute hikes” since the hike certainly didn’t take us one minute, and the video is longer than a minute… but still, a useful tool!) This week’s color inspiration hails from photos I took along the hike. Color palettes were made using Play Crafts’ Palette Builder 2.1, and the matching Kona cotton and Moda Bella solids and Aurifil threads are my favorite perk of using the Palette Builder.
Corresponding solids from left to right: Bella Chocolate, Bella Stone, Bella Etchings Slate, Kona Scone, Bella Snow, Bella Paper Bag
Corresponding Aurifil thread from left to right: 1140 – Bark
5011 – Rope Beige 2625 – Arctic Ice 5010 – Beige 2311 – Muslin 2335 – Lt Cinnamon
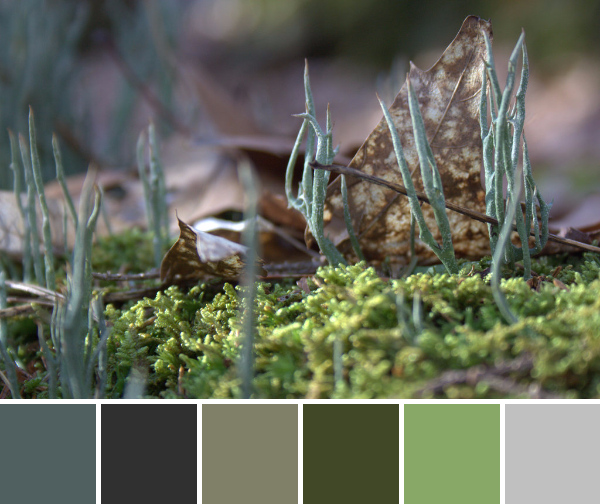
The climb up Mansell Mountain was very steep, so my gaze was often on the ground right in front of my face, finding hand-holds in some cases. I marveled in the variations of texture and color as we climbed up the mountain, and this one spot in particular caught my eye. I love the play of shadow in the crevasses, and could even see this transcribed into a full quilt. It reminds me of barren desert cliffs, and without the tiny twig for perspective, I’d almost think I were overlooking some barren landscape.
Corresponding solids from left to right: Bella Graphite, Kona Coal, Kona Charcoal, Bella Zen Grey, Bella Snow, Kona Cobblestone
Corresponding Aurifil thread from left to right: 5004 – Grey Smoke
1158 – Med Grey
2785 – V Dk Navy
2600 – Dove
2311 – Muslin 2375 – Antique Blush
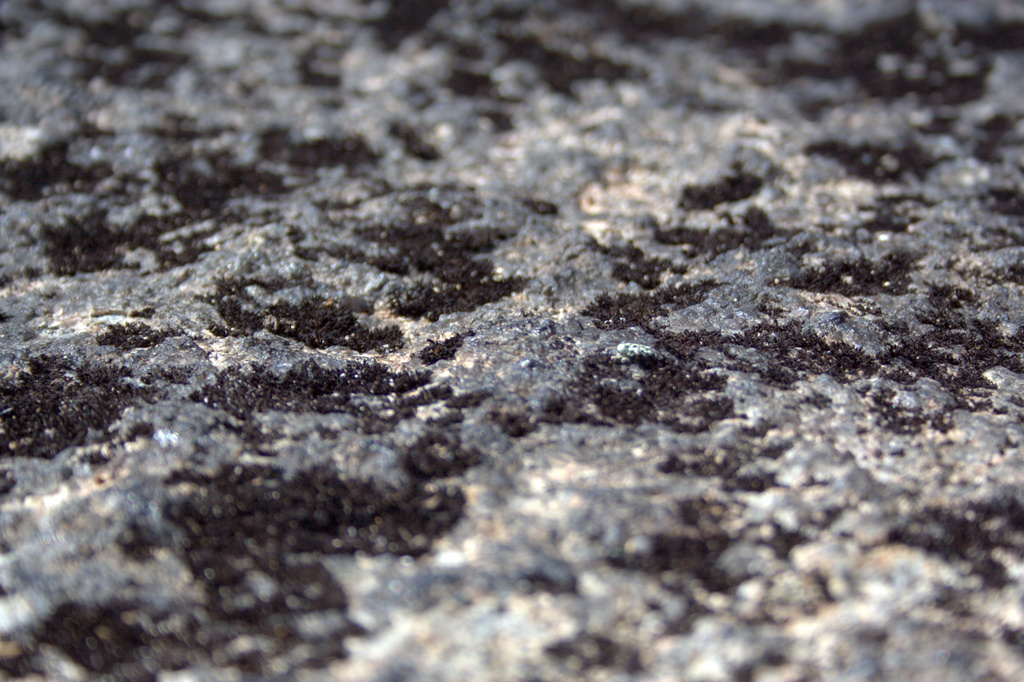
I love this photo and palette since it’s a perfect example of the benefit of taking a *really* close look at the world around you. These tiny almost crystalline bits of lichen could have easily been tromped over without a second glance. Looking closely, though, you see it’s a beautiful little varied world full of greys, beige, and a hint of peach. Call me weird, but I think it’s quite beautiful.
To give you some perspective, here is a series of photos showing you a lengthening view of what you see in the color palette above. If you take a step backward, you see this:
Take one step back…
Take another step back and you see:
Take two steps back….
With one more step back, here’s what you would see as you’re hiking along the trail:
Three steps back…
It’s amazing how the appearance of the world changes as you take a closer look! This “dirty rock” is actually a tiny world of beauty. Amazing!
Corresponding solids from left to right: Kona Cotton Candy Blue, Bella Admiral Blue, Bella Washed Black, Bella Etchings Slate, Bella Fig Tree Olive, Bella Evergreen, Kona Moss
Corresponding Aurifil thread from left to right: 2770 – V Lt Delft
1310 – Med Blue Grey
2630 – Pewter
2325 – Linen
5010 – Beige
2887 – Olive
2905 – Army Green
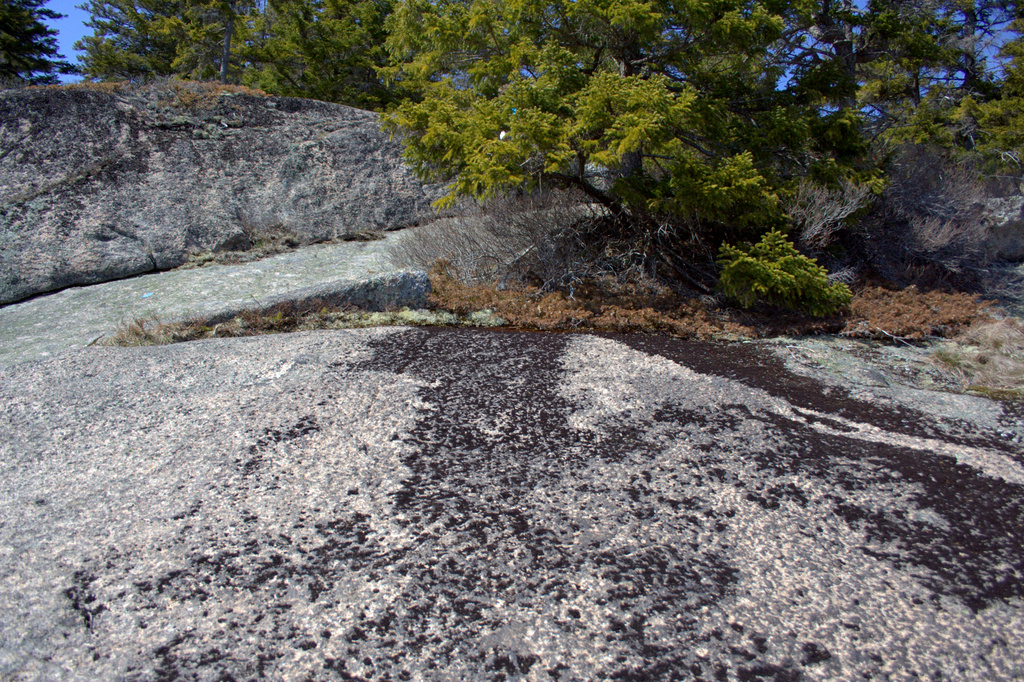
We were seeking great views, and we found them indeed. Photos don’t do the hike justice at all, but I’ll include some more below. A mountain face of stone stairs, wooden slats across wet areas, pristine babbling streams winding along next to the path, sun on our backs, and a view that just cannot be portrayed. It was a lovely day!
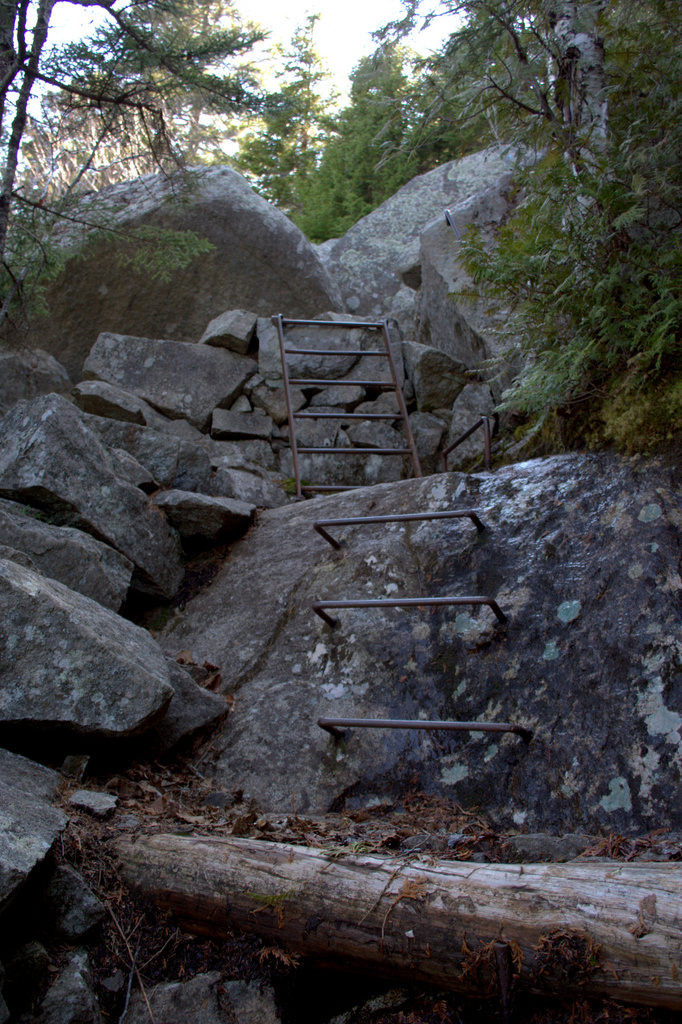
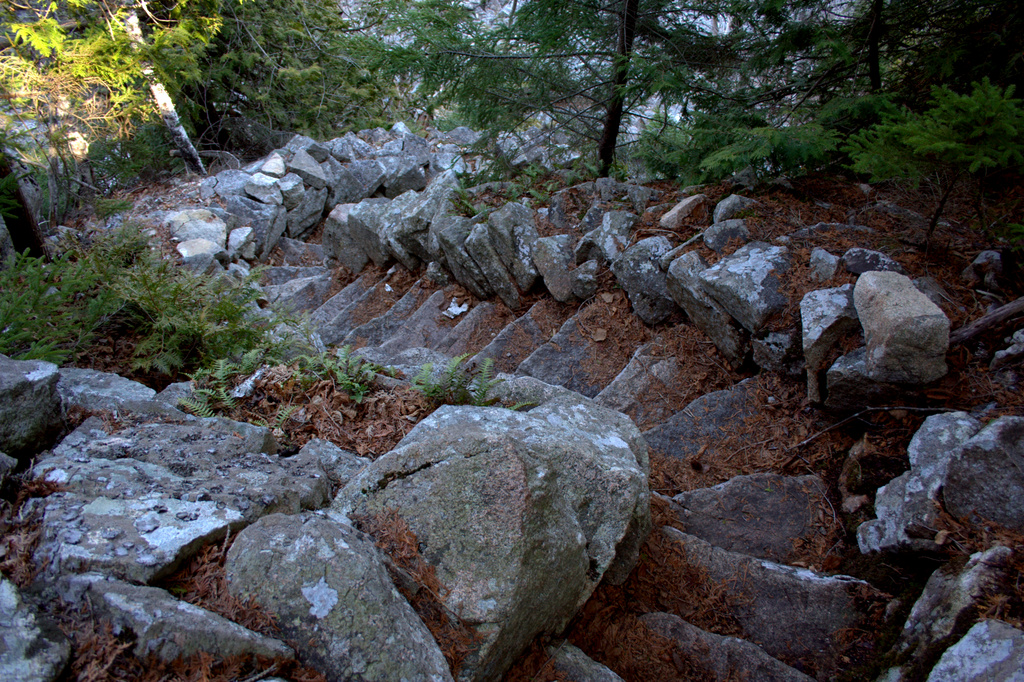
Climbing up Mansell Mountain with a baby on his back. He’s a keep-ah!The view from one of the lookouts on Mansell Mountain.It was THIS gorgeous!I love trails with actual metal ladders!Pretty much the entire trail down the mountain consisted of these gorgeously crafted stone stairs. 900+ foot elevation traversed on stairs!My sweet and handsome hiking buddies!
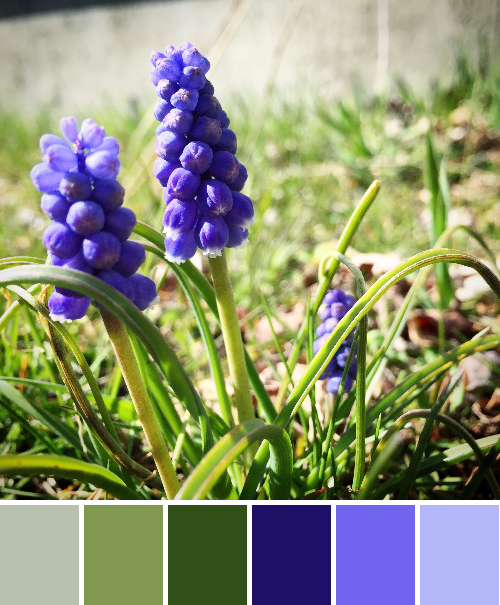
I’m breaking one of my big blogging rules today and sharing color palettes created from photos I took with my phone, but I had to–they are photos of the first flowers of spring! Yesterday we finally had a warm and sunny day, so the boys and I walked to meet Maddie after kindergarten. As we began to walk home, I spotted something tiny and blue in the grass. We all immediately went to investigate and found a bunch of tiny grape hyacinths and Siberian squill. I had my phone but not my camera since we were traveling by foot with only a stroller. We watched a honey bee buzz around them for a bit and I flattened to my belly to capture the moment (as is my style). Camera phones are pretty impressive these days, though, so I think the photos turned out alright. I think I have an iPhone 6, but tech details are not my forté. Color palettes were created using Play Crafts’ Palette Builder 2.1, as per usual, and the springy matching Aurifil thread and fabric solids (a mix of Kona cottons and Moda Bella solids) are one of my favorite perks of the Palette Builder tool.
Corresponding solids from left to right: Bella Flax, Bella Leaf, Kona Avocado, Kona Nightfall, Kona Royal, Kona Cornflower
Corresponding Aurifil thread from left to right: 5011 – Rope Beige 2888 – Fern Green 5018 – Grass Green 2780 – Dk Delft Blue 2525 – Dusty Blue Violet 2770 – V Lt Delft
These little grape hyacinths were tiny, but I’m glad my ever-color-seeking eyes spotted them! I love how everything changes when you get really close and take a detailed look. Tiny bulbous bells, happily visited by an early bee, were exactly what I needed to see! The bee was flitting a bit too quickly for me, so I didn’t catch him this time. No worries; there will be a next time.
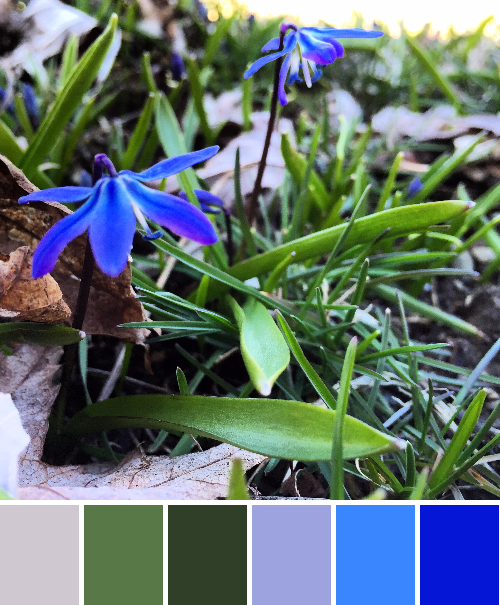
Corresponding solids from left to right: Bella Bunny Hill Blue, Kona Laurel, Kona Palm, Kona Grapemist, Kona Copen, Kona Royal
Corresponding Aurifil thread from left to right: 2600 – Dove
2890 – Dk Grass Green 5021 – Light Grey 2770 – V Lt Delft 2725 – Lt Wedgewood 2775 – Steel Blue
Siberian squill are one of my favorite flowers, most likely due to their rich and gorgeous color. I also love their dainty overhanging splay, which I would imagine to be a fabulously cute umbrella for the resident fairies. You can get a really fabulous look at these flowers in bulk in my post from a year or so ago HERE (seriously, it’s worth a visit!).
To give you a bit of scale for these spring beauties, here is giant Finn sitting next to them, more focused on the leaves and grass that those tiny pops of blue. I’m so excited that the flowers have begun to bloom, since the forecast promises a few more warm days of sun. Surely by next week, the flowers in our yard will begin to show! Spring has finally arrived in Maine!
I recently hit a pretty big milestone over on Instagram when I surpassed 3K followers, so to help celebrate that (and the fact that it was my birthday yesterday), I’m hosting a pretty epic giveaway over on Instagram. If you haven’t seen it yet, check out my feed @nightquilter and enter to win! The giveaway will close tomorrow (Monday) night at 9pm EST.
I figured I couldn’t go wrong giving away some of my all-time favorite fabrics and threads, and I’m so very grateful to my sponsors for donating the prizes. The prize package contains (from left to right): a fat quarter bundle of Endpaper from Sun Prints 2016 by Alison Glass (Andover) donated by Fiddlehead Artisan Supply; a low volume bundle of 14 gorgeous quilting cottons curated my yours truly donated by Fat Quarter Shop, and the Simply Color by Vanessa Christensen large spool set of 50wt Aurifil thread donated by Alex Veronelli at Aurifil. Many, many thanks!!
Fat Quarter Shop also sent a low volume bundle for me to keep since I curated it, so I’m super excited to be restocking my low volumes! The low volume bundle is available here. Go check it out, and if you love low volumes as much as I do, I hereby give you permission to treat yourself!
I included a little bit of everything in this bundle, including Cotton + Steel basics, Modern Background Paper, Lizzy House mini pearl bracelets, prints from Anna Maria Horner’s newest line, a print from Wonderland by Katarina Rocella, those adorable scissors from Maker Make by Art Gallery fabrics, and more. You’ll have to visit the post on Fat Quarter Shop to see the full list of included fabrics, but I can tell you I’m loving every one and already plotting the next low volume + rainbow Alison Glass fabrics project (are you surprised?).
As always, I’ll be sure to show you once I start putting these fabrics to use. In the meantime, head over to Instagram to enter for a chance to win your very own stash building prize package! I apologize to those of you who don’t have Instagram, but there’s sure to be another great giveaway here on the blog, too. Surpassing 3 thousand followers needs some celebrating!
I’m linking up with Molli’s Sunday Stash, since my low volume stash grew in a fabulous way this week, and one lucky follower will be REALLY building his/her stash soon! Best of luck!
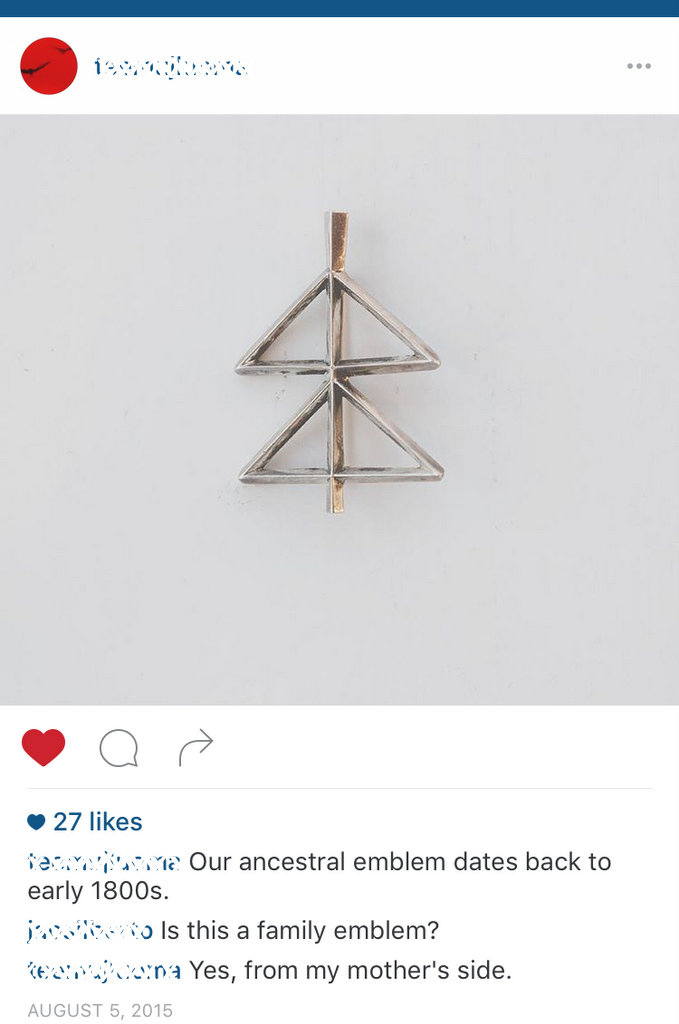
A few months ago, my brother-in-law posted the coolest picture on Instagram of what appeared to be a little metal pin or charm. My first thought (of course) was, “That would make a cool paper pieced pattern!” His caption read: “Our ancestral emblem dates back to the 1800s.” That sealed the deal. This HAD to be made into fiber art of some sort. How awesome is it to have an ancestral emblem!? I’ve been prodding my artist brother to design one for our family, since you’ve gotta start somewhere, right?!
When I got the reminder from my mom that his birthday was in early March, I decided it was time for this ancestral emblem creation to become a reality. I drafted a foundation paper pieced pattern, decided a mug rug would be the perfect doable yet useful gift, and set to work.
I’m very happy with the result!
This gift was a surprise for my brother-in-law, so I had to do some secretive research into favorites. He and my brother both have a very distinct style and I wanted to be sure to make a gift he’ll sincerely love (for more than just the fact that I made it for him). First up was to do some research to figure out a favorable color scheme. Word back from my brother was that colors were tough, and the safest bet was to go with grey, black, or white. Since Robert Kaufman’s Essex yarn dyed linen in charcoal is one of my all-time favorite fabrics, this color scheme sounded perfect to me!
With Kona white and Essex yarn dyed in charcoal, I pieced the top using my newly created foundation paper pieced pattern. I made some binding with my go-to Carolyn Friedlander text on black from Architextures and decided the whole thing needed an accent–just a pop of color in the binding to round it out. I sent my brother the photo above for his opinion, and I’m glad I did! The texty print was vetoed and orange and black apparently are a favorite color combination (you know me–I was leaning heavily toward turquoise).
I easily switched in Kona black instead of the Architextures (I’ll save that for another project!) with three narrow bits of Kona Persimmon and before I knew it, I was relaxingly hand stitching the binding to the back to finish it up.
I am really happy with this mug rug, and I hope that my brother-in-law loves it and better yet–uses it ALL the time! He can now invite his ancestors to tea whenever he wants.
Those of you who follow me on Instagram most likely already saw my secret trick to perfectly straight quilting lines, but I’ll share it here for those who missed it. I used Ledger from Carolyn Friedlander’s Architextures line for the backing and quilted straight lines with the backing facing up. This project was small enough that I could easily line up the backing with the front, so the lines were perfectly straight, evenly spaced, and horizontal on the front. I used 50wt Aurifil 2600-Dove thread for piecing, quilting, and binding (of course).
This was mailed off yesterday (better late than never!), so it should be arriving soon.
Project Stats – Mug Rug
Pattern: Finnish Ancestral Emblem foundation paper pieced pattern designed by me, inspired by a photo of a metal pin.
Size: 6.5″x11″
Fabric: Front: Kona White (Robert Kaufman), Essex Yarn Dyed Linen in Charcoal (Robert Kaufman) Back: Ledger in Ivory from Architextures by Carolyn Friedlander (Robert Kaufman) Binding: Kona Black with three accents of Kona Persimmon (Robert Kaufman)
Batting: 100% cotton Soft n’ Crafty batting
Thread: Aurifil 50wt in 2600 – Dove for both piecing and quilting
Quilting: Straight line quilting using the lines in Ledger as a guide, with my Bernina 560 and a walking foot
*******
I’m linking up with Crazy Mom Quilts Finish it Up Friday. I have a lot of finishes to share in the coming weeks, which explains my relative quiet here on the blog. Time to show you what I’ve been making!
Last weekend, we took advantage of the gorgeous spring weather and headed down to hike Mt. Battie in Camden, Maine. Flowers have not yet made their way out, but I found lots of color along the trail. It was also really nice to actually hike, probably for the first time in nearly six years. My oldest was at a playdate, so my husband carried Max and I carried Finn, meaning we could travel the path at an adult’s pace instead of a 3-6 year old’s pace. I love hiking with kids, but it was a nice change of pace to get to work a bit. It was a lovely day! This week’s color inspiration comes from some photos I took along the trail. Color palettes are made using Play Crafts’ Palette Builder 2.1 and my photographs.
Corresponding solids from left to right: Bella Lead, Bella Soft Finish Black, Kona Sweet Pea, Kona Palm, Bella Grass, Bella Zen Grey
Corresponding Aurifil thread from left to right: 1246 – Grey 4241 – V Dk Grey 2900 – Lt Khaki Green 5021 – Light Grey 2908 – Spearmint 2600 – Dove
I was excited to see quite a bit of green along the path, even if none of it was new growth. The moss, lichens, and wintergreen ferns growing on the rocks on the forest floor gave me a much needed dose of green goodness.
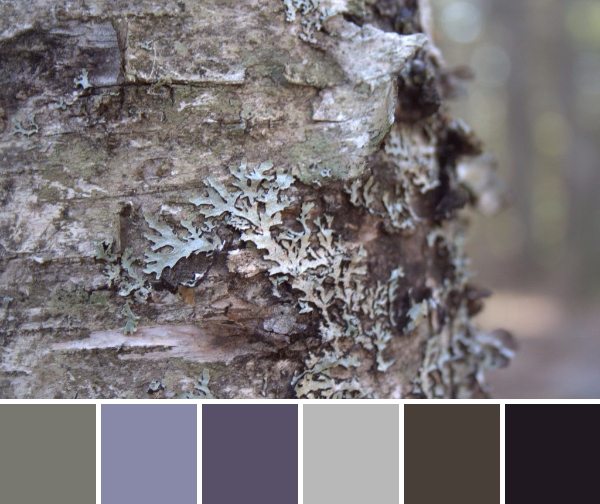
Corresponding solids from left to right: Bella Etchings Slate, Bella Wisteria, Bella Indigo, Kona Ash, Bella Betty’s Brown, Bella Peacoat
Corresponding Aurifil thread from left to right: 2900 – Lt Kakhy Green
2524 – Grey Violet
2568 – Mulberry
2600 – Dove
5013 – Asphalt
2785 – V Dk Navy
Again, these lichens caught my eye from their textured perch on the trees. I love the purples that are pulled from this photo.
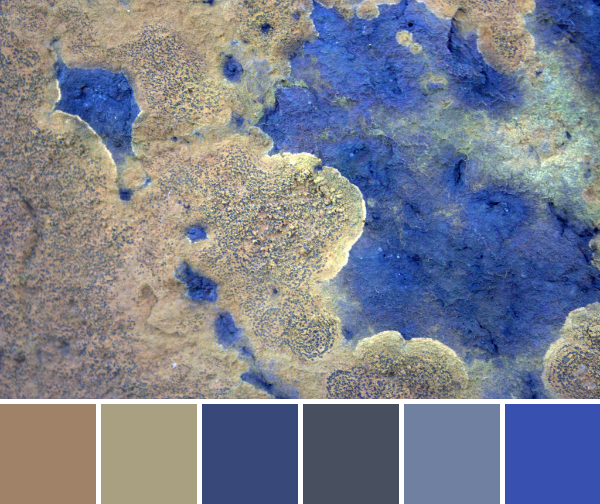
Corresponding solids from left to right: Bella Paper Bag, Kona Herb, Bella Night Sky, Bella American Blue, Bella Betty’s Blue, Kona Surf
Corresponding Aurifil thread from left to right: 2335 – Lt Cinnamon 5010 – Beige 1248 – Grey Blue 1158 – Med Grey 4140 – Wedgewood 2735 – Med Blue
I couldn’t resist including this third palette, featuring some gorgeous orange lichen on a large stone. The shadowed lighting helped the blue to shine, but I wish the brightness of that orange came through better. Imagine that left-most color cranked up a notch or two. Such a gorgeous partnership of colors! I am wishing my geological knowledge was stronger, but lo I’m more a botanist. I want to say this is granite since it’s wasn’t layered like slate, but I can’t be sure.
And now, just for fun, a few more photos from our hike.
My handsome husband, all suited up with our 3-year old, ready to hike!
This kid was telling everyone along the trail “shhhh! the Tick-Tock Crock is here!”, but I think he took his imaginative play to heart a bit. He was pretty serious during the hike.It’s always fun when my husband takes some turns with the camera. Look, I was there, too!Fishing for the Tick-Tock Crock.
I grab a needle and thread once the kids are in bed


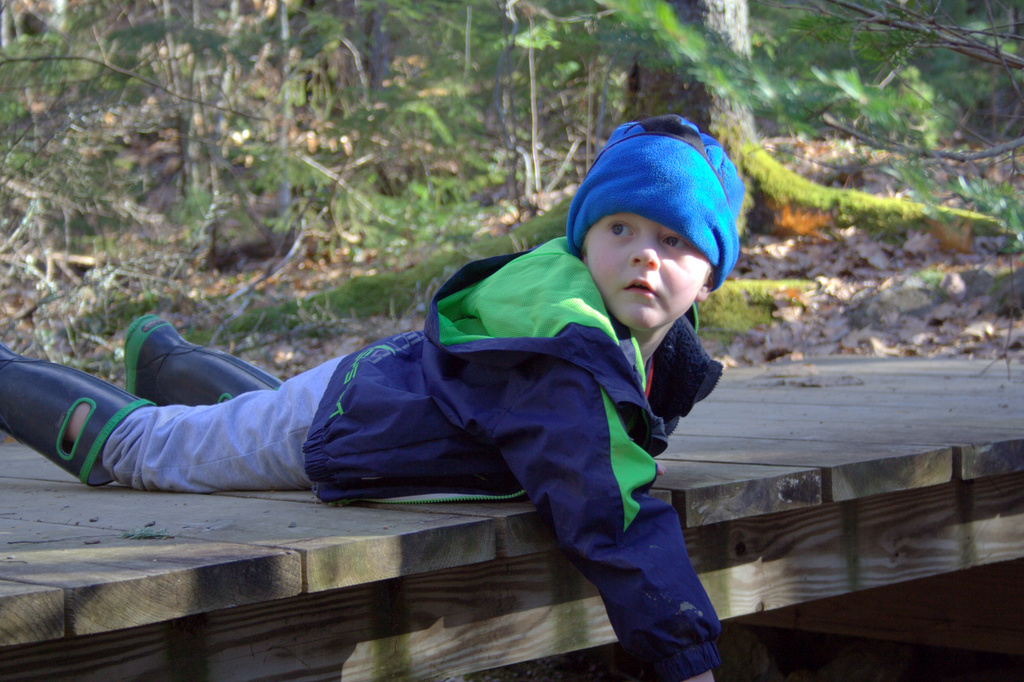
 And just like that, all of the blocks for Finn’s milestone quilt are finished and my baby is officially one year old. They say “babies don’t keep” but somehow it feels like the past year flew by especially quickly. I won’t even try to pretend I won’t miss this project dearly now that it’s mostly finished. I do still need to piece the top and quilt it, so no worries–you haven’t seen the last of Finn and his quilt!
 Within the past week, Finn has fully mastered walking and now prefers it over crawling. He joyfully walks circles around the house, his wobbly steps getting stronger and smoother by the day. This joy of walking certainly made this photo shoot the most difficult yet! I got one, only one, photograph of Finn relatively near his final quilt block, and while it’s not as clear as I’d like, it’s staying.
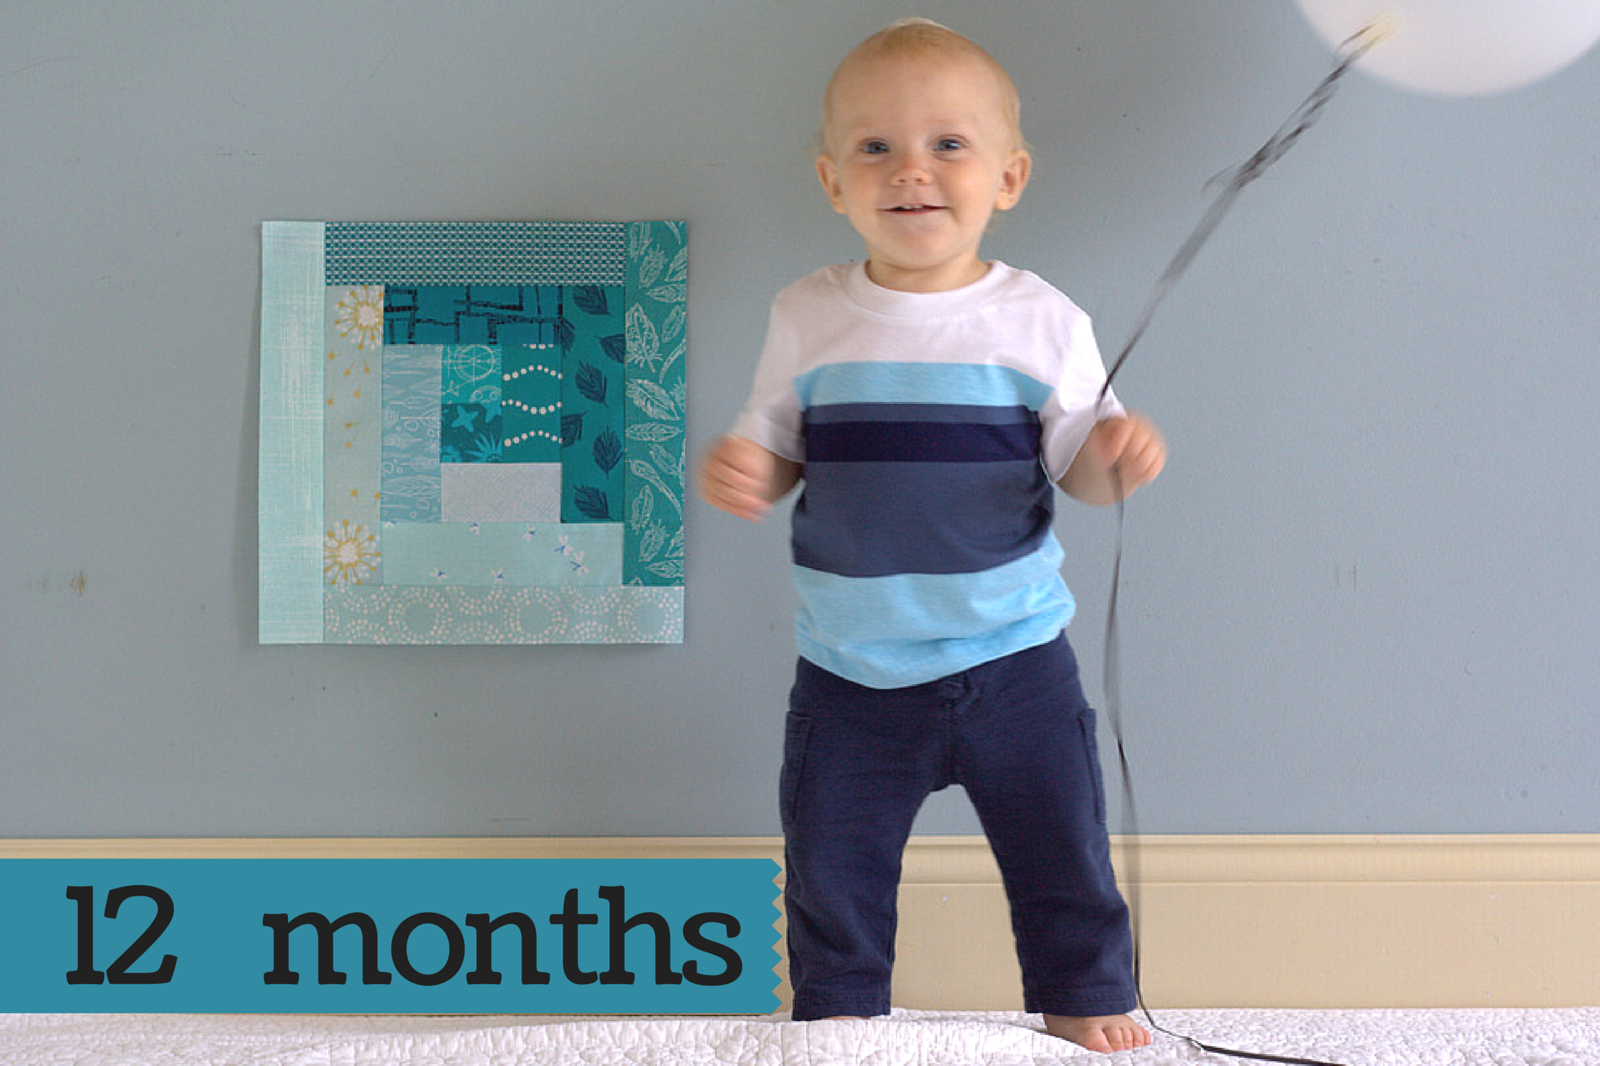 Twelve months is 12 months, and not even mommy’s most sincere and pleading attempts will keep a newfound walker from walk, walk, walking! Just as a reminder, here is Finn with his very first milestone quilt block, 11 long months ago:
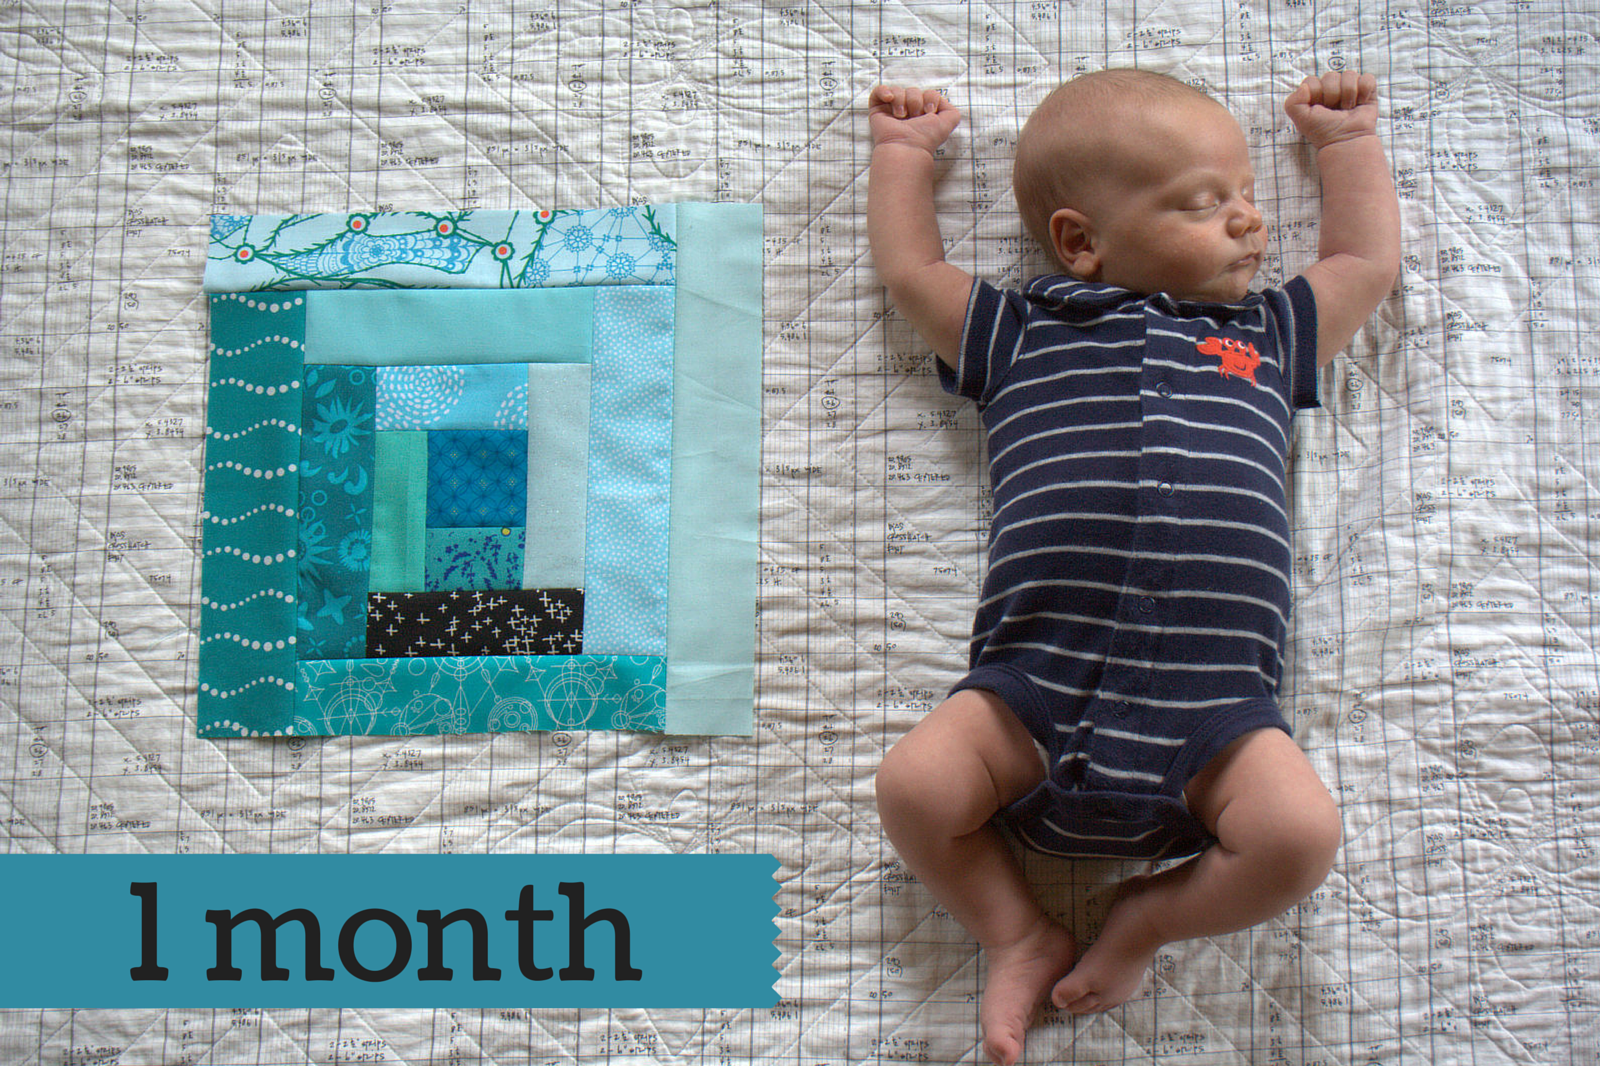 Isn’t it absolutely mind-blowing how much babies grow and learn in such a short time!? Life is an amazing thing.
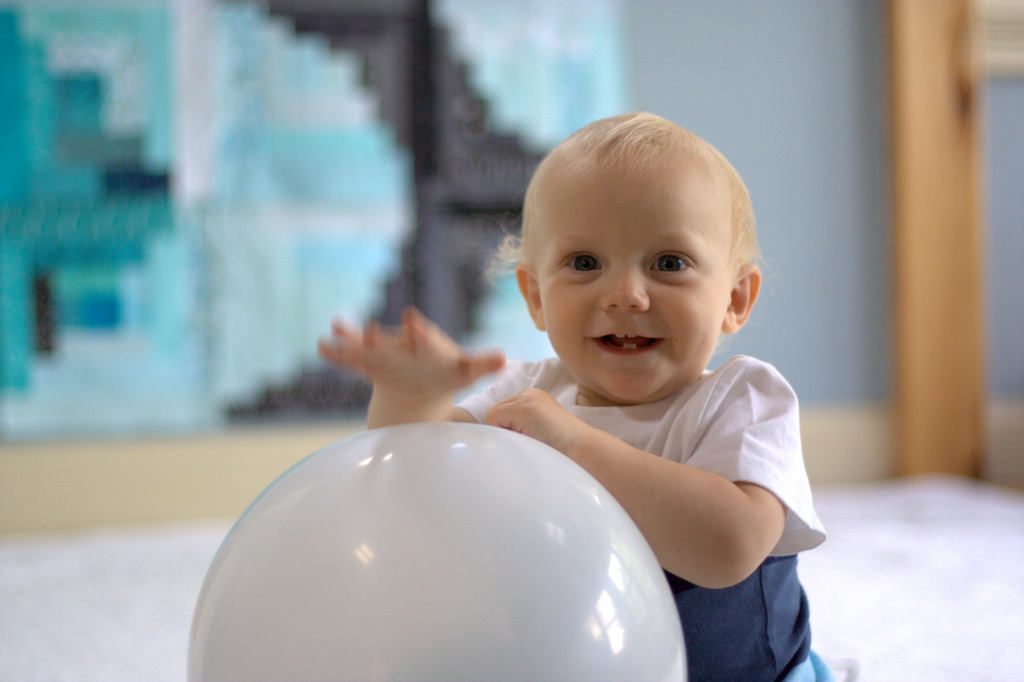 My big kids brought home a couple of balloons from their cousin’s first birthday this weekend (we had a full family birthday weekend with both Finn and cousin Reagan born 26 hours apart), and they have become the favorite toy for all three kids. (Safety note: Yes, I know that balloons are not technically safe for babies, so I will reassure you here that I only allow Finn to play with the balloon when I am directly supervising him!) I figured giving Finn something fun to hold was my best bet at having him stand still for even a moment.
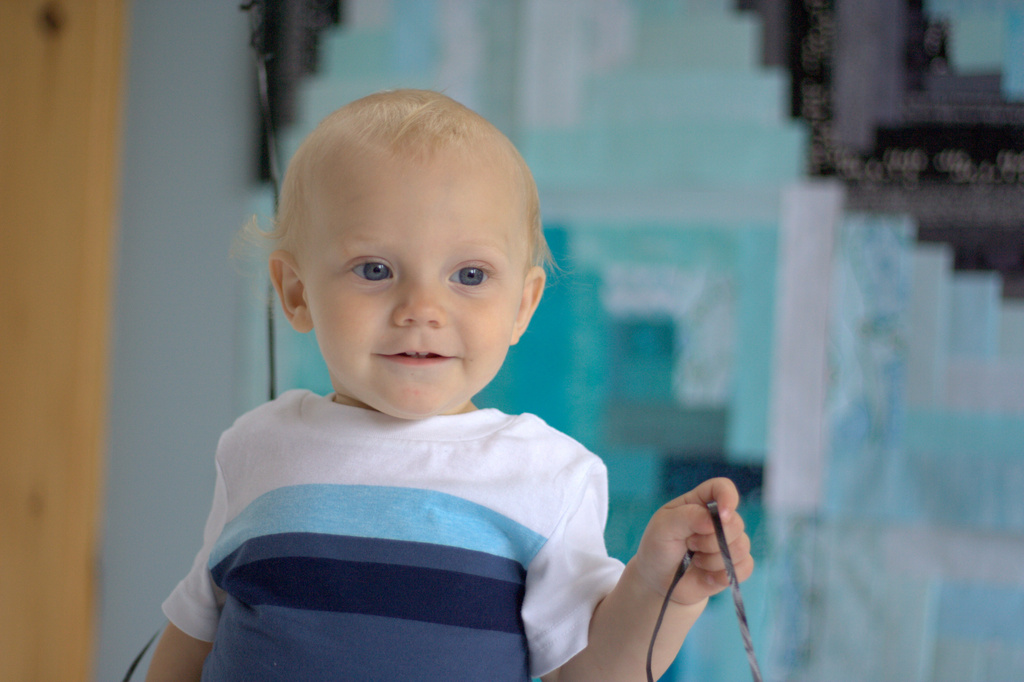 Even still, Finn would rather walk around than stand still, despite my best efforts. C’est al vie. Such is life with a brand new walker!
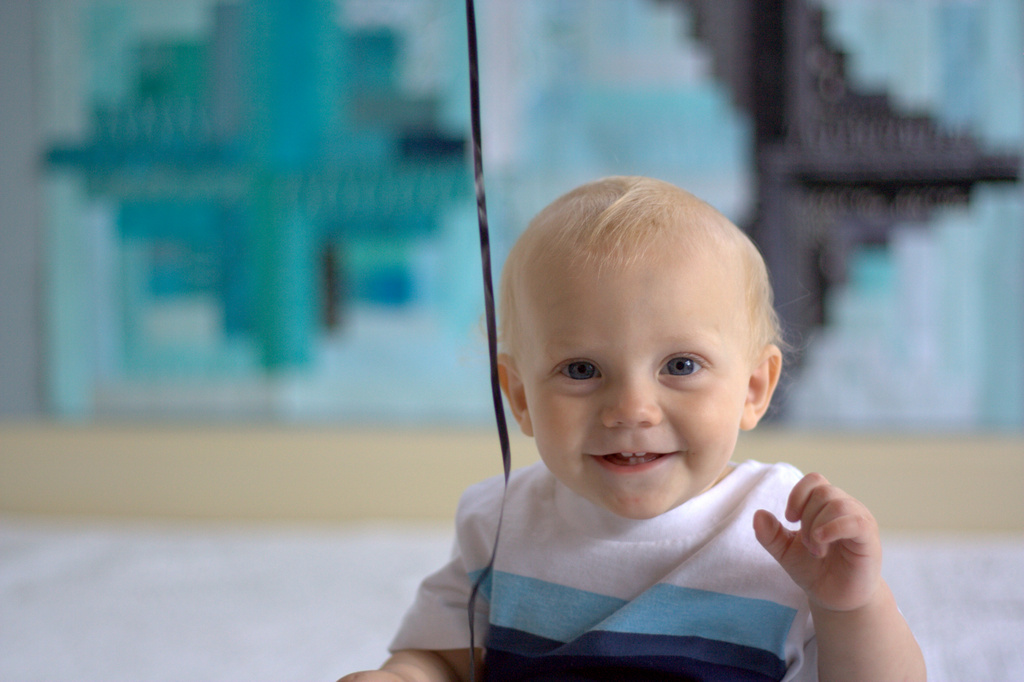 Add an eager almost-four-year old big brother helper, and the majority of my photos looked like this:
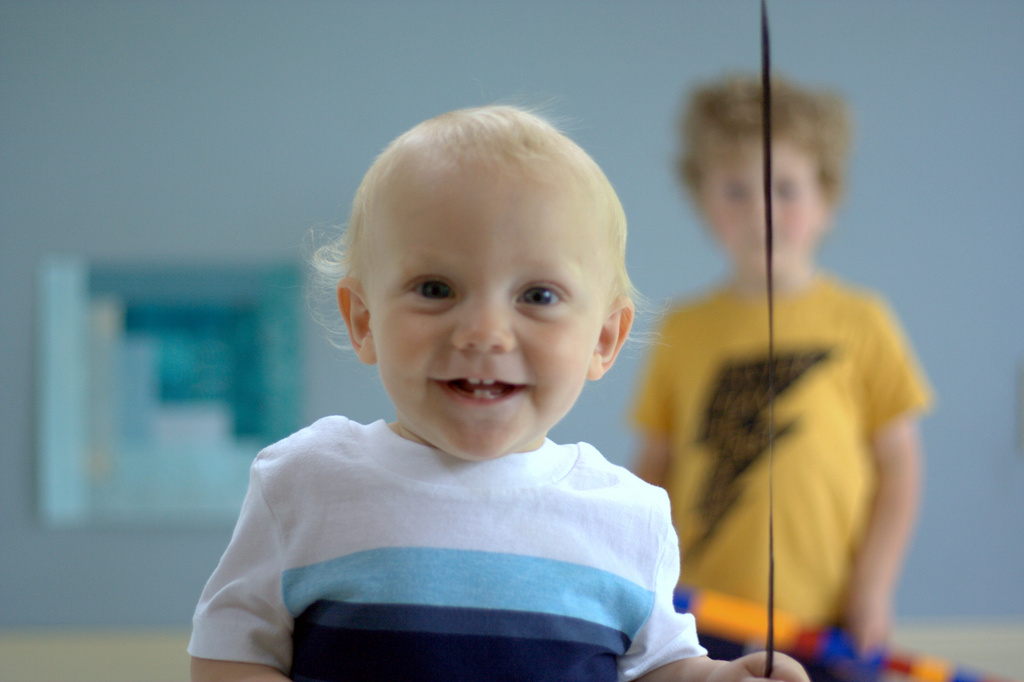 or, more accurately, like this:
 This is part of what I have loved about this project, though. It has given me an opportunity to sit down, reflect, and write about life in the current moment. By documenting each month of my baby’s life, I’m also documenting our life as a family. With our busy lives, how often do we take a moment to write about our day? I have loved that this project has given me the motivation to write, reflect, and document the joyful milestones in Finn’s first year.
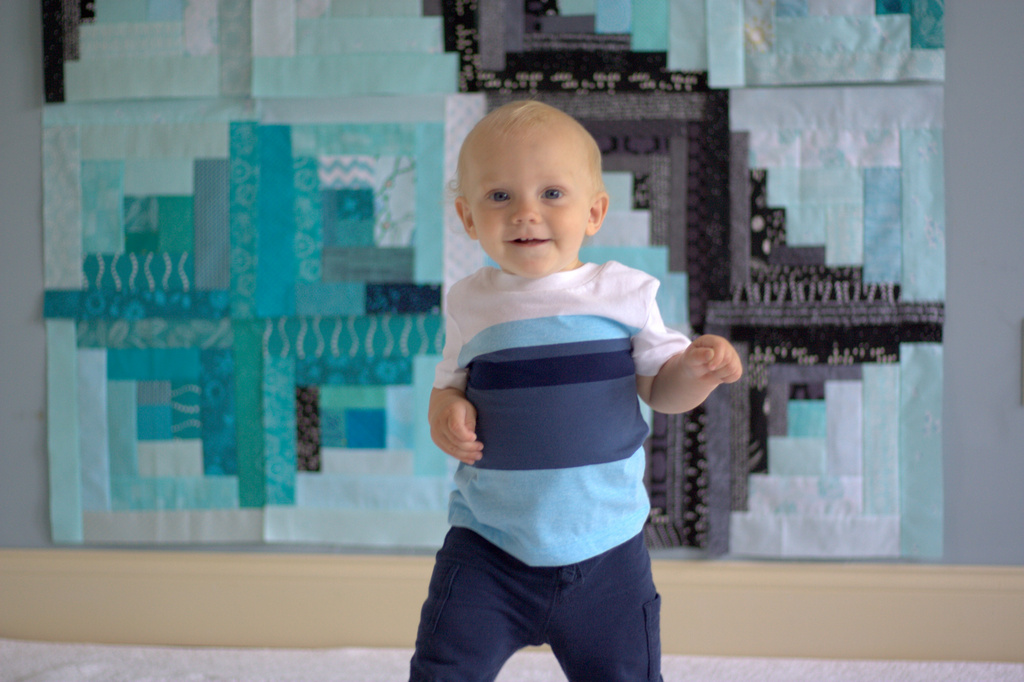 Finn continues to have a sweet and joyful disposition, complete with his newfound ability to express frustration and flop himself face down, crying, on the floor. Overall, though, he is a happy boy and a super helper. He loves to help me unload the dishwasher, taking out each utensil and holding it up for me (as long as I’m quick enough to take it within a second or two). When he does that, I always say “Thank you!” and now it sounds like he says, “Thank you!” right back. This morning while I was getting dressed, he joyfully opened my dresser drawer and started taking out folded clothes, tossing them on the floor one at a time and saying “thank you” after each one! Oh, the innocence of babes!
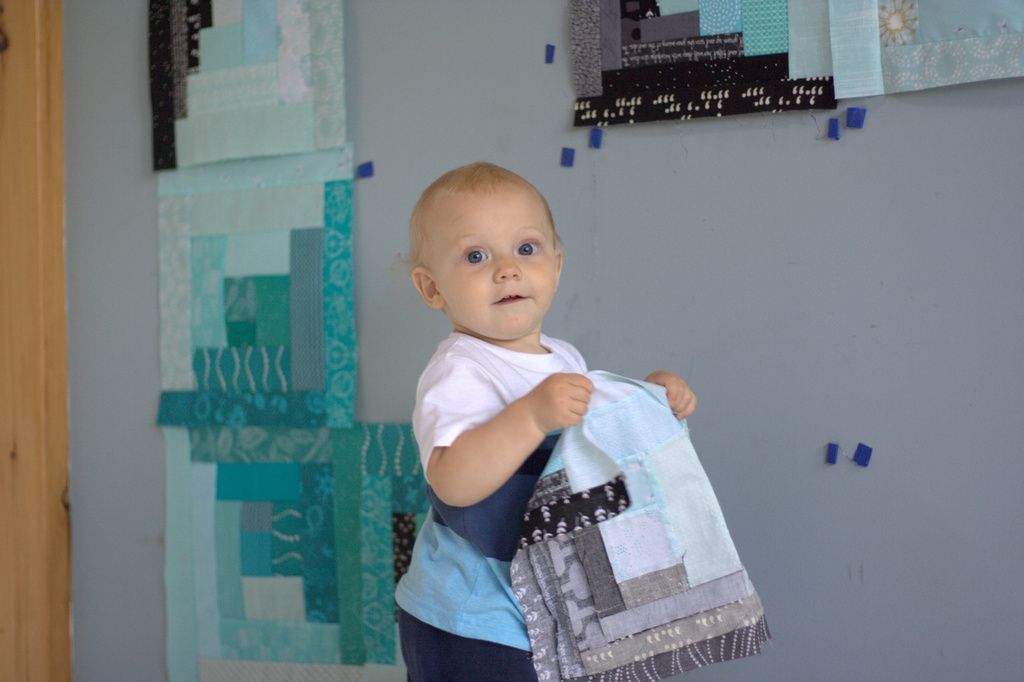 Finn has helped take these blocks off the wall for the very last time. Next up is squaring up the blocks and sewing the quilt top together. I’m going to give myself a month in which to do it, since it feels like an attainable goal. Setting realistic goals is still something I’m continuously working on, and something this project has helped with greatly. As much as I may have itched at times to make extra blocks, or up the ante to two blocks per month, I’m SO glad that I stuck with my original plan of one block per month, since deadlines have a funny way of sneaking up on me. Sure, it took an entire year, but all of the blocks for Finn’s quilt have been made! A finished quilt is just around the corner.


 Corresponding solids from left to right:
 This grass-covered dune was gorgeous as a whole, too, and I was happy to see a nice solid fence and signage clearly explaining the importance of looking without touching (or walking).
 Corresponding solids from left to right: