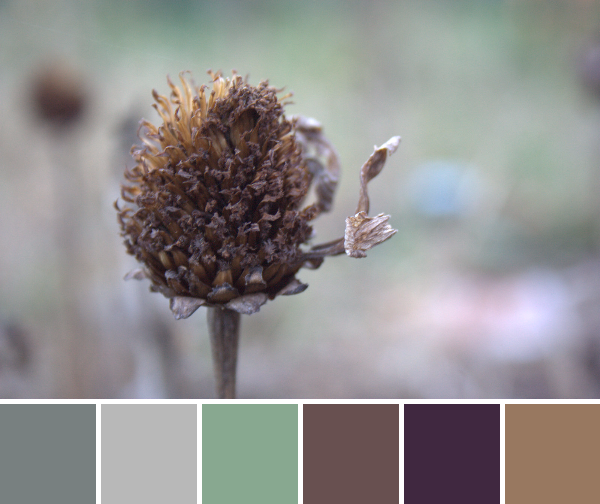
Yesterday was one of those gorgeously warm days that pop up amidst the weeks of solid autumn chill. The kids and I took advantage and spent as much time outside as we could. It was a much needed reminder of how rejuvenating time outside is for everyone; I think the entire afternoon and evening went by without a single bicker, request for a movie, or beg for Halloween candy. That’s the way I like it. Today’s color inspiration comes from some photos taken during our outside play. These are colors of the season, muted and earthy. Color palettes are created using Play Crafts’ Palette Builder 2.1 and my photos.
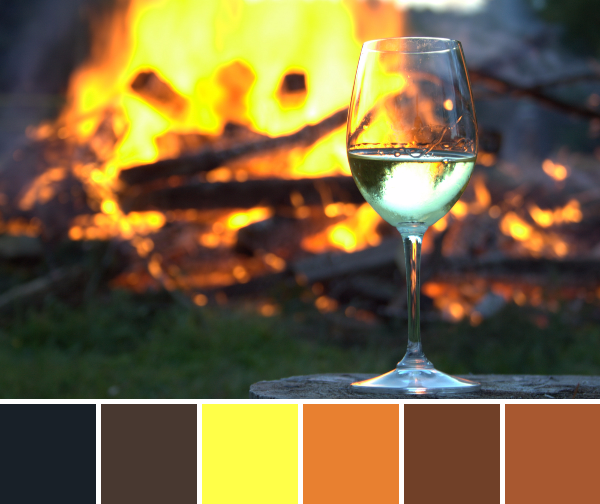
Corresponding solids from left to right: Bella Graphite, Kona Ash, Kona Celadon, Bella Chocolate, Kona Hibiscus, Bella Paper Bag
Corresponding Aurifil thread from left to right: 2625 – Arctic Ice
2600 – Dove 2850 – Med Juniper 1140 – Bark 2465 – V Dk Brown 2335 – Lt Cinnamon
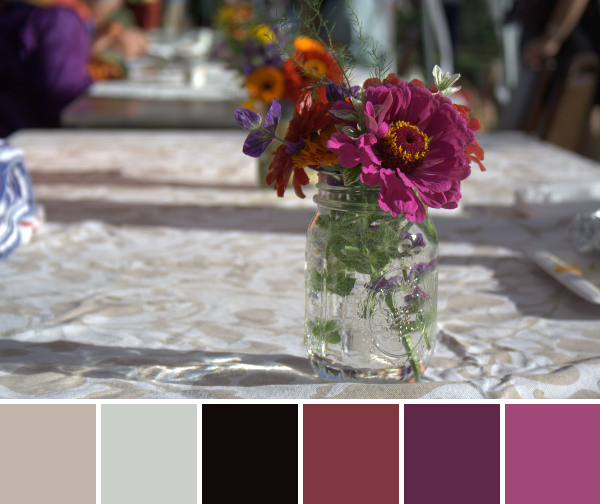
Remember those vibrant and colorful zinnias that brightened our yard not so long ago and made cheery color palettes here? Well here they are now, in all of their back to the earth autumnal glory. This palette embraces the earth tones that I enjoy so much while out in the world, but very rarely include in my quilts.
Corresponding solids from left to right: Bella Grape, Bella Etchings Slate, Bella Baby Blue, Kona Blue, Kona White, Kona Titanium
Corresponding Aurifil thread from left to right: 1158 – Med Grey
2625 – Arctic Ice
5008 – Sugar Paper
2710 – Lt Robins Egg
2024 – White
2612 – Arctic Sky
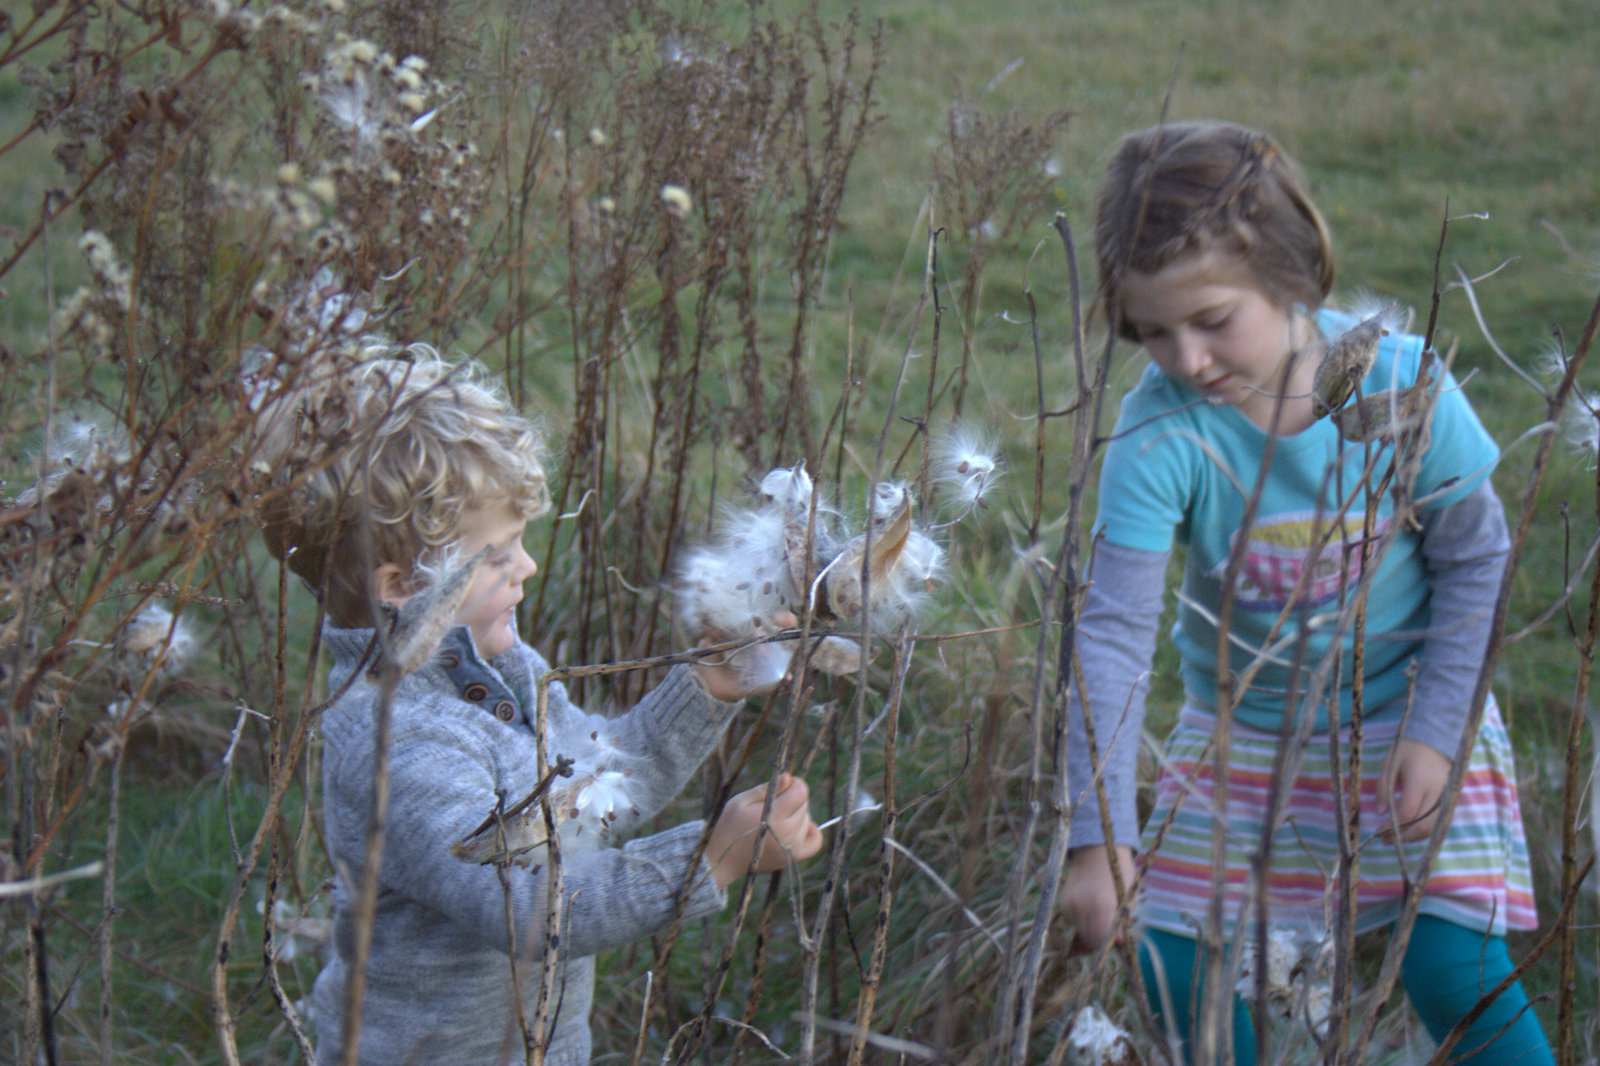
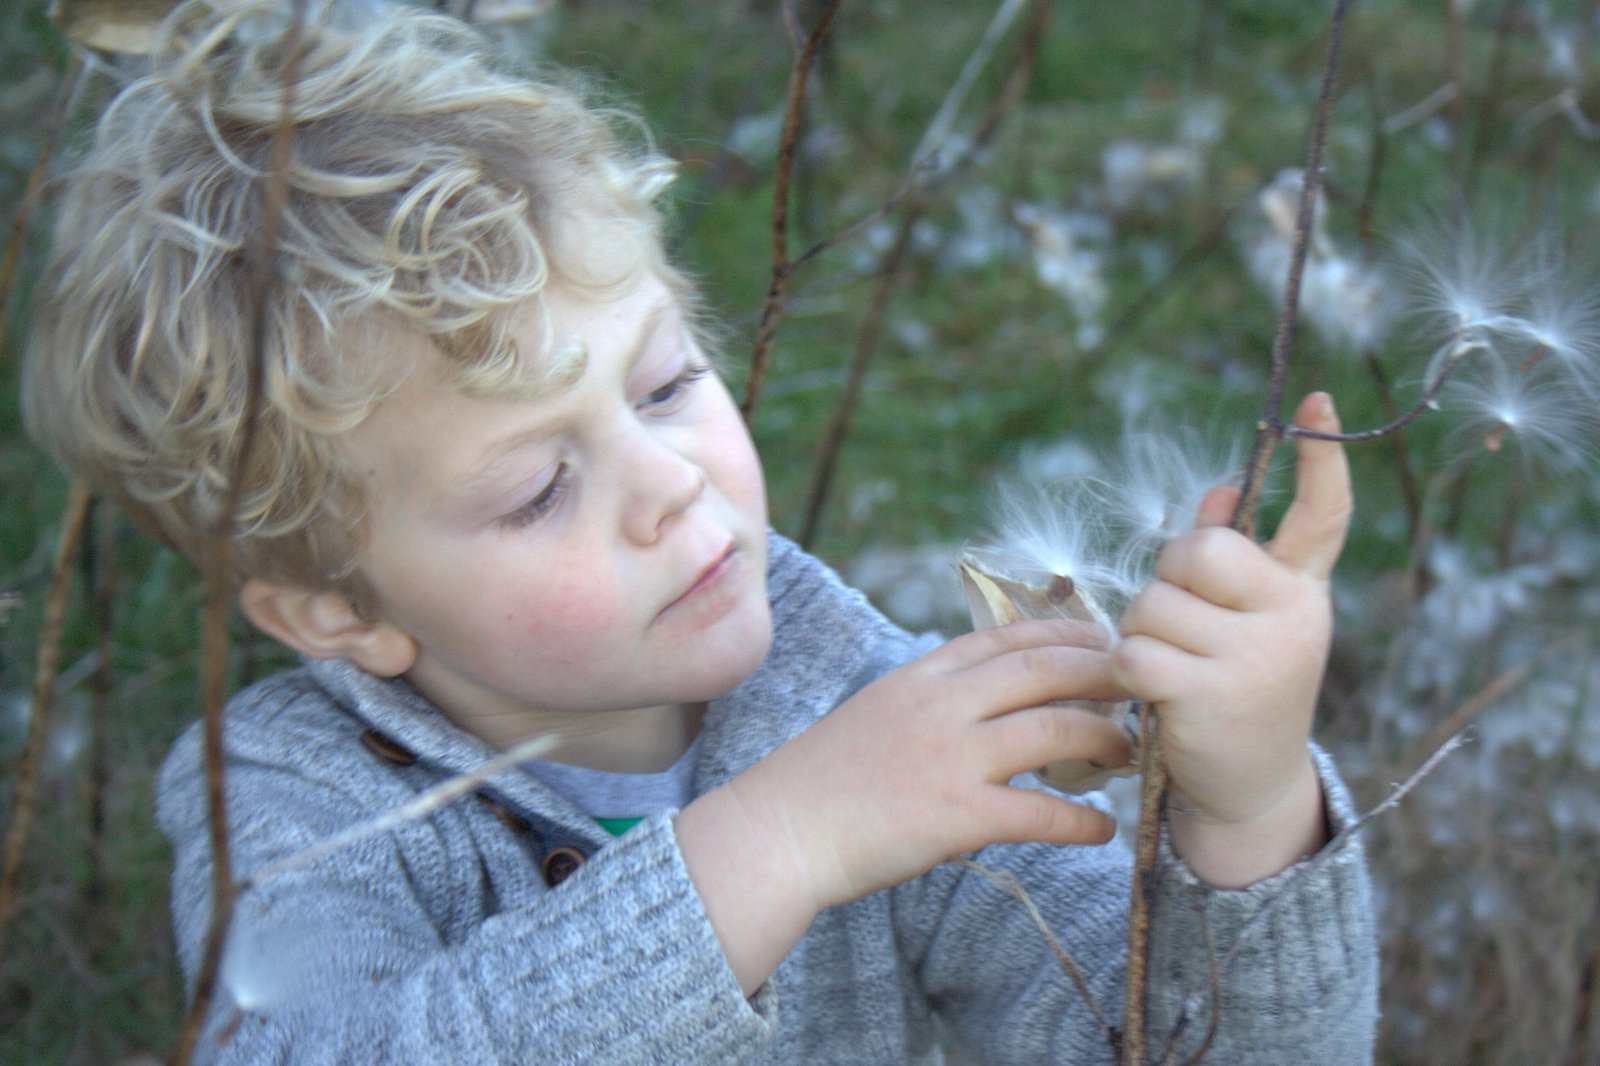
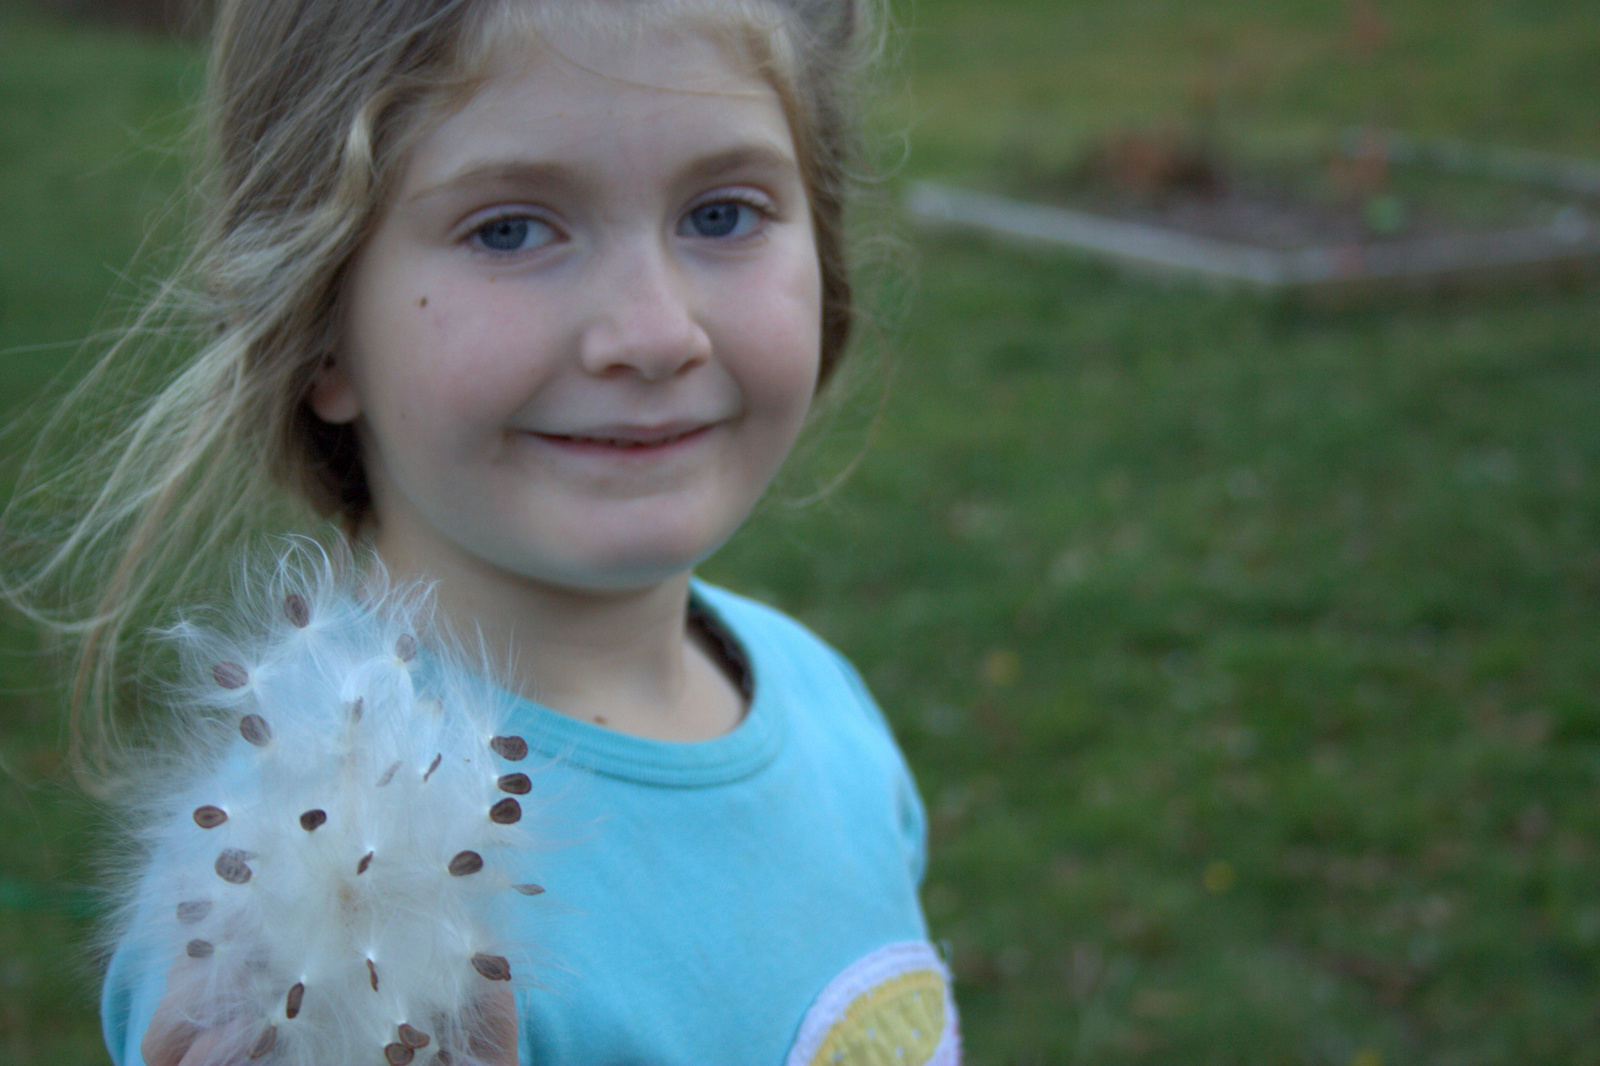
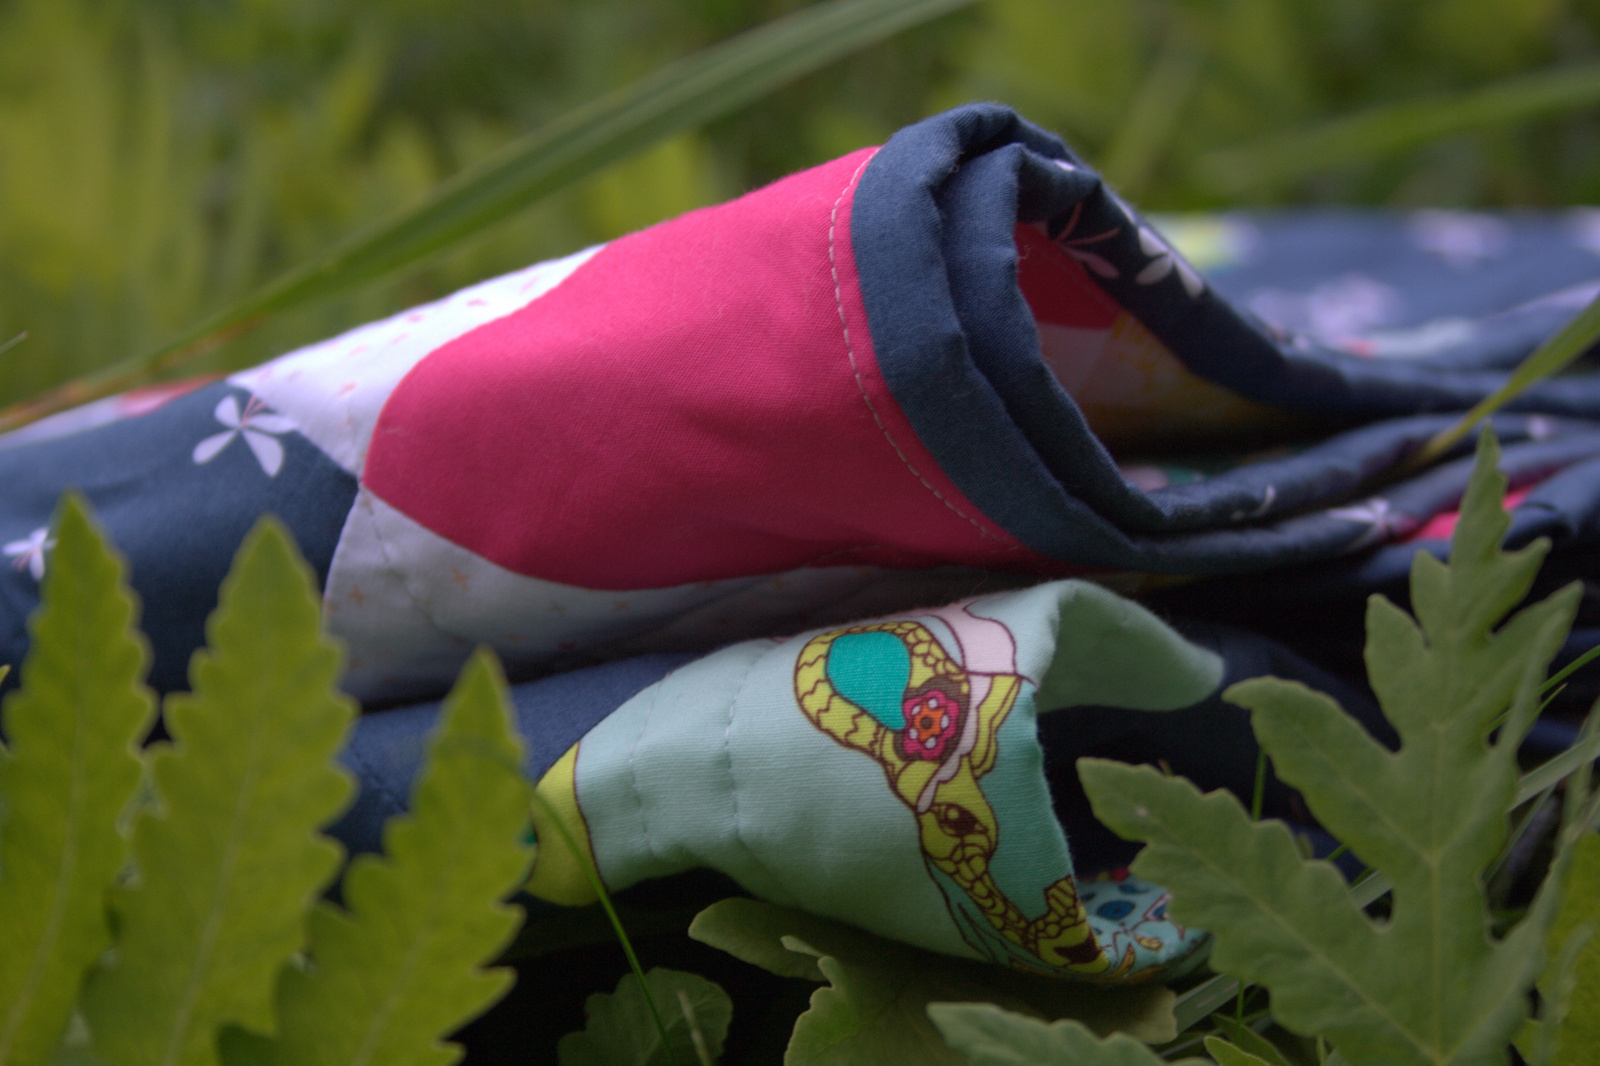
Ahhh, the season of seed dispersal! The way different plants attempt to champion the continuation and widespread of their species never ceases to amaze me. From burdock seed pods that stick your clothes and refuse to be removed, to the delicate and beautiful milkweed seeds that blow gently in the wind. Want to have a fun afternoon with your kids? Set them free in a field of milkweed that has gone to seed. Here are some more glimpses into our afternoon of exploration and seed dispersal.
On our way to apple picking after spreading milkweed seeds far and wide
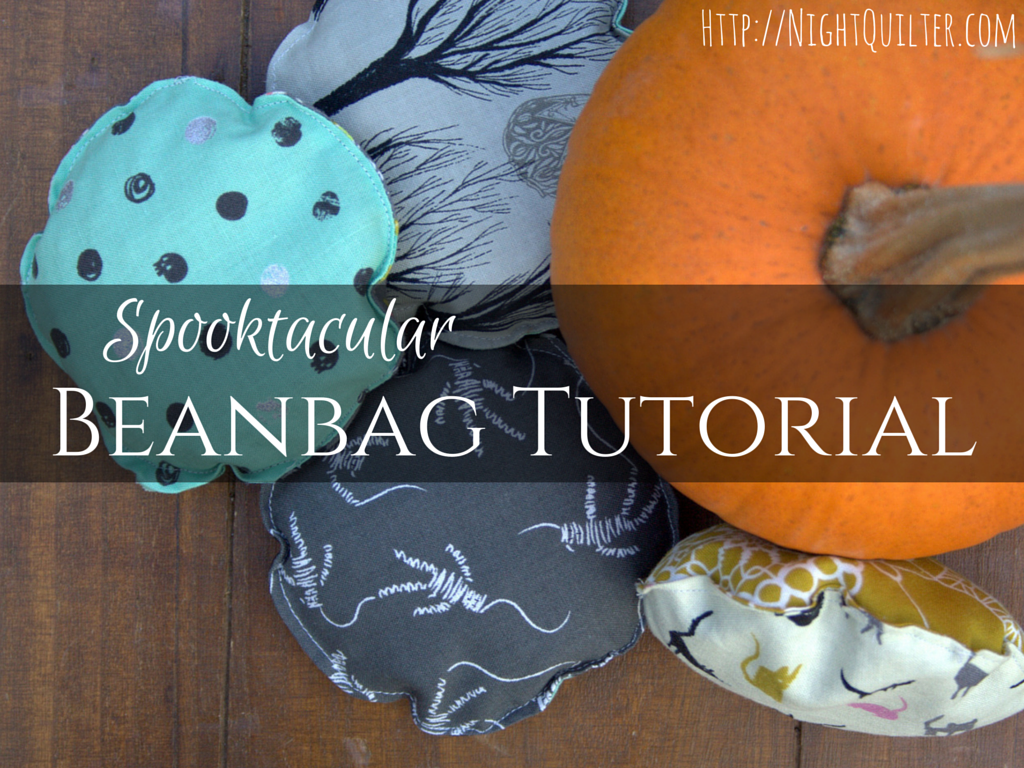
Halloween is a fun time of year around our house, since my kiddos love to dress up in costumes from years past all year ’round, and the end of October means NEW costumes and candy! While I’m not really big into decorating the house for holidays (with the exception of Christmas and Easter–how can you resist those?), I do like making holiday crafts with the kids to help build excitement.
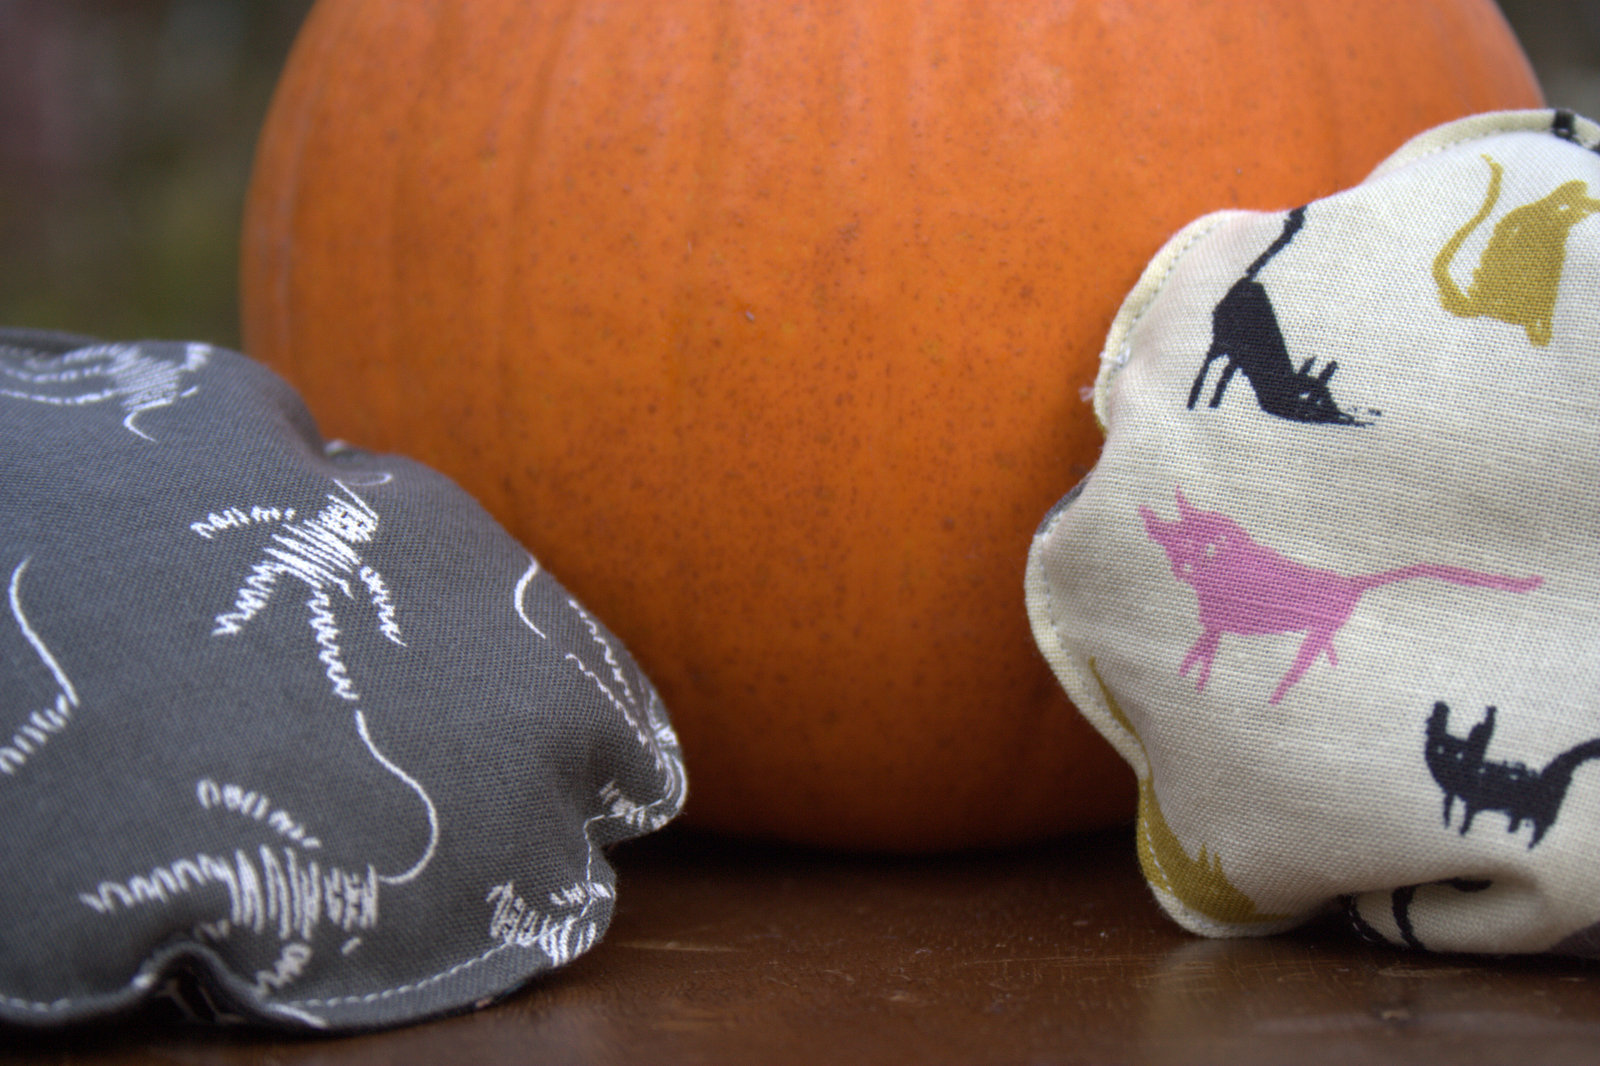
Today I’m going to share a quick tutorial for some spooktacularly sturdy beanbags, a perfect addition to a Halloween party but also a great addition to any child’s toybox. I should note, too, that beanbags are my go-to gift for two year old birthday parties. When a child turns two, I’ve found it’s really fabulous to have something you’re SUPPOSED to throw. Beanbags are such a versatile gift since they can be personalized in any way; you can change the shape, change the fabric, or personalize with applique letters or pictures. I’ve included affiliate links in this post so that if you decide to buy any of the tools I’m using, I will receive a small commission, too. I only share tools and products I love, so you can be sure they are tried, tested, and loved!
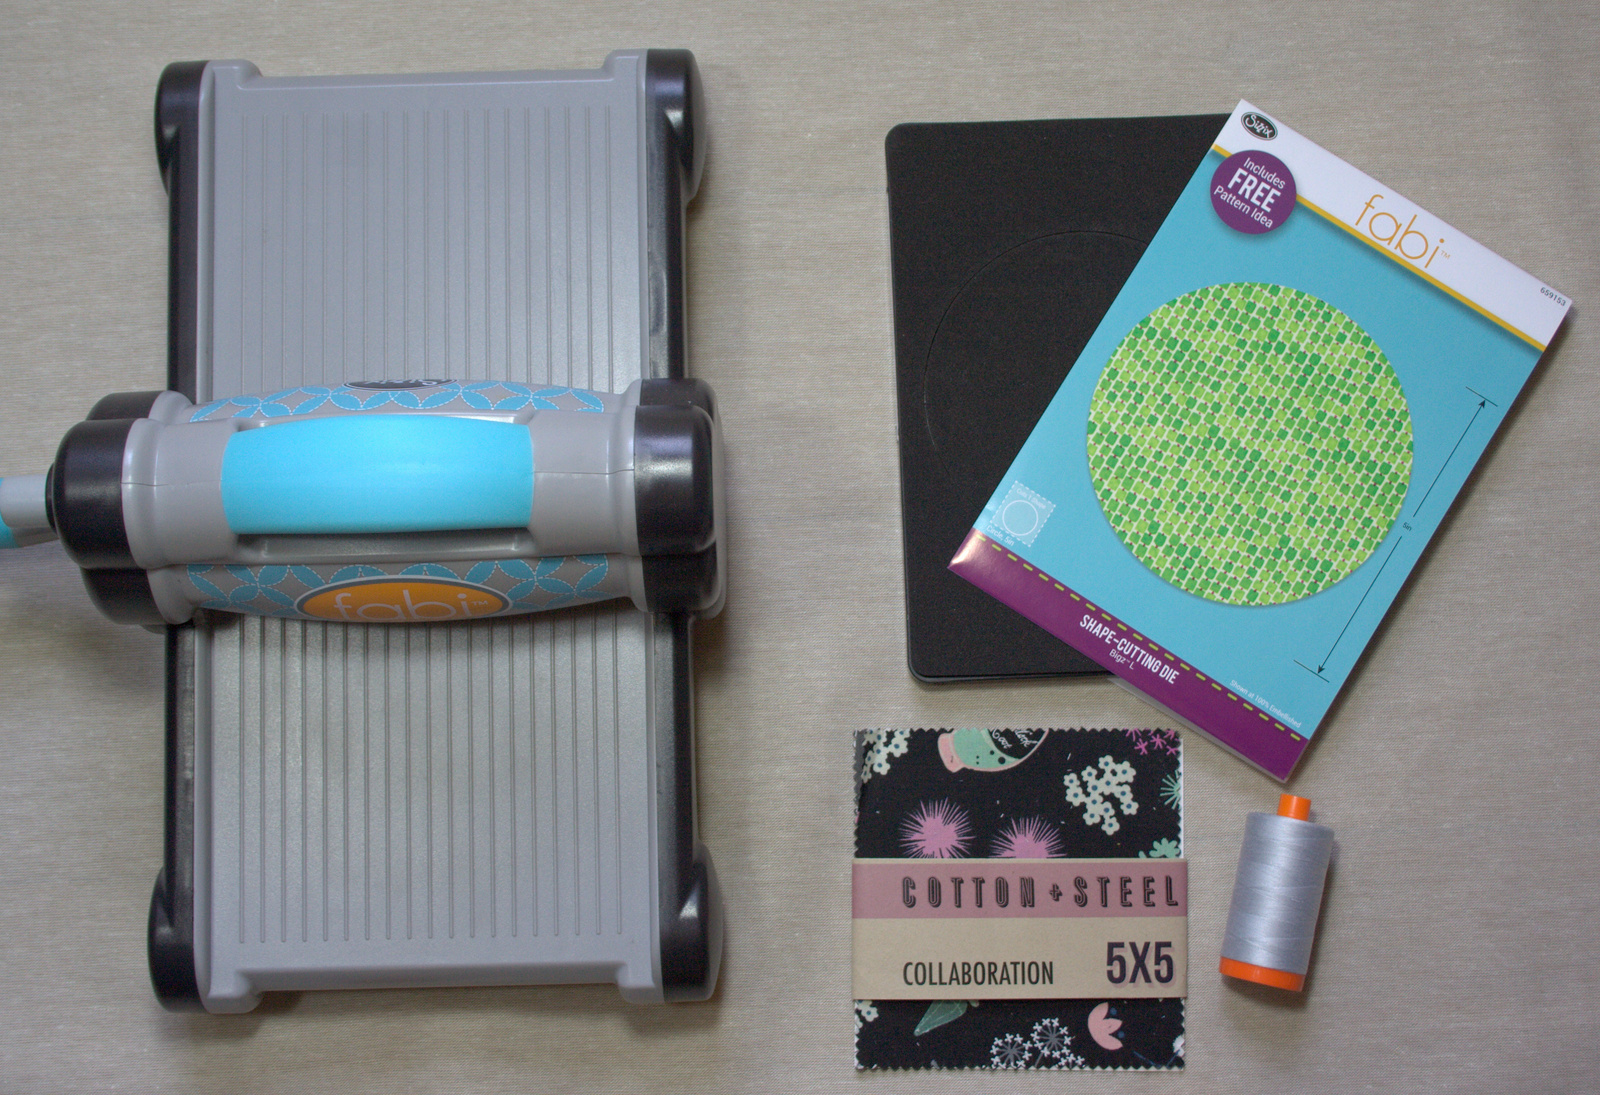
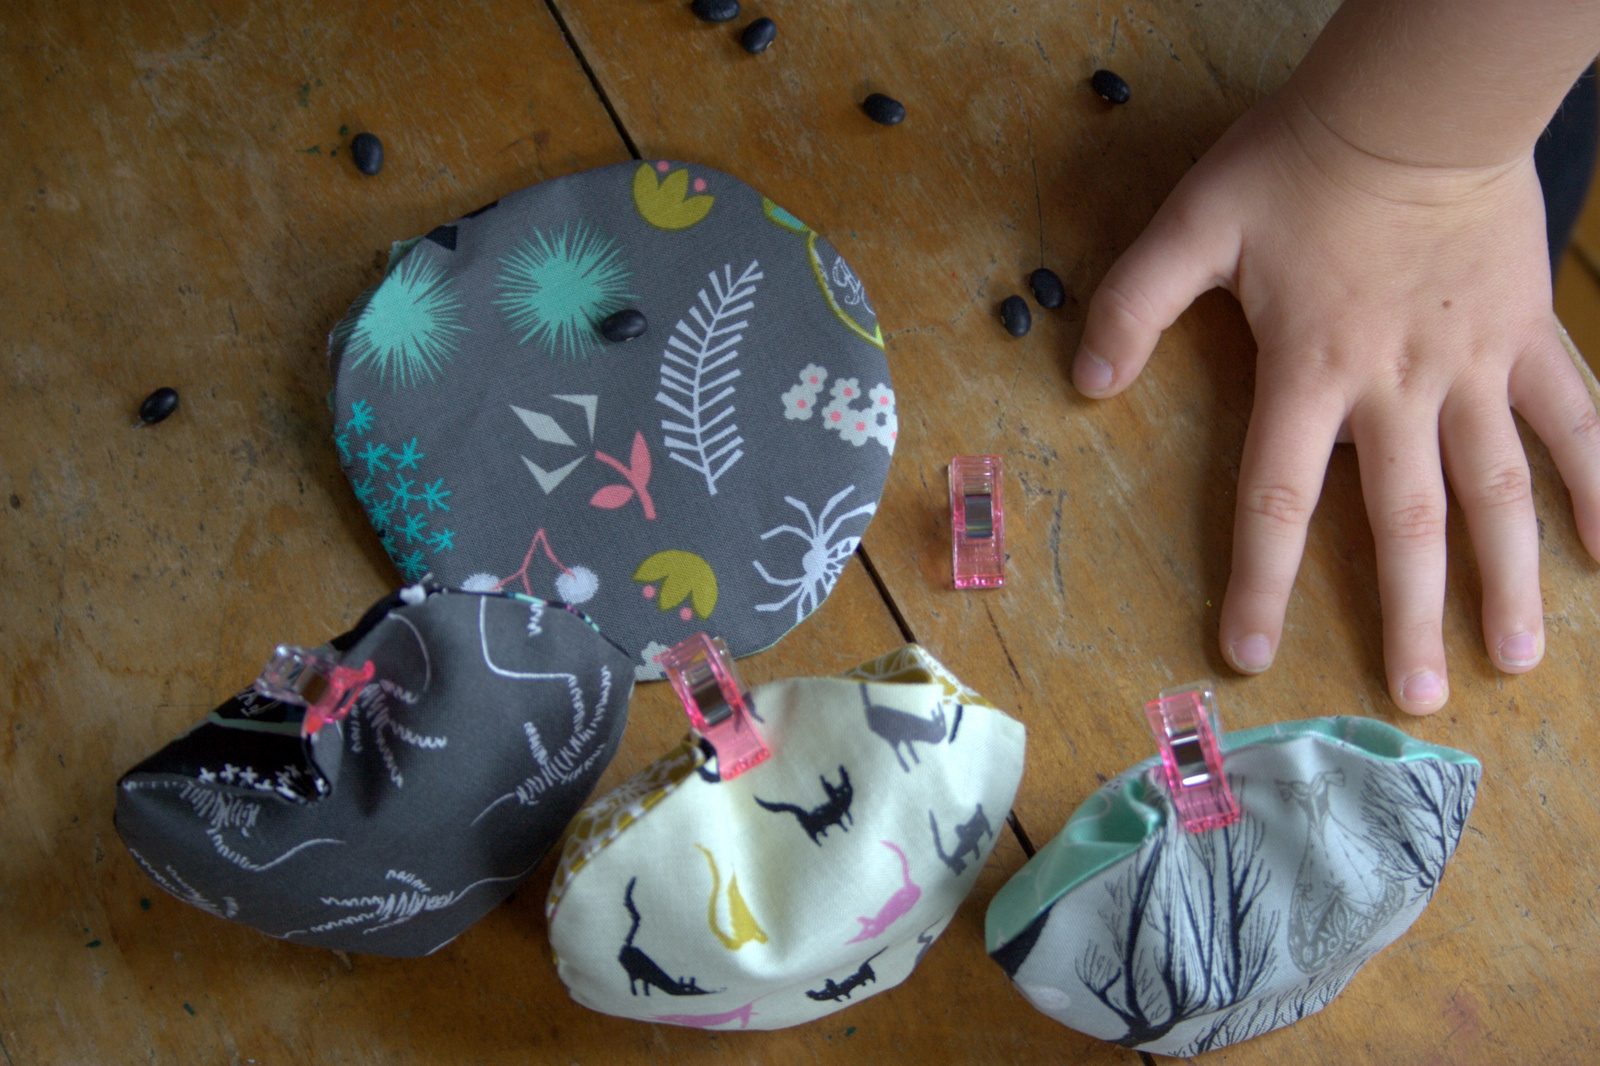
Materials needed (to make 4 beanbags):
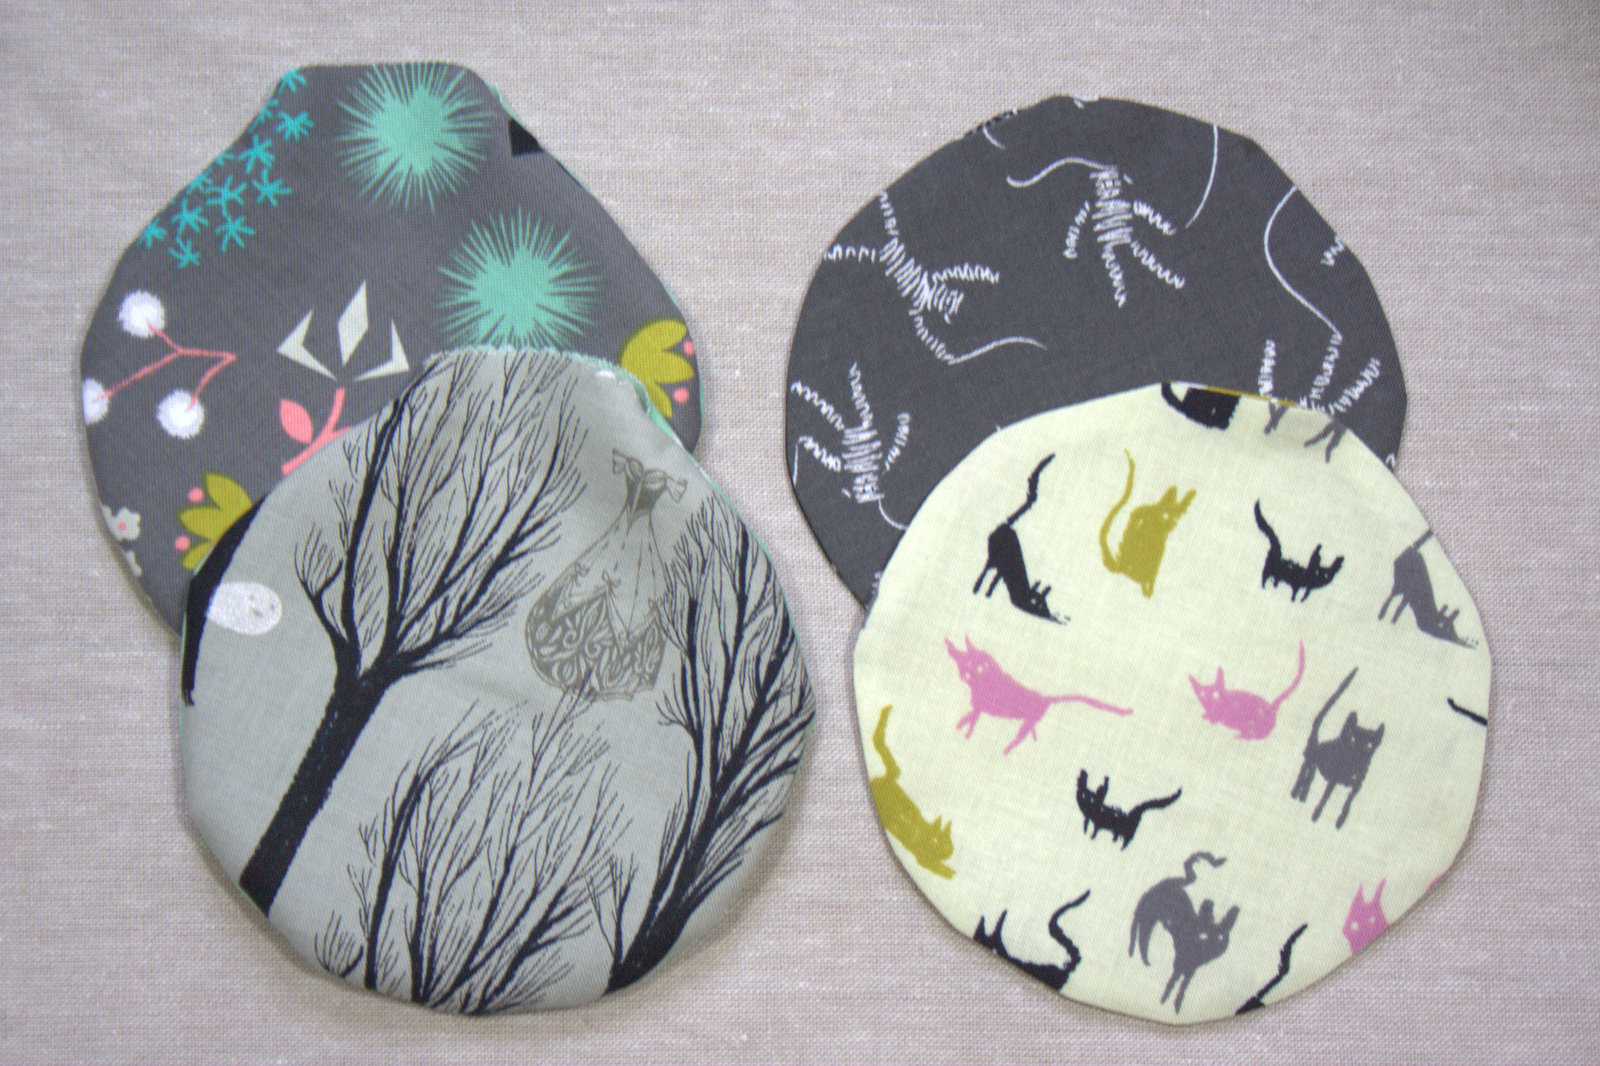
8 charm squares of fabric
Die cutting machine & 5″ circle die (such as Sizzix cutting machines, AccuQuilt, Cricut, etc)
8 x 5″ diameter circles of fabric
Sewing machine (zipper foot suggested but not required) – I use a Bernina 560
I made my beanbags using my Sizzix fabi die cutting machine and the BigZ L Circle 5″ die. You can also use any palm-sized circle item in your kitchen to trace circles on fabric for the beanbags if you don’t have a die cutting machine.
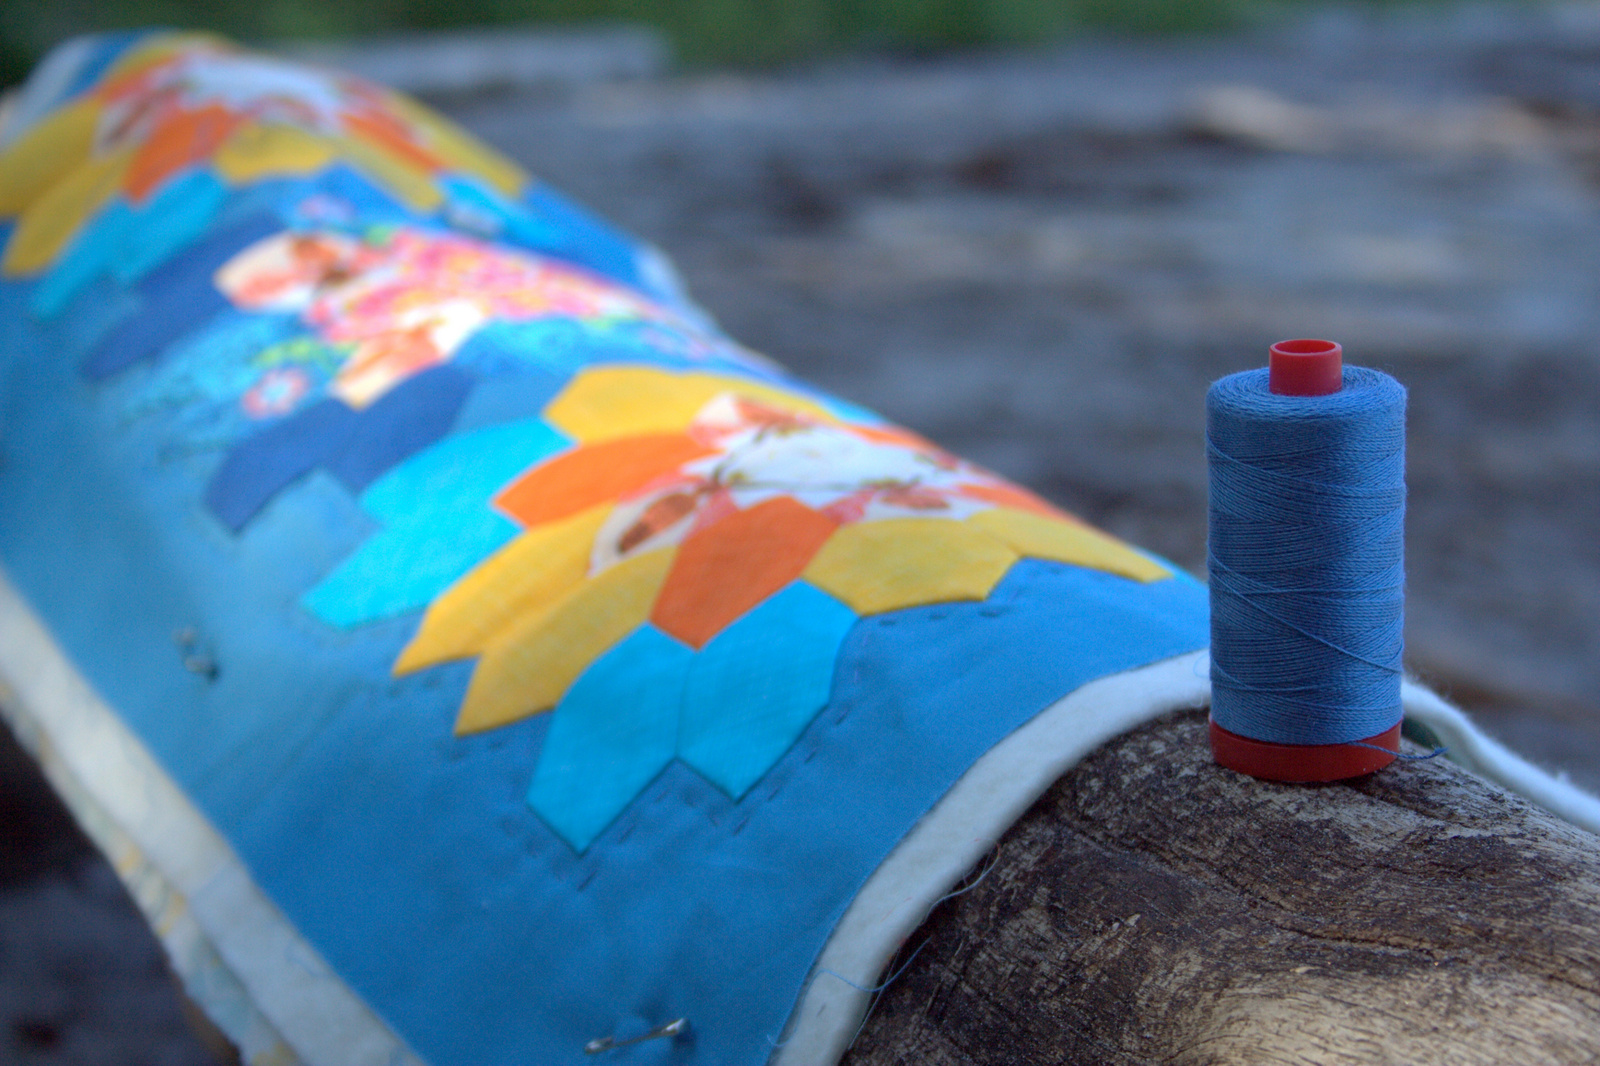
I figured since it’s nearly Halloween, it was the perfect time to use my Cotton + Steel Spellbound Collaboration charm pack. The 5″ circle die worked perfectly with the charm squares, which made my job even easier! I used my go-to thread, 50wt Aurifil 2600-Dove for all sewing.
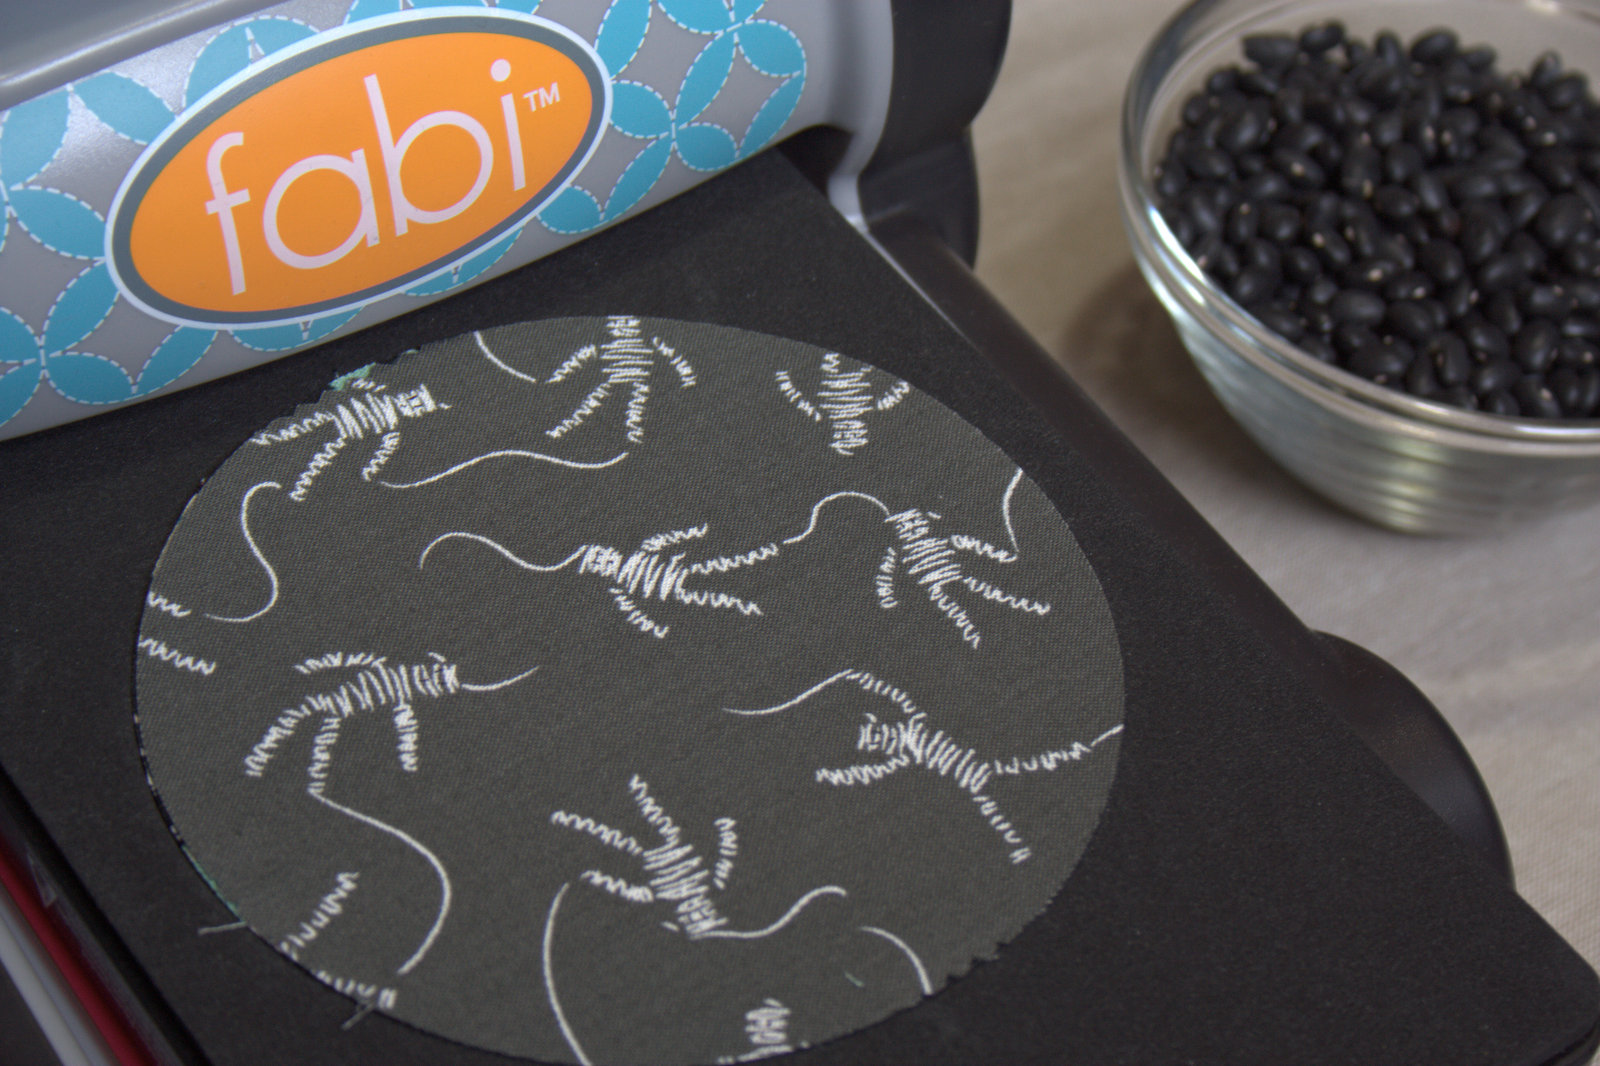
Choosing four pairs of coordinating charm squares, cut eight (8) 5″ circles, layering your Sizzix sandwich: bottom cutting pad, die with the blades facing up, fabric centered over the circle blade, and top cutting pad. All necessary circles for this project can be cut with one pass through the die cutting machine, which made this a really quick project to make with my kids.
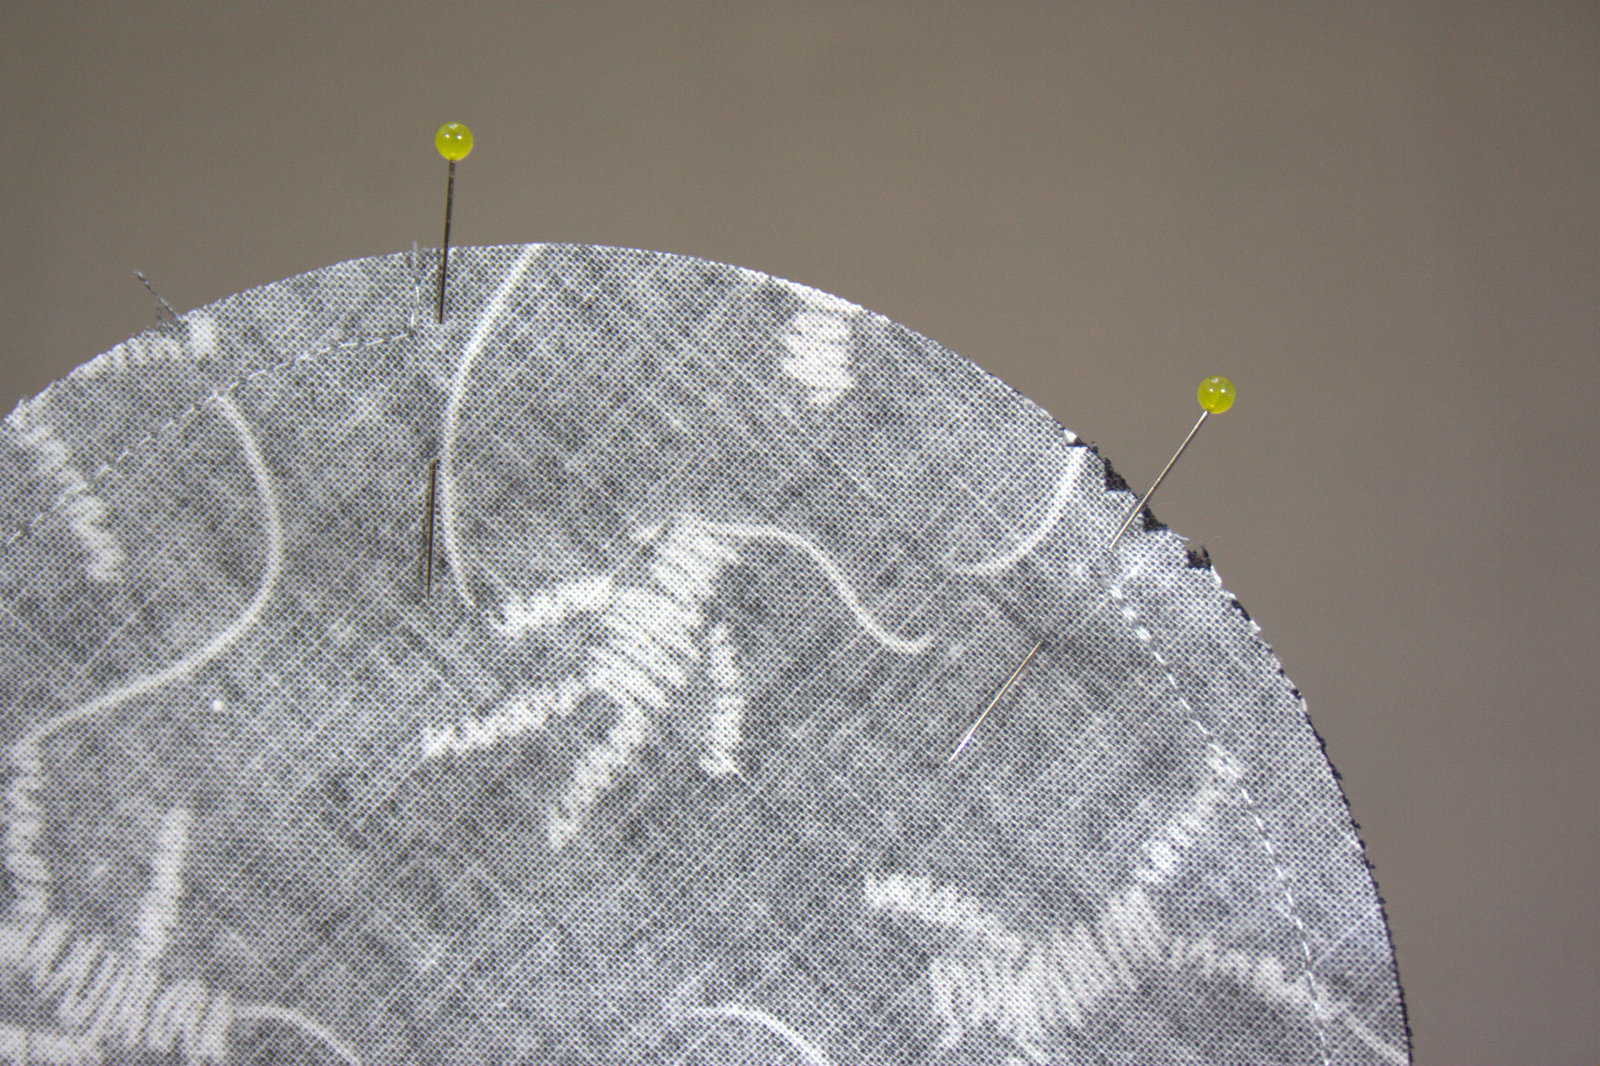
Next, pin your pairs of fabric right sides facing. I used only four pins, two of which marked a 2″ opening. With a 1/4″ seam allowance, sew the circles together, leaving 2″ open for turning and filling. Remember to backstitch at the beginning and end of each seam.
Beanbags once they have been turned. On the left are beanbags before pressing; on the right are beanbags after pressing and turning in the opening.
Turn beanbags right side out through the 2″ opening. Gently slide your finger along the seam from the inside to make sure the circle is fully turned. Press with a hot iron. Turn in the seam allowance around the opening and press, too, since that will make sewing the beanbags together much smoother once they are filled with dried beans. Since it’s a curve, this step is a little tricky (or at least it was a little tricky for me). Just remember what you’re making: these are going to be tossed and thrown and loved, and perfection is overrated!
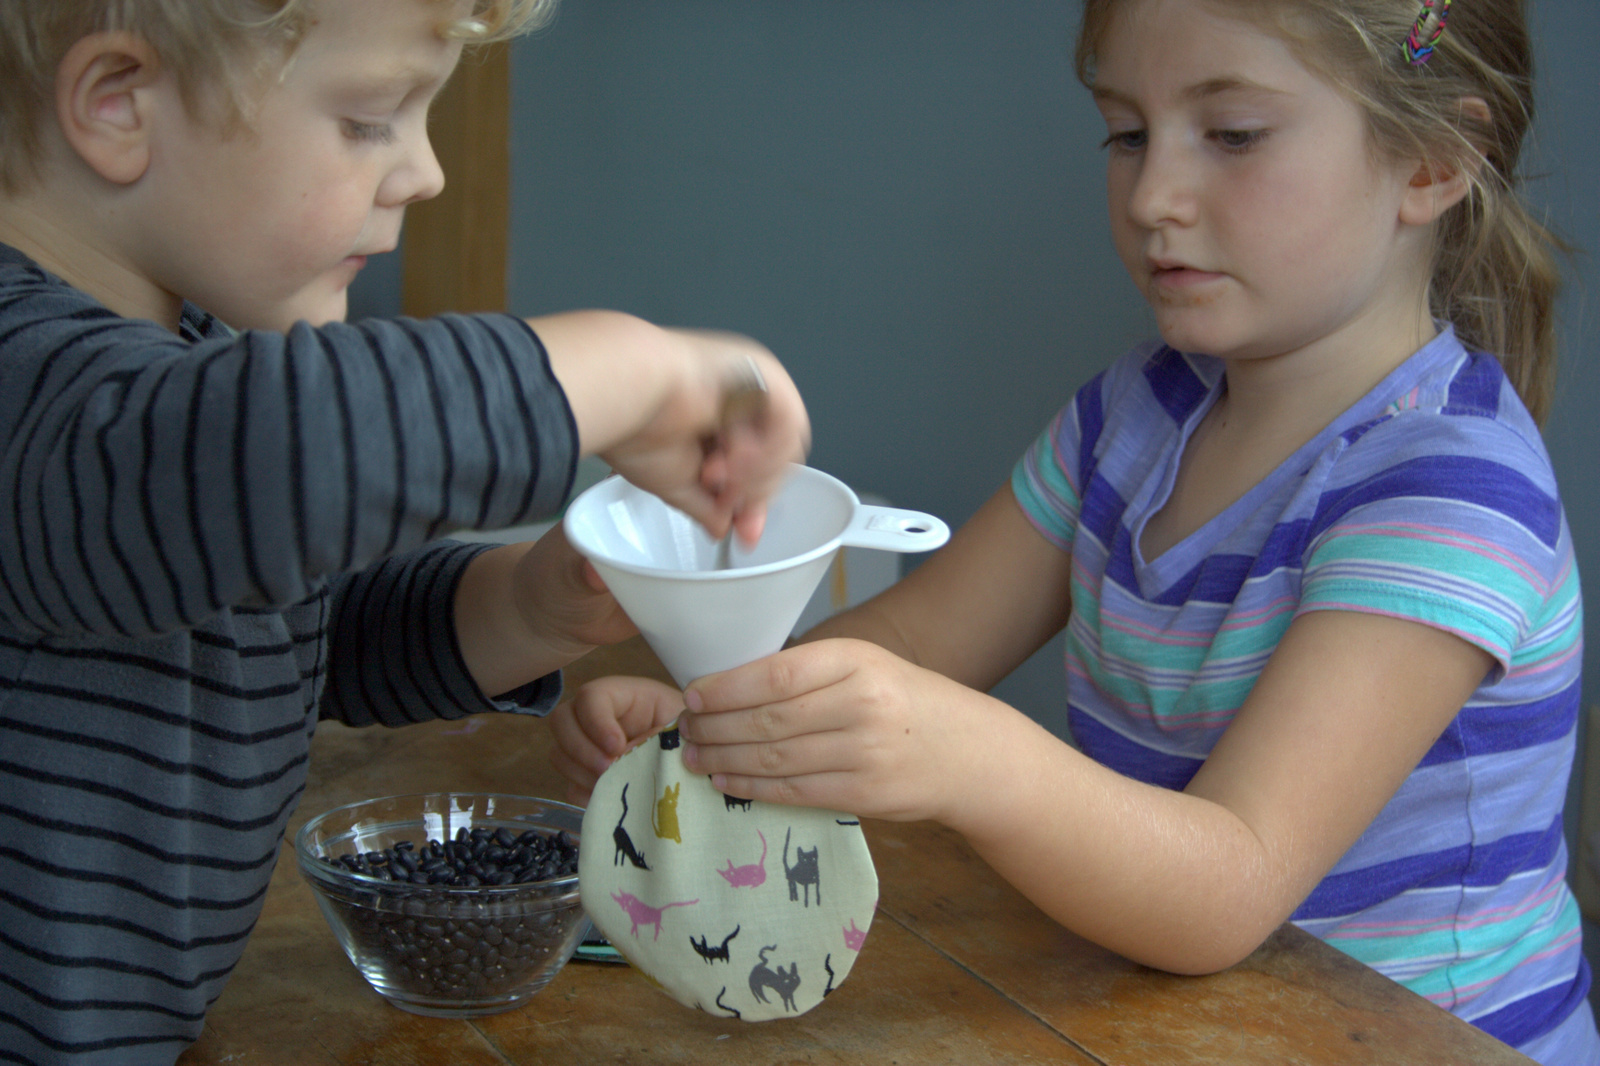
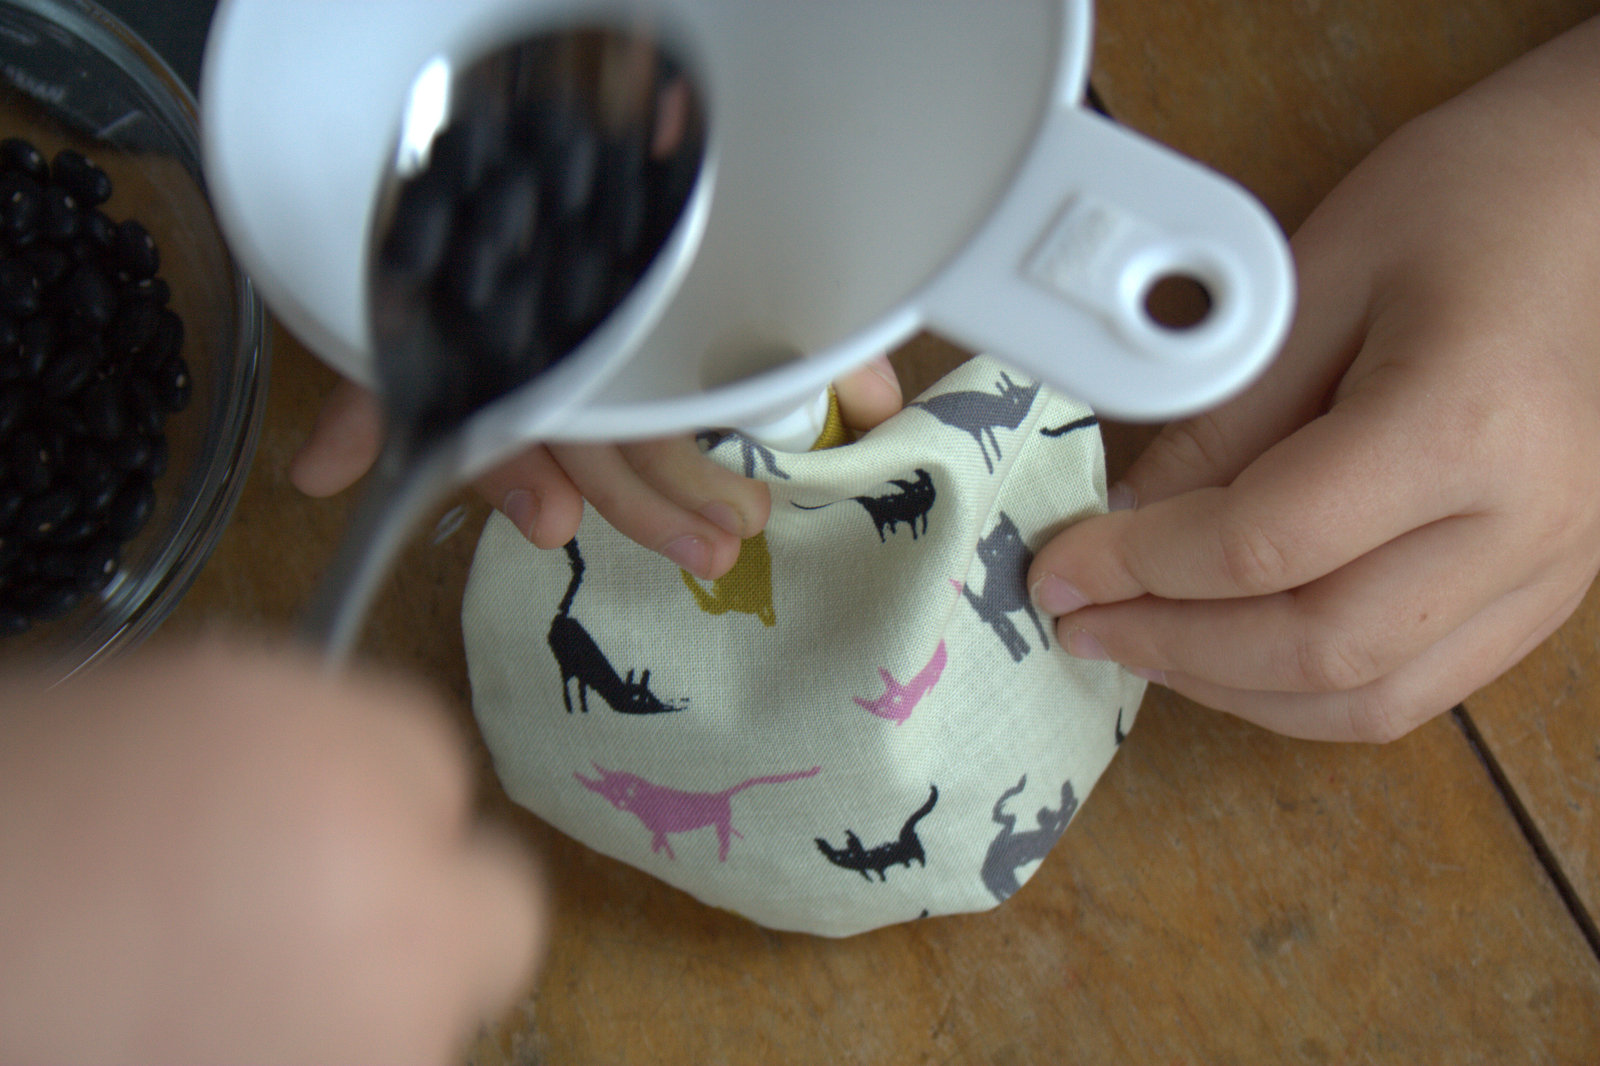
Now comes the fun part! Grab some small dried beans (I used dried black beans), a funnel and/or spoon, and a couple of eager helpers.
Fill the beanbags with dried beans, leaving at least an inch of empty space at the top. Trust me here; the beanbags will seem too empty, but while you are sewing them shut and top-stitching, you will want that extra wiggle room.
We found that a combination of funnel, spoon, and simple “use your hands to put the beans in” worked well for us.
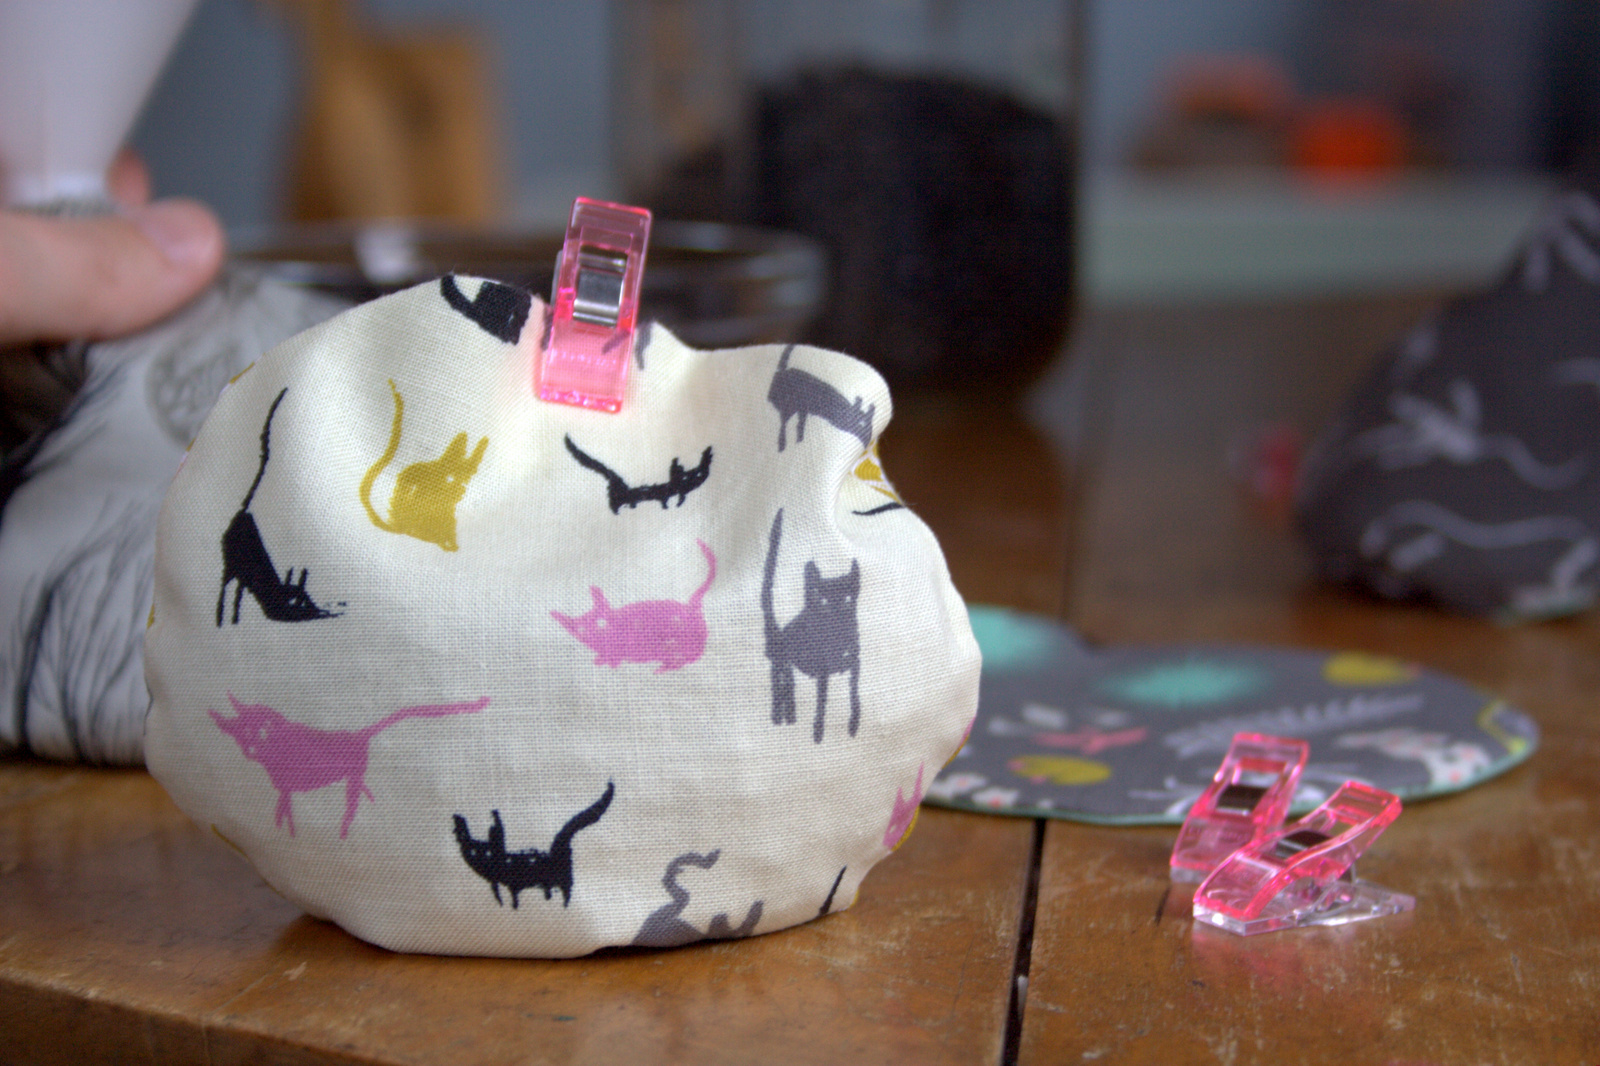
Either pin or clip the tops once the beanbags are filled (remember to leave that good inch or inch and a half of empty space in the top). This will both remind you that the beanbag is “finished filling”, and remind your kiddos not to cram any more beans into it. (We definitely took as many beans out of the beanbags as we put it. All part of the fun, right!?)
Depending on the size of your helpers, this may be a messy activity. Plan accordingly, or embrace the chaos.
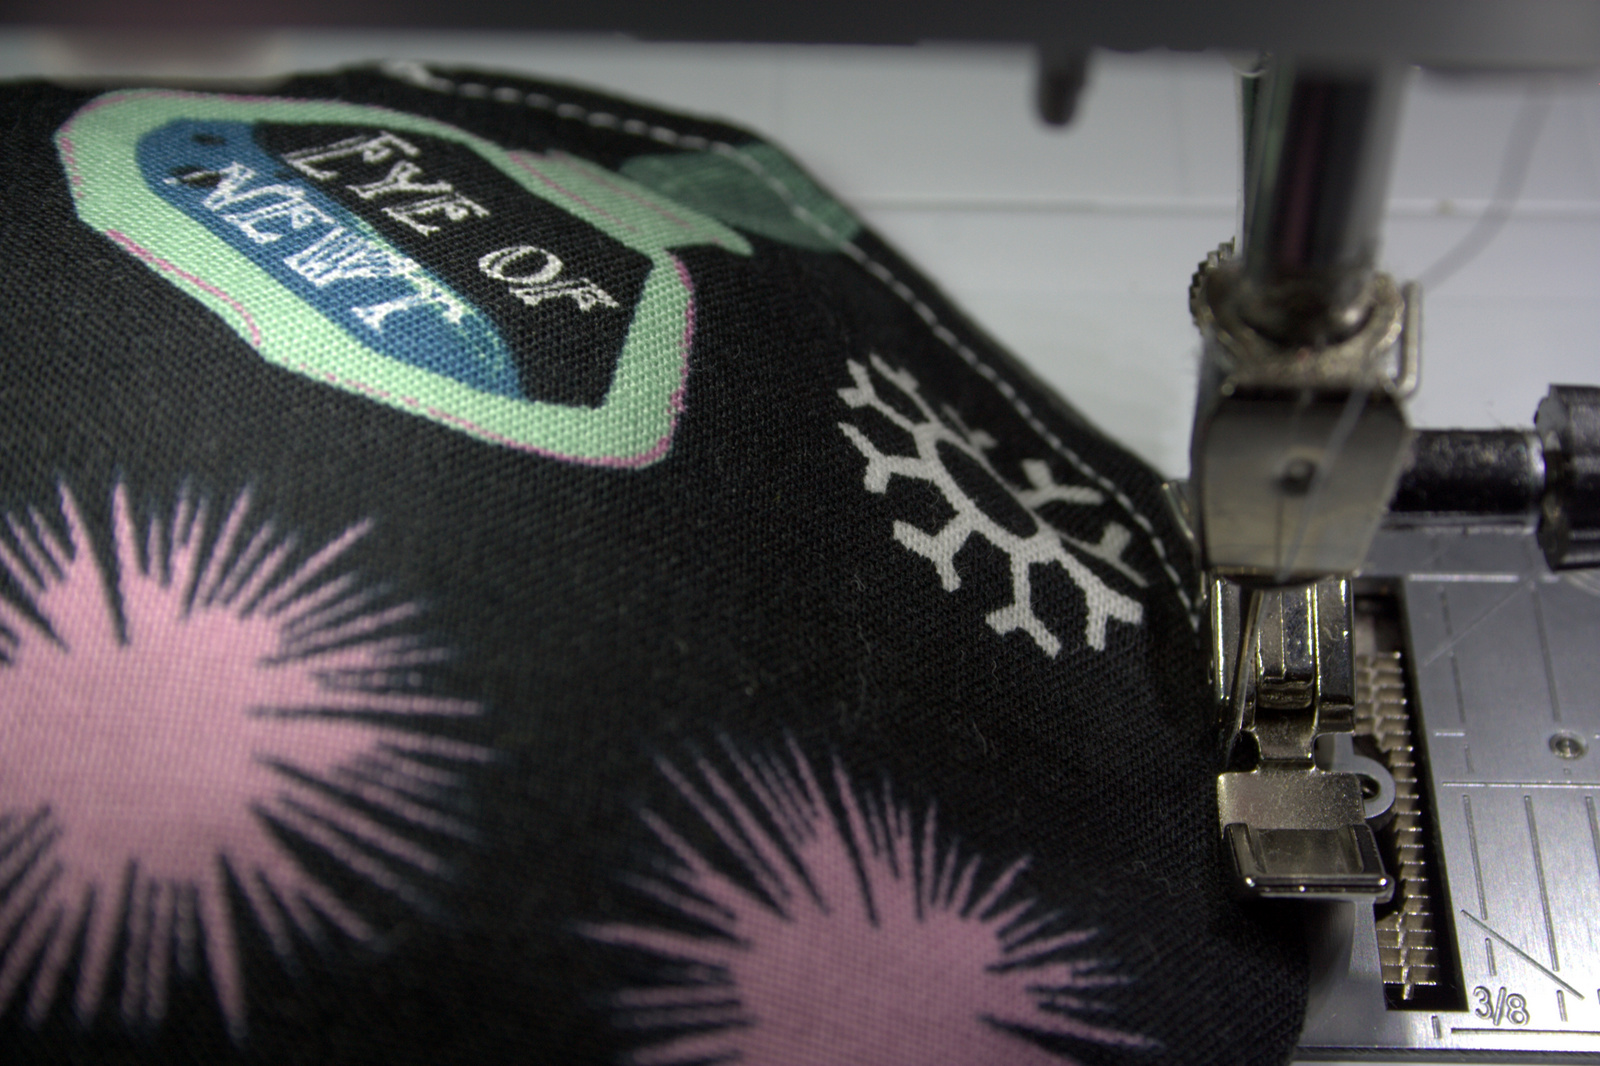
Needle between foot and beanbag.
Once all of your beanbags are sufficiently filled, head back to the sewing machine and topstitch about 1/8″ inch from the edge of the beanbag, beginning by sewing the opening closed. This extra round of sewing will securely close the opening, and will also provide extra durability for the entire beanbag. I made some beanbags for my nearly-six year old when she turned two, and they are still going strong in our playroom.
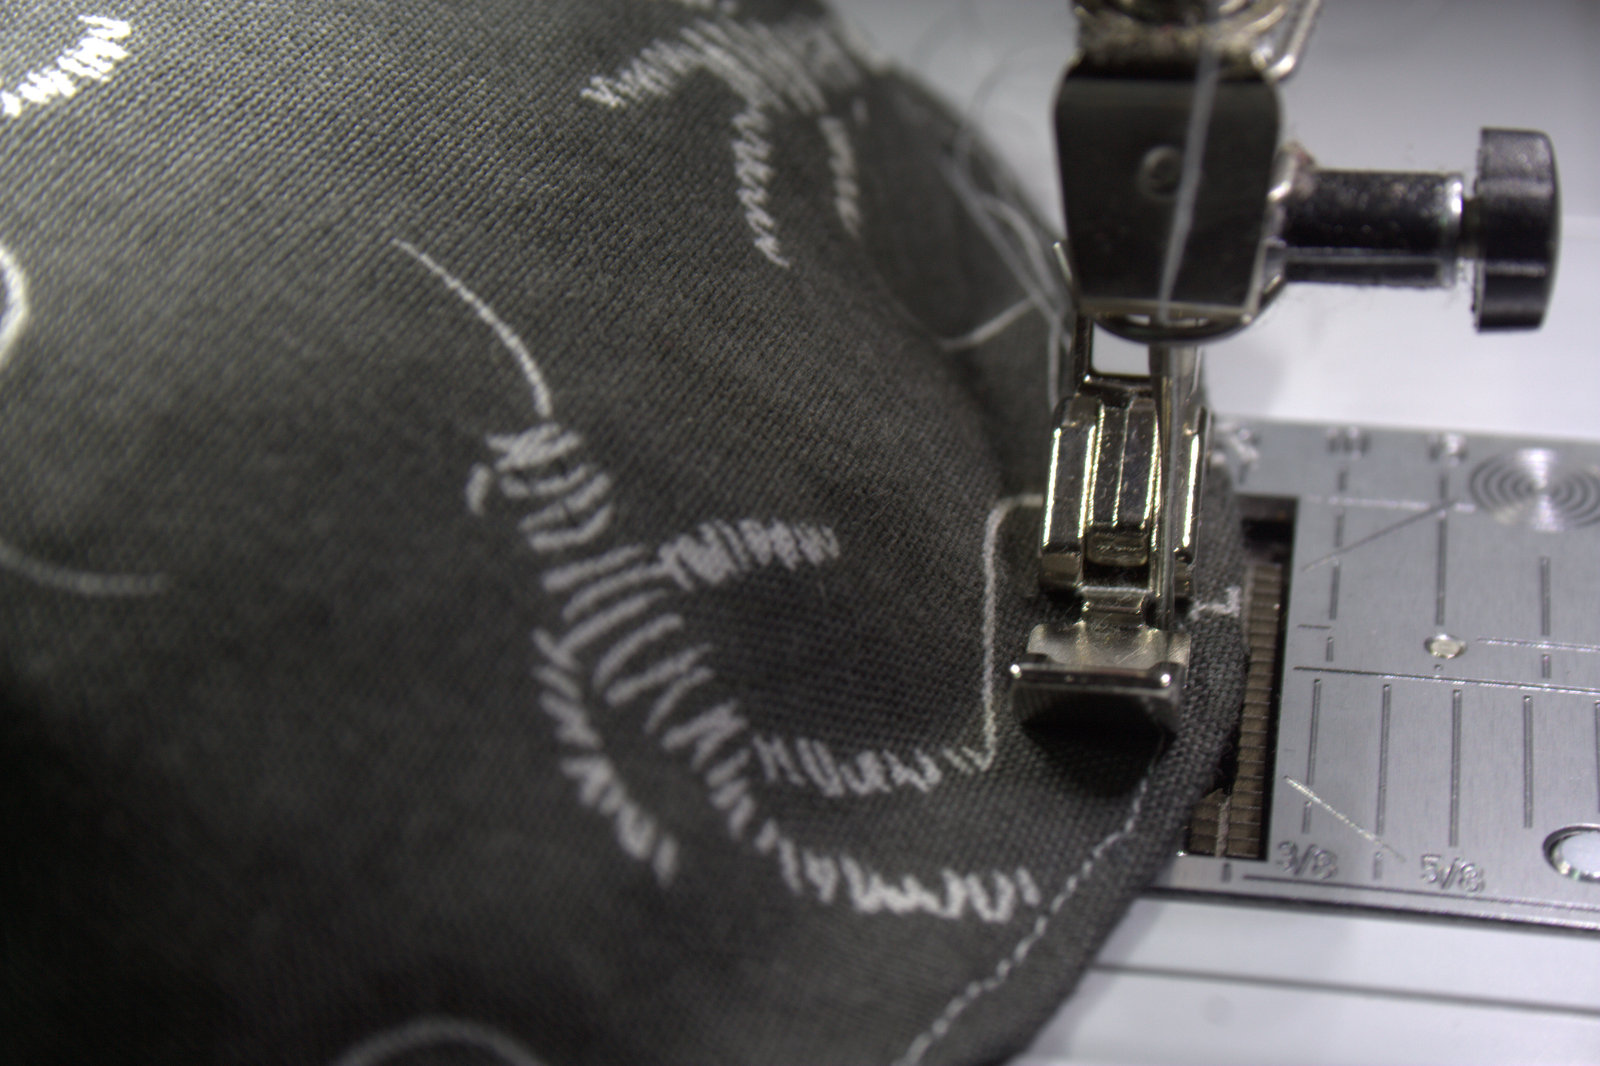
Foot between needle and beanbag = winning combination for me.
I used my zipper foot to sew these beanbags closed, and sewed most of them with the needle between the foot and the beanbag (shown in the top photo above). It proved more finicky than I remembered, so with the final beanbag, I moved the needle so that the foot was between the needle and the beanbag (shown in the photo above). This worked much more smoothly for me. As you sew around the edges of the beanbag, stop every couple inches with the needle down to reposition the beans, pushing them away from the part of the beanbag you are about to sew. Sew all the way around each beanbag.
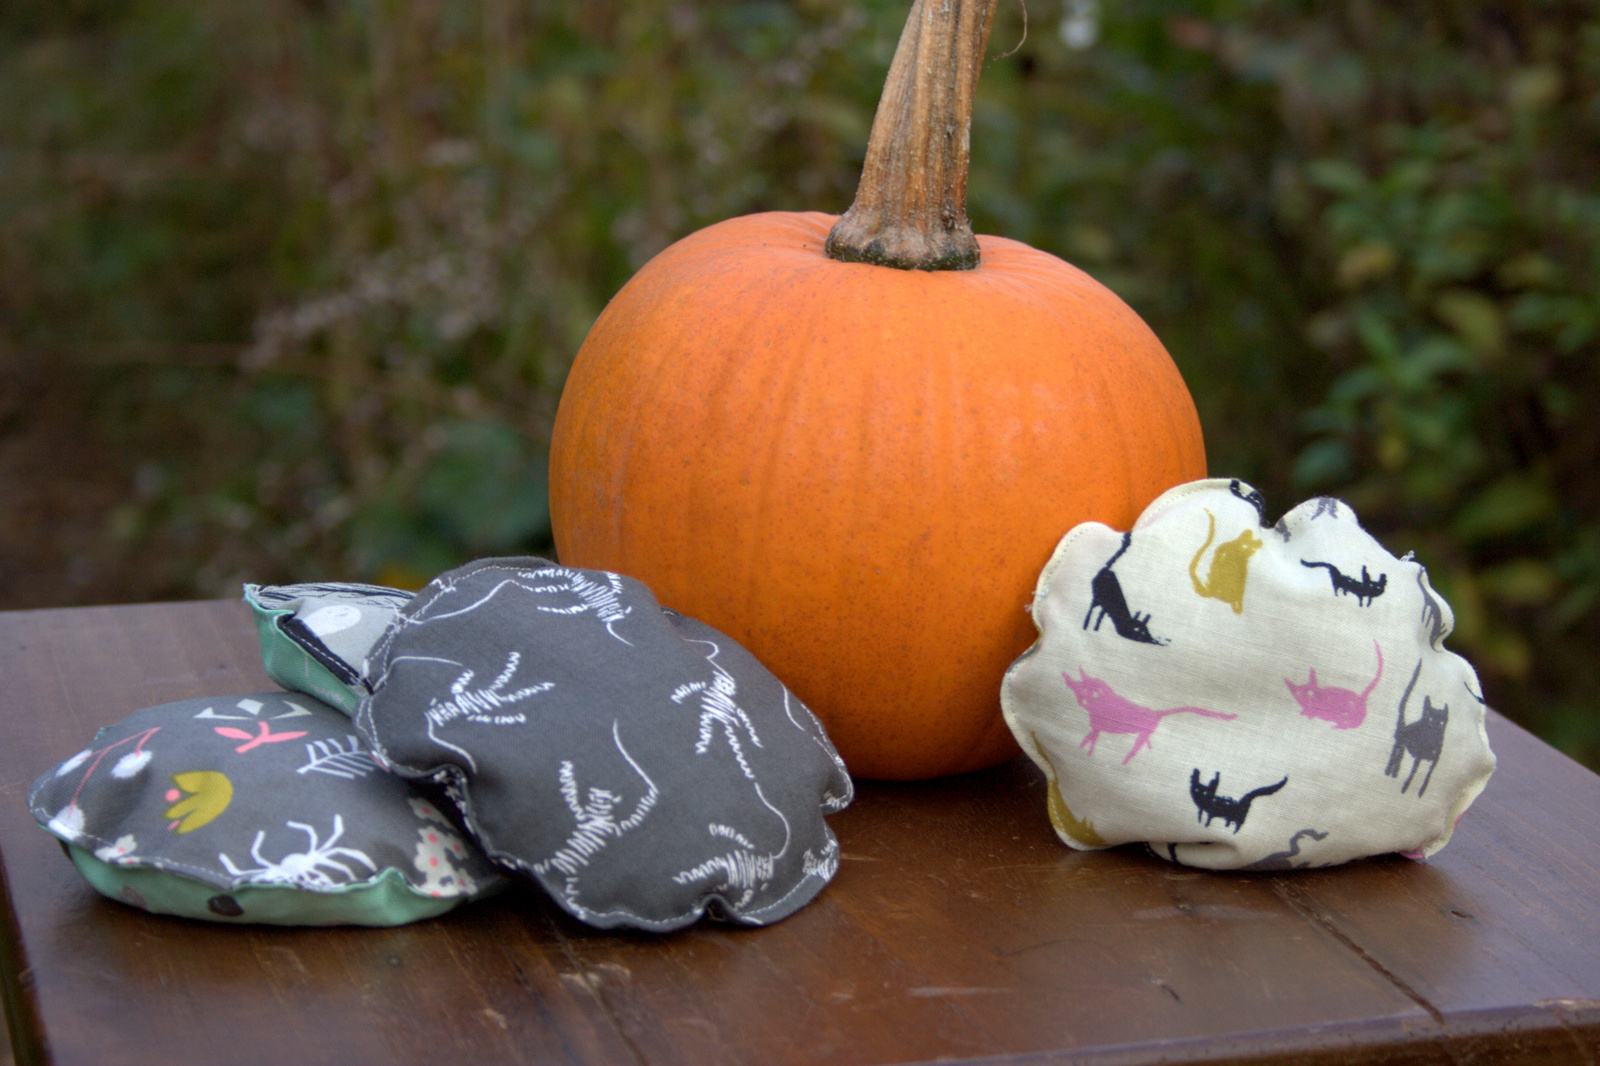
Now you have a handful of spooktacular sturdy beanbags and you’re ready for fun! Toss them at pumpkins, into trick-or-treat buckets, or at each other (avoid faces!). Have fun!
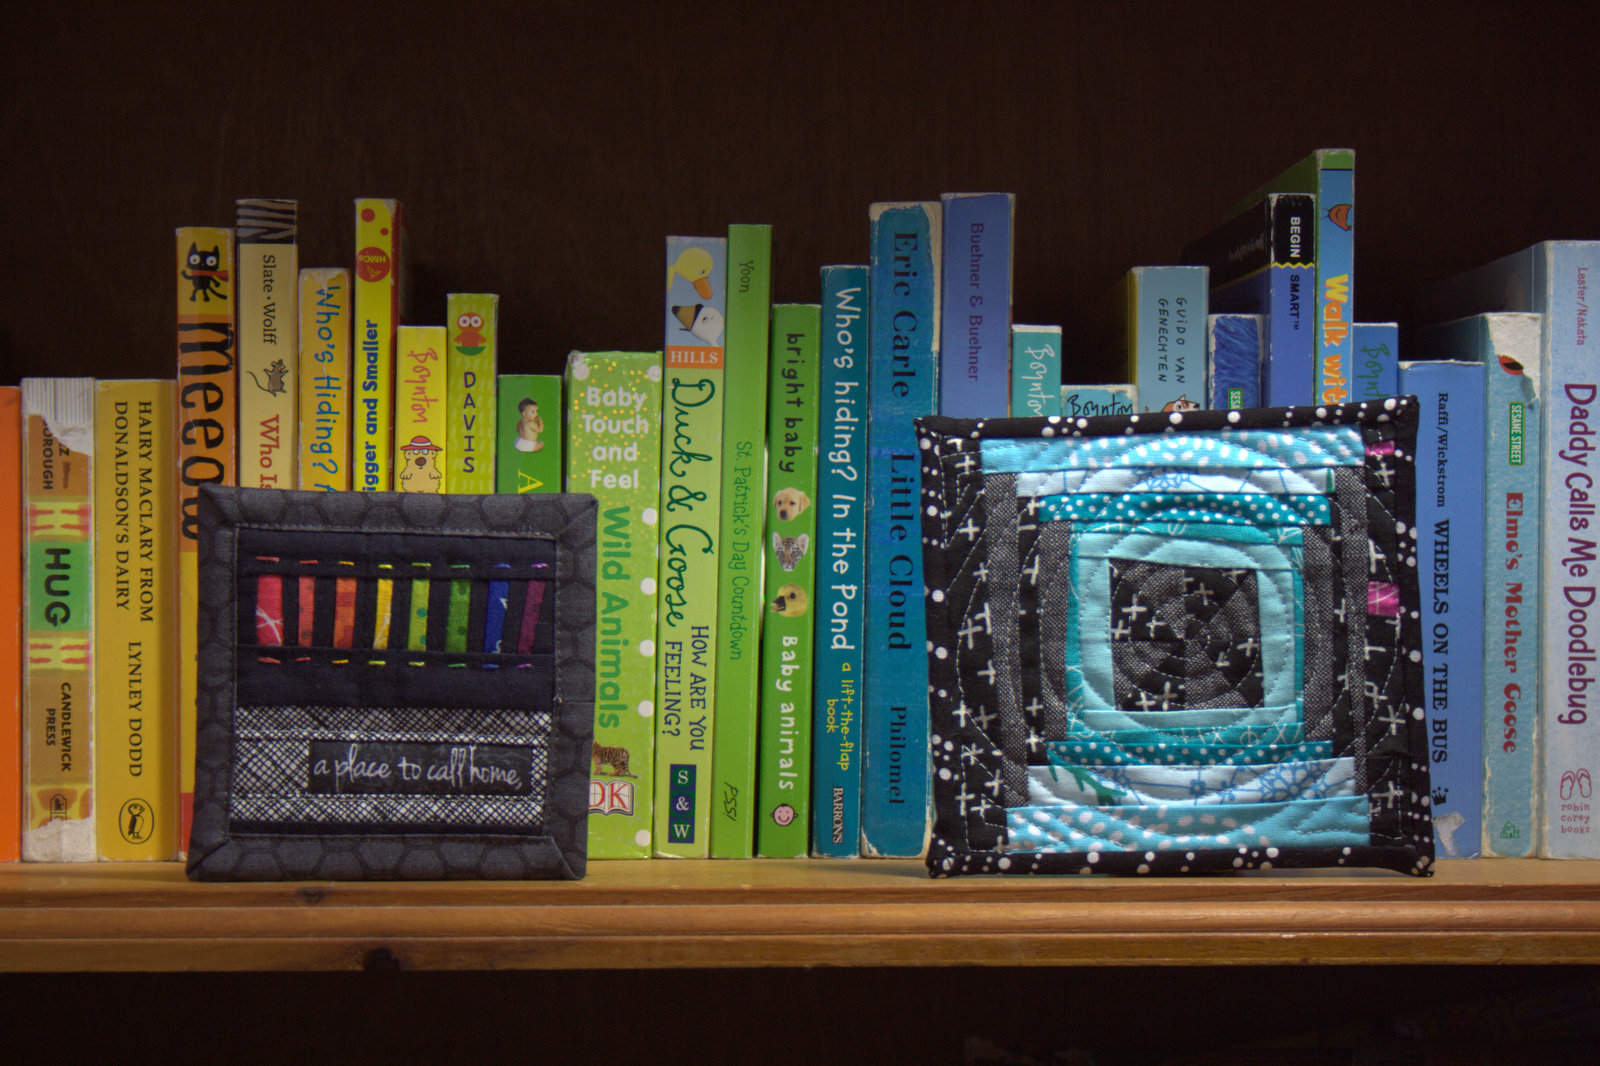
Lately, I’ve been sucked into the world of mini mini quilts, sparked by an Instagram post by my quilty blogger friend Michelle Bartholomew. The Mini Mini Quilt Swap, as far as I can tell, is an open swap of teeny tiny quilts (finishing usually between 3 – 5 inches square). It’s entirely independent, and up to you or a partner to send the invitation to swap, on you and your swap partner’s own set timeline, and open to as much fun and interpretation as you want. As Yvonne from Quilting Jetgirl said, it’s the perfect “Squirrel!” activity for quilters.
I have a big project to fini…. Squirrel! Off to the world of mini mini quilts.
The first two mini mini quilts I made.
I’ve finished four mini mini quilts so far and have at least two (more like three or four) in progress. You can see my mini minis in progress HERE. I have promised mini mini quilts to 9 people and have received 4 (5, technically, since Allison sent me two!) so far. They are a perfect little brain-rest in between bouts of completion on larger projects.
The first mini mini quilt I finished was inspired by Chawne Kimber’s Roberta quilts and her idea to sew SMALLER (check #sewSMALLER on Instagram to find her amazingly tiny and detailed quilting @cauchycomplete). I had played around with the idea after meeting Chawne and seeing her amazing work in person at the Slow Stitching Retreat hosted by Sam of A Gathering of Stitches this summer, and this mini mini was originally one of my play pieces. Michelle claimed it, I quilted it with a spiral and bound it with as much skill as an elephant threading a needle.
As my first mini mini quilt bound, I was silly and tried a normal binding method, except thought it would be a good idea to join the binding at a corner (like a miter, right!?). Trust me, don’t do that. I’m seriously strongly considering ripping off the binding and giving it another go. In fact, I think I will. Sorry, Michelle, it will be a bit longer before your mini is in the mail.
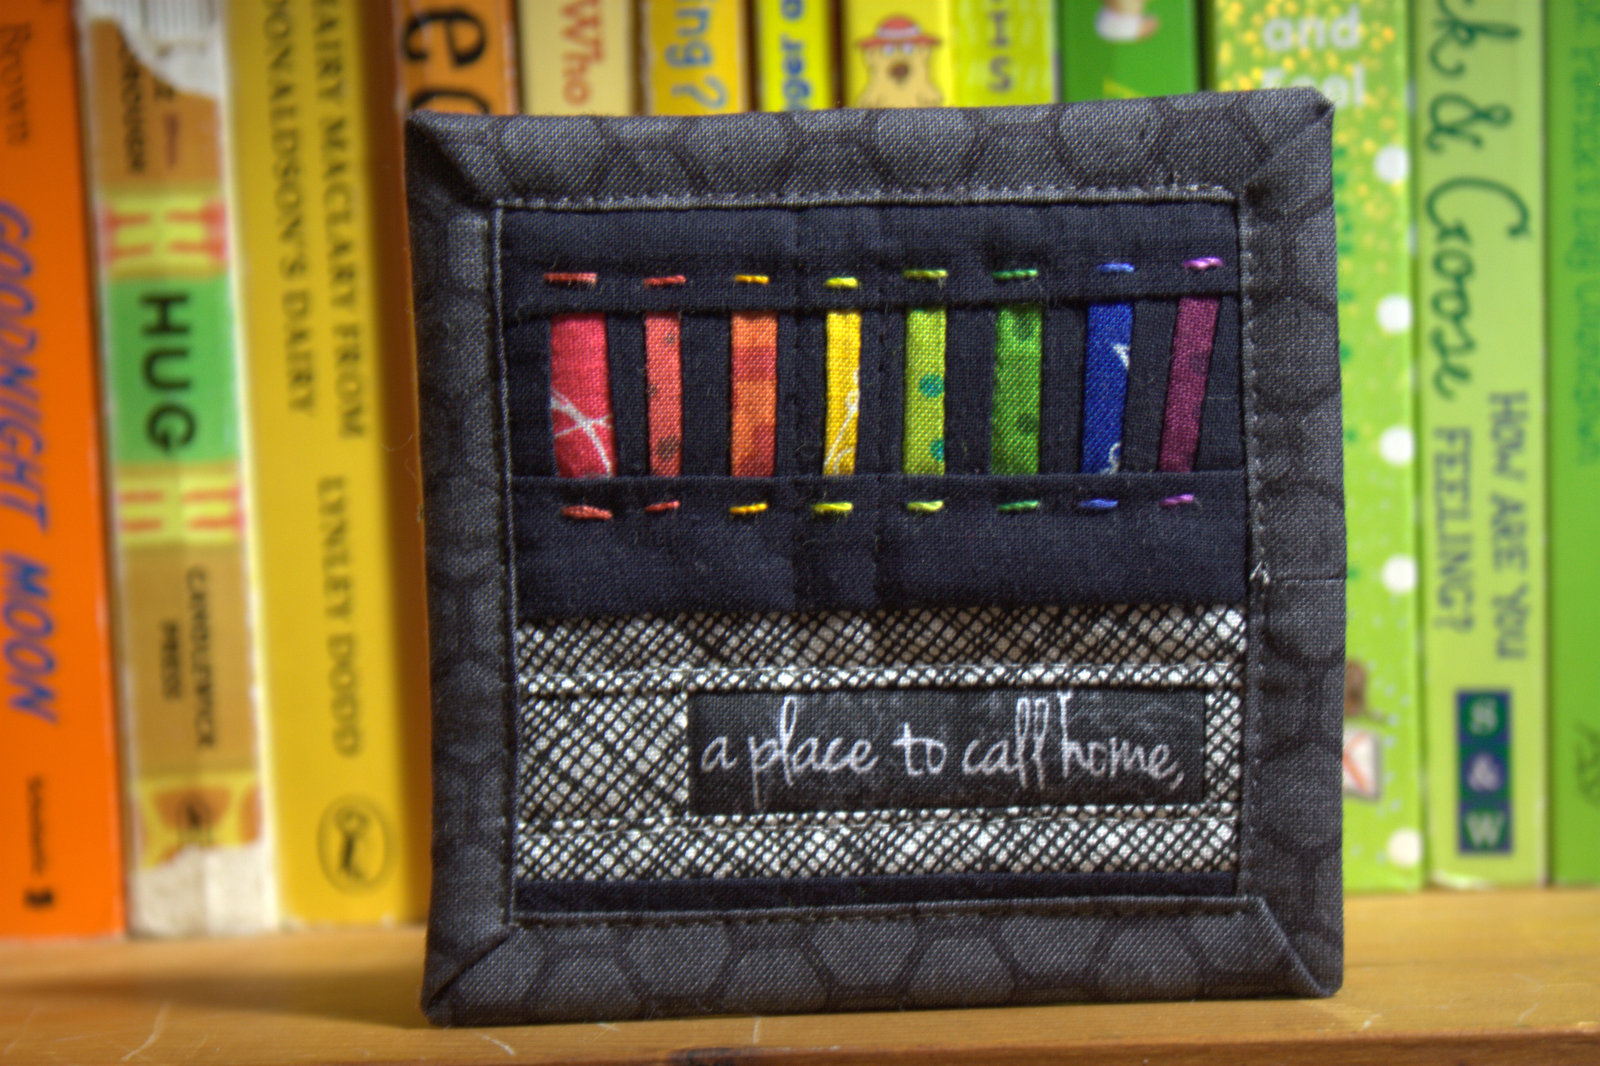
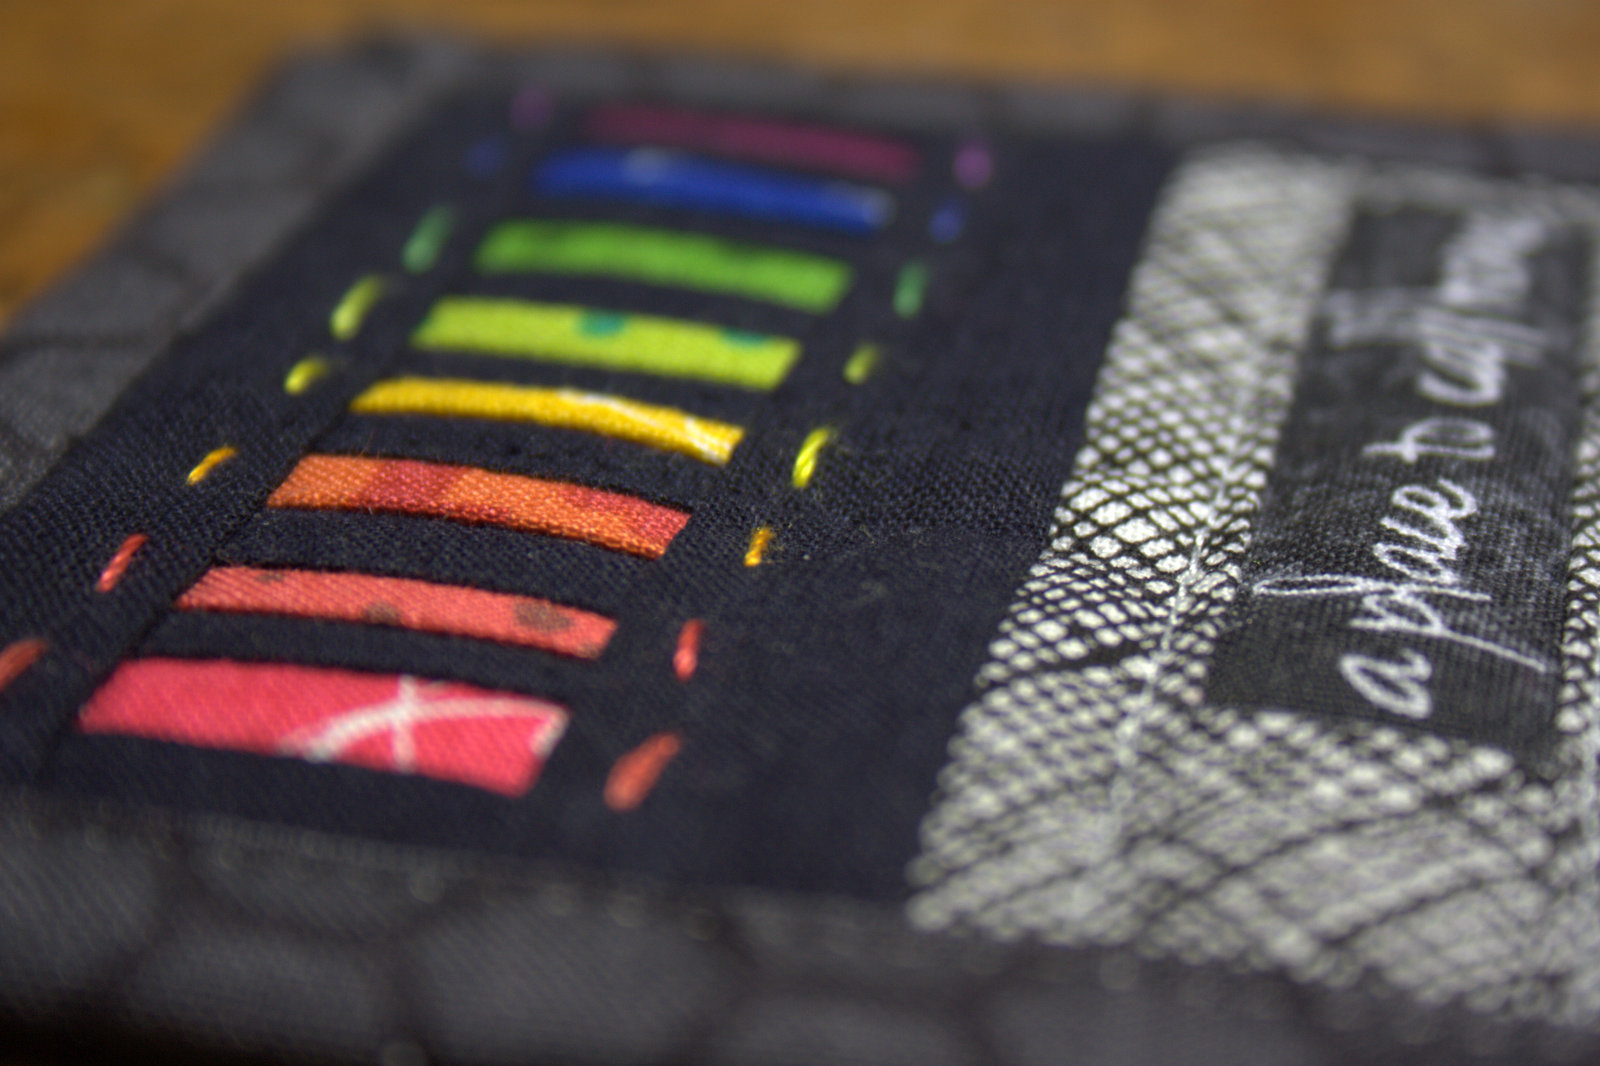
The second mini mini I finished is for Yvonne, who said she liked rainbows and that I could have free reign. I first made the rainbow strips 1/4″ wide, but it ended up far too large.
So I channeled Chawne and sewed smaller… these finished rainbow bars finish at about 3/16ths of an inch. In my typical style, this mini is rainbow with a black/grey contrast (it’s either that or low volume, right!?).
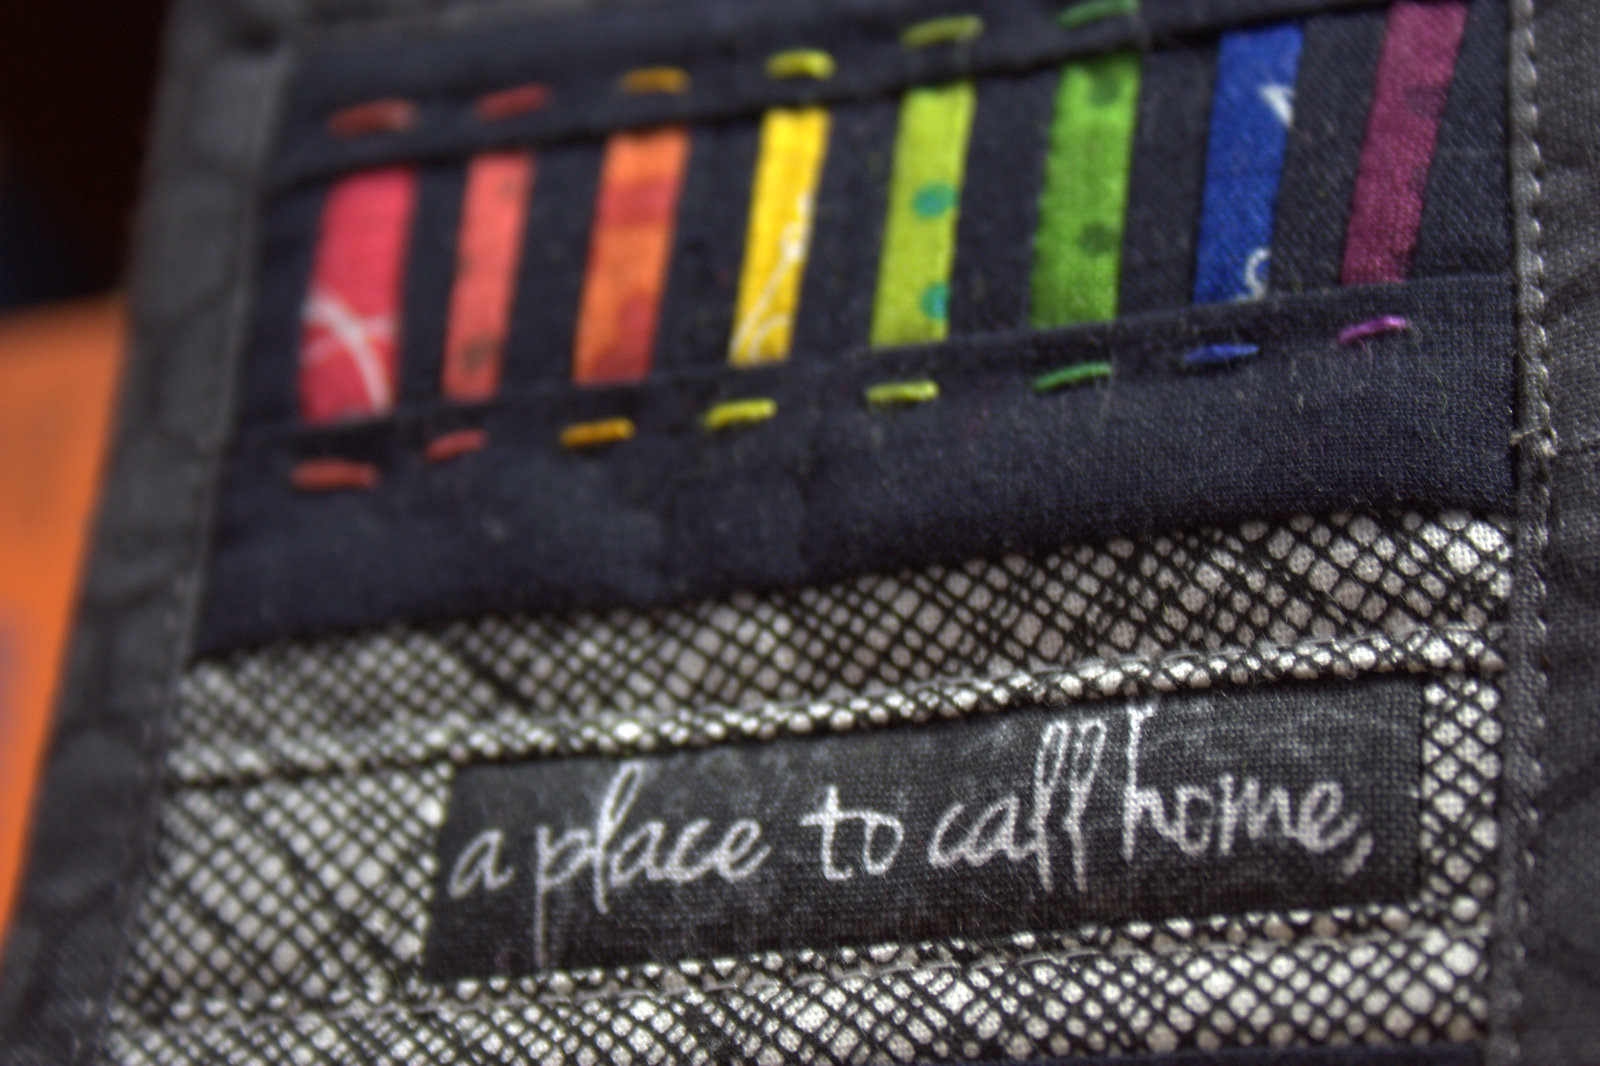
I added a little meticulously cut bit of Medrona Road that says “a place to call home”. Without going into too much detail, one of the projects Yvonne is undertaking in an ongoing manner is her Reclamation Project, where she creates quilts with a personal statement. As she says, she “decided to take seeds of inspiration I found in song lyrics to create my own unique poetry in the form of a simple haiku. Once I had derived my own original work, my goal was to use my poetry as design inspiration for a mini quilt.” (from her Reclamation Project intro) From these projects, and through knowing Yvonne for nearly 2 years (really!?), I know that Yvonne has moved quite a bit in her life. I mean this mini mini quilt as a positive reminder that now that she’s found quilting, she will always have a place to call home. Home is where your sewing machine is, right?!
I quilted this mini mini with 50wt Aurifil 2600 – Dove around the text, and then used 12wt Aurifil in coordinating colors to hand quilt a single stitch above and below each rainbow bar. I think it’s the perfect amount of quilting to bring out the colors without detracting from the overall clean aesthetic of the quilt. I hope Yvonne loves it!
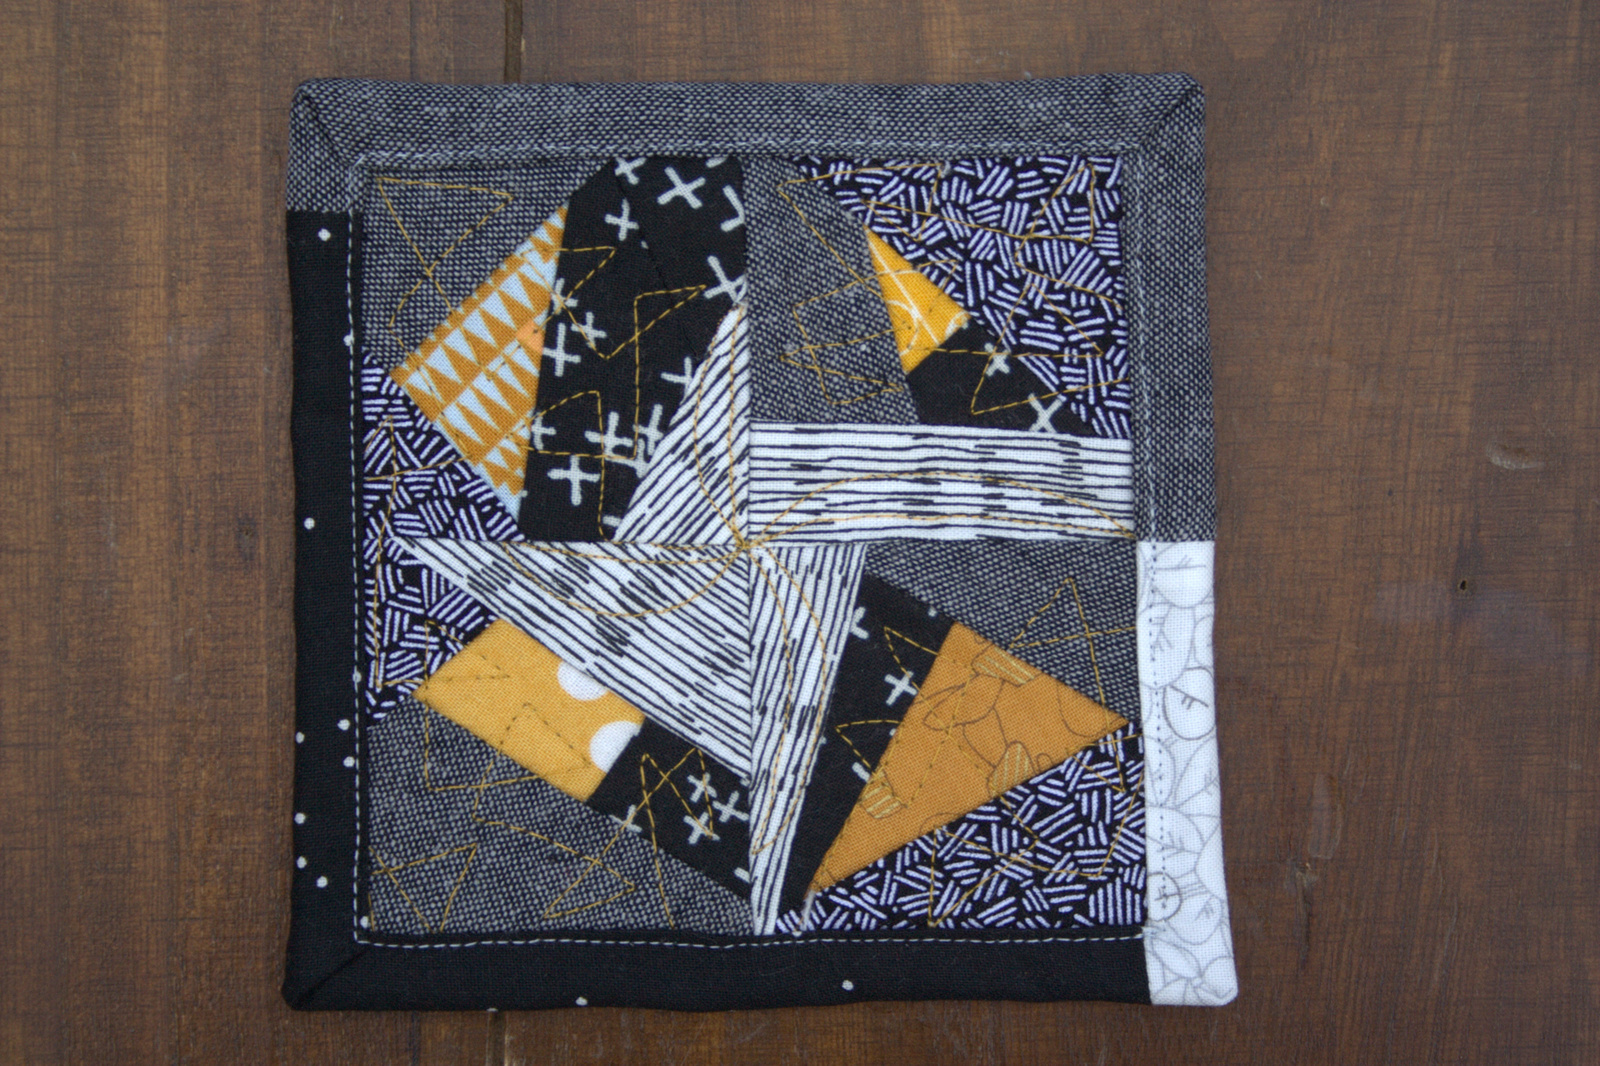
Next, I attempted my first improv and resulted in this mini mini. I love the scrappy binding and the gold 50wt Aurifil works great to bring out the pops of gold in the quilt. This mini mini is not yet claimed, but I figure I will make a few more and then email the folks with whom I agreed to swap and let them choose a mini mini of their liking.
I like the backing, too, which is a scrap of a fun low volume print called Passport Charcoal Etchings by 3 Sisters for Moda included in the low volume fat quarter bundle I put together for Fiddlehead Artisan Supply early in the summer.
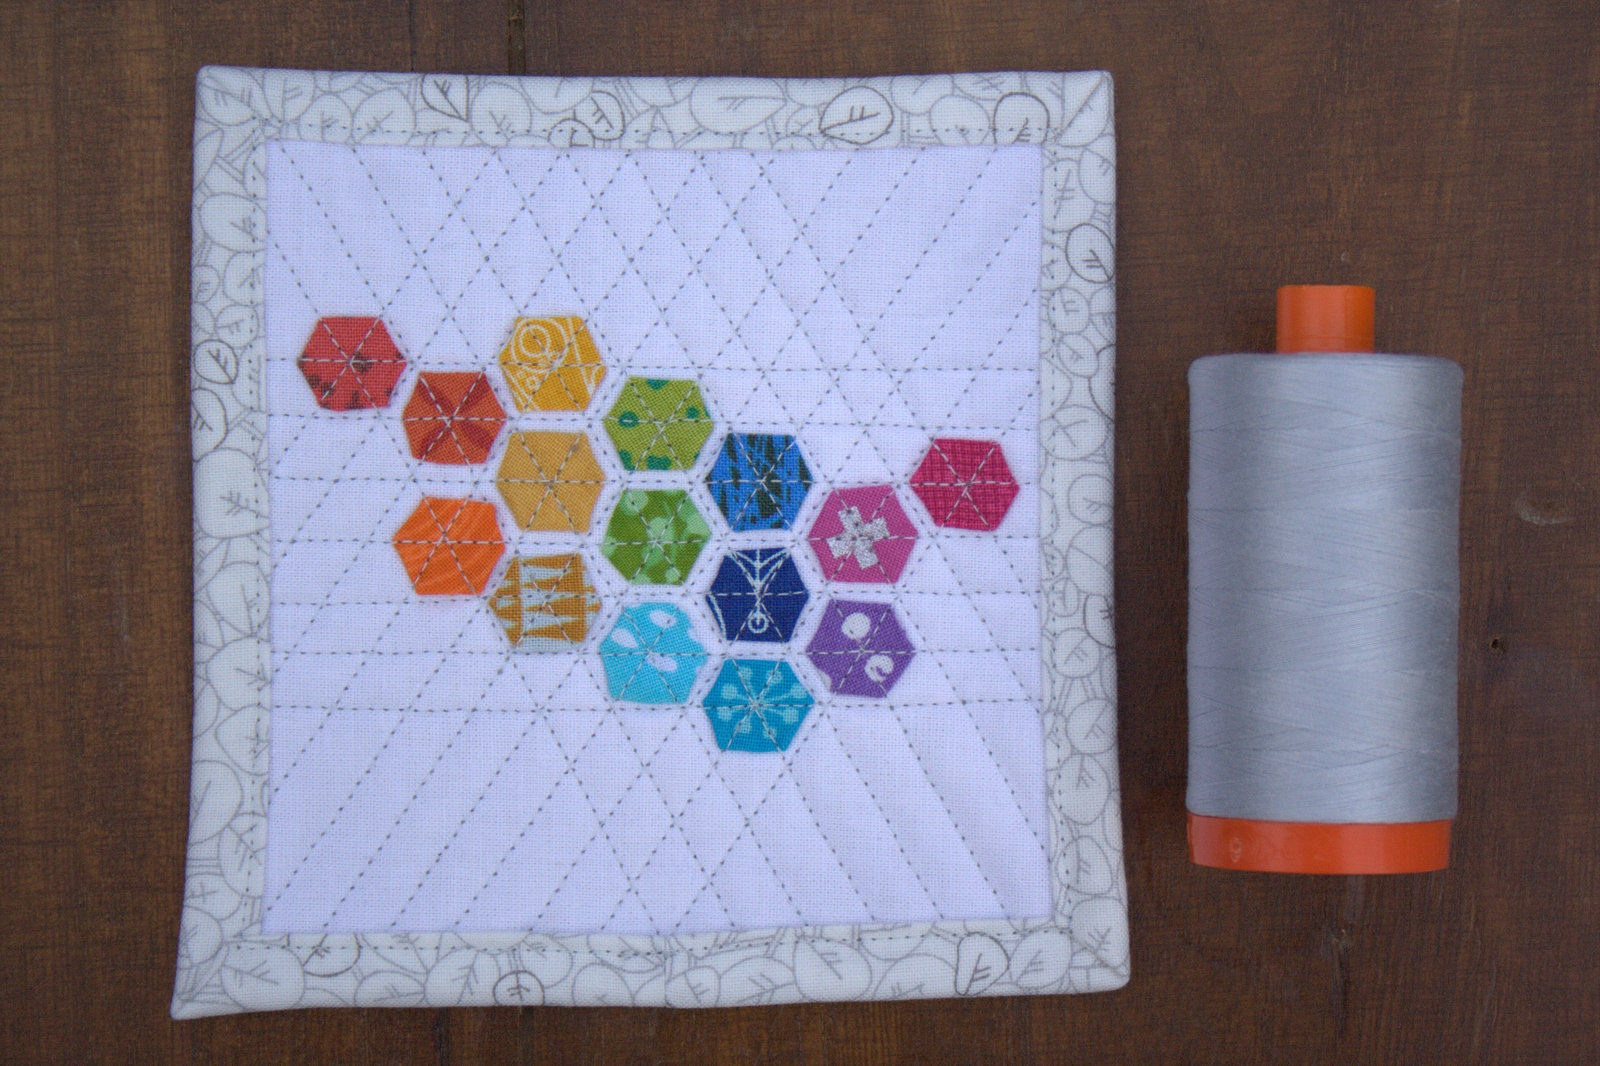
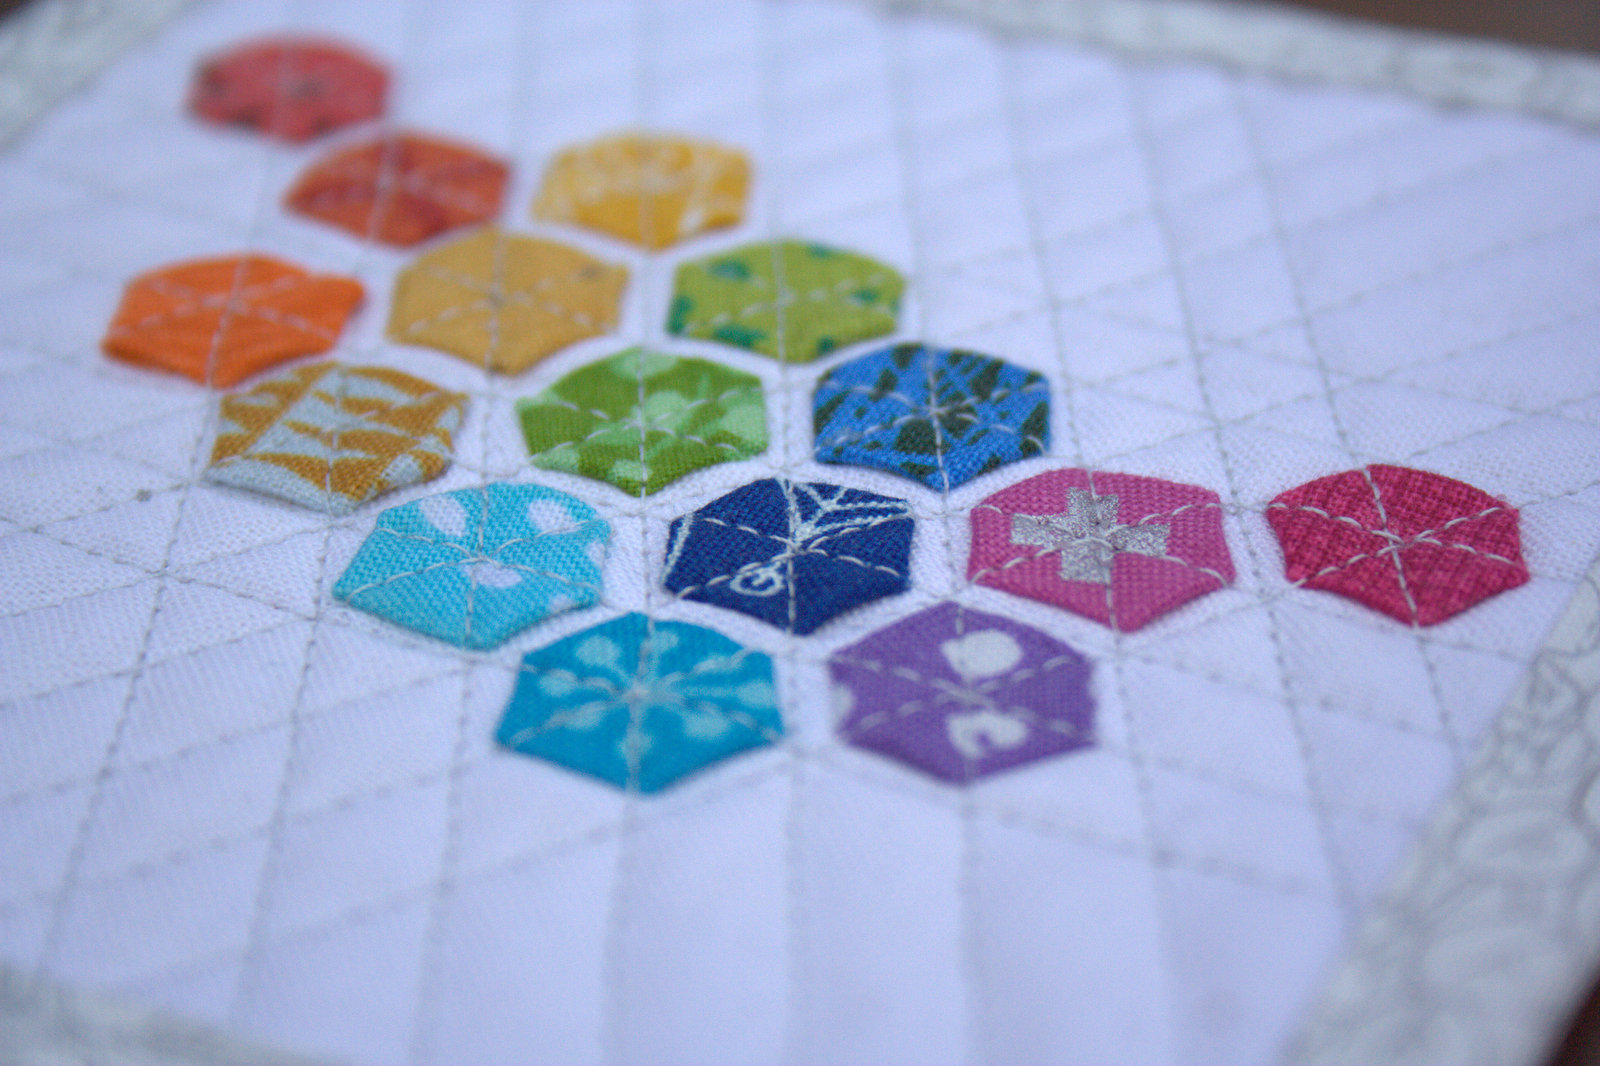
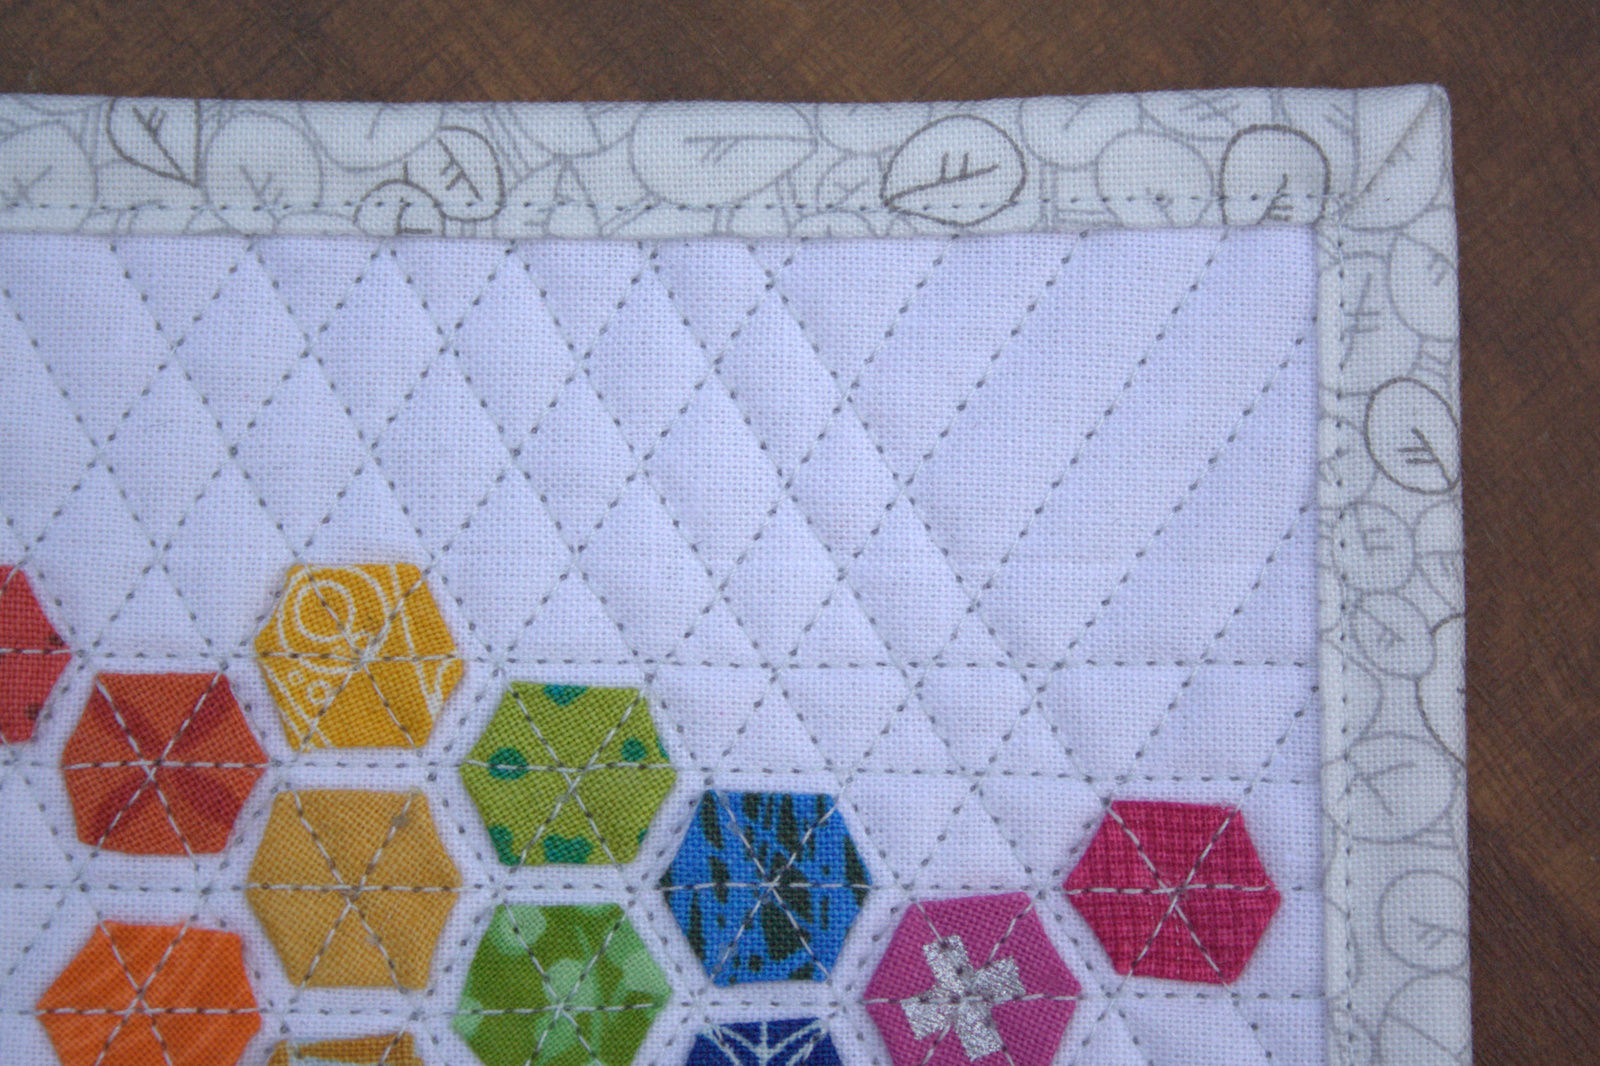
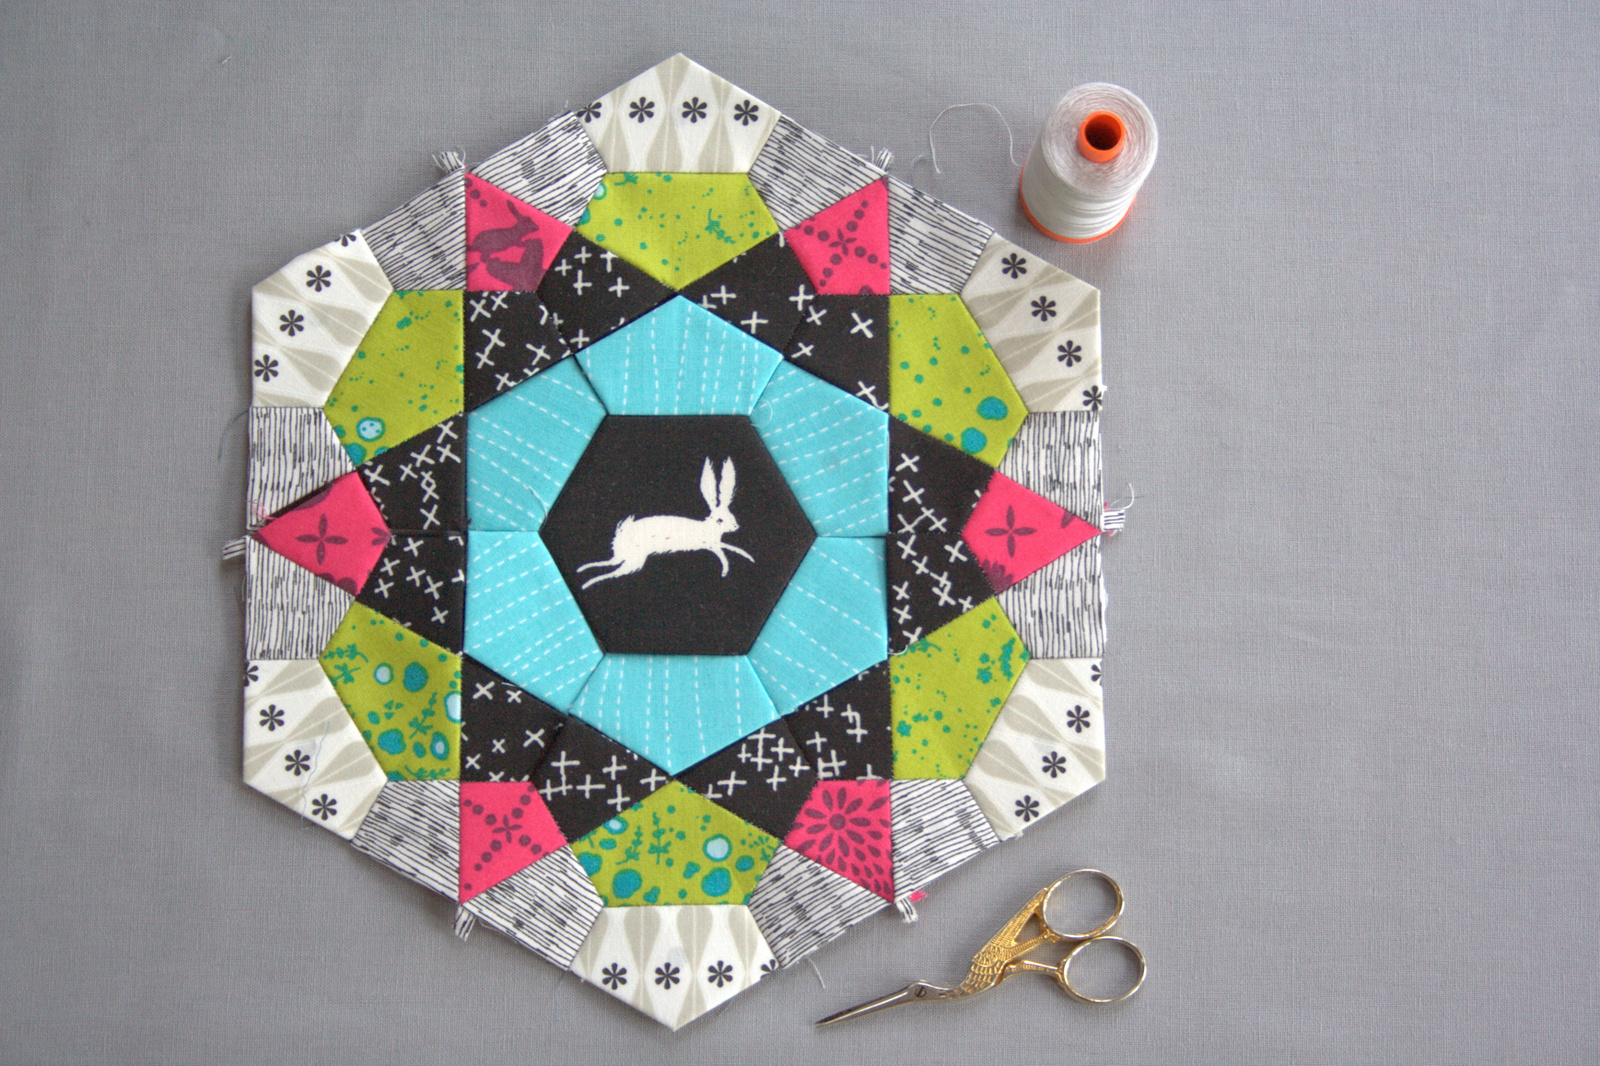
Finally, I made what is perhaps my favorite mini mini to date: my ultra tiny modern hexies mini mini, with 1/4″ EPP hexagons glued and sewn according to Nicole at Modern Handcraft‘ awesome Modern Hexies tutorial, and finishing at 4 1/2″ square.
I wasn’t sure if these tiny hexies would work, but with forgoing actual basting (I just used a hot iron and Flatter to press the fabric around each tiny cardstock template), and using a toothpick for fine-tuning placement, it all worked quite smoothly! I quilted with 50wt Aurifil 2600 – Dove and bound in one of my favorite Carolyn Friedlander prints from her Botanics collection.
Now that I’ve bound four of these mini minis, I think I’m beginning to get the hang of a method that works. A single fold binding, joined before it’s attached to the quilt, and sewn to the back before top stitching to the front seems to work the best for me. As you can see, the bottom left corner of the modern hexies mini is a *bit* mis-calculated, but the rest of it is spot on. I’m planning to send this one to Jennifer at Little Black Cat quilting, since it’s somewhat inspired by the gorgeous mini mini she made for me!
I’m linking up with Crazy Mom Quilts Finish it up Friday for the first time in a LONG time. But, hey! A finish is a finish, no matter how small.
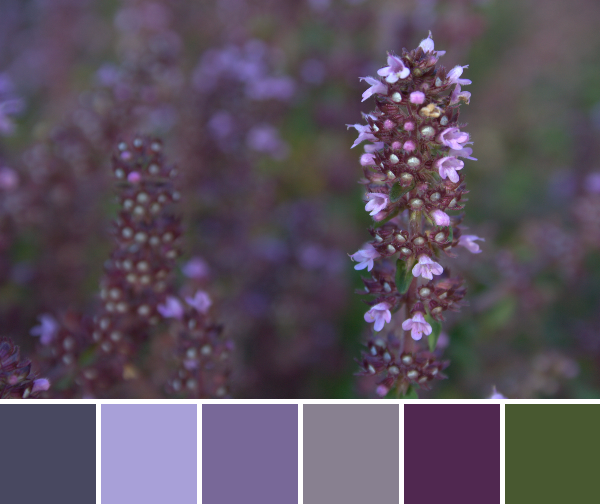
It’s here. The season in Maine where the days are brisk but warm in the sun, the colors of the changing trees are stunning, and mornings often arrive with a glistening layer of frost. This year it feels like the true chill of the coming winter arrived overnight. It flipped from unseasonably warm to BAM! frozen. I was tempted to officially dub this week’s color inspiration “Denial”, but decided that instead I should just face it and pull out the winter clothing bins, pull out the knits, pull out the boots and gloves, and see what still fits. I live in Maine, after all.
These color palettes were made using Play Crafts’ Palette Builder 2.1 and my photographs, and illustrate the difference between this week and last.
Corresponding solids from left to right: Bella American Blue, Bella Amelia Lavender, Bella Crocus, Kona Medium Grey, Kona Purple, Kona Avocado
Corresponding Aurifil thread from left to right: 1158 – Med Grey
2510 – Lt Lilac
2524 – Grey Violet
2625 – Arctic Ice
1240 – V Dk Eggplant
5021 – Light Grey
This is what my creeping thyme plant looked like last week. It was vibrant, bold, and flowering happily. A little sea of purply green sweeping along the edge of my edible plants & herb garden.
Corresponding solids from left to right: Kona Graphite, Bella Glacier, Kona Shadow, Bella Indigo, Bella Petal Pink, Kona Straw
Corresponding Aurifil thread from left to right: 1246 – Grey
5008 – Sugar Paper
2847 – Lt Grey Green
2568 – Mulberry
2425 – Bright Pink
2314 – Beige
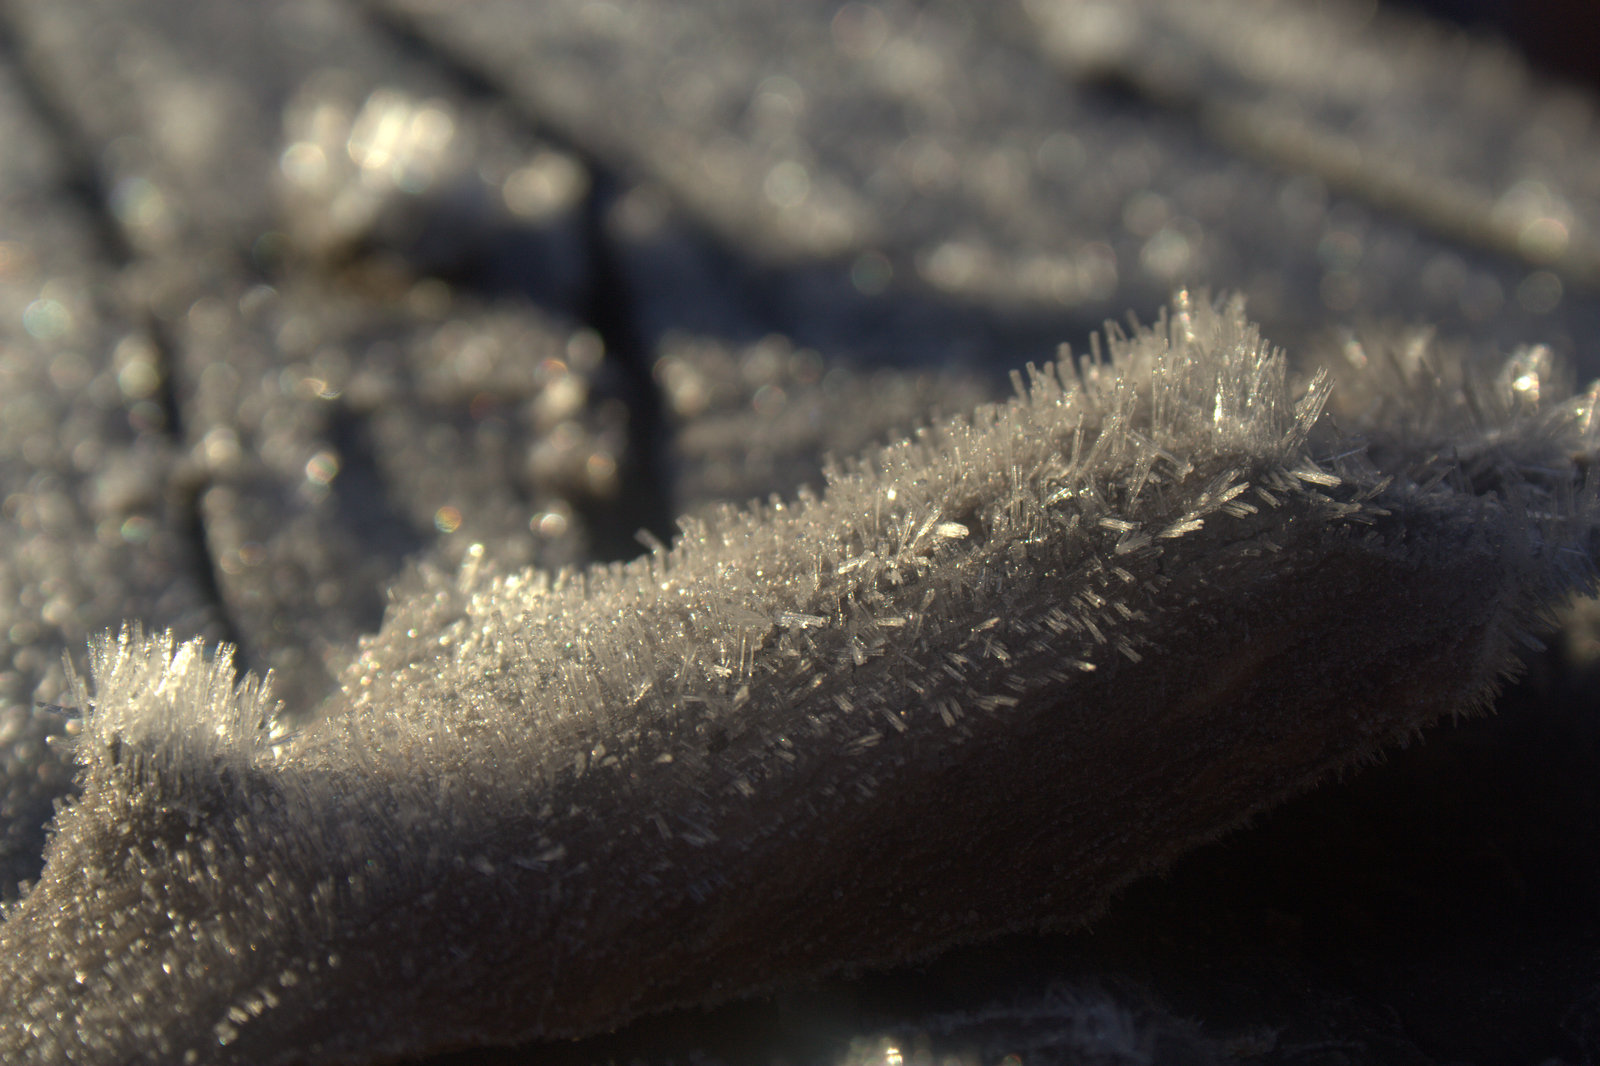
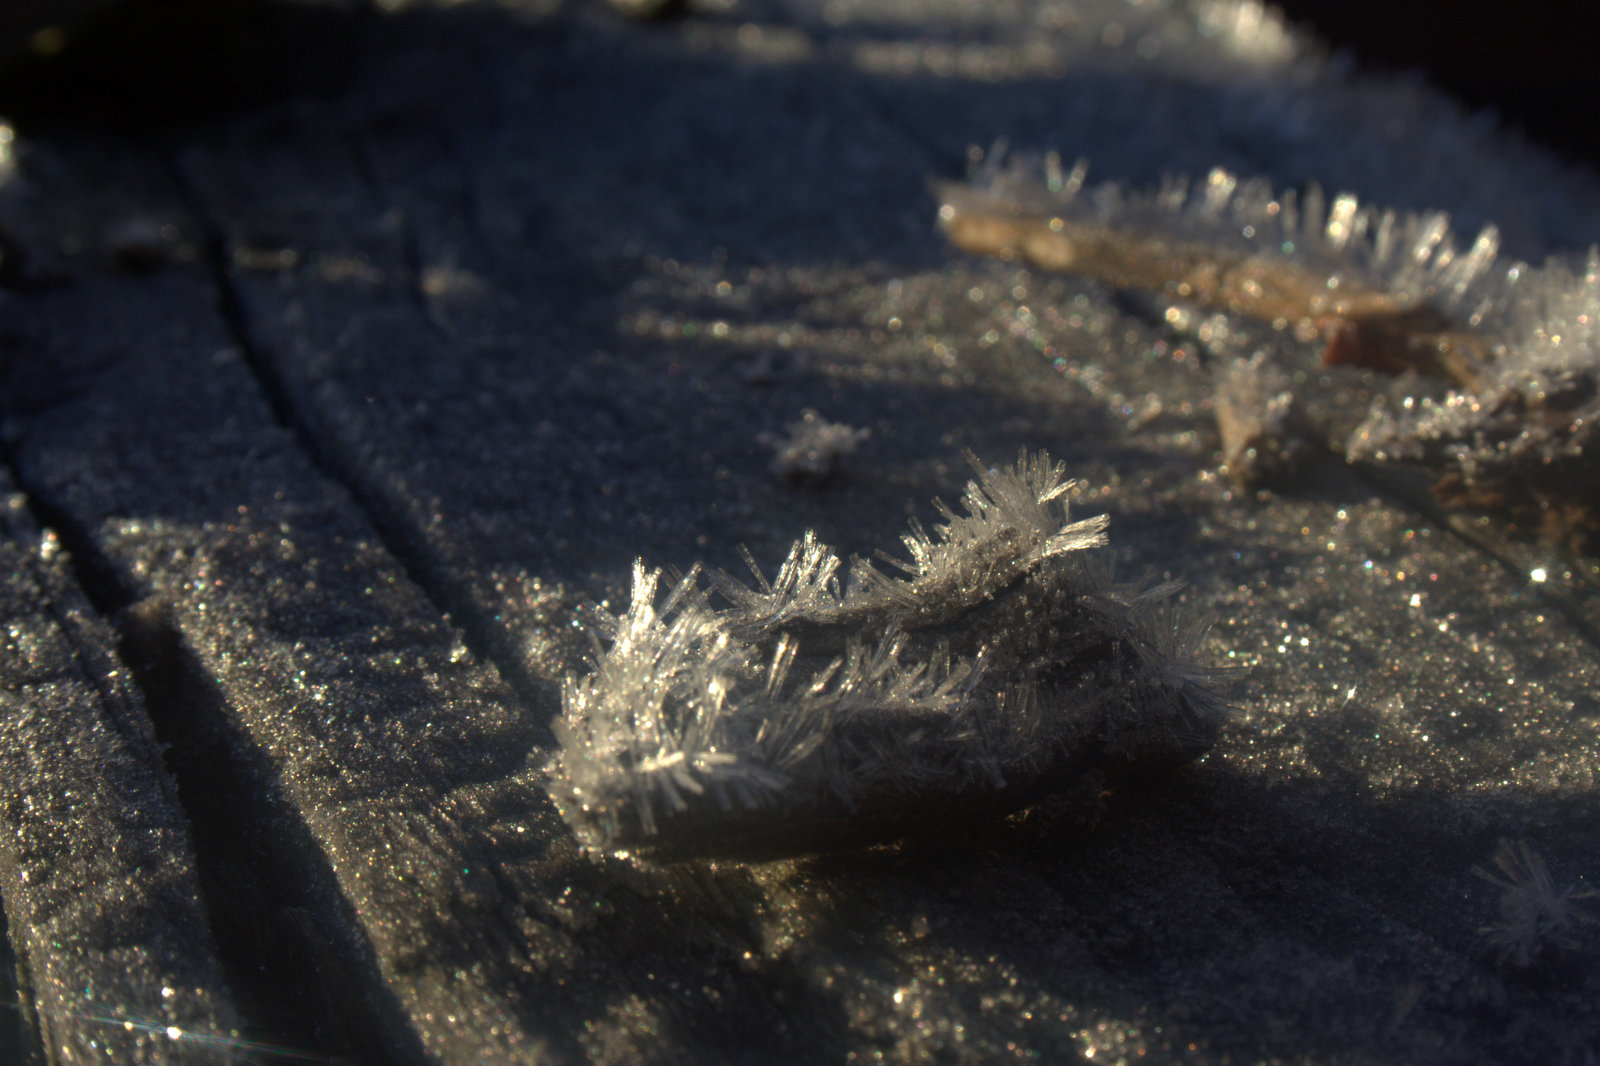
Flash forward one week and here it is, fully frosted. Despite the indication that winter is indeed coming, I love the frost. It seems to soften everything, muting out the colors and making them glisten. I suppose seeing the world covered in frost is the one time I like pastels.
Again, when you get realllllly close and look at the frost-covered ground, beauty shoots up at you in tiny spikes. How awesome is nature!?
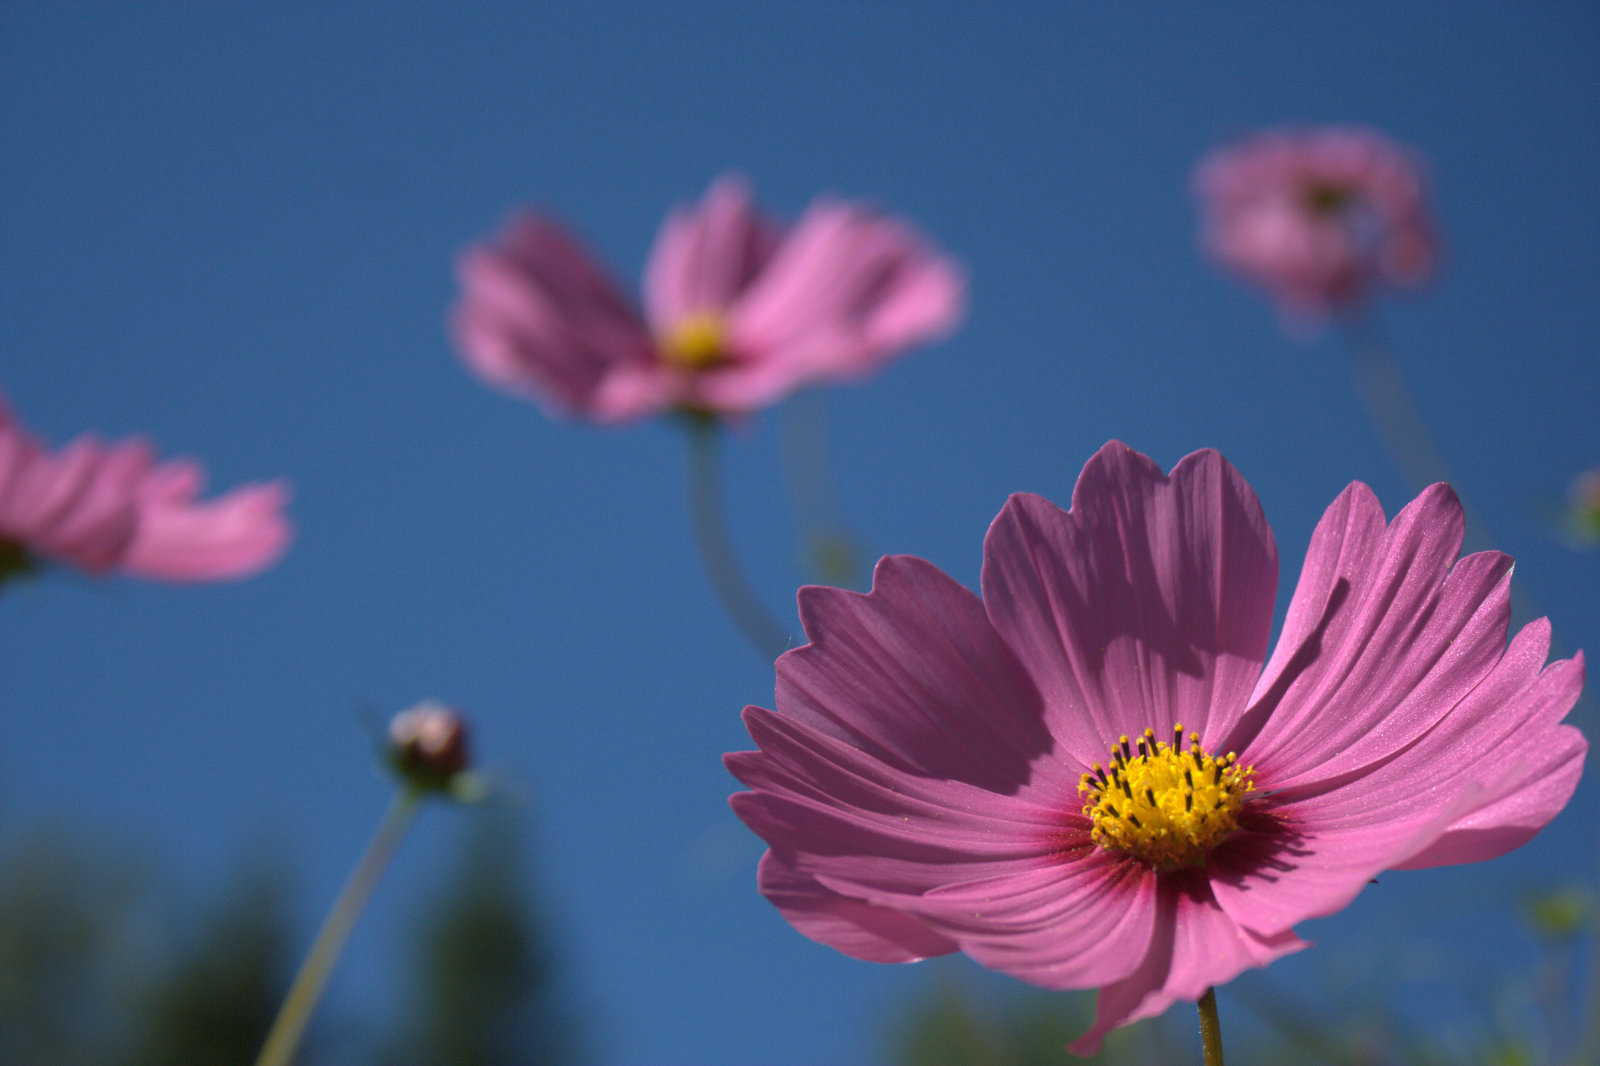
As long as it’s before midnight, it still counts as Thursday, right? I don’t want this week to slide, so I’m squeaking this beauty in before the buzzer. We’ve been getting doused in rain (I hear we got 9″ yesterday!), so these poor gorgeous flowers have been beaten down into a horizontal position since these photos were taken, but that doesn’t mean we can’t bask in their beauty!!
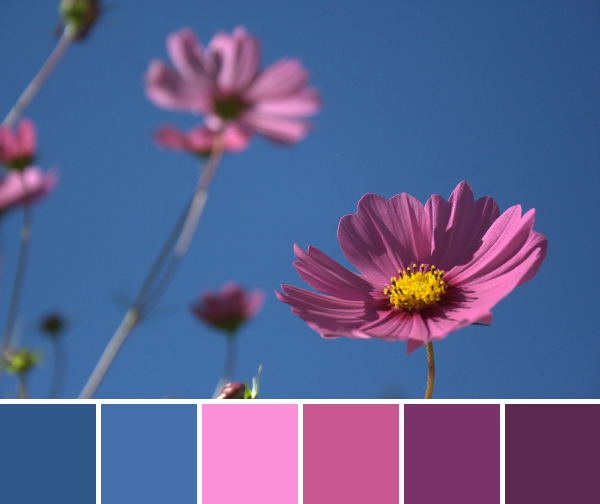
Today’s color inspiration features Cosmos from my garden, a perfect magenta-pink against a bright blue sky. The color palette was created using Play Crafts’ Palette Builder 2.1 and the matching solids and Aurifil thread are an awesome perk!
Corresponding solids from left to right: Bella Cobalt, Bella Amelia Blue, Kona Candy Pink, Bella Fuchsia, Bella Boysenberry, Kona Eggplant
Corresponding Aurifil thread from left to right: 1248 – Grey Blue
4140 – Wedgewood
2515 – Light Orchid
2479 – Med Orchid
4030 – Plum
1240 – V Dk Eggplant
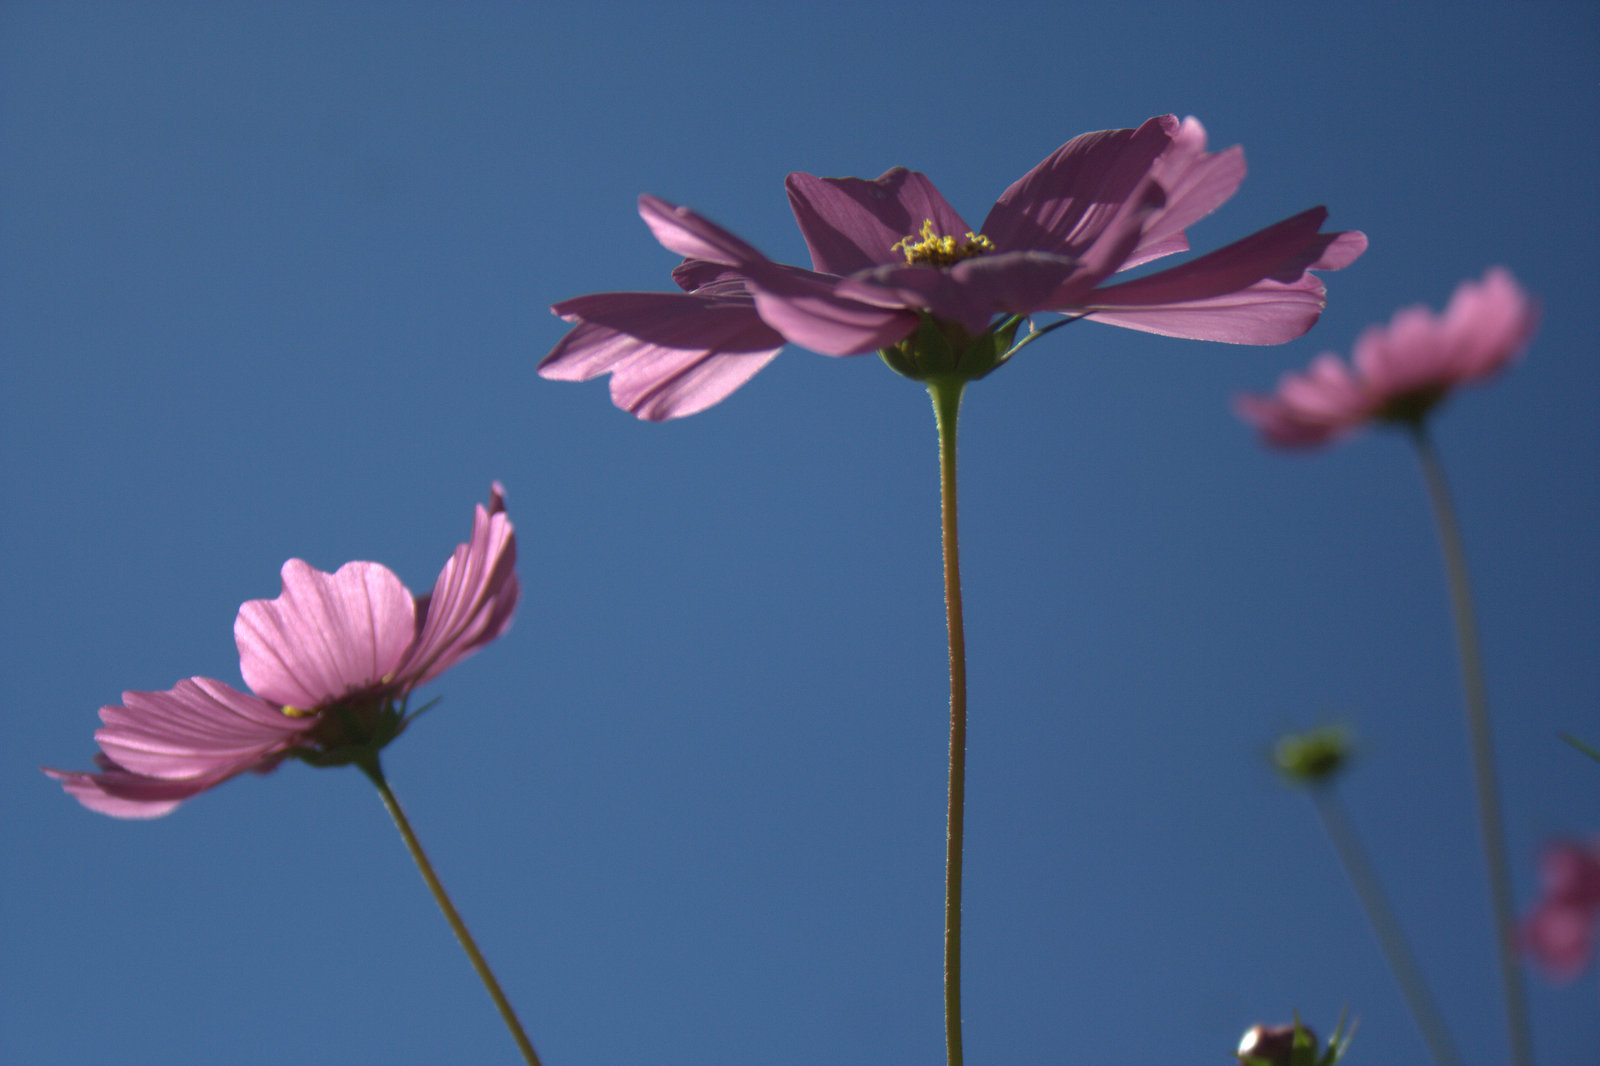
Take a deep breath. Soak in the glorious sun (c’mon, play along with me, even if it’s nighttime). Imagine these dainty flowers peacefully bobbing together in the gentle breeze, warm sun shining down upon them. Just looking at this photo makes me feel lighter. It surely helps that I LOVE these colors together. In fact, I very well might take this palette to create my first official color inspiration quilt. I’ll need to include a pop of golden yellow, of course. Maybe?…
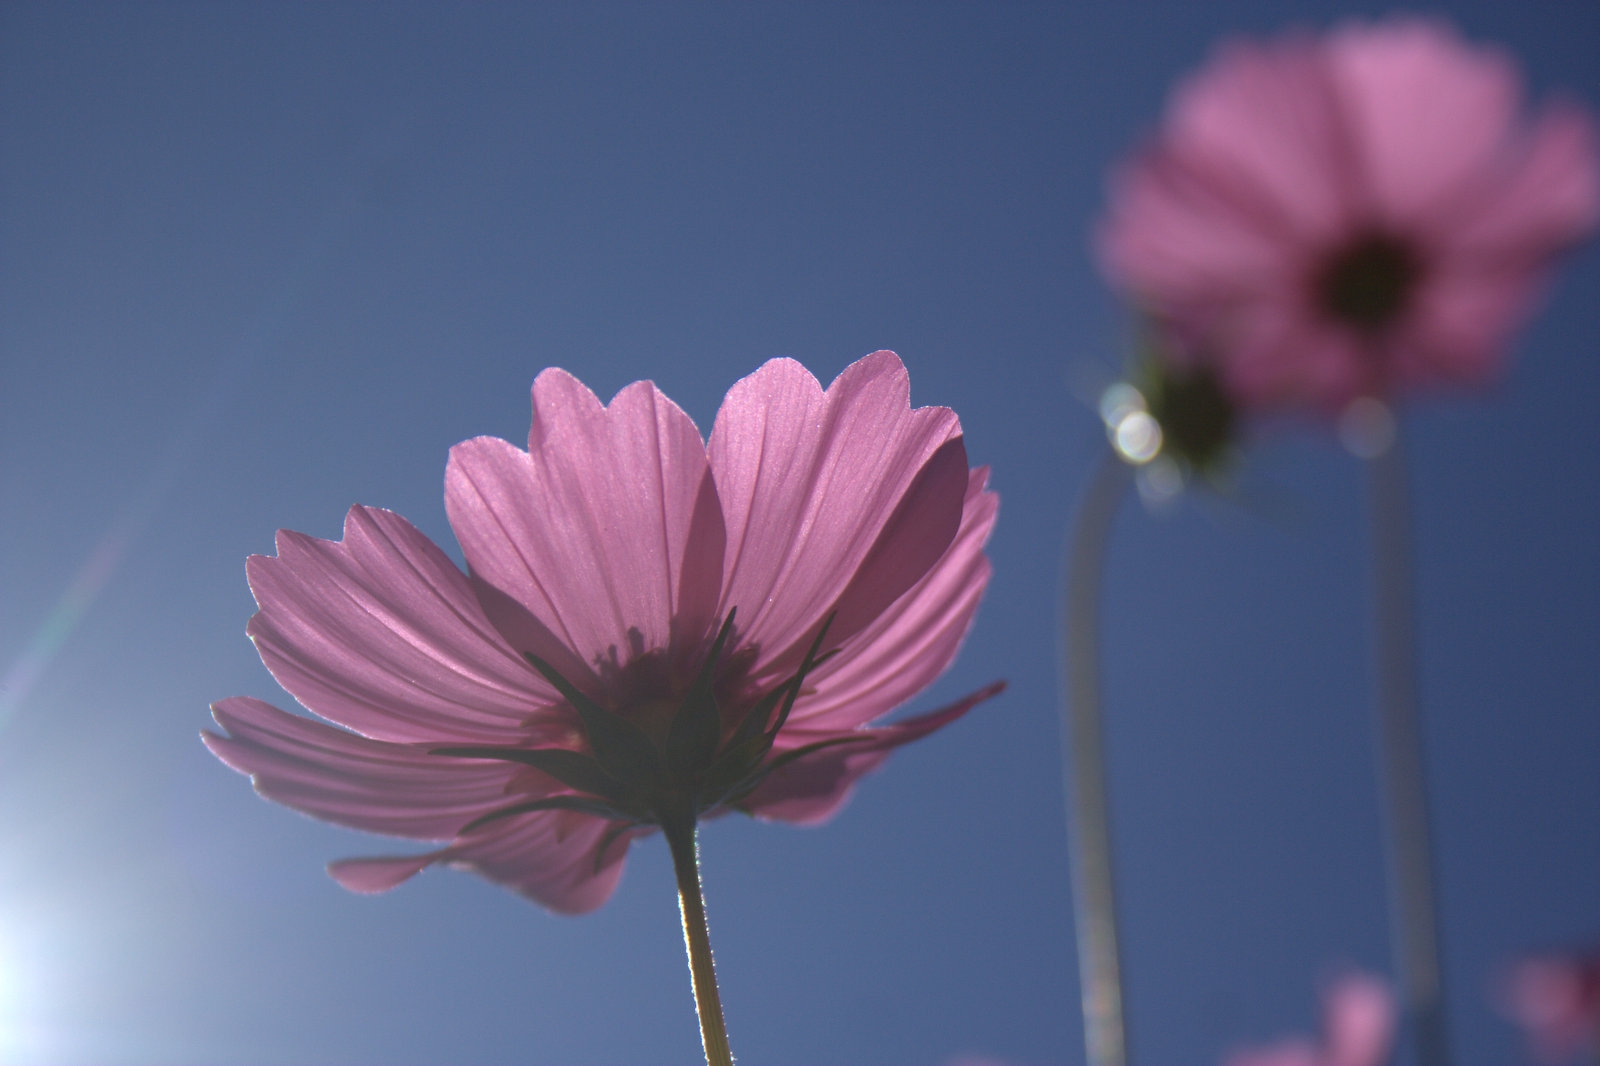
I’m sharing a few more photos of these flowers, sans color palette, since the palette above embodies the colors and brightness so well, but I can’t resist sharing these other angles with you. Enjoy!
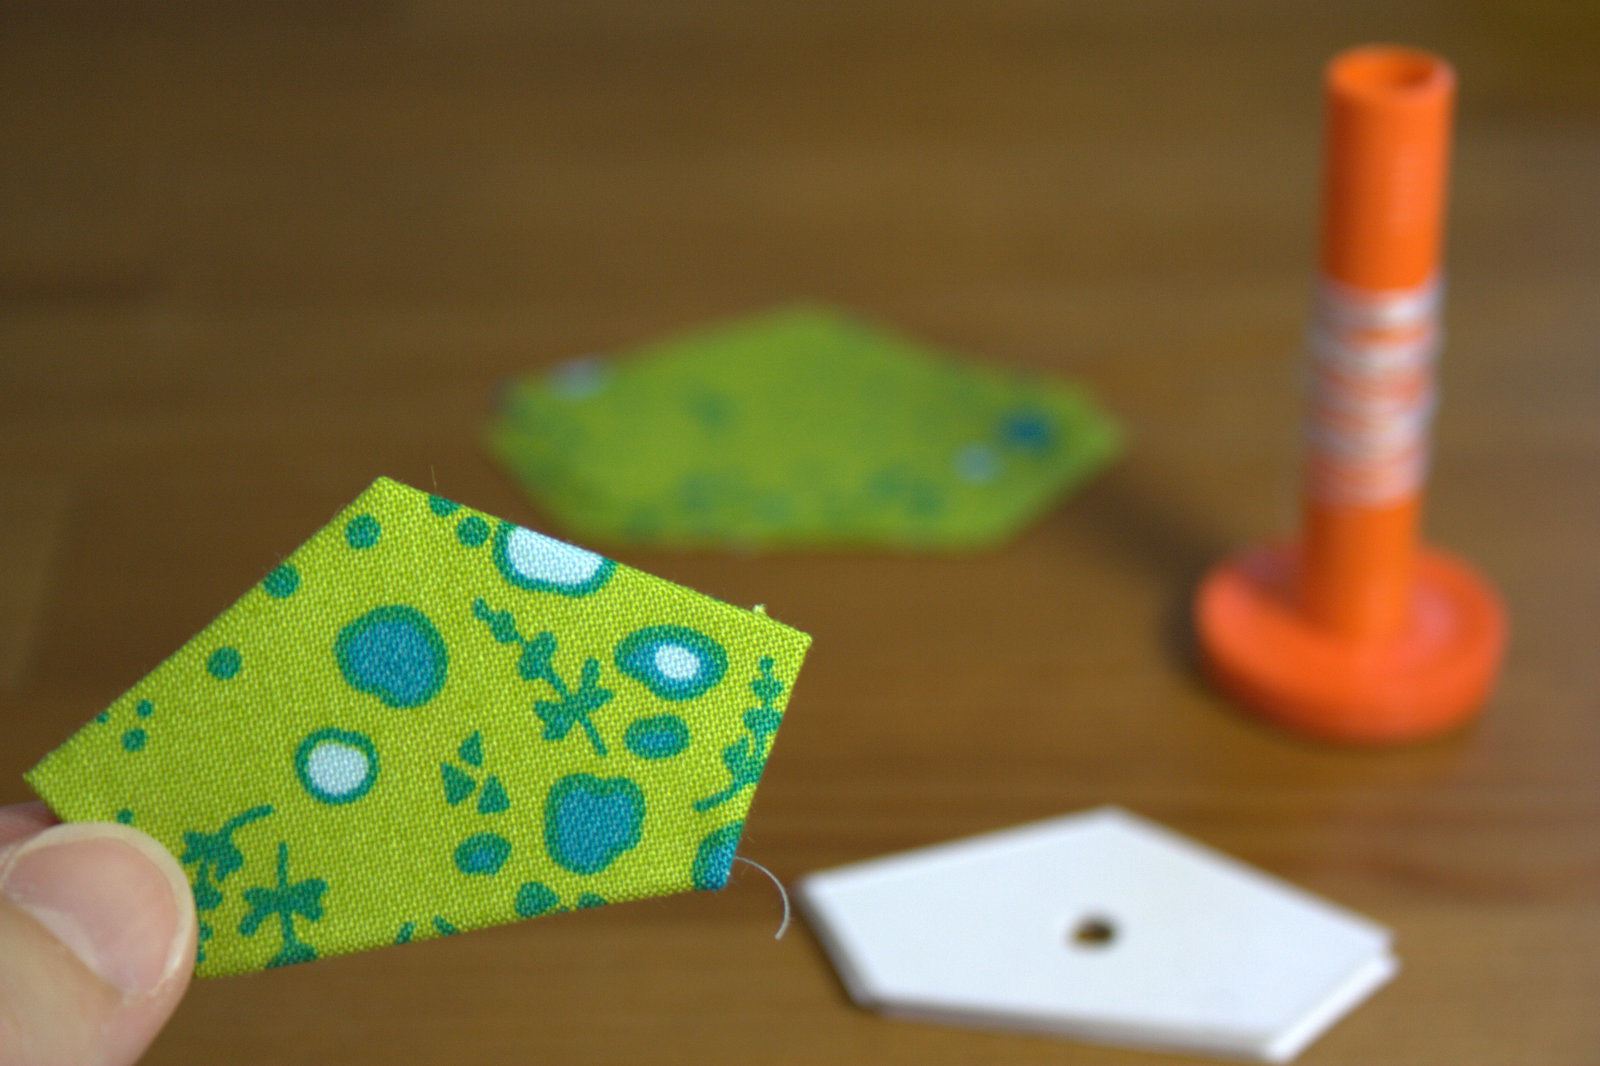
I’m excited to share that today is my Sizzix Design Team debut! Over on the Sizzix blog, I share a tutorial on how to get started on making an awesome English Paper Pieced (EPP) mug rug using the Rose Star die.
Did you know that there are Sizzix dies created specifically for paper piecing!? I cut all of the templates and fabric needed to piece this EPP star all from a single die! Pretty awesome.
In the tutorial, I take you step by step through the process of making and basting EPP pieces, including some helpful tips, so if you’ve been wanting to learn or brush up on your piecing, go check it out!
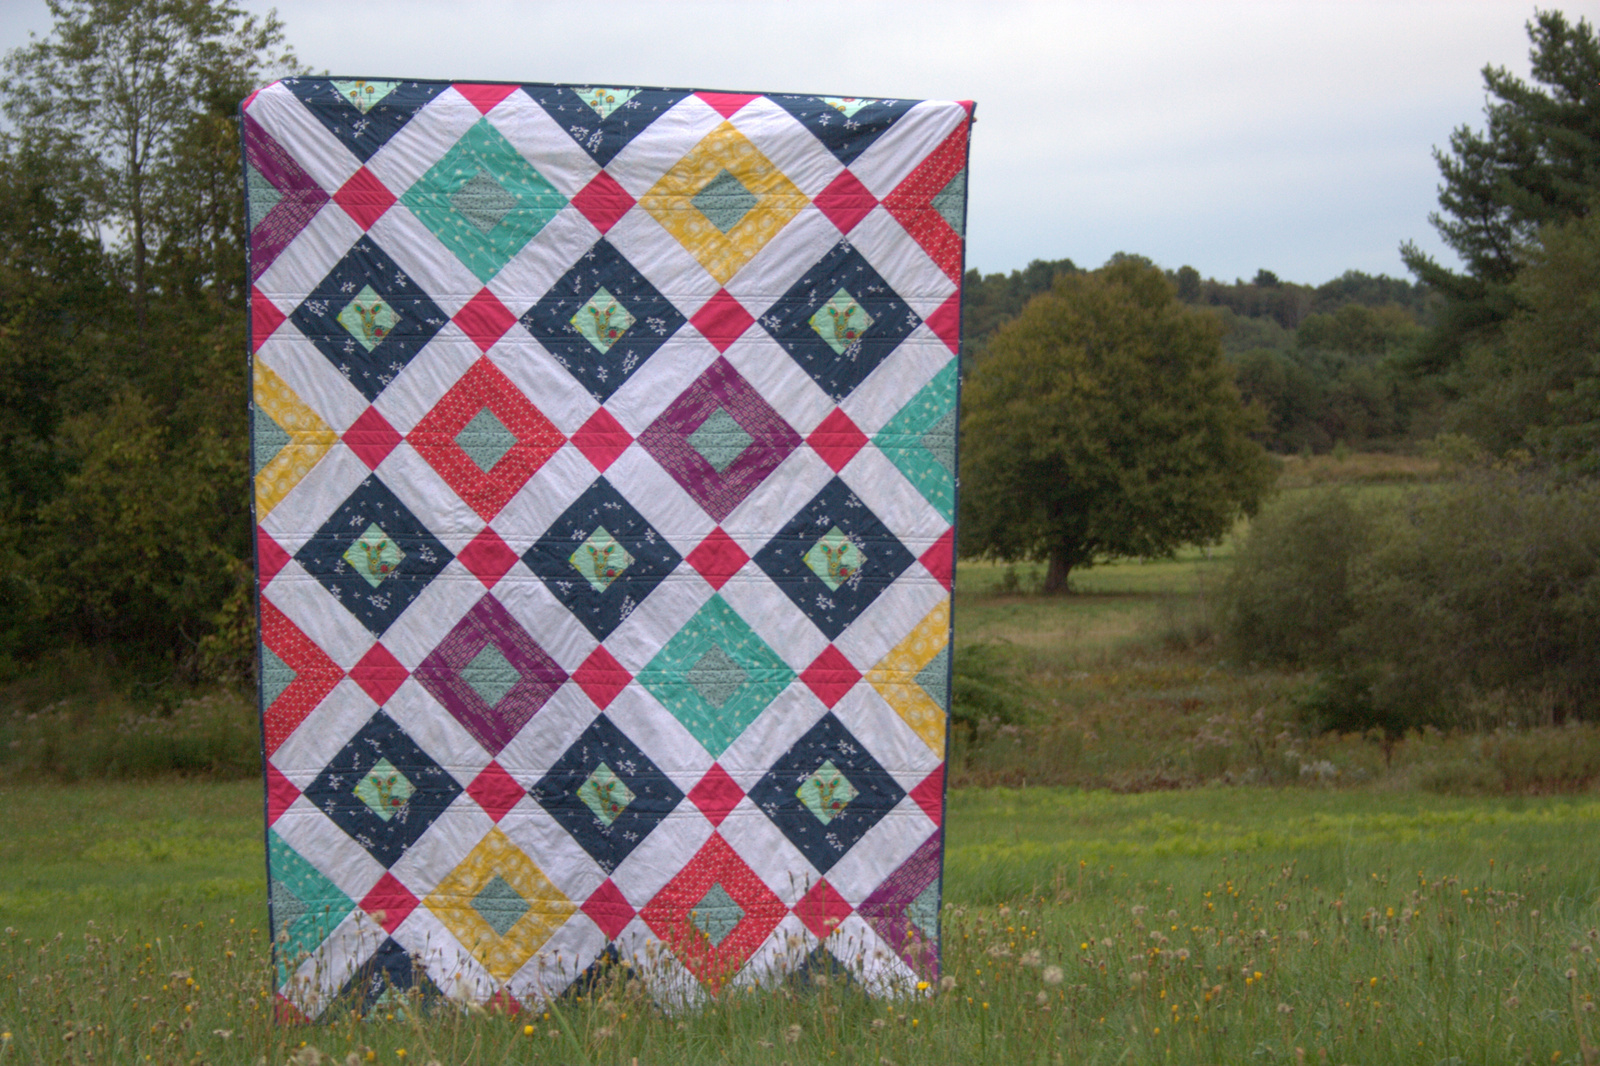
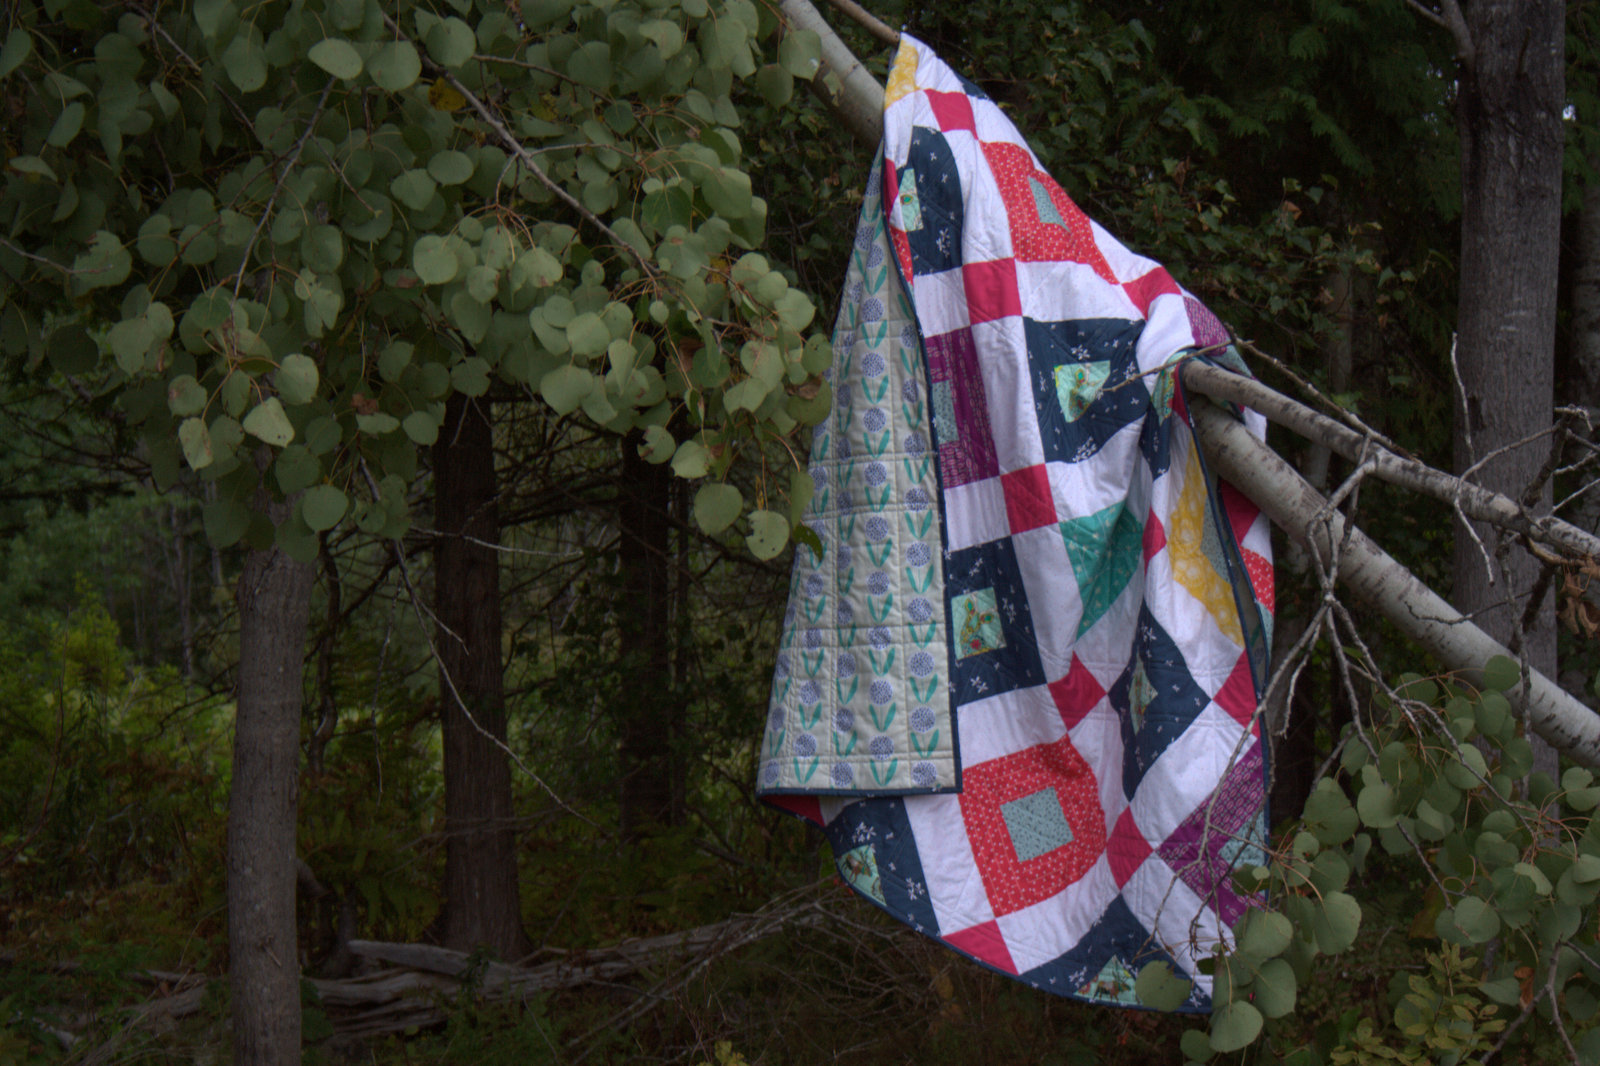
I’m excited to share one of the big behind-the-scenes projects I’ve been furiously sewing over the past few weeks: my version of the Welded Quilt, the newest free quilt pattern released as part of a collaboration between Art Gallery Fabrics and Fat Quarter Shop called AGF Stitched with Kimberly (or #agfstitched).
This quilt is the third pattern released by Fat Quarter Shop and Art Gallery fabrics (you may have seen the Birchen and Fractal quilt patterns already released). The original version of the Welded quilt features Artisan by Pat Bravo. There’s an awesome instructional video HERE that helps make the organization and piecing of this on-point quilt very straight forward, without having to worry about bias edges. Fat Quarter Shop also has quilt kits and backing sets available.
When I was invited to be a part of the team to make this quilt, I accepted excitedly. I loved the idea of making an on-point quilt, and I knew that I wanted to use the focal diamonds to feature some meticulous cutting (fussy cutting to the rest of the quilting world). I also know how easy Kimberly makes quilt-making with her simple instructions.
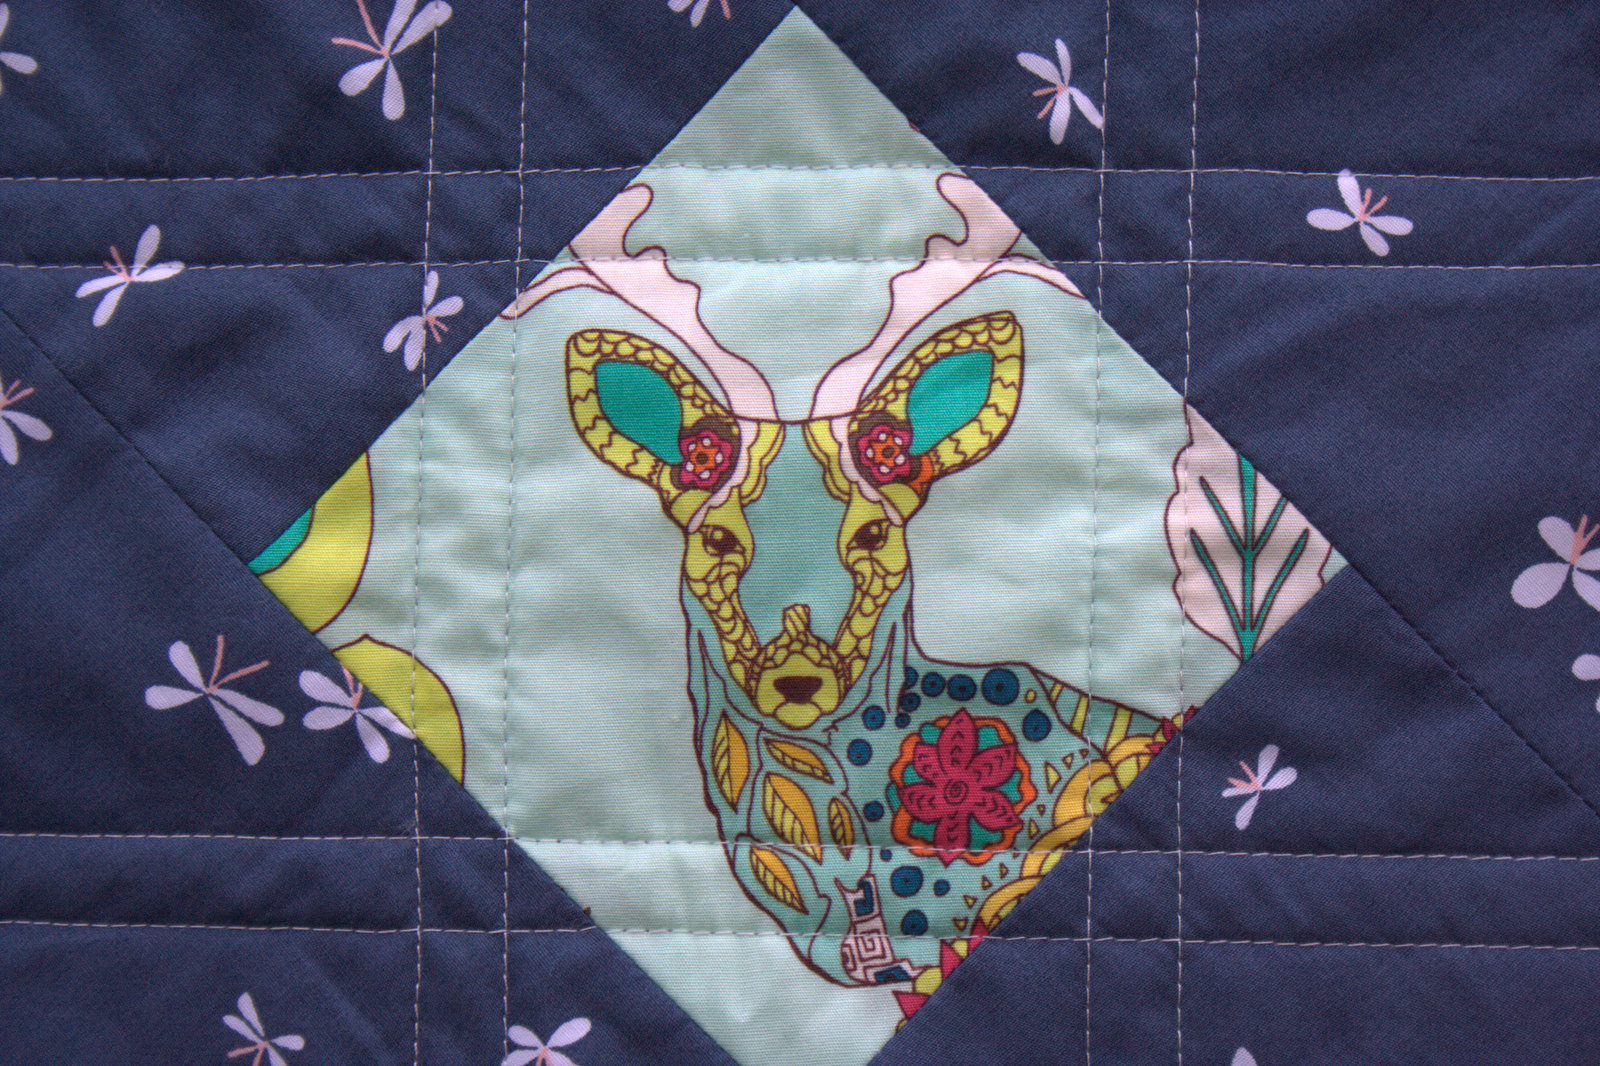
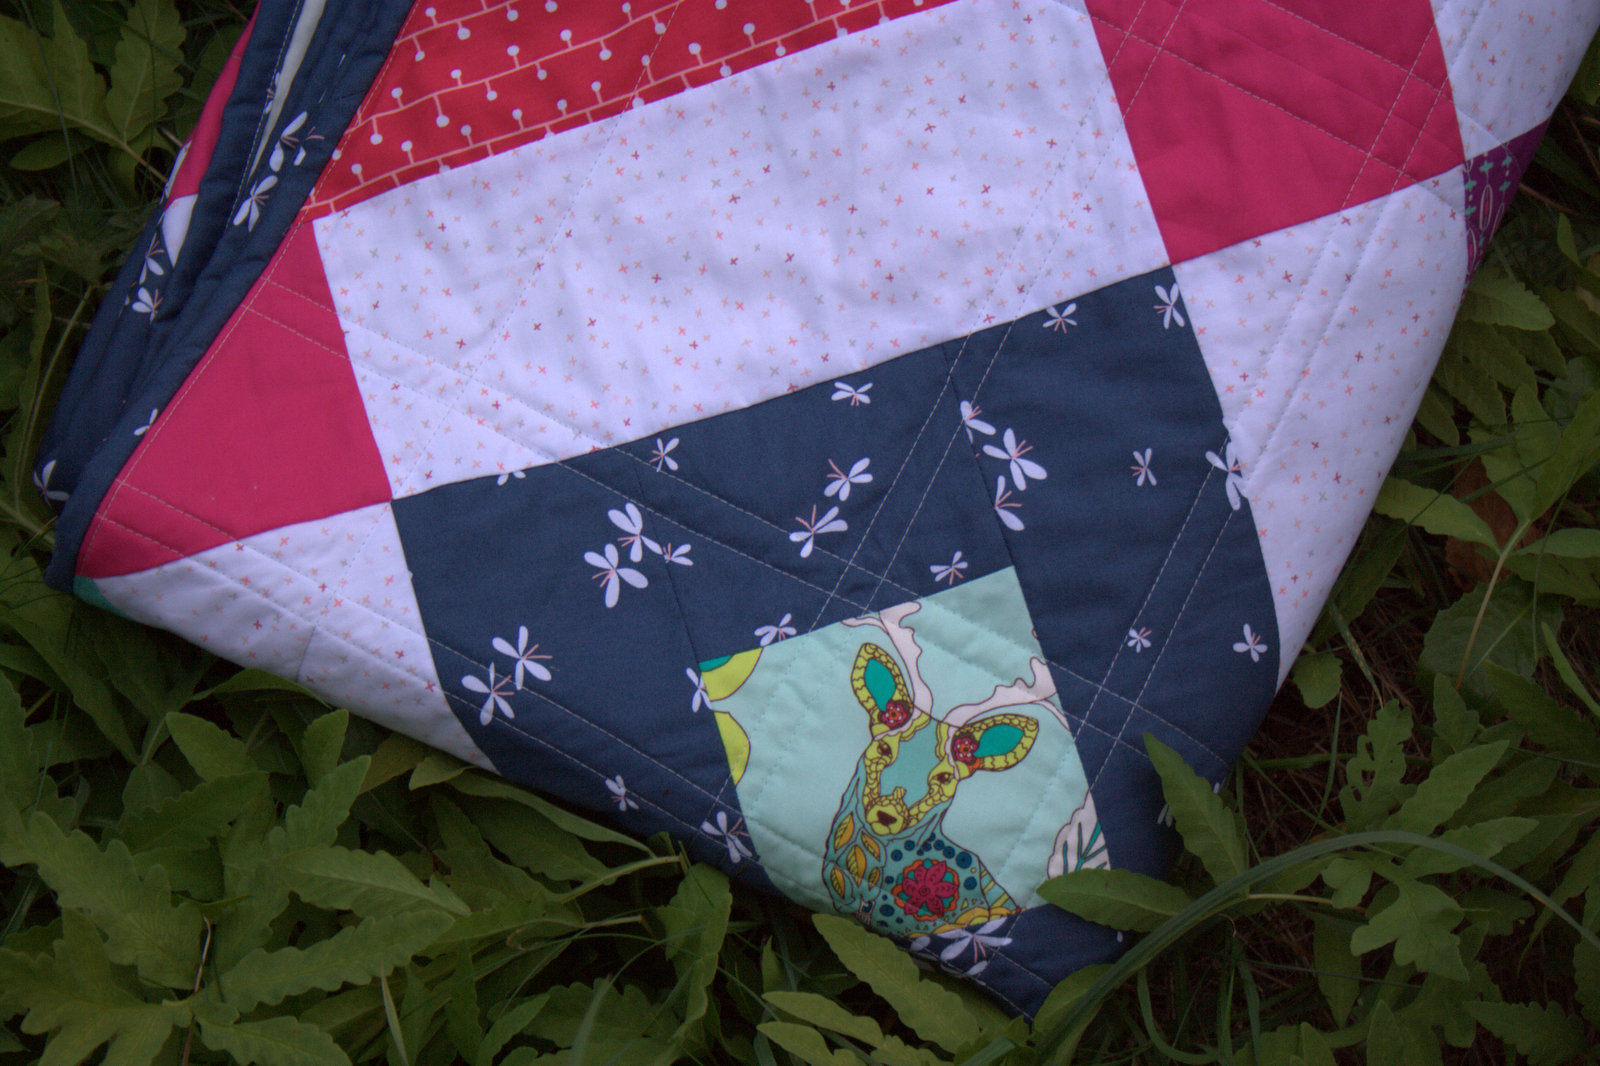
I was invited to use the Art Gallery fabrics of my choice to make this quilt, and the fabric was generously provided by AGF. I quickly selected fabrics from Utopia by Frances Newcombe, including this Dreamlandia Irradiated (featuring the awesome deer), and some coordinating Curiosities by Jeni Baker. I added Art Gallery Pure Elements in Raspberry Rose, Teensy Weensy Lotus from Littlest for the light sashing, and Optical Origami Mod from Urban Mod by the AGF Studio to round out the palette.
I did have a few extra dates with my BFF the seam ripper due to directionality miscalculations, so pay extra attention to directionality of your edge pieces if you choose fabric with a distinct top and bottom. Those seam ripping dates were well worth it, though. I’m thrilled with the resulting quilt.
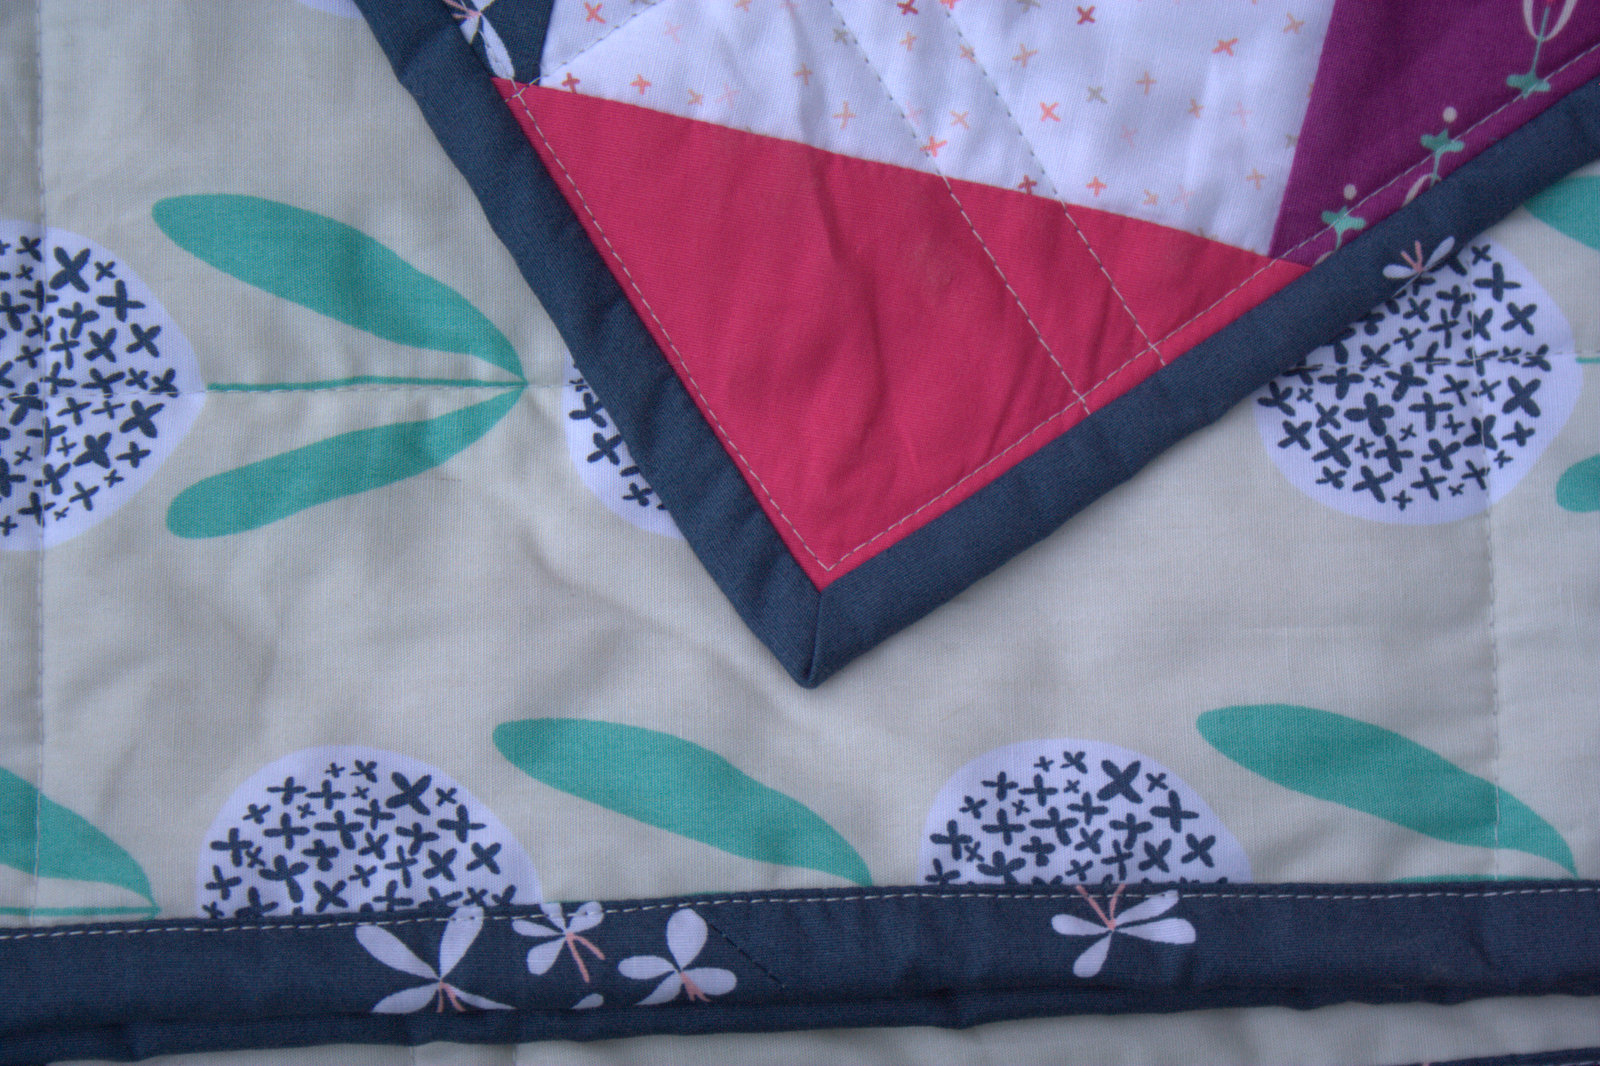
I quilted it with straight lines in a grid work pattern framing the center diamonds, using my domestic Bernina 560 and a walking foot. I kept the quilting fairly minimal to preserve the super softness of the Art Gallery fabrics. I used my go-to thread, Aurifil 50wt in 2600-Dove for both piecing and quilting. I LOVE how this thread complements just about every fabric color combination and pattern.
I machine bound the quilt for durability using the fabulous machine binding tutorial by Allison at Cluck Cluck Sew, and it turned out so well. Practice certainly helps, but I’m finding myself favoring the sharp look of the machine binding more and more (although I will always love hand stitching binding!).
I just can’t get over how cute those Utopia deer are peeking out from this quilt. As you can probably tell, I had a blast prancing through our front field with the rest of my family for this quilt photo shoot.
Quilt Stats
Pattern: Welded, part of the AGF Stitched with Kimberly collaboration (instructional video here)
Size: 61” x 79.5″
Fabric (all by Art Gallery Fabrics): Front: Dreamlandia Irradiated, Specks of Carambola, and Atomic Influx Perse from Utopia by Frances Newcombe; String Lights Carmin, Book Pressed Memories, and Firefly Jar Dark from Curiosities by Jeni Baker; Art Gallery Pure Elements in Raspberry Rose, Teensy Weensy Lotus from Littlest, and Optical Origami Mod from Urban Mod by the AGF Studio. Back: Candied Lollies Mint from Curiosities by Jeni Baker. Binding: Firefly Jar Dark from Curiosities by Jeni Baker.
Batting: 100% cotton Soft n’ Crafty batting
Thread: Aurifil 50wt in 2600 – Dove for both piecing and quilting
Quilting: Straight line quilting in a grid work pattern using my Bernina 560 and a walking foot
Time:
Piecing the top: 14 hours 20 min (includes fussy cutting and seam ripping to fix directionality)
Piecing the back: 45 minutes
Squaring, layering, and basting: 1 hour
Quilting: 5 hrs 10 min
Finishing (squaring): 25 minutes
Binding: 2 hr 30 min Total: Approx. 24 hours 10 min
Why did it take me so long to bind!? Meticulous machine binding, I suppose! It was worth every minute!
++++++++++++++++++
Now, for a giveaway!
Fat Quarter Shop has generously offered a giveaway to one of my readers. Comment below to be entered to win a bundle of your favorite Art Gallery Fabrics collection! You can enter by leaving two comments:
What Art Gallery Fabric collection would you choose?
If you follow me, Night Quilter, let me know how–or visit my right sidebar to follow me if you don’t already, then tell me how! (e-mail, WordPress, Bloglovin’, Instagram, Twitter, Craftsy)
The giveaway will be open until Wednesday, September 30th 12noon EST. I will select one winner randomly from the comments below. Good luck!Note: This giveaway is now closed! Congratulations, Nicole!
Once you enter, be sure to check out the versions of Welded created by the other talented quilt bloggers participating in this event (links will be added as soon as available):
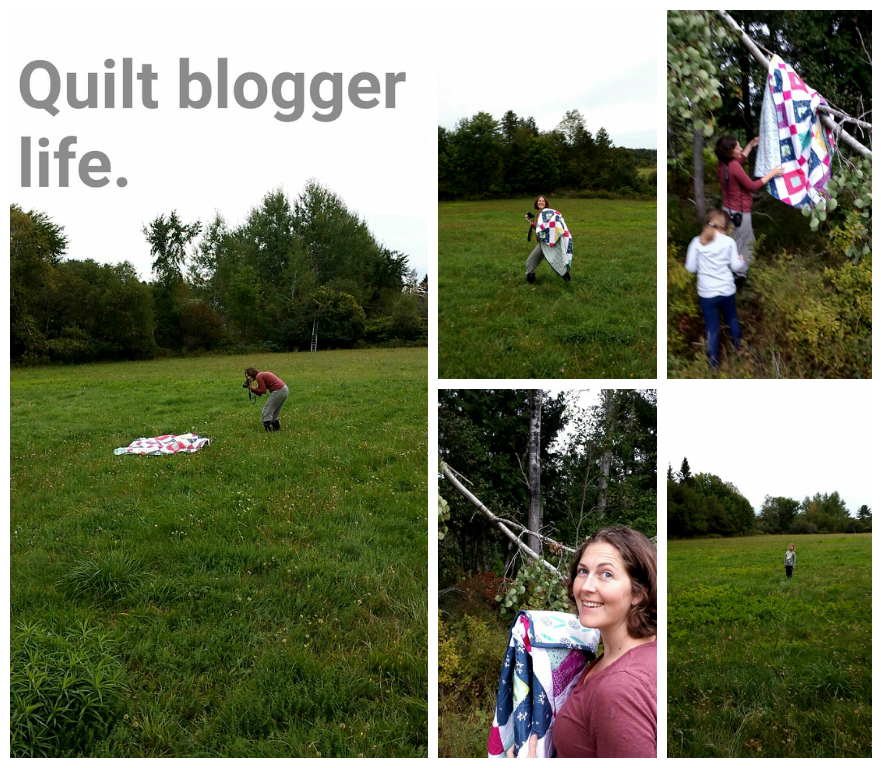
Just for fun, here are some behind the scenes shots from our frolicking fun family photo shoot:
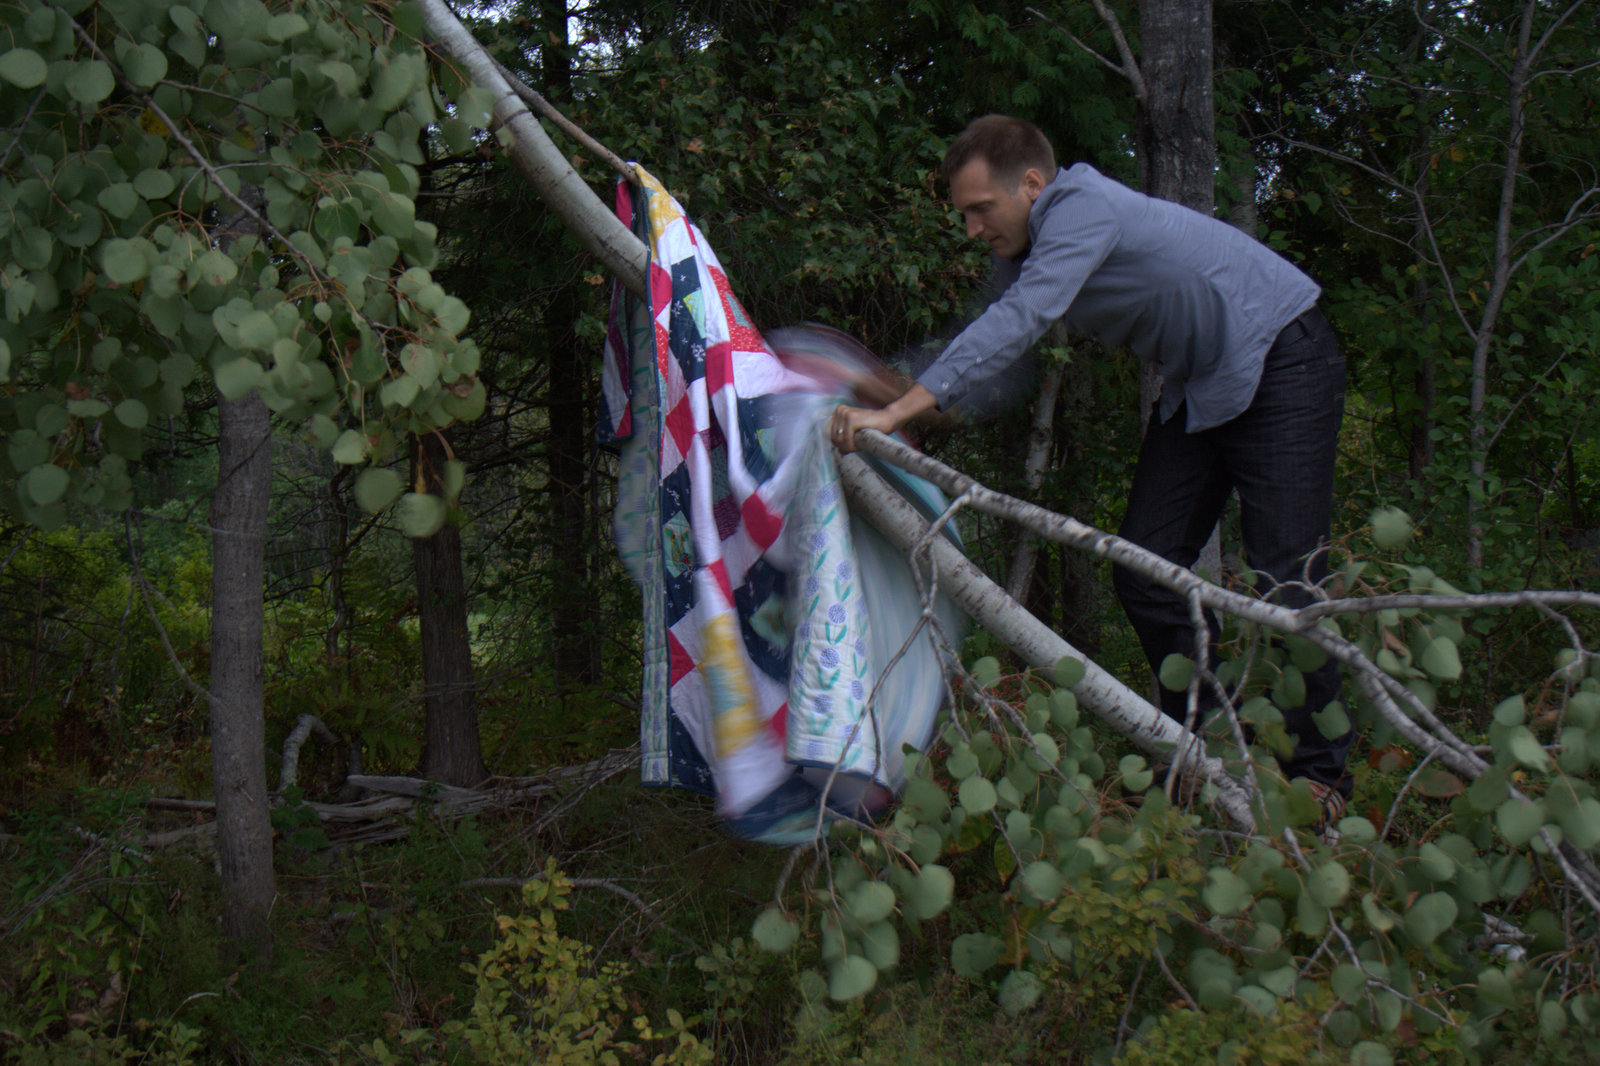
My awesome husband not only is a champion quilt holder, but he also climbs downed branches to help adjust the quilt *just so*.Finn cheered us on from the stroller while Maddie and Max ran wild.Max needed a piggy back all the way home after playing in the field and climbing the apple tree to pick apples.
Everyone’s husband makes a SnapChat story about his family’s quilt photoshoot adventures, right? Yes, my husband is a tech geek extraordinaire! We had fun. Thanks again to Fat Quarter Shop and Art Gallery Fabrics!
P.S. I always try to respond to comments, but may not be able to on the giveaway posts due to the high number of comments. Please know I appreciate your visit and hope you follow or come back again!
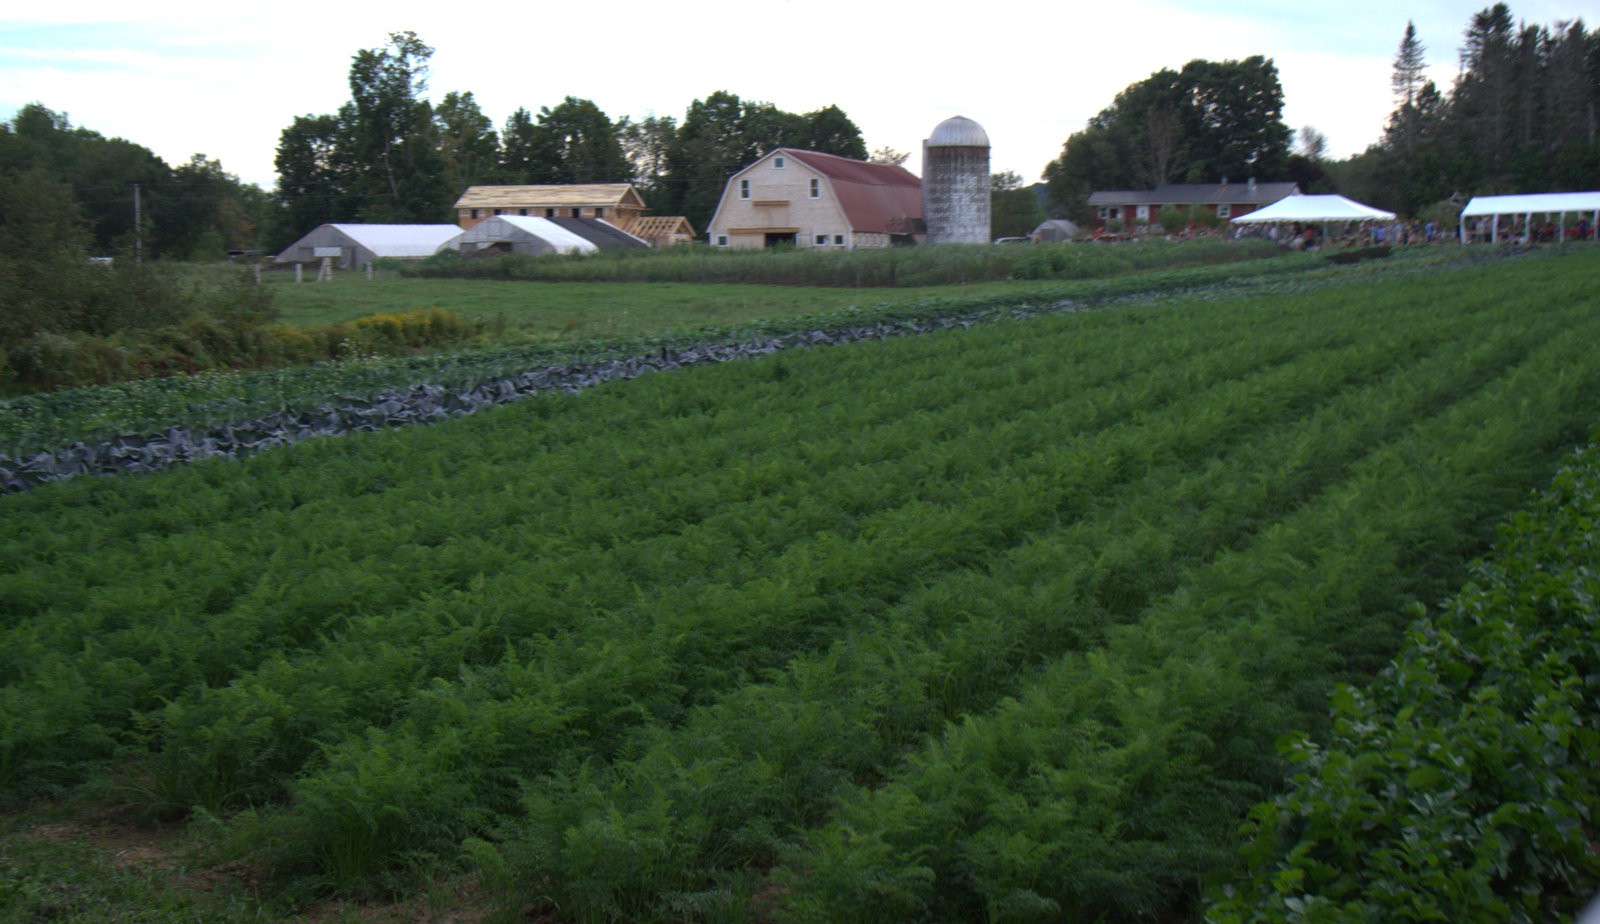
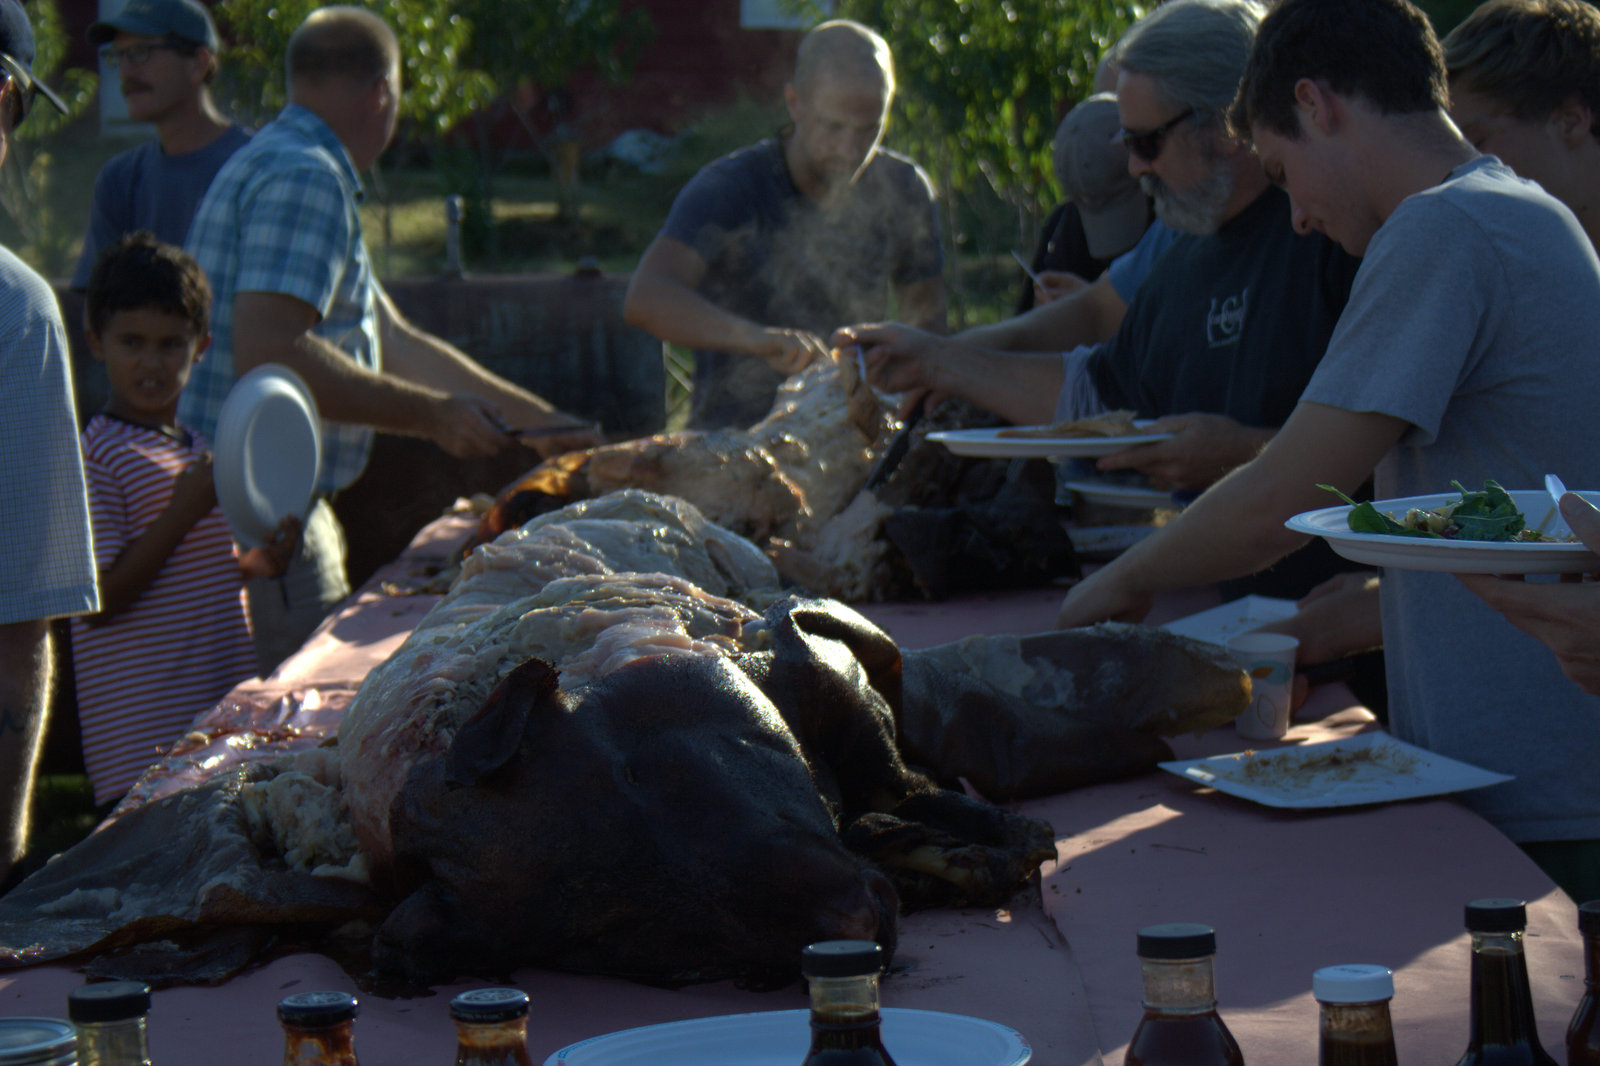
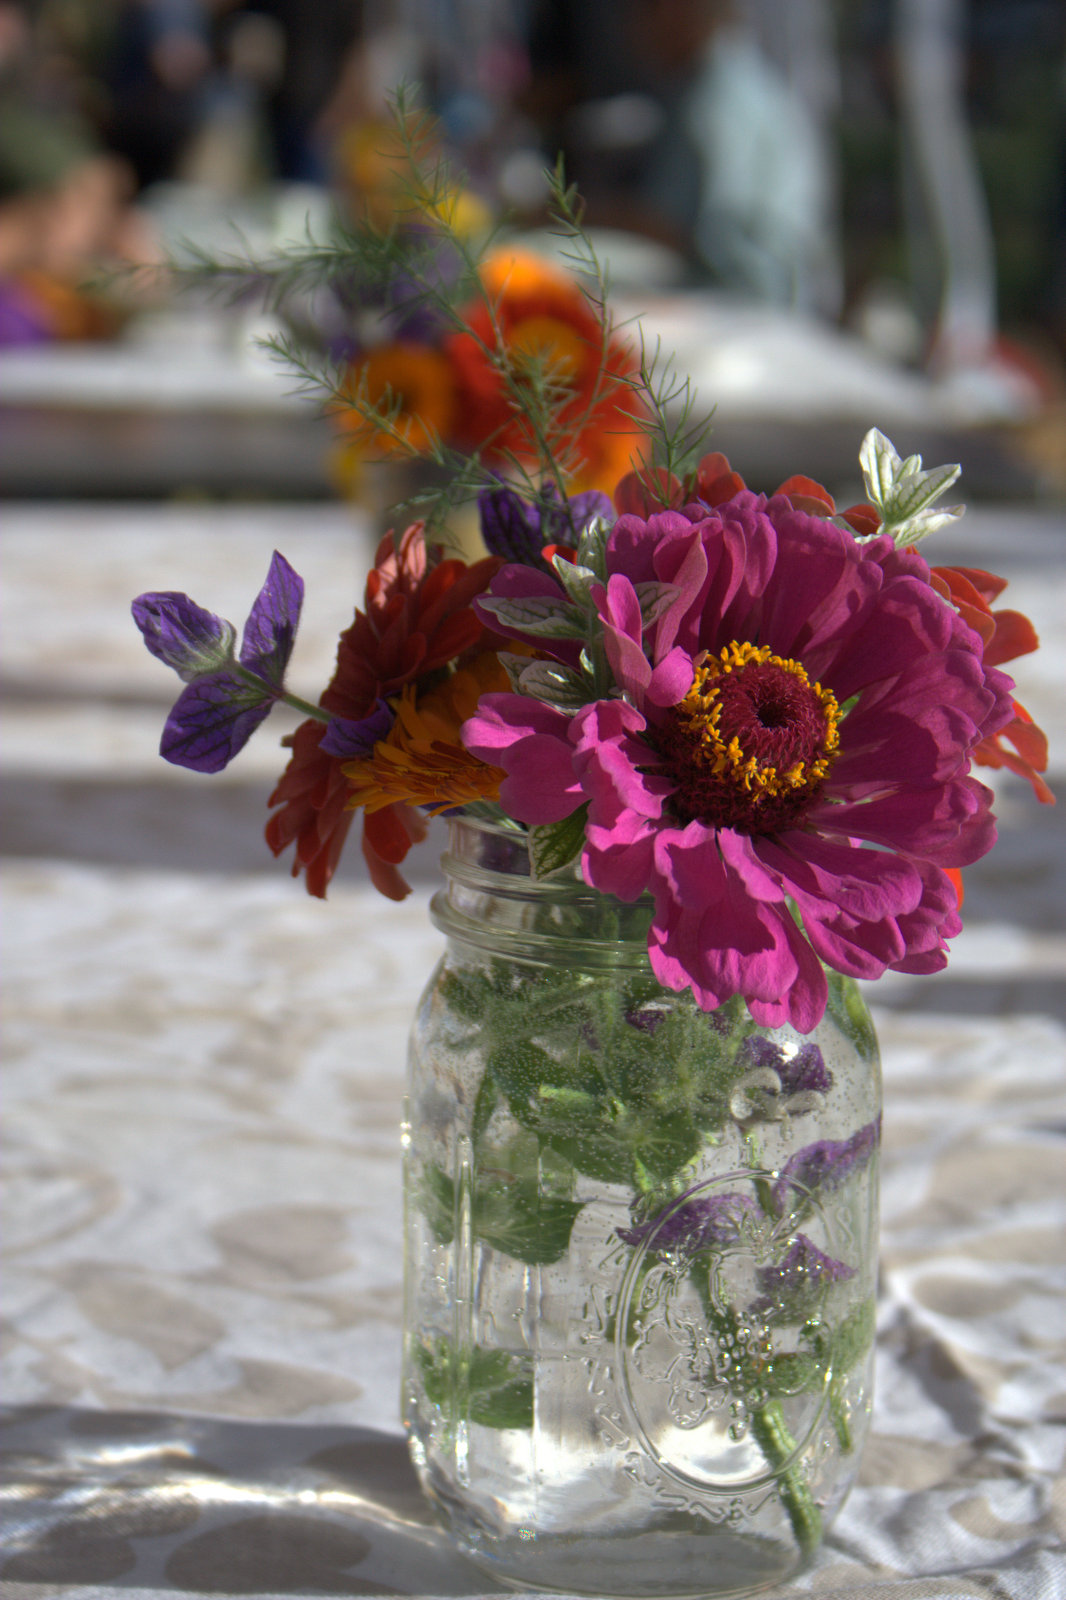
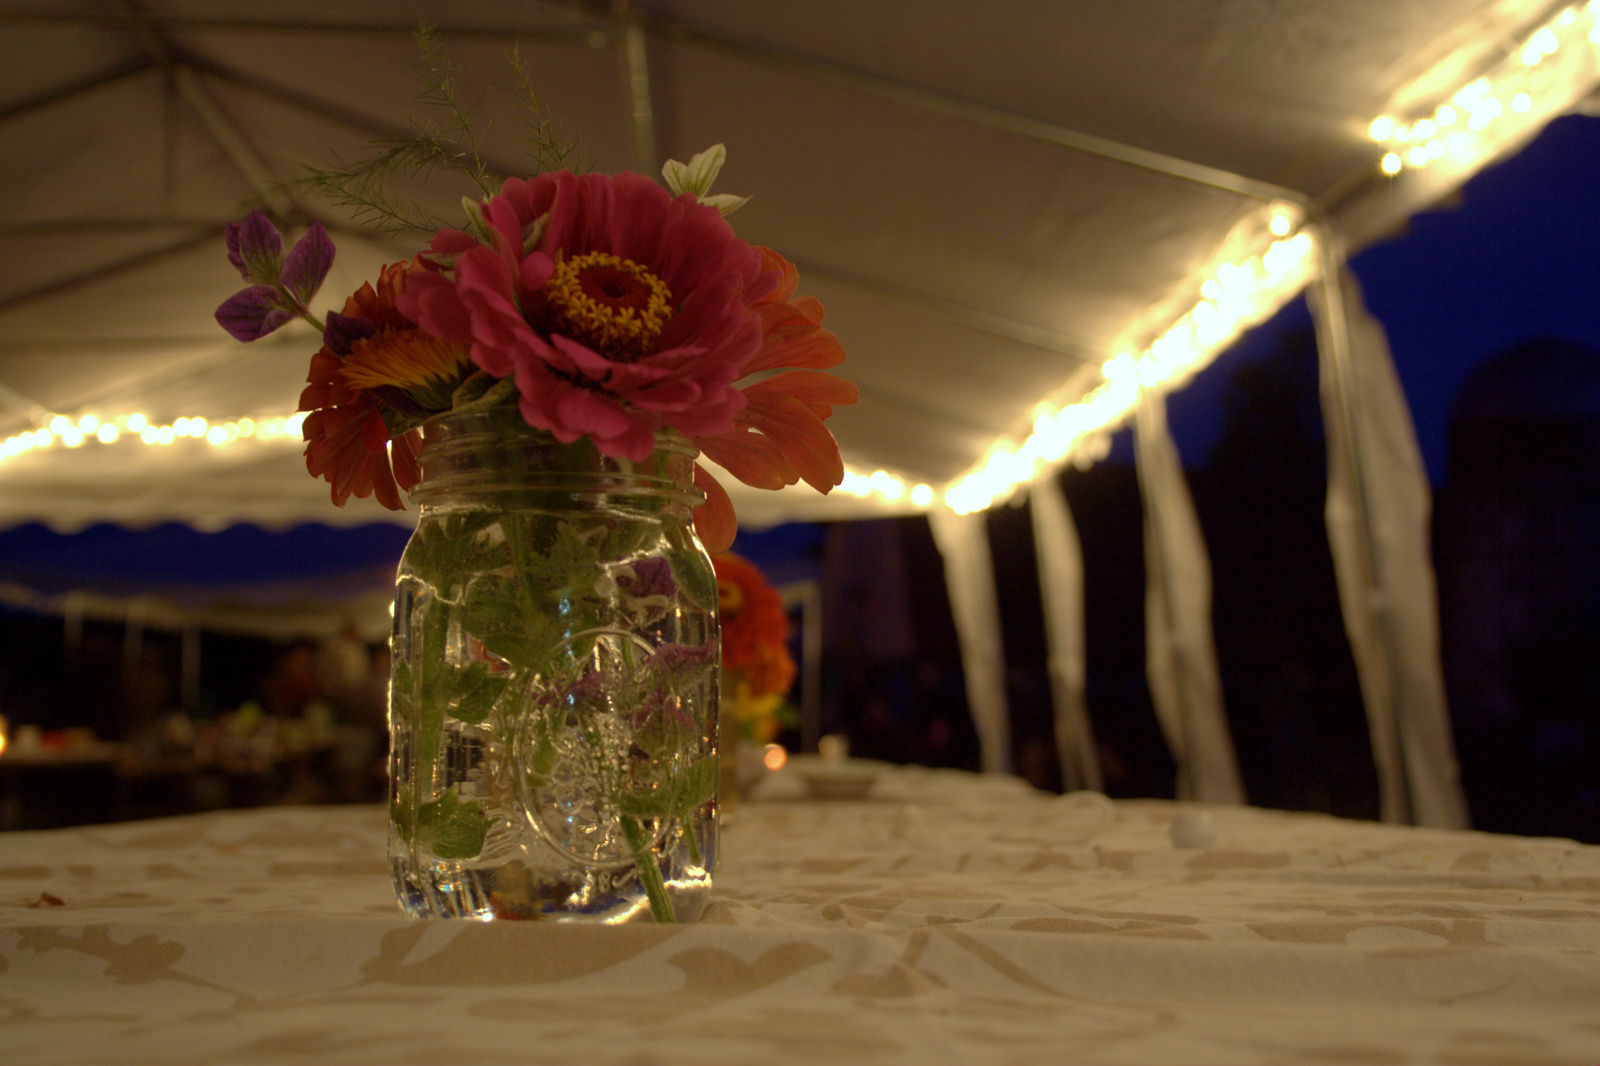
Every year, friends of ours host a pot luck pig roast on their 360+ acre organic farm right up the road. It is truly one of the (if not THE) highlights of our year. With contributing family members who are musicians, a midwife, farmers, cheese makers, contractor, parents, kids, the invite list always includes a wonderful group of local folks with many smiles, more babies than you would think possible, and dear friends. The food is always amazing, the farm is gorgeous as always, the day is filled with kids running around and playing, hay rides behind their team of work horses, amazing seasonal local food, and usually a bonfire with accompanying impromptu music. North Branch Farm is such an amazing place, made so entirely by the vision, ability, hardwork, and unending determination of a wonderful family. I am truly in awe of all that they do, and so grateful to call them dear friends.
Today’s color inspiration comes from some photos I took during this year’s Pig Roast. I spent more time socializing, playing with kiddos, and eating than photographing, but this is just a little glimpse into one of our favorite events. Color palettes are made using Play Craft’s Palette Builder 2.1 and my photographs. Enjoy, and I do encourage you to visit North Branch Farm’s website to read a bit more about their awesome farm, and of course be inspired!
Corresponding solids from left to right: Bella Christmas Green, Kona Pepper, Kona Laurel, Bella Betty’s Teal, Bella French Blue, Kona Raffia
Corresponding Aurifil thread from left to right: 1158 – Med Grey
2785 – V Dk Navy
2890 – Dk Grass Green
2850 – Med Juniper
4140 – Wedgewood
2314 – Beige
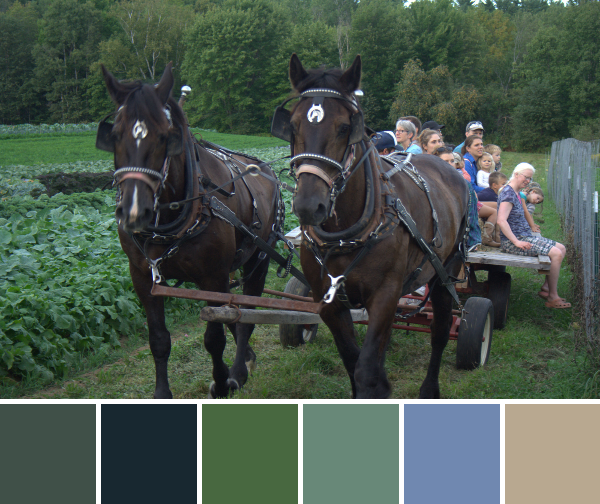
This post wouldn’t be complete without a photo of their gorgeous work horses, named April and May. The resulting palette is super soothing and earthy, too. You can catch a glimpse of one of their gorgeous fields and the happy rows of giant organic veggies to the left of the horses. You can also catch a little glimpse of the haywagon filled with happy rows of friends and family. I’m pretty sure that little head hanging way over the edge on the right is my daughter. I think she rode this wagon with her friend Noah at least 20 times.
Corresponding solids from left to right: Kona Ash, Kona Shadow, Kona Black, Bella Brick Red, Kona Garnet, Kona Plum
Corresponding Aurifil thread from left to right: 5011 – Rope Beige
2600 – Dove 2692 – Black 2245 – Red Orange 1240 – V Dk Eggplant 4030 – Plum
The tiny details are never forgotten, from these jars of garden and wild flowers on the tables, the string lights hung from the tent, or the cross-section of a tree with leaves and grapes used to plate their own aged gouda that graced the pot luck table (I wish I had gotten a photo of this display, but sadly I did not.)
Here are just a few more peeks into our fun day.
I hope the early days of autumn bring you much joy, family, friends, and fulfilling preparation for the winter to come.
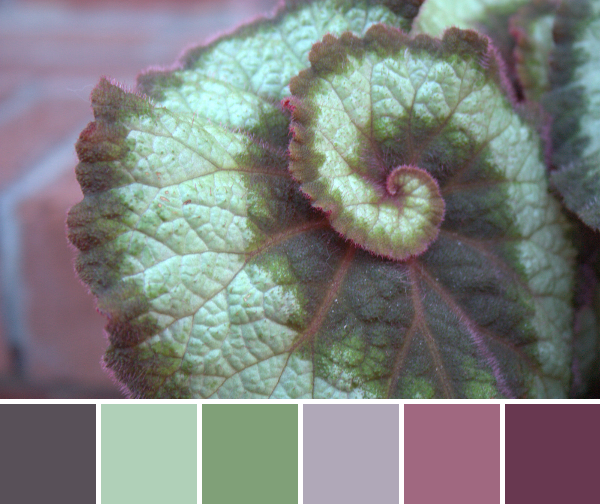
Heat and humidity still run deep here in Maine, although nights are beginning to cool off. Even still, with school starting and the garden passing its peak, we are clearly headed into autumn, like it or not. Today’s color inspiration includes a couple of photographs I took while my family was visiting in early August. I’ve saved them until now, though, since they have a decidedly autumnal feel to me. Color palettes are created using Play Crafts Palette Builder 2.1 and my photographs. The matching solids and Aurifil thread are an awesome perk of using the Palette Builder; they are automatically generated for you!
Corresponding solids from left to right: Kona Coal, Bella Green, Kona Spring, Bella Baby Blue, Bella Plum, Bella Eggplant
Corresponding Aurifil thread from left to right: 1158 – Med Grey
5014 – Marine Water 2850 – Med Juniper 2606 – Mist 2566 – Wisteria 2568 – Mulberry
This awesome spiral ornamental plant was spotted outside one of the businesses in downtown Camden, Maine. It’s variegated, but beyond that I have no idea what species of plant it might be. I thought the combination of the unique spiral of the soft green leaf, the brick tinged veins and leaf border, and the brick step background would make a gorgeous palette. It feels like fall to me.
Corresponding solids from left to right: Kona Pepper, Kona Chocolate, Bella Acid Green, Kona Amber, Kona Cedar, Kona Spice
Corresponding Aurifil thread from left to right: 2785 – V Dk Navy
1285 – Med Bark 2120 – Canary 2145 – Yellow Orange 2390 – Cinnamon Toast 2385 – Terracotta
Wine and a bonfire. What’s not to like? While this scene was enjoyed during a hot midsummer’s night, the resulting color palette screams fall. Maybe it’s the fiery orange and yellow with the dark black/brown background that seems reminiscent of jack-o-lanterns and autumn leaves. I’d certainly love to enjoy a nice glass of wine by a bonfire, but I’ll have to wait until my month-long antibiotic Lyme-kicking regiment is finished before I imbibe. This photo will just have to suffice for now.
Taking this photo reminded me that I haven’t paired wine and fabric in a while. I think it’s high time I got back to that, since it makes for some fun creative fabric play. If you’re a wine drinker, what are some of your favorites? Perhaps I’ll try to find one and pair it up with the perfect fabric match!
I completely missed August for A Lovely Year of Finishes (ALYoF), so I’ll just call it summer break. The ALYoF link up is one of the most successful ones at getting me to finally finish projects, though, so I want to be sure to sneak in September’s goal setting post before it’s too late (in other words, before midnight tonight). I’m choosing a quick and easy goal for this month, since there are a lot of behind-the-scenes projects going on, too.
My goal is to finish my Summer EPP Table Runner. I have a small bit of hand quilting remaining, and then I need to bind it. Easy peasey.
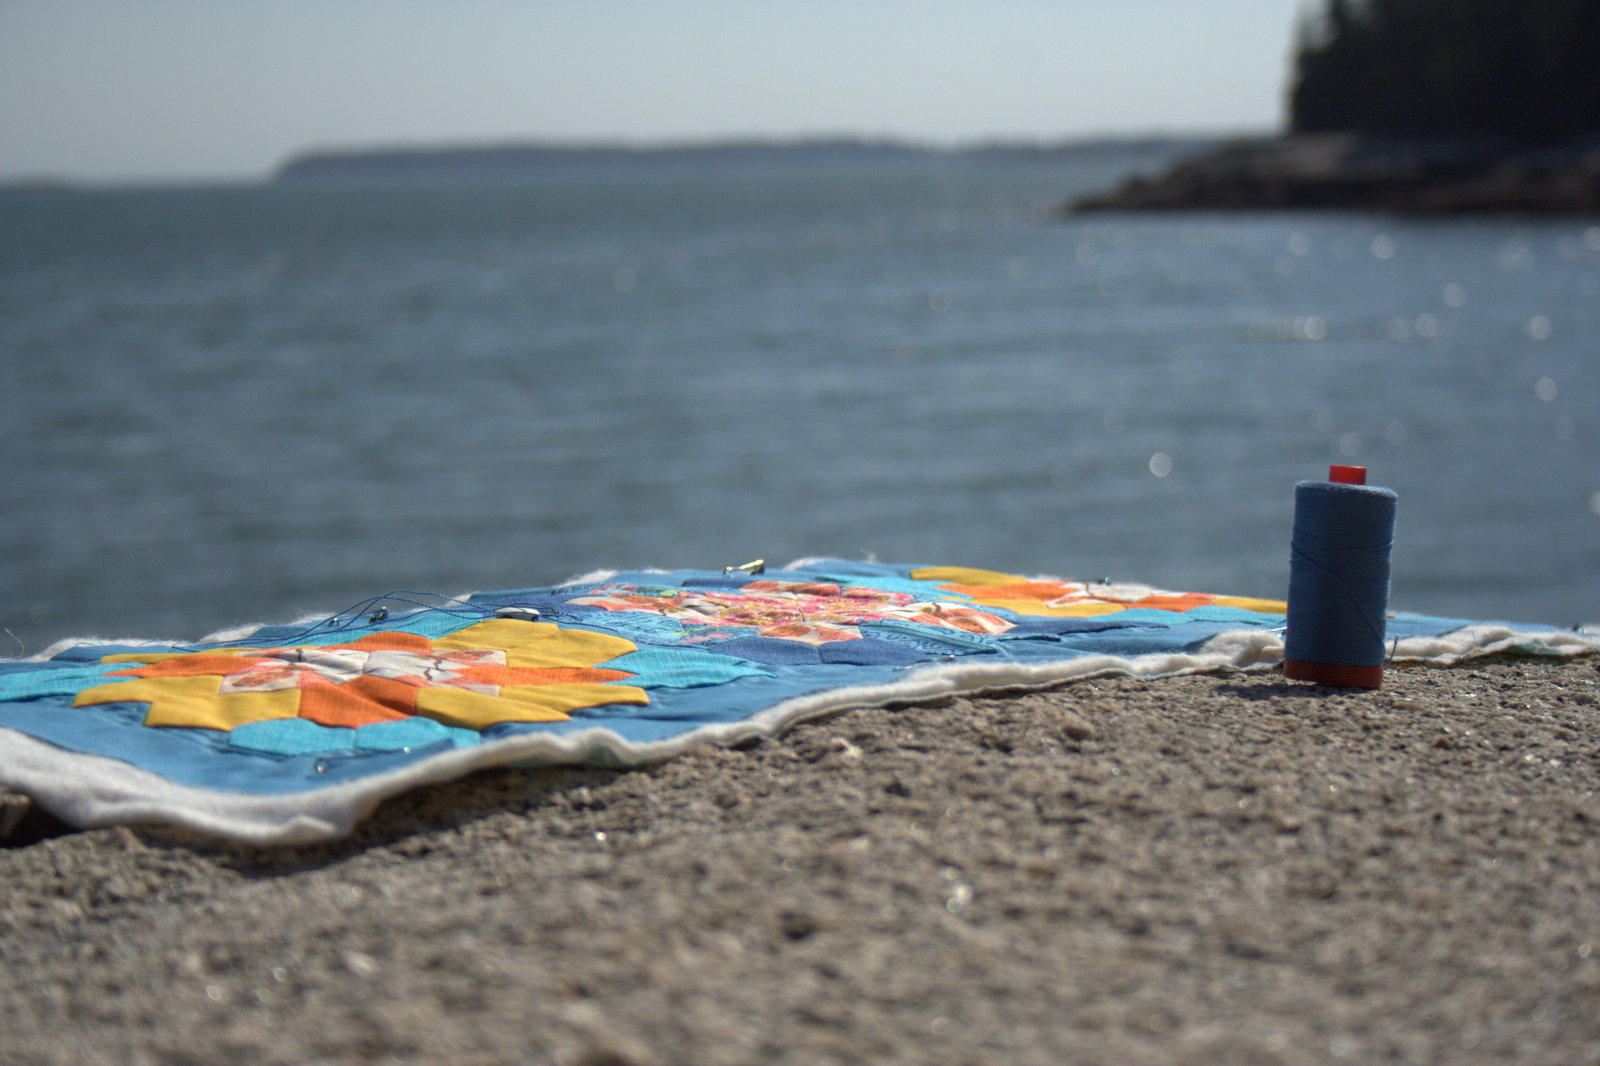
We spent a lovely relaxing family day at the beach today, so I decided to have an impromptu photo shoot. I always carry a couple of hand-sewing projects with me, either a small hand quilting project like this one, some English Paper Piecing, or both! The strong cool breeze of the ocean made the 90 degree day feel absolutely perfect, but it made it a bit tricky to photograph this light weight runner. I took a few photos in full sun, which is typically a photography no-no, but with the gorgeous view and glittering water, how could I resist?
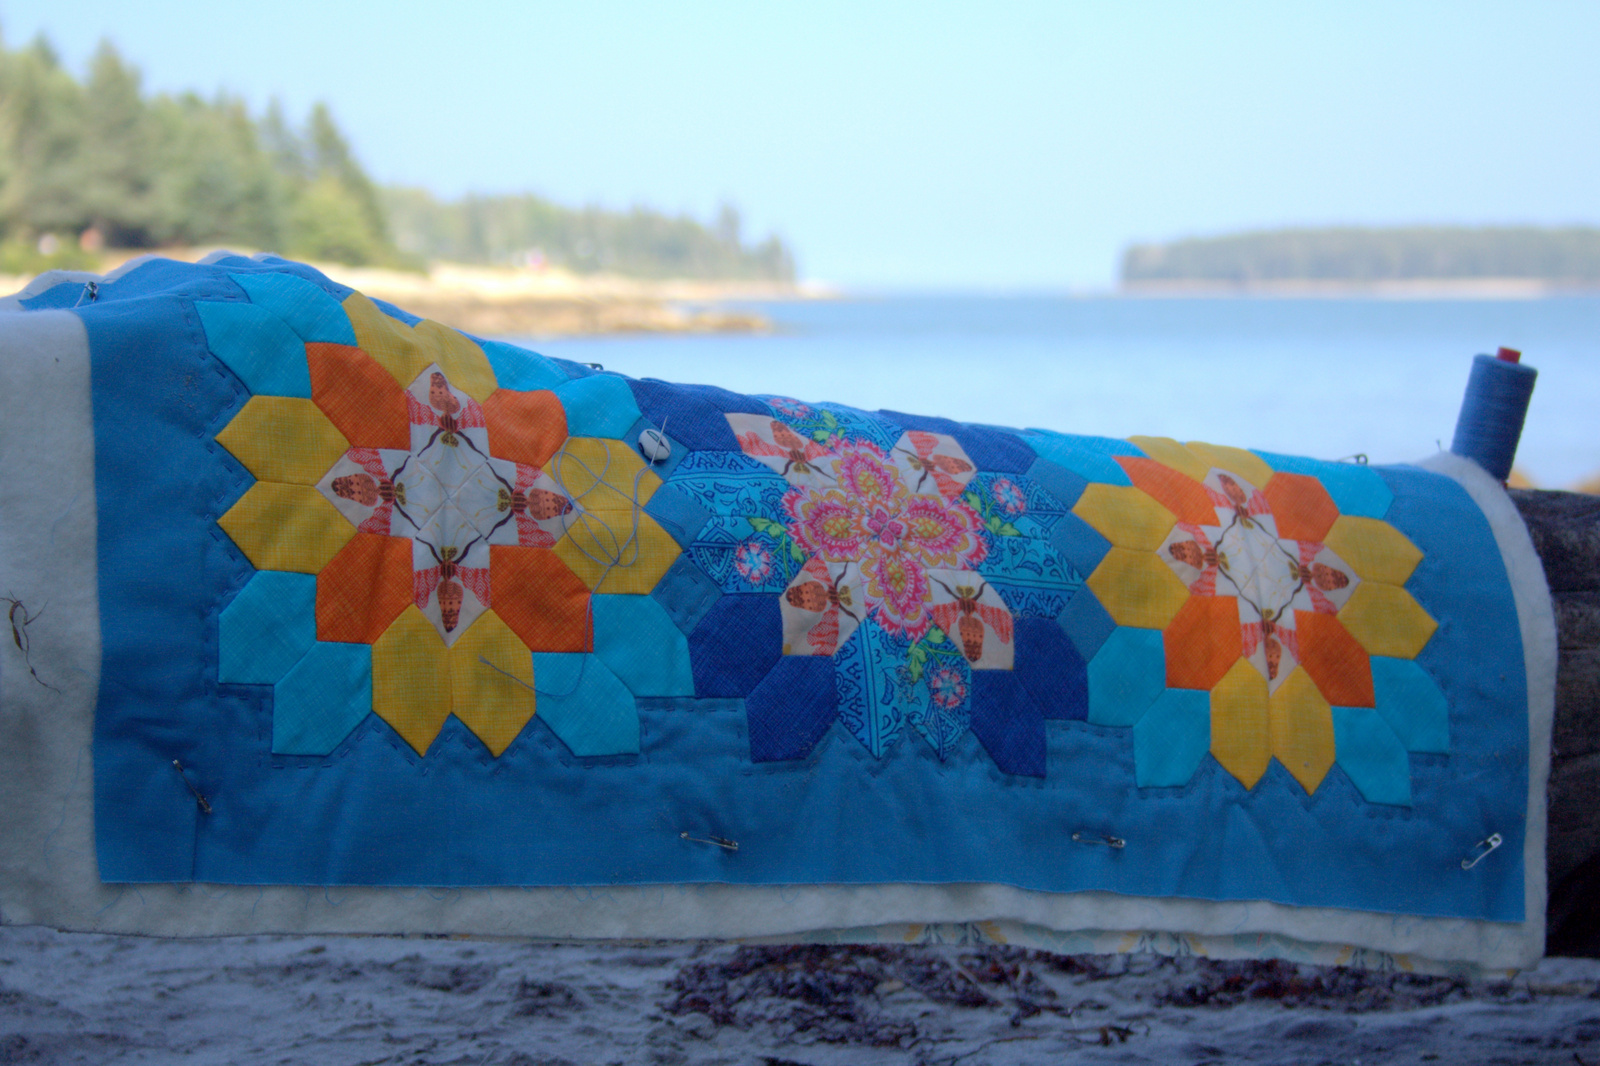
Then I decided that the trek over to the shady half of the beach was worth it. This is just a tiny little lesson in quilt photography. Photographs in full sun result in washed out colors and highly emphasized wrinkles due to resulting shadows (above). Shady photos, however, provide much richer, truer, and almost more gentle colors and a more forgiving look at the quilt despite the lack of an iron’s smoothing touch (below).
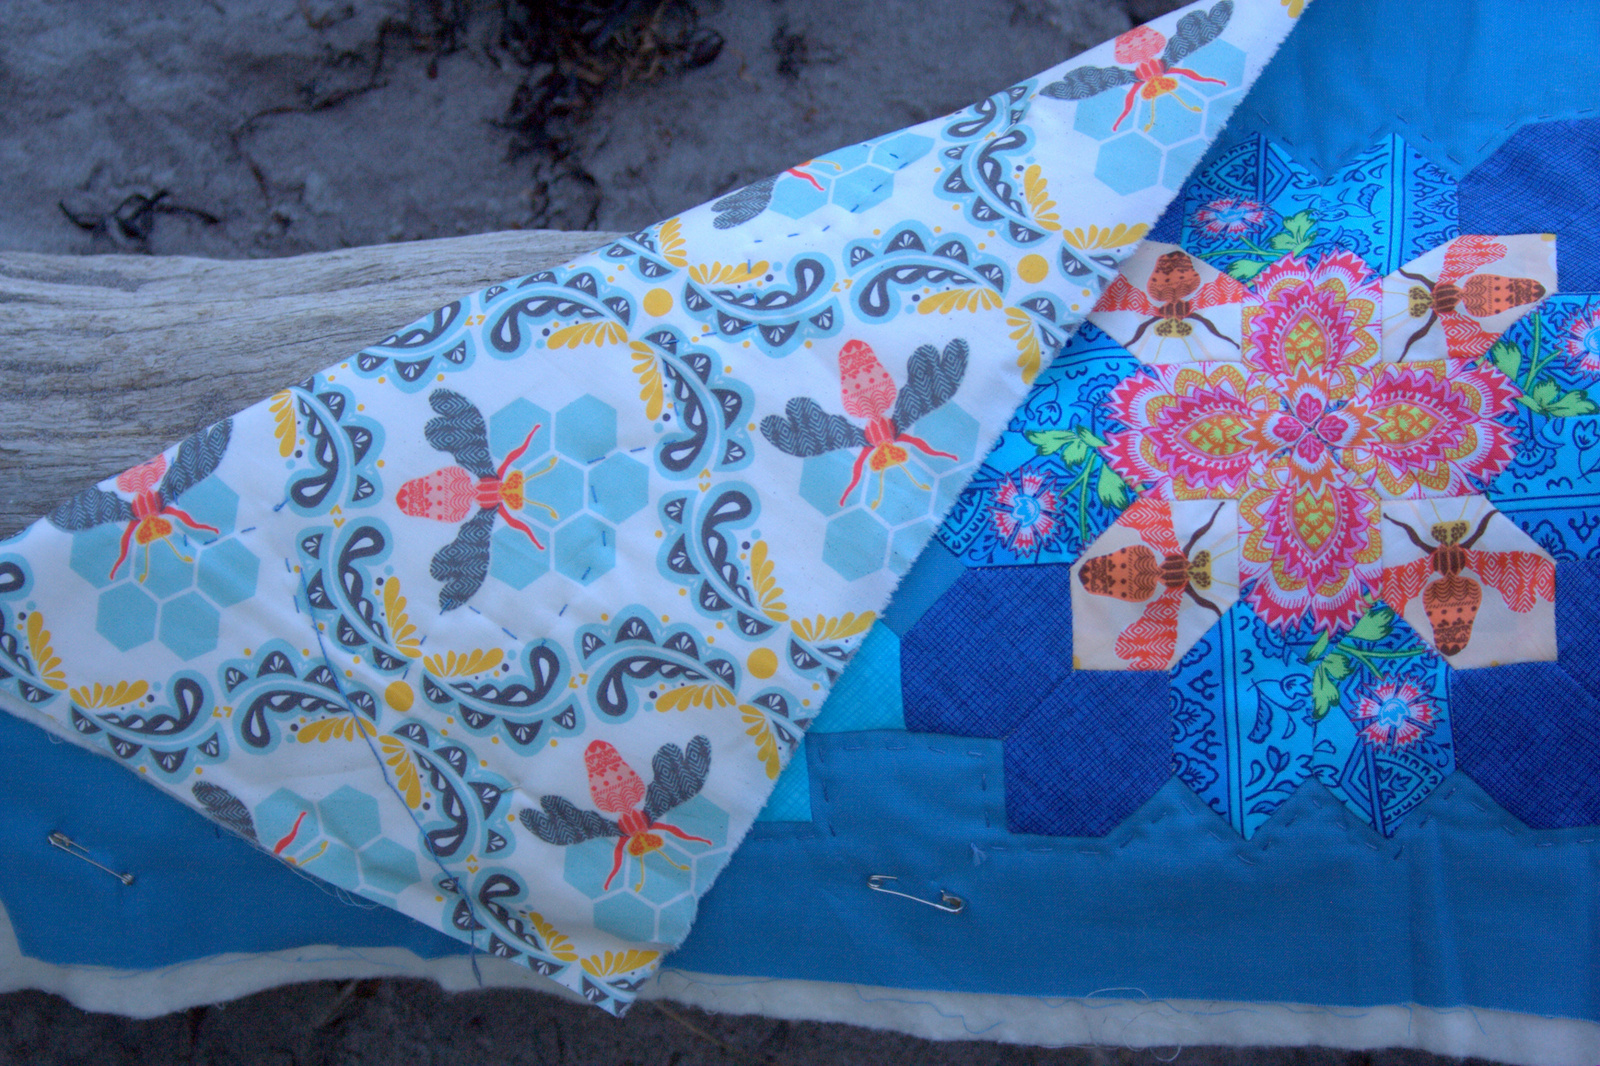
I decided to back this table runner in Bee Sweet in the Morning colorway from Bonnie Christine’s Sweet as Honey fabric line. The bees in the table runner top are from the Bee Sweet in the Sunset colorway, so it coordinates fabulously.
I have only a bit more hand quilting to do, and then I MIGHT do a little bit of machine quilting to make sure all stays nice and securely despite the many inescapable washes that surely await anything that will live on our table.
I’m using 12 wt Aurifil thread #4140 Wedgewood, which is a perfect match. I love the subtle effect of the large quilting stitches in a coordinating color, and I’m very much looking forward to having this table runner finished and on our table. It can be a lingering reminder of our fun and beautiful summer. And it WILL be finished by the end of September!


 Corresponding solids from left to right:
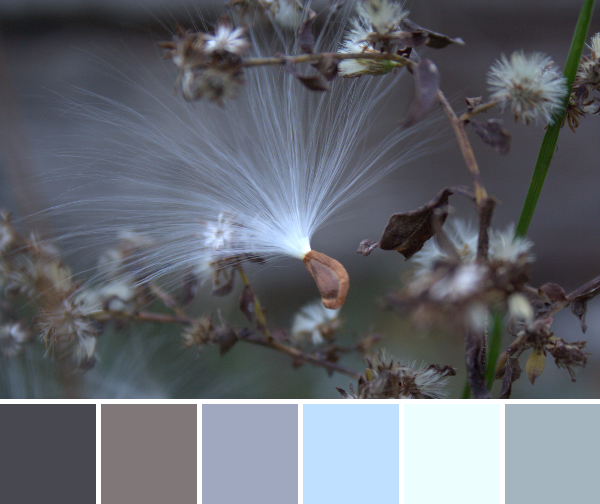 Corresponding solids from left to right: